How to use Tripo3D for 2D concept art to 3D mesh Blender
Converting 2D concept art into a clean 3D mesh using Tripo3D and Blender often frustrates artists, especially when they try it for the first time. A beautiful stylized design that looks sharp and full of personality in a single image does not always translate smoothly into usable 3D geometry. Shapes can distort, fine details disappear, and the AI output quickly turns into a high-poly mess with poor topology instead of a production-ready model.
Another common issue appears right after generation. Beginners often accept the raw Tripo3D result without proper cleanup, while more experienced users still struggle with fixing broken edge flow, uneven surfaces, and lost artistic style. This forces hours of manual retopology and UV fixes in Blender, turning what should be a fast AI shortcut into another time-consuming bottleneck.
The challenge becomes even more noticeable when working on complex or stylized concept art. Without the right workflow, it is easy to lose proportion accuracy, break symmetry, or end up with unnecessary geometry that kills performance in game engines or animation. These issues slow down the entire pipeline and make it harder to produce professional-quality assets that actually match your original vision.
This guide provides a clear and practical workflow to convert 2D concept art into a clean 3D mesh using Tripo3D and Blender. You will learn how to prepare your concept art for best results, generate the model with the right settings, import it correctly, refine topology and UVs step by step, and finalize it for production. By following this workflow, you can turn flat concept designs into structured, game-ready 3D models suitable for rendering, animation, or game development.
You no longer need to spend hours box-modeling every asset from scratch. Tripo3D turns your 2D concept art into a solid 3D base model in seconds. Then Blender lets you quickly clean and optimize that mesh for real production work.
Traditional modeling wastes precious time. You draw the concept, then rebuild the same shapes again in 3D. Proportions break. Stylized details vanish. By the time you finish, your creative energy disappears.
Tripo3D solves this problem. The AI analyzes your concept art and generates accurate geometry fast. You get a usable 3D mesh with decent topology and textures in under 10 minutes. Blender then gives you full control to fix edges, improve flow, and make the model animation-ready.
This combination delivers the best of both worlds. You keep the speed of AI and the precision of Blender. Artists now iterate faster, test ideas quicker, and deliver cleaner 3D meshes without burning out.
Prerequisites & Setup
You need only a few things to start converting concept art into a clean 3D mesh with Tripo3D and Blender.
First, create a free Tripo3D account. The free plan gives you 300 credits per month enough to test several concepts. For higher resolution textures and faster processing, upgrade to the Pro plan later.
Second, install Blender 4.2 or newer. This version handles imported models smoothly and offers better retopology tools.
Third, prepare your concept art properly. Use clean, well-lit images at 2048×2048 pixels or higher. Save them as PNG files under 10 MB. For best results, create 3–4 views of the same design: front, side, three-quarter, and back. Keep the style consistent across all images.
You also need a stable internet connection because Tripo3D processes everything in the cloud. No powerful GPU is required.
Step 1: Prepare Your 2D Concept Art for Tripo3D
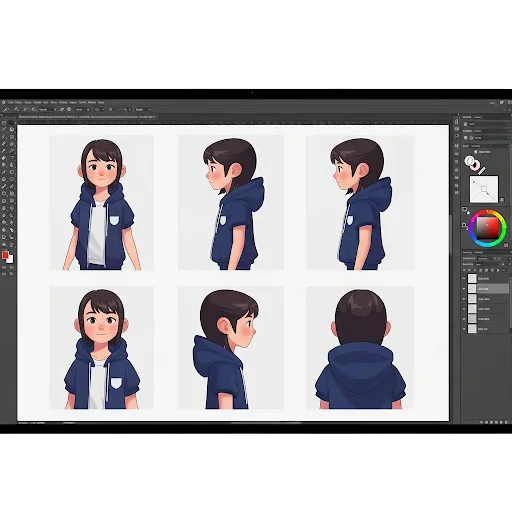
Start by preparing your concept art correctly. Tripo3D performs best with clean, high-quality images. Open your original design in Photoshop, Krita, or any image editor. Boost the contrast slightly and remove any heavy shadows or noise. Keep the lines sharp and the colors flat or with soft gradients. Save the image as a PNG file at 2048×2048 pixels or higher. Make sure the file size stays under 10 MB.
For much better results, create multiple views of the same concept. Draw or generate a front view, side view, three-quarter view, and back view. Use the exact same art style and color palette in all images. This gives Tripo3D rich spatial information and helps it build more accurate proportions and geometry.
Avoid uploading images with extreme outlines, heavy text, or very complex backgrounds. The cleaner and more focused your concept art is, the better the initial 3D mesh Tripo3D will generate.
Once your images are ready, you can move to the upload and generation stage.
Step 2: Upload Your Concept Art and Generate the 3D Mesh in Tripo3D
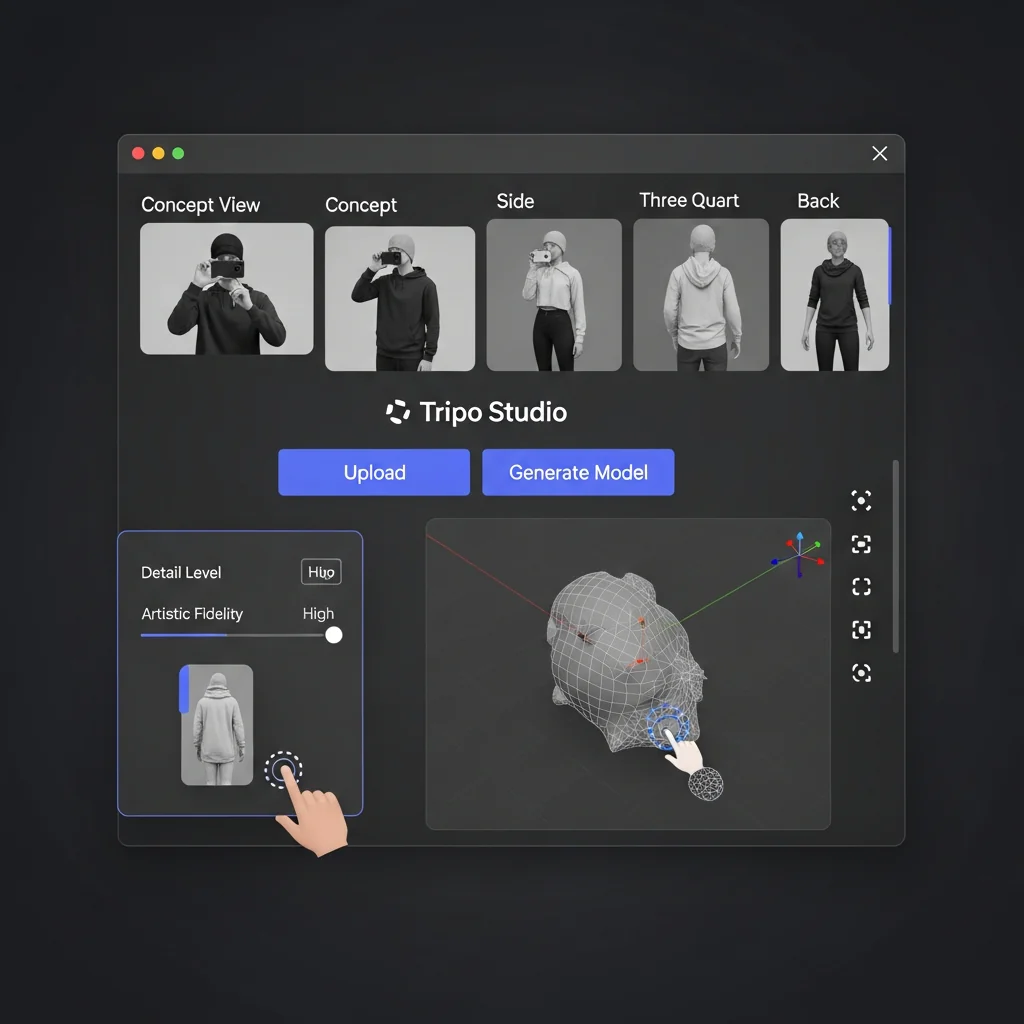
Log into your Tripo3D account and open Tripo Studio. Click the big “Upload” or “Generate Model” button. Select your prepared concept art images start with the front view first, then add the side, three-quarter, and back views if you created them. Tripo3D automatically detects multiple images and combines them for better results.
After uploading, adjust the key settings. Set Detail Level to High or Production mode. Enable Artistic Fidelity or Stylized Mode to preserve the look of your concept art. In the prompt box, add a short description such as: “clean game-ready 3D model from stylized concept art, accurate proportions, good topology”. Leave negative prompts empty for now.
Click Generate Model. Tripo3D processes everything in the cloud and usually finishes in 8 to 60 seconds. Once complete, the model appears in the built-in 3D viewer. Rotate and zoom to inspect the geometry and how well it captured your concept art
Step 3: Preview, Adjust, and Optimize the Model in Tripo3D
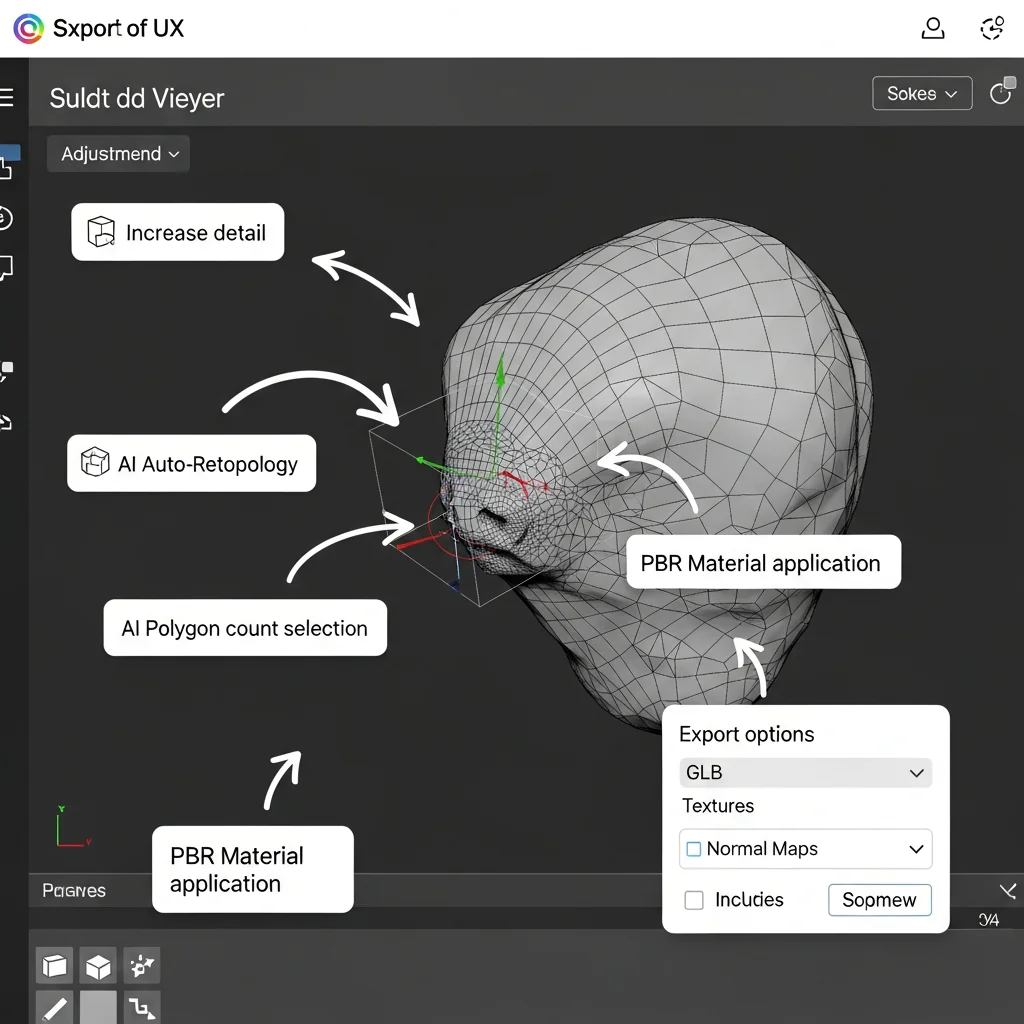
Open the generated model in Tripo3D’s built-in 3D viewer. Rotate, zoom, and pan around the mesh to check proportions, details, and how well it matches your original concept art. Look for any major issues like distorted shapes, missing parts, or extra floating geometry.
If the model needs improvement, use the built-in adjustment tools. Increase the geometric detail level for sharper edges or apply the AI Auto-Retopology feature with one click. Choose “Low” or “Medium” polygon count if you want a game-ready base mesh. For better visuals, enable AI Texturing and select PBR materials with appropriate resolution.
Make these changes quickly while still in Tripo3D. The platform lets you iterate fast without leaving the browser. Once the overall shape, topology, and basic textures look solid, click the Export button. Choose GLB format for the best compatibility with Blender. Check the options to include textures and normal maps, then download the file to your computer.
Step 4: Export from Tripo3D with the Right Settings for Blender
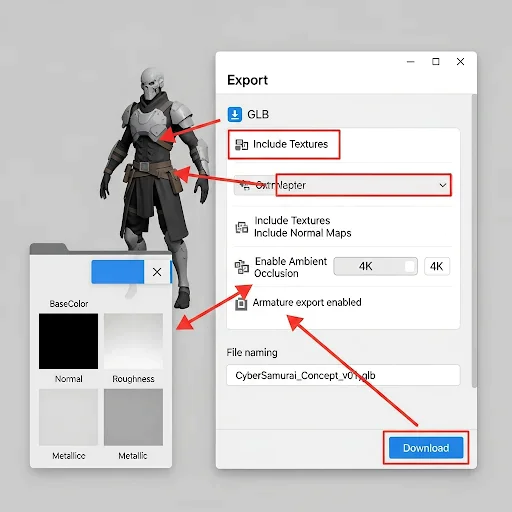
Once you are satisfied with the preview and optimizations in Tripo3D, click the Export button at the bottom of the viewer. In the export window, choose GLB as your main format because it works best when you bring the model into Blender. This format keeps your textures, normal maps, and mesh data intact during the transfer.
Make sure you turn on all the important options before exporting. Enable Include Textures and Include Normal Maps so you do not lose any surface details from your concept art. If the option appears, also enable Ambient Occlusion. Select the highest texture resolution your plan allows, go for 4K if you are using the Pro plan because it gives much better results with stylized concept art. If your model includes any basic rigging, check the box to export the armature as well.
Give the file a clear name such as CyberSamurai_Concept_v01.glb so you can find it easily later. Click the Export button and download the complete file to your computer. The download usually contains the main GLB file plus separate texture maps including BaseColor, Normal, Roughness, and Metallic. Save all these files together in one folder so Blender can automatically locate the textures when you import the model.
With the properly exported 3D mesh now on your computer, you are ready to move into Blender for professional cleanup and refinement.
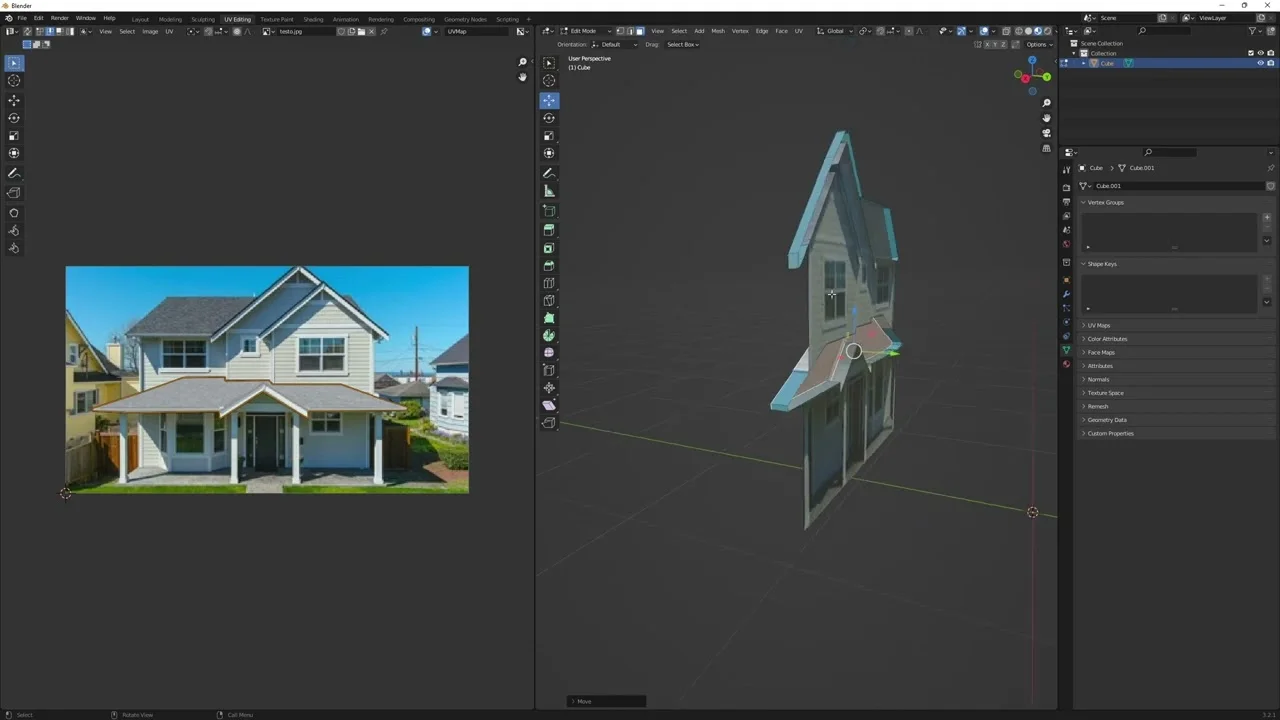
Step 5: Import the Model into Blender and Perform Initial Cleanup
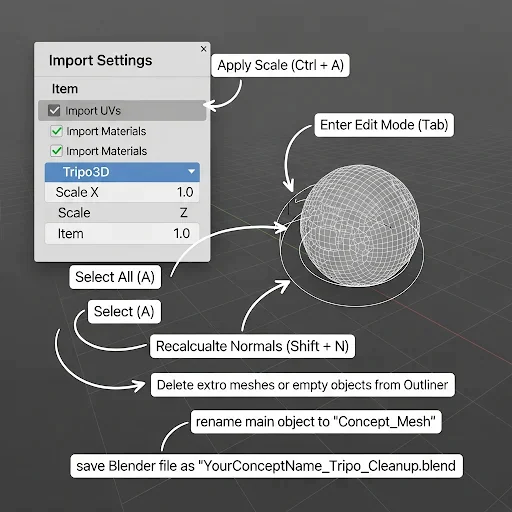
Open Blender 4.2 or newer and create a new scene. Go to File > Import > glTF 2.0 (.glb/.gltf) and select the GLB file you exported from Tripo3D. In the import settings, keep the default options for most cases, but make sure Import UVs and Import Materials are checked. Click Import to bring your 3D mesh into Blender.
The model may appear very small or extremely large because of scale differences. Select the imported object, press N to open the sidebar, and go to the Item tab. Change the Scale values to 1.0 for X, Y, and Z if needed. Then press Ctrl + A and choose Apply > Scale to lock in the correct size.
Next, fix common issues quickly. Select the model and press Tab to enter Edit Mode. Press A to select all, then press Shift + N to recalculate normals. If you see flipped faces, this step corrects them. Check the Outliner and delete any unwanted empty objects or extra meshes that Tripo3D sometimes adds.
Finally, rename the main object to something clear like “Concept_Mesh” and save your Blender file as “YourConceptName_Tripo_Cleanup.blend”. At this point, your 3D mesh from Tripo3D is inside Blender and ready for proper refinement.
Step 6: Refine the Mesh and Create Clean Topology in Blender
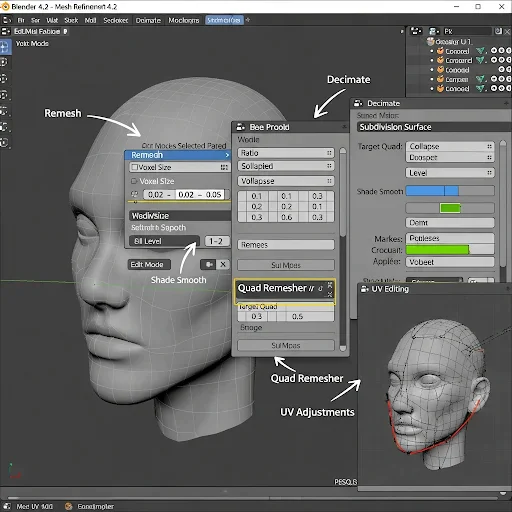
With your model now inside Blender, it is time to turn the raw Tripo3D output into a clean, production-ready 3D mesh. Select your object and add a Remesh modifier. Set the Voxel Size to 0.02–0.05 depending on the complexity of your concept art. Apply the modifier to create more even geometry.
Next, add a Decimate modifier and set it to Collapse mode with a Ratio of 0.1 to 0.3. This reduces the polygon count while keeping the overall shape. Apply this modifier too. Now enter Edit Mode, select all faces with A, and right-click to choose Shade Smooth. This gives your mesh a nicer surface look.
For proper topology, use the Quad Remesher add-on (free version works well) or Blender’s built-in Remesh tools. Set the target to quads and aim for 8,000 to 15,000 triangles for most game assets. This creates clean edge flow that is easy to animate and texture later.
After remeshing, check your UVs. Go to the UV Editing workspace, select all, and press U > Smart UV Project. Adjust any stretched islands manually. If you need even better UVs, mark seams along natural edges of your concept art and unwrap again.
Finally, add a Subdivision Surface modifier set to level 1 or 2 for smoother preview. Do not apply it yet so you can still edit the base mesh easily. Your 3D mesh now has solid topology and is ready for texturing and final polish.
Step 7: Add Textures, Materials, and Final Polish in Blender
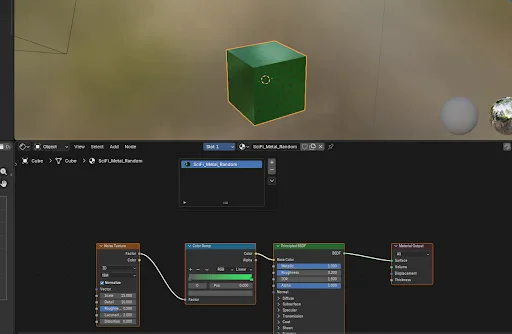
Now bring life back to your concept art by setting up proper materials in Blender. Select your cleaned mesh and go to the Shader Editor. Delete the default Principled BSDF node and create a new one. In the Material Properties panel, click the folder icon next to Base Color and load the BaseColor texture you exported from Tripo3D. Do the same for the Normal map and set the Color Space to Non-Color. Connect the Roughness and Metallic textures to their respective inputs.
To match the stylized look of your original concept art, add a Color Ramp node after the Base Color texture. Adjust the ramp to boost contrast and make colors pop exactly like your 2D design. For the Normal map, add a Normal Map node and connect it to the Normal input of the Principled BSDF. This restores the surface details that make your concept art feel three-dimensional.
Switch to the EEVEE render engine for fast previews. Add a simple HDRI or three-point lighting setup so you can clearly see how the model looks under light. Rotate the model and tweak the material settings until the colors and shading closely match your original concept art.
Finally, apply a Subdivision Surface modifier at level 1 if you want smoother edges, then bake the high-detail normals onto your low-poly mesh if needed for games. Once everything looks correct, export the final model in FBX or GLB format for Unity, Unreal Engine, or your animation pipeline.
Your 2D concept art is now a clean, fully textured, production-ready 3D mesh in Blender.
Advanced Techniques and Pro Tips
You can take this Tripo3D and Blender workflow even further with a few smart techniques. For batch processing multiple concept art pieces, export several models from Tripo3D first, then use Blender’s Python console or a simple script to import and apply the same cleanup modifiers to all of them at once. This saves hours when you are building a full character set or prop library.
For characters that need animation, use Tripo3D’s Auto-Rigging feature before exporting, or apply Rigify or Auto-Rig Pro in Blender after cleanup. These tools automatically detect the body structure and add a proper skeleton that follows your concept art pose.
If you want even higher detail, combine the AI base mesh with manual sculpting. After Step 6, add a Multiresolution modifier and sculpt extra wrinkles, cloth folds, or armor details in Sculpt Mode. Then bake those high-resolution details back onto your clean low-poly mesh.
Many artists also create a reusable Blender asset library. Save your cleaned and textured models as assets with proper naming and materials. This way, you can drag and drop them into new projects instantly.
These advanced steps turn the basic Tripo3D pipeline into a fast, professional production system that fits perfectly into game development, animation, or portfolio work
Troubleshooting: Common Problems and Quick Fixes
Even with a good workflow, you may run into issues when converting concept art with Tripo3D and Blender. Here are the most common problems and how to solve them fast.
If the generated model looks melted or loses important details from your concept art, go back to Tripo3D and upload 3–4 clean multi-view images instead of a single image. Add a short prompt like “accurate proportions, clean stylized concept art” and regenerate. This almost always improves shape accuracy.
When the mesh has bad topology or too many polygons after import, apply a Decimate modifier first with a ratio of 0.2, then use the Remesh modifier with a voxel size of 0.03. This quickly creates cleaner geometry without destroying the overall form.
If textures look washed out or do not match your original concept art, reconnect them in the Shader Editor and add a Color Ramp node to increase contrast. For stretched or broken UVs, mark seams along natural edges of the model and use Smart UV Project again, then manually adjust the islands in the UV editor.
Proportions appear wrong after scaling in Blender? Select the object, press Ctrl + A, and choose Apply > All Transforms. Then check the front and side orthographic views (Numpad 1 and 3) against your original concept art images as reference.
If the model imports with missing textures, make sure all texture files are in the same folder as the GLB file and re-import. For any other strange artifacts, delete the imported object and re-export from Tripo3D using GLB format with all texture options enabled.
Conclusion
You now have a complete, repeatable workflow to convert your 2D concept art into a clean, production-ready 3D mesh using Tripo3D and Blender. By preparing your images properly, generating the model with the right settings, exporting correctly, and refining the mesh step by step in Blender, you can go from a flat concept sketch to a fully textured, game-ready asset in under 30 minutes.
This pipeline solves the biggest pain points artists face: slow manual modeling, lost artistic style, and messy topology. You keep full creative control while enjoying the speed of AI. Whether you are building characters, props, or entire environments for games, animation, or personal projects, this method dramatically speeds up your process without sacrificing quality.
Start applying this workflow today. Take one of your recent concept art pieces, follow the seven steps exactly, and see how much faster and cleaner your results become. With a little practice, turning 2D ideas into professional 3D meshes will feel natural and effortless.
