How to Convert 2D Concept Art into a Clean 3D Mesh in Blender
Converting 2D concept art into a clean 3D mesh in Blender often frustrates artists, especially when they try it for the first time. A design that looks clear and well-defined in an image does not always translate smoothly into 3D space. Shapes can feel off, proportions may break, and the model quickly turns into messy geometry instead of a clean, usable mesh.
Another common issue appears during the modeling process itself. Beginners often jump into adding details too early, while intermediate users struggle with maintaining clean topology. This leads to problems like uneven surfaces, bad edge flow, and models that are difficult to edit, animate, or optimize later. Instead of focusing on creativity, artists spend hours fixing structure and rebuilding parts of the mesh.
The challenge becomes even more noticeable when working on complex or stylized concept art. Without a proper workflow, it is easy to lose accuracy, break symmetry, or create unnecessary geometry that affects performance. These issues slow down the entire pipeline and make it harder to produce professional-quality results.
This guide provides a clear and practical workflow to convert 2D concept art into a clean 3D mesh in Blender. You will learn how to set up references correctly, build strong base shapes, refine details step by step, and maintain clean topology throughout the process. By following this workflow, you can turn flat concept designs into structured, production-ready 3D models suitable for rendering, animation, or game development.
Step 1: Set Up Reference Images in Blender
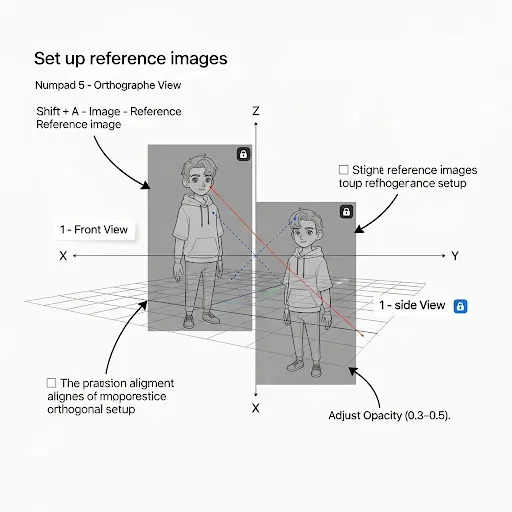
Start by importing your 2D concept art into Blender so you have a clear visual guide while modeling. Open Blender, switch to Orthographic View by pressing Numpad 5, then use 1 (Front), 3 (Side), and 7 (Top) views to match your reference angles. Press Shift + A → Image → Reference and load your concept image. Place the image correctly in the scene and align it with the world axes so your model stays accurate from every angle. Reduce the image opacity to around 0.3–0.5 from the object properties panel, which helps you see both the reference and your mesh at the same time. Lock the reference image in place to avoid accidental movement while modeling. If your concept includes multiple views (front and side), import them separately and align them carefully this step ensures proper proportions and saves hours of correction later. A clean reference setup gives you a solid foundation and makes the entire 2D to 3D workflow faster, more accurate, and easier to manage.
Step 2: Create a Clean Blockout
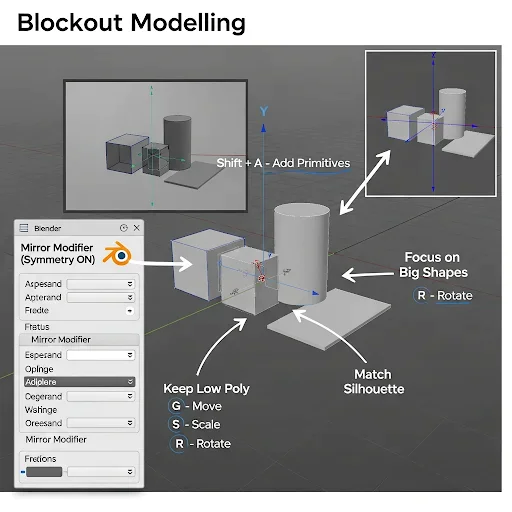
Start building your model by creating a simple blockout that matches the overall shape of your concept art. Press Shift + A and add basic primitives like a cube, cylinder, or plane depending on the form you’re modeling. Position and scale these shapes using G (Move), S (Scale), and R (Rotate) to match the silhouette of your reference image. Focus only on the big shapes and proportions at this stage do not add details yet. Keep your geometry low-poly and easy to adjust so you can quickly fix mistakes without breaking the mesh.
Work in orthographic views (Front/Side) to align your model accurately with the reference. If your model is symmetrical, apply a Mirror Modifier early to save time and maintain perfect balance on both sides. This step helps you establish a strong foundation, which makes the rest of the modeling process much smoother. A clean blockout ensures your final 3D model looks correct before moving into refinement and detailing.
Step 3: Refine the Shape with Controlled Modeling
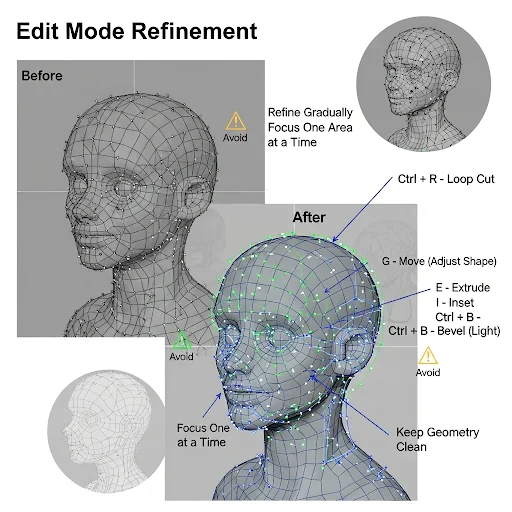
Once your blockout matches the overall proportions, start refining the shape by adding more geometry in a controlled way. Enter Edit Mode (Tab) and use Loop Cut (Ctrl + R) to add edge loops only where you need better shape definition. Move these edges using G to tighten curves and improve the silhouette based on your reference. Use Extrude (E) to extend parts of the mesh and Inset (I) to create smaller surface details without breaking the structure. If you need sharper edges, apply a light Bevel (Ctrl + B), but keep it minimal at this stage.
Work step by step focuses on one area at a time instead of the whole model. Constantly switch between front and side views to make sure your model stays accurate from every angle. Avoid adding too many edge loops too early, as this makes the mesh harder to control and often leads to messy topology. Your goal here is to improve the form gradually while keeping the geometry clean and organized.
Keep your mesh mostly in quads (four-sided faces) and avoid triangles or n-gons, especially in areas that may deform later. This step is critical because it defines how clean and professional your final model will look. A well-refined mesh at this stage makes detailing, sculpting, and texturing much easier in the later steps.
Step 4: Add Secondary Details Without Breaking the Mesh
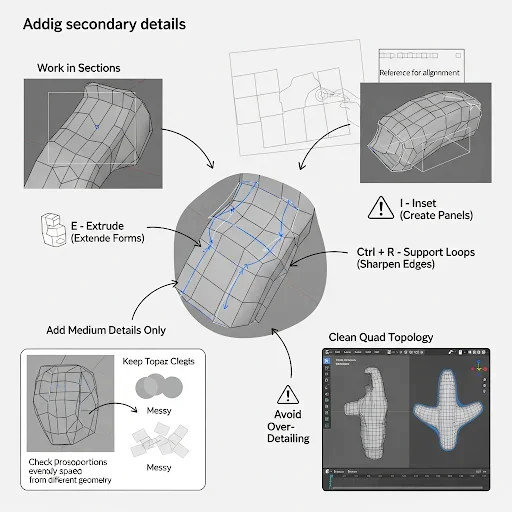
After refining the main shapes, start adding secondary details that bring your model closer to the original concept art. At this stage, you should already have a clean and well-structured mesh, so your focus now is to enhance forms without damaging topology. Use tools like Extrude (E) to pull out shapes, Inset (I) to create panels or inner sections, and Loop Cuts (Ctrl + R) to control sharpness and transitions between surfaces.
Work in small sections and build details gradually. For hard surface models, define edges using support loops instead of randomly adding geometry. For organic models, slightly adjust vertices to maintain smooth flow and natural curves. Keep checking your model from multiple angles to ensure the added details match the concept art and do not distort the overall form.
Avoid over-detailing too early only add medium-level details that support the structure. If the mesh starts to feel heavy or difficult to edit, it usually means you’ve added unnecessary geometry. Keep everything clean, evenly spaced, and easy to manage. This step is important because it prepares your model for final detailing while maintaining a professional, production-ready topology.
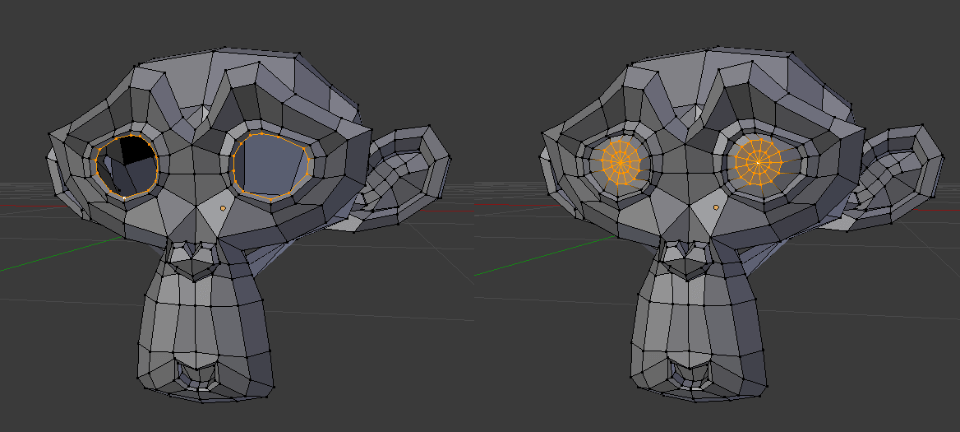
Step 5: Retopology – Clean the Mesh for Production
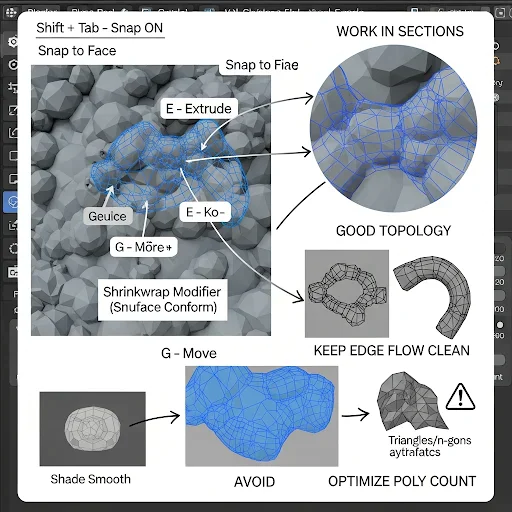
Once your model has the correct shape and details, you need to clean the geometry so it becomes usable for rendering, animation, or games. This process is called retopology, and it turns messy or dense geometry into a clean, organized mesh.
Start by enabling Snap (Shift + Tab) and set it to Face. Then create a new low-poly mesh using simple planes or vertices. Place this new mesh on top of your existing model and use tools like Extrude (E) and Move (G) to rebuild the surface manually. Add a Shrinkwrap Modifier to snap your new mesh onto the original shape, so it follows the form accurately.
Focus on creating clean quad-based topology with proper edge flow. Keep edge loops around important areas like joints, curves, or sharp edges. Avoid triangles and n-gons as much as possible, especially if the model will be animated later. Work in sections—don’t try to fix the whole model at once.
Keep your polygon count efficient. Use more geometry only where needed (curves and details) and keep flat areas simple. Regularly check your mesh by enabling Shade Smooth to spot shading issues early
Step 6: Apply Modifiers for Smooth and Controlled Geometry
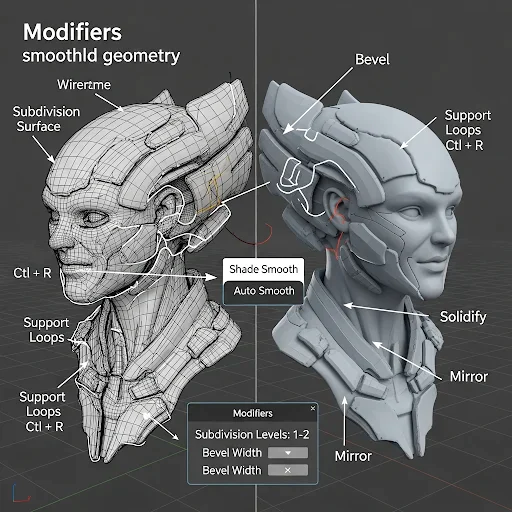
After creating a clean topology, start using modifiers to improve the quality and smoothness of your model without destroying the base mesh. Go to the Modifiers tab and add a Subdivision Surface Modifier to smooth out the geometry. Keep the levels low (1–2) so your system stays responsive while working.
To maintain sharp edges, add support loops using Ctrl + R near corners instead of increasing subdivision too much. You can also use a Bevel Modifier to create clean, realistic edges this is especially useful for hard surface models. Adjust the bevel width carefully so it enhances the model without over-rounding it.
If your model needs thickness (like cloth, armor, or panels), apply a Solidify Modifier. For symmetrical models, make sure your Mirror Modifier is still active and applied correctly before moving forward.
Always check your model in Shade Smooth mode and enable Auto Smooth from object data properties to fix shading issues. If you notice artifacts, adjust edge flow or add supporting edges instead of forcing the modifier to fix it.
This step helps you keep your workflow non-destructive, meaning you can still make changes anytime without breaking your model. Proper use of modifiers ensures your mesh looks clean, smooth, and professional while staying easy to edit.
Step 7: UV Unwrapping – Prepare the Mesh for Texturing
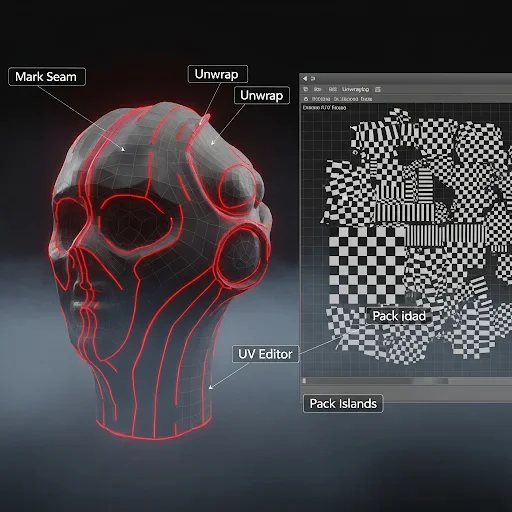
After finalizing your model, move to UV unwrapping to prepare it for texturing. Enter Edit Mode (Tab), select your mesh, and begin by marking seams on edges where the model can naturally “open,” such as sharp edges, hidden areas, or less visible parts. Use Edge Select (2), choose the edges, then Right Click → Mark Seam to define these cuts. Once your seams are placed, select the entire mesh with A, press U, and choose Unwrap to generate the UV layout. Open the UV Editor to review the result and adjust as needed. Make sure your UV islands are evenly scaled, properly spaced, and free from stretching use a checker texture to verify this. If needed, use tools like Pack Islands to organize the layout efficiently and maximize space. Beginners can use Smart UV Project for quick results, but manual seam placement gives much cleaner and more professional output. A well-structured UV map ensures your textures apply correctly, making your final model look polished and production-ready.
Step 8: Optimize the Mesh for Performance and Clean Output
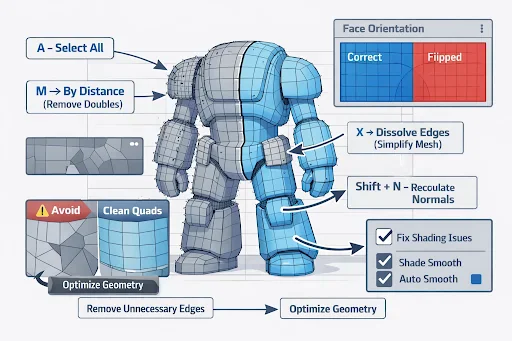
After completing the UV unwrapping, optimize your mesh to ensure smooth performance and clean rendering results. Enter Edit Mode (Tab), select all vertices using A, and press M → By Distance to remove duplicate vertices that often cause shading issues. Check for unnecessary geometry and simplify the mesh by selecting extra edge loops and using X → Dissolve Edges, which helps keep your model lightweight and easier to manage. To fix shading problems, recalculate normals by pressing Shift + N, and enable Face Orientation to quickly detect any flipped faces. Inspect your mesh carefully for n-gons and triangles, especially in important areas, and convert them into clean quads to maintain proper topology. Apply Shade Smooth and enable Auto Smooth from object data properties to improve surface quality without increasing polygon count. Focus on keeping more geometry only where needed, such as curves or detailed areas, and simplify flat regions as much as possible. This step ensures your model is efficient, performs well in real-time applications, renders faster, and is fully ready for use in games, animation, or high-quality production
Step 9: Final Checks, Materials, and Presentation
After optimizing your mesh, perform final checks to ensure your model is fully ready for rendering or production use. Start by reviewing the entire model in Object Mode and rotate it from all angles to catch any remaining issues in shape, shading, or proportions. Apply all necessary modifiers (like Mirror or Subdivision) only when you are sure no major changes are needed. Assign basic materials from the Material tab to test how light interacts with your surface, and adjust roughness or color to better visualize the final result. Set up simple lighting using a three-point light setup or an HDRI in the world settings to preview your model in a realistic environment.
Enable Shade Smooth and confirm that Auto Smooth is correctly set to remove shading artifacts. Check your UVs again by applying a texture to ensure everything maps correctly. If your model is intended for games or export, apply all transforms using Ctrl + A → Apply All Transforms and make sure scale and rotation are correct. Finally, position your camera, frame your model properly, and do a quick render to evaluate the final output.
This step ensures your model is not only technically clean but also visually polished and ready for presentation, rendering, or integration into real projects.
Step 10: Export the Final 3D Model for Production Use
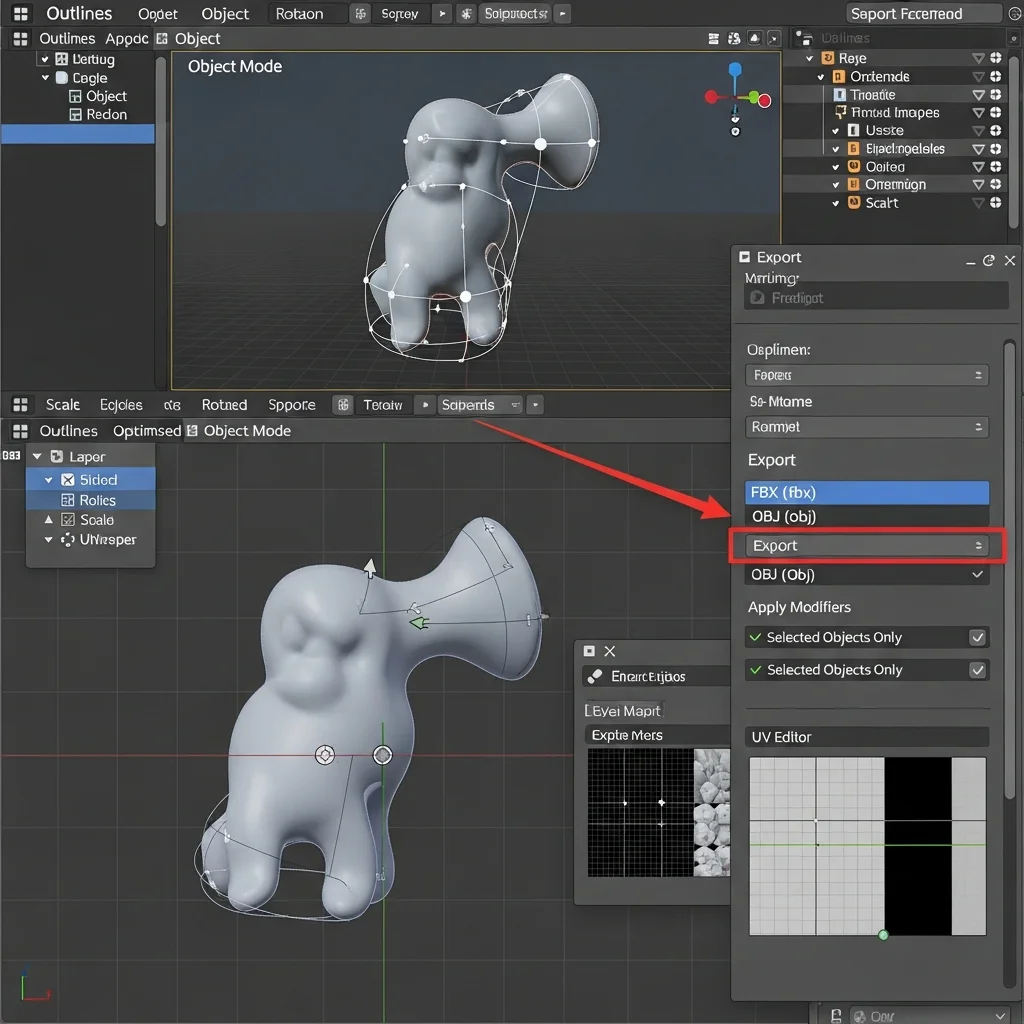
Once your model is fully checked and polished, export it in the correct format based on your final use (game engine, animation, or rendering pipeline). First, make sure everything is properly prepared—apply all transforms using Ctrl + A → Apply All Transforms, confirm the scale is correct, and ensure there are no hidden objects or unused meshes in the scene. Select your final model, then go to File → Export and choose the appropriate format such as FBX (.fbx) for game engines like Unity or Unreal, or OBJ (.obj) for general use.
In the export settings, enable options like Apply Modifiers and Selected Objects Only to avoid exporting unnecessary data. If your model includes textures, make sure UVs are properly unwrapped and textures are packed or linked correctly. For game-ready assets, also check that the polygon count is optimized and normals are correctly oriented.
After exporting, it’s a good practice to import the file into a new Blender scene or your target software to verify that everything works as expected. This final step ensures your 3D model is clean, correctly formatted, and ready to be used in real production environments without errors or missing data.
Common Mistakes to Avoid When Converting 2D Concept Art to 3D
Many artists slow down their workflow or ruin their models by repeating a few common mistakes during the 2D to 3D process. One of the biggest mistakes is jumping into details too early without building a proper blockout, which leads to incorrect proportions that are hard to fix later. Another issue is ignoring reference alignment if your images are not properly set up at the start, your entire model can end up inaccurate. Artists also tend to add too much geometry too soon, making the mesh heavy and difficult to edit, which often results in messy topology.
Poor edge flow is another major problem, especially when working without planning. Random edge cuts, excessive triangles, and n-gons can break shading and create issues during animation or rendering. Skipping retopology is also a critical mistake, as it leaves you with an unclean mesh that is not suitable for production. Many beginners also ignore UV mapping quality, which causes texture stretching and poor visual results.
Finally, not checking the model from multiple angles or failing to optimize the mesh can lead to performance issues and visual errors in the final output. Avoiding these mistakes will save time, improve your workflow, and help you create clean, professional 3D models directly from concept art.
Required Tools & Blender Setup
Before starting, make sure your setup is ready so you don’t face issues later in the workflow. Use the latest stable version of Blender to access updated tools and better performance. Enable useful built-in addons like LoopTools (Edit → Preferences → Add-ons) to speed up modeling tasks. Keep your system optimized by closing unnecessary background apps, especially when working with heavy meshes. Set your viewport to Solid Mode for better performance during modeling, and switch to Material Preview only when needed. A clean and optimized setup helps you work faster and avoids lag or crashes during the modeling process.
Preparing 2D Concept Art for Modeling
Before importing your concept art into Blender, prepare it properly to avoid proportion and alignment issues later. Use a high-resolution image so details remain clear while modeling. If possible, collect multiple views such as front and side to maintain accurate depth and structure. Check the proportions of the image in advance if something looks off in 2D, it will become a bigger problem in 3D. Crop unnecessary areas and keep the subject centered to make alignment easier inside Blender. A well-prepared reference image saves time and helps you build a more accurate 3D model.
Pro Tips for Clean 3D Modeling
To improve your workflow and get professional results, follow these practical tips while modeling. Always start with a low-poly mesh and keep your geometry simple in the beginning. Use the Mirror Modifier early to save time and maintain symmetry. Avoid adding too many subdivisions too soon, as it makes the mesh harder to control. Focus on the silhouette first—if the overall shape looks correct, details will naturally fit better. Save multiple versions of your file (v1, v2, v3) so you can go back if something breaks. These small habits make a big difference in creating clean and efficient models.
Best Practices for Game-Ready Models
If your model is intended for games or real-time applications, follow these best practices to ensure performance and quality. Keep your polygon count as low as possible while maintaining shape accuracy. Use clean quad topology and avoid unnecessary geometry. Maintain proper UV spacing so textures look sharp and consistent. Always apply transforms before exporting to avoid scaling issues in game engines. Test your model in software like Unity or Unreal to make sure it works correctly. A well-optimized model performs better and is easier to use in real projects.
When to Use Sculpting vs Modeling
Understanding when to use sculpting or traditional modeling can improve your workflow significantly. Use standard modeling techniques for hard surface objects like weapons, props, or mechanical designs where clean edges are important. Use sculpting for organic shapes like characters, creatures, or anything with natural forms. In professional workflows, artists often combine both stars with sculpting to define shapes, then use retopology to create a clean mesh. Choosing the right method saves time and helps you achieve better results.
Conclusion
Converting 2D concept art into a clean 3D mesh in Blender becomes much easier when you follow a structured and practical workflow. Instead of jumping between random tools or fixing mistakes later, focusing on the right steps—reference setup, blockout, refinement, retopology, and optimization—helps you build models that are both accurate and professional.
The key is to stay consistent with the process. Start simple, build strong shapes, and only add detail when the foundation is correct. Keep your topology clean, your geometry controlled, and always check your model from multiple angles. Small improvements at each step lead to a much better final result.
With practice, this workflow becomes faster and more natural. Whether you’re a beginner learning the basics or an experienced artist improving your pipeline, following these steps will help you create clean, production-ready 3D models from any concept art with confidence.
