

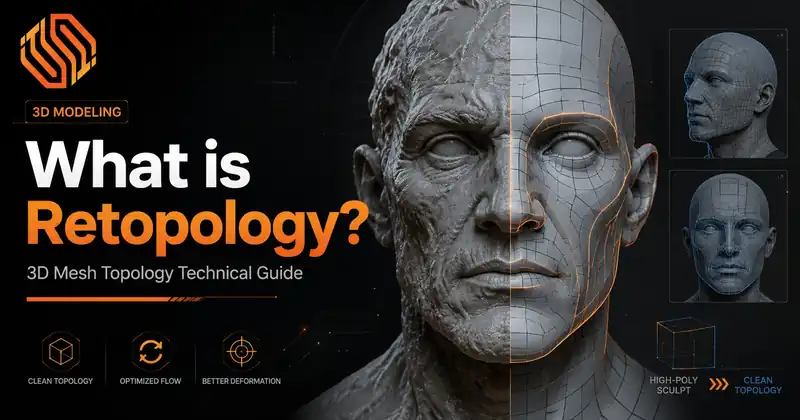
What is Retopology? 3D Mesh Topology Technical Guide
Retopology is the process of rebuilding a 3D model with clean, organized geometry while preserving the shape of the original high-resolution sculpt. It creates a production-ready mesh that deforms correctly during animation, supports efficient UV unwrapping, and produces accurate texture bakes. Whether you’re creating a game character, an animated asset, or a visual effects model, good retopology is the foundation of a reliable 3D workflow.
Many beginners assume that a detailed sculpt is ready for production. In reality, high-poly models often contain millions of polygons arranged without a usable edge flow. While this level of detail is ideal for sculpting, it can cause problems during rigging, animation, simulation, rendering, and real-time performance. Retopology solves these issues by replacing the sculpt’s dense geometry with a clean mesh designed for its intended purpose.
This guide explains what retopology is, why it matters, and how it fits into professional 3D production pipelines. You’ll learn the principles of clean mesh topology, understand when retopology is necessary, and discover how it improves animation, texture baking, game optimization, and visual effects workflows.
The Difference Between Surface Quality and Topology Quality
Surface quality describes how a model looks, while topology quality describes how the mesh is built. Although these concepts are related, they serve different purposes.
A high-resolution sculpt can have excellent surface quality, with realistic wrinkles, sharp edges, and fine details. However, it may still have poor topology because its polygons are uneven, stretched, or randomly distributed. Such a mesh often performs poorly during rigging, animation, or texture baking.
Topology quality focuses on the arrangement of vertices, edges, and faces. A clean topology uses consistent polygon density, logical edge flow, and well-placed loops that follow the model’s form. This structure allows the mesh to deform naturally, unwrap cleanly, and support subdivision without introducing unwanted artifacts.
Professional artists evaluate both qualities independently. A model with excellent surface detail but poor topology is difficult to use in production, while a clean retopologized mesh provides the stable foundation needed for animation, visual effects, rendering, and game development.
Why Retopology Exists in Production Pipelines
Retopology exists because the geometry used to create a model is rarely suitable for using it in production. During sculpting, artists focus on adding shape and fine details without worrying about polygon flow or optimization. Once the design is complete, the model needs a clean, efficient mesh that can move smoothly through the rest of the pipeline.
A production-ready mesh supports every stage that follows. Rigging artists need predictable edge loops for natural deformation. Texture artists need organized geometry for clean UV unwrapping and accurate texture baking. Game developers require optimized polygon counts to maintain real-time performance, while VFX teams need stable meshes for simulations and rendering.
Without retopology, a single asset can create problems across multiple departments. Animation may produce unrealistic deformations, texture baking can generate projection errors, and simulations may become unstable or unnecessarily slow. By rebuilding the mesh with proper topology, artists reduce these issues before they affect production.
Instead of treating retopology as an optional cleanup step, professional studios consider it a standard part of creating production-ready assets. It improves consistency, reduces revisions, and helps every department work with reliable geometry.
When a Model May Not Need Retopology
Not every 3D model requires retopology. If a model is created directly with clean polygon modeling techniques and maintains proper edge flow from the beginning, additional retopology may not provide any benefit.
For example, many hard-surface models such as simple furniture, architectural elements, or mechanical parts are built with organized topology during modeling. Since these assets are already optimized, artists can often move directly to UV unwrapping and texturing.
Retopology may also be unnecessary for concept sculpts, static renders, or personal projects where the model will never be animated, simulated, or used in a game engine. In these cases, the original geometry is often sufficient for the intended purpose.
When Retopology Becomes Necessary
Retopology becomes necessary when a model must perform reliably throughout a production pipeline. High-resolution sculptures created in applications like Blender or ZBrush usually contain dense, irregular geometry that is unsuitable for animation, real-time rendering, or efficient texture baking.
Character models almost always require retopology because they need clean edge loops around the face, shoulders, elbows, knees, and other joints. These loops allow the mesh to deform naturally during rigging and animation.
Retopology is also essential for game assets, cinematic characters, digital doubles, and visual effects models. By creating a clean production mesh before UV unwrapping and baking, artists improve performance, reduce technical issues, and ensure the asset is ready for every stage of development.
Sculpt Geometry vs Production Geometry
Sculpt geometry and production geometry serve different purposes in a 3D workflow. Sculpt geometry allows artists to create highly detailed models without worrying about polygon efficiency, while production geometry is designed to perform well during rigging, animation, texturing, simulation, and rendering.
Digital sculpting software generates geometry dynamically as artists add or refine details. This approach provides creative freedom but often results in uneven polygon density, irregular edge flow, and millions of polygons. Although the model looks highly detailed, its mesh structure is not optimized for production.
Production geometry takes the opposite approach. Instead of maximizing detail, it organizes polygons into clean edge loops with consistent density. The mesh follows the shape of the sculpt while remaining lightweight, predictable, and easy to edit. This structure allows every stage of the pipeline to work efficiently without sacrificing visual quality.
In most professional workflows, the sculpt acts as the source of detail, while the production mesh becomes the asset used throughout the project. Surface details from the sculpt are later transferred to the optimized mesh using texture maps such as normal maps or displacement maps. This approach preserves visual fidelity while keeping the model efficient enough for animation, games, and visual effects.
Why High-Poly Does Not Mean Production-Ready
A high-poly model contains a large number of polygons, but polygon count alone does not determine whether an asset is ready for production. What matters is how those polygons are arranged.
For example, a character sculpt may contain several million polygons that accurately capture pores, wrinkles, and clothing folds. However, the geometry often consists of stretched polygons, uneven edge spacing, and random topology created during the sculpting process. This makes the mesh difficult to rig, slow to animate, and inefficient for real-time rendering.
A production-ready model focuses on topology quality rather than polygon quantity. Clean edge loops support natural deformation around joints, evenly distributed polygons improve UV layouts, and organized geometry produces more accurate texture bakes. The model also consumes fewer system resources, making it easier to work with in game engines and animation software.
Professional studios rarely use high-poly sculpts directly in production. Instead, they create a clean retopologized mesh and transfer the sculpted details through texture baking. This workflow delivers the visual richness of a high-resolution model while maintaining the performance and flexibility required for modern 3D pipelines.
What Makes Good Retopology?
Good retopology is more than reducing polygon count. It creates a mesh that behaves predictably throughout the production pipeline while preserving the shape of the original sculpt. A well-retopologized model deforms naturally during animation, unwraps cleanly for texturing, and performs efficiently in rendering and real-time applications.
Professional artists build topology with a specific purpose in mind. A game character, a cinematic creature, and a mechanical product all require different edge flows and polygon distributions. Instead of following a universal pattern, good retopology supports how the asset will be used.
Several characteristics define high-quality topology:
- Clean and continuous edge flow
- Mostly quad-based geometry
- Even polygon density across similar surfaces
- Edge loops placed around joints and facial features
- Minimal stretching and distortion
- Logical pole placement
- Geometry that supports UV unwrapping and texture baking
When these principles are applied correctly, the mesh becomes easier to edit, animate, and optimize without affecting the model’s appearance.
Edge Flow: The Direction of Deformation
Edge flow describes how edges travel across the surface of a model, and in practice it should always support movement, not just shape. A useful way to think about edge flow is to ask: where will this model bend, twist, or stretch? The topology should be built to answer that question.
For example, if you are retopologizing an arm, the edge loops should run around the elbow and shoulder so the mesh can bend without collapsing. If you are working on a face, the loops should follow the mouth and eyes so expressions can open, close, and stretch naturally. If the model is a hard-surface object, the edge flow should support clean curvature and sharp transitions without creating shading problems.
A practical workflow for edge flow is to start with the main deformation areas first:
- Face: place loops around the eyes, mouth, and jaw before filling in the rest of the head
- Arms and legs: build loops around elbows, knees, shoulders, and hips so the mesh bends cleanly
- Hands and fingers: keep the loops simple and evenly spaced to preserve finger motion
- Torso: use loops that follow the chest, ribs, and abdomen so twisting looks natural
Good edge flow also means avoiding unnecessary complexity. If an area does not deform much, it does not need dense topology. Flat surfaces, rigid armor, or the sides of a prop can stay simple as long as the silhouette remains accurate. This keeps the mesh efficient and easier to manage.
When checking edge flow, artists often test the model in a pose or simple rig before finishing the asset. If the mesh pinches at the elbow, breaks at the shoulder, or distorts around the mouth, the edge flow needs adjustment. In other words, edge flow is not just about how the mesh looks in the viewport; it is about how well it performs when the model moves.
Why Shoulders Are Difficult
The shoulder is one of the most challenging areas to retopologize because it rotates in multiple directions. Unlike a simple hinge joint such as the elbow, the shoulder twists, lifts, extends, and rotates simultaneously.
- If the topology does not support these movements, the mesh can collapse, stretch, or produce unnatural folds during animation. Adding more polygons rarely solves the problem because deformation depends on edge flow rather than density.
- Professional character artists create circular edge loops that flow from the chest into the shoulder and upper arm. These loops distribute deformation across a wider area, allowing the rig to bend the shoulder more naturally while preserving volume.
- Testing shoulder deformation early in the rigging process helps identify topology issues before animation begins, reducing costly revisions later in production.
Why Facial Topology Needs Special Attention
Facial animation demands some of the cleanest topology in a 3D model. Even subtle expressions rely on controlled edge flow around the eyes, mouth, nose, cheeks, and jaw.
- The face contains many small muscles that move independently. Well-placed edge loops follow these muscle groups, allowing smiles, blinks, speech, and other expressions to deform smoothly without creating unwanted creases or stretched polygons.
- Poor facial topology often causes visible artifacts during animation. Lips may intersect, eyelids may not close correctly, and cheeks can lose their natural shape when the character smiles or speaks. Fixing these issues after rigging is much more difficult than preventing them during retopology.
For this reason, experienced artists spend extra time refining facial topology before moving to UV unwrapping, texture baking, and rigging. A clean facial mesh provides a stable foundation for realistic character animation and high-quality visual performance.
Core Principles of Clean Mesh Topology
Clean mesh topology is not created by accident. Professional artists plan the mesh before placing the first polygon. They first study how the model will be used. A character for animation needs a different topology than a static product render or a game prop.
Before starting retopology, inspect the high-poly model from every angle. Rotate the model and identify areas that will bend, twist, or deform. These areas usually include the shoulders, elbows, knees, hips, fingers, eyelids, and mouth. Planning these regions first makes the entire retopology process easier.
Even Polygon Density
Keep the polygon density consistent across similar parts of the model. Large changes in polygon size can create stretching during animation and make UV unwrapping more difficult.
A practical workflow is:
- Start with the largest shapes instead of small details.
- Compare the size of neighboring polygons as you build the mesh.
- Increase polygon density only where extra deformation or detail is required.
- Keep flat or rigid surfaces simple whenever possible.
- Review the wireframe regularly to check for sudden changes in polygon size.
For example, a character’s face requires more polygons than the forearm because facial expressions create much more deformation. Likewise, a mechanical panel can use fewer polygons than a curved handle without affecting the final result.
Supporting Loops
Supporting loops help the mesh maintain its shape during subdivision and animation. Instead of adding extra geometry everywhere, place supporting loops only where they improve the model.
When creating supporting loops:
- Identify sharp edges or important forms.
- Add a loop close to the edge that needs support.
- Keep the spacing between loops consistent.
- Preview the mesh with subdivision enabled to see how the surface changes.
- Remove loops that do not improve the shape or deformation.
For character models, supporting loops are commonly added around joints and facial features. For hard-surface models, they are placed near beveled edges, panel lines, and mechanical details to keep those features crisp after subdivision.
Topology That Matches Surface Form
Your topology should follow the natural shape of the object instead of forcing polygons into straight rows.
A simple way to build better topology is to work in stages:
- Block out the primary forms with large quads.
- Create edge loops around major deformation areas.
- Connect the loops using evenly sized polygons.
- Refine the topology only after the overall edge flow looks correct.
- Turn on the wireframe overlay and inspect the mesh from multiple angles to ensure the loops follow the model’s contours.
Before considering the retopology complete, perform one final check. View the wireframe without textures or materials. If the edge loops clearly describe the shape of the model and the polygon density looks balanced, the mesh is ready for UV unwrapping, texture baking, and the next stage of the production pipeline.
Why Quads, Poles, and Triangles Matter
The shape of your polygons affects how a model behaves during subdivision, animation, texture baking, and rendering. This is why professional artists pay close attention to quads, triangles, and poles instead of focusing only on polygon count.
Before evaluating your topology, switch to Wireframe or X-Ray view in your 3D software. This makes it easier to inspect the edge flow and identify areas where the mesh may cause problems. As you review the wireframe, look for long stretched polygons, unnecessary triangles, and poles placed in high-deformation areas.
A clean production mesh does not have to contain only quads, but most of the geometry should be quad-based. Triangles and poles are useful when placed correctly, while poor placement often leads to shading issues or unnatural deformation.
Quad Topology and Subdivision
Quads are four-sided polygons and are the preferred choice for most production assets because they subdivide evenly and support smooth edge flow.
When building your mesh:
- Start with large quad polygons that define the overall shape.
- Continue adding quads as you build edge loops around joints and facial features.
- Check the mesh with a Subdivision Surface preview to see how the topology smooths.
- If you notice pinching or uneven shading, adjust the surrounding edge loops instead of adding random polygons.
- Keep quads as square as possible. Extremely long or thin quads can create deformation and shading problems.
For example, when retopologizing a character’s face, build circular quad loops around the eyes and mouth first. These loops provide a clean structure for facial animation and make later adjustments much easier.
Triangles Are Not Always Wrong
Many beginners try to eliminate every triangle, but that is not how professional artists work. Triangles are acceptable when they are used deliberately and placed where they will not affect deformation or shading.
A practical approach is:
- Place triangles on rigid or flat surfaces whenever possible.
- Avoid placing triangles directly on elbows, knees, shoulders, fingers, or facial features.
- Test the mesh with subdivision enabled to ensure the triangle does not create visible artifacts.
- If a triangle produces pinching during animation or subdivision, redirect the surrounding edge flow instead of simply moving the triangle elsewhere.
In game development, triangles are common because game engines ultimately convert every mesh into triangles during rendering. The goal is not to avoid triangles completely but to control where they appear.
Poles Are About Placement
A pole is a vertex where five or more edges, or three edges, meet instead of the typical four. Poles help redirect edge flow, making them an important tool during retopology.
When working with poles:
- Use them only when you need to change the direction of edge loops.
- Place poles on relatively flat or low-deformation areas.
- Keep them away from joints, facial expressions, and areas with heavy subdivision.
- Rotate the model and inspect the surrounding topology to make sure the pole does not create visible shading artifacts.
- Test the model in a simple pose before finalizing the topology.
For example, if you need to redirect edge loops from the chest toward the shoulder, placing a pole on the upper torso usually produces better results than placing one directly on the shoulder joint.
Remember that poles are not mistakes. Poorly placed poles are the real problem. When used carefully, they help create clean, efficient topology while maintaining smooth edge flow throughout the model.
Retopology for Games, Animation, and VFX
The purpose of retopology changes depending on where the 3D asset will be used. A game character must run efficiently in real time, an animated character must deform naturally, and a visual effects (VFX) asset must support complex simulations and high-resolution rendering.
Before you begin retopology, decide the asset’s final destination. This decision influences polygon density, edge flow, and the level of detail you include in the production mesh. Building a mesh without considering its purpose often leads to unnecessary revisions later in the pipeline.
Retopology for Game Assets
Game assets require a balance between visual quality and performance. Every polygon affects rendering performance, especially in real-time engines such as Unity and Unreal Engine.
A practical workflow for game-ready retopology is:
- Determine the target platform, such as PC, console, mobile, or VR.
- Review the high-poly sculpt and identify the silhouette that must be preserved.
- Build a low-poly mesh using mostly quad topology while keeping the polygon count within your project’s budget.
- Add extra edge loops only around areas that deform or define the silhouette.
- Remove unnecessary geometry from flat or hidden surfaces.
- Unwrap the UVs after completing retopology.
- Bake normal maps, ambient occlusion maps, and other texture maps from the high-poly sculpt onto the optimized mesh.
- Import the finished asset into the game engine and test it under real lighting conditions.
For example, a game character’s face and hands usually receive more geometry because players notice these areas the most. In contrast, the back of a belt or the underside of a boot can often use fewer polygons without affecting visual quality.
The goal is to create a mesh that looks detailed while remaining efficient enough for real-time rendering.
Retopology for Animation
Animation places greater emphasis on deformation than polygon count. A well-retopologized character should bend, twist, and stretch naturally without producing pinching or collapsing geometry.
When preparing a character for animation:
- Identify every joint that will move during animation.
- Build circular edge loops around the shoulders, elbows, knees, hips, wrists, ankles, and neck.
- Create clean loops around the eyes and mouth if the character requires facial animation.
- Keep polygon density consistent across deformation areas.
- Perform simple pose tests before moving to UV unwrapping or rigging.
- Adjust the topology wherever the mesh loses volume or produces visible artifacts.
Professional studios often test a basic rig before the model reaches the animation team. Finding deformation problems early is much faster than fixing them after animation has started.
The objective is smooth, predictable deformation that reduces corrective work later in production.
Retopology for VFX and Simulation
Visual effects projects usually prioritize accuracy and stability over aggressive polygon reduction. Assets may be used for cloth simulations, destruction effects, fluid interactions, or high-resolution cinematic rendering.
A practical VFX workflow includes:
- Review the simulation requirements before creating the production mesh.
- Build topology that follows the model’s major forms with clean, continuous edge flow.
- Avoid stretched polygons that can create unstable simulation results.
- Maintain consistent polygon density across simulated areas such as clothing or skin.
- Test the mesh with subdivision enabled to identify shading issues.
- Validate the topology before sending the asset to cloth, hair, or physics simulations.
Many VFX studios use separate meshes for simulation and final rendering. The simulation mesh is optimized for stable calculations, while the render mesh preserves the highest level of visual detail. The simulation results are then transferred to the render mesh, allowing artists to achieve realistic effects without slowing down production.
Although the workflows differ, game development, animation, and VFX all depend on the same foundation: clean, well-planned topology. A production-ready mesh saves time, improves quality, and reduces technical problems throughout the entire pipeline.
How FX Geometry Transfers onto Retopologized Meshes
In professional productions, artists rarely run simulations directly on the final render mesh. Instead, they create separate meshes for sculpting, simulation, and rendering. This approach improves performance, speeds up calculations, and gives artists greater control over the final result.
After retopology is complete, the clean production mesh becomes the foundation for rigging, animation, and simulation. Once a simulation is approved, its motion is transferred or wrapped to the high-resolution render mesh. This workflow allows studios to keep the visual quality of the original sculpt while avoiding the performance cost of simulating millions of polygons.
Before starting any simulation, verify that your production mesh has clean edge flow, consistent polygon density, and no non-manifold geometry. These checks reduce the risk of unstable simulations and make troubleshooting much easier.
Why the Sim Mesh and Render Mesh Are Separated
Simulation software performs better with clean, lightweight geometry. Running cloth, muscle, or soft-body simulations on a multi-million-polygon sculpt can dramatically increase processing time and may introduce unnecessary instability.
A typical production workflow looks like this:
- Create the high-poly sculpt for all visual details.
- Build a clean retopologized mesh.
- Rig and animate the production mesh.
- Use the production mesh as the simulation mesh or create a simplified simulation version if required.
- Cache the simulation after reviewing the results.
- Transfer the simulated movement to the high-resolution render mesh.
- Render the final asset using the detailed geometry.
For example, a character wearing a detailed jacket may have thousands of folds sculpted into the clothing. Instead of simulating every wrinkle, artists simulate a cleaner version of the jacket and then apply that movement to the detailed render mesh. The final animation looks realistic while remaining computationally efficient.
Why Wrapping Matters in Production
Wrapping is the process of transferring deformation from one mesh to another while preserving the original shape and details. It allows a low- or medium-resolution mesh to drive the movement of a much more detailed model.
In a typical production pipeline:
- Animate or simulate the retopologized mesh.
- Apply a wrap or surface-transfer method to the high-resolution model.
- Preview the animation to check for sliding, stretching, or surface intersections.
- Adjust the wrap settings if the high-resolution mesh does not follow the production mesh accurately.
- Finalize the animation before rendering.
This workflow is common in feature films, television, and high-end game cinematics because it separates performance from visual quality. Animators work with lightweight meshes that are responsive in the viewport, while lighting and rendering teams use the detailed models for the final output.
Without wrapping, every department would need to work directly on high-resolution geometry. That would slow production, increase hardware requirements, and make revisions much more difficult. By separating the production mesh from the render mesh, studios create a workflow that is both efficient and scalable.
Retopology and Texturing
Retopology directly affects the quality of your textures. A clean production mesh creates organized UV islands, produces accurate texture bakes, and reduces visible artifacts in the final render. Even the best textures cannot fully compensate for poor topology.
Before opening your UV editing software, make sure the retopology is complete. Changing the topology after creating UVs usually means you must unwrap the model again and rebake all texture maps.
A typical production workflow is:
- Complete the retopology.
- Inspect the mesh for non-manifold geometry, overlapping faces, and flipped normals.
- Apply transforms and finalize the production mesh.
- Create UV seams and unwrap the model.
- Check the UV layout for stretching and unused space.
- Bake texture maps from the high-poly sculpt.
- Import the baked maps into your texturing software.
- Paint and refine the final textures.
Following this order helps avoid unnecessary rework and keeps every stage of the pipeline organized.
Why UV Unwrapping Comes After Retopology
UV unwrapping converts a 3D mesh into a 2D layout so textures can be applied accurately. Because UVs depend on the mesh structure, retopology should always come first.
Imagine you unwrap a high-poly sculpt and then decide to rebuild the topology. The new mesh will have different vertices, edges, and faces, making the original UV layout unusable. You would need to create a new UV map and repeat the baking process.
To avoid this, professionals follow these steps:
- Finish the retopologized mesh.
- Confirm that the edge flow and polygon density are final.
- Mark seams in logical locations, such as clothing edges, inner arms, or less visible areas.
- Unwrap the mesh and check for stretching using a UV checker texture.
- Rearrange the UV islands to maximize texture space before baking.
A clean retopology also makes UV editing much easier. Evenly sized quads create predictable UV islands, while irregular topology often produces distorted or difficult-to-manage layouts.
Normal Map Baking and Projection Errors
One of the main reasons artists perform retopology is to transfer high-resolution sculpt details onto a low-poly production mesh using normal map baking. This process preserves fine details without requiring millions of polygons in the final asset.
A typical baking workflow is:
- Position the high-poly and low-poly meshes in the same location.
- Ensure both meshes have matching proportions and orientation.
- Confirm that the low-poly model has finished UVs.
- Bake the normal map using your preferred baking software.
- Apply the normal map to the low-poly mesh and inspect the results under different lighting angles.
If the topology or UVs are incorrect, several projection errors can appear, including:
- Visible seams between UV islands
- Wavy or distorted surface details
- Black spots or shading artifacts
- Missing sculpt details
- Projection rays capturing the wrong surface
Manual Retopology vs Automatic Retopology
Artists can create a production-ready mesh either manually or with automatic retopology tools. Both methods have a place in modern 3D workflows, but they serve different purposes. The right choice depends on the asset, the required quality, and the amount of control you need over the final topology.
Before starting, ask yourself two questions:
- Will this model be animated or deformed?
- Do I need complete control over edge flow?
If the answer is yes, manual retopology is usually the better option. If the model is a static object or you need a quick starting point, automatic retopology can save time.
What Automatic Retopology Does Well
Automatic retopology tools analyze the shape of a high-poly model and generate a cleaner mesh without requiring artists to place every polygon manually. Applications such as Blender, ZBrush, Maya, and 3DCoat include built-in auto-retopology features that can significantly reduce production time.
A practical workflow is:
- Finish the high-poly sculpt.
- Run the automatic retopology tool using your preferred polygon count or target density.
- Review the generated mesh in Wireframe mode.
- Inspect the edge flow around joints, facial features, and sharp corners.
- Correct any areas where the automatic solution creates unnecessary poles, stretched polygons, or poor loops.
- Continue with UV unwrapping and texture baking only after verifying the topology.
Automatic retopology works particularly well for:
- Static props
- Hard-surface objects
- Background assets
- Concept models
- Creating a base mesh for manual refinement
For these assets, automatic tools often produce acceptable results with minimal cleanup.
Where Automatic Retopology Fails
Although automatic tools have improved considerably, they cannot understand how a model will deform during animation. They optimize geometry based on surface shape rather than production requirements.
Common problems include:
- Edge loops that do not follow joints
- Poor facial topology
- Unnecessary poles in deformation areas
- Uneven polygon density
- Difficult UV layouts
- Pinching during animation
A simple way to evaluate an automatically generated mesh is to rotate the model and inspect critical deformation areas. Look closely at the shoulders, elbows, knees, fingers, eyelids, and mouth. If the edge loops do not follow the expected direction of movement, the topology should be rebuilt or manually adjusted.
For production assets, many studios use a hybrid workflow:
- Generate a base mesh with automatic retopology.
- Manually rebuild important deformation areas.
- Redirect edge loops where necessary.
- Remove unnecessary geometry.
- Validate the mesh before rigging, baking, and texturing.
This approach combines the speed of automation with the precision of manual topology.
Automatic retopology is an excellent productivity tool, but it should not replace professional judgment. For hero characters, cinematic assets, and animation-ready models, manual retopology remains the industry standard because it gives artists complete control over edge flow, deformation, and production quality.
How Bad Retopology Breaks a Pipeline
Poor retopology affects far more than the appearance of a 3D model. A mesh with bad topology can create problems during rigging, animation, UV unwrapping, texture baking, simulation, and rendering. Small topology mistakes made early in production often become expensive to fix later.
Before sending an asset to the next department, perform a quality check. Rotate the model in Wireframe mode, inspect the edge flow around all deformation areas, and test the mesh with a simple rig or subdivision preview. Finding issues at this stage is much faster than rebuilding the asset after animation or texturing has started.
Animation Artifacts
Animation is usually the first stage where topology problems become obvious. A character may look perfect in a neutral pose but deform incorrectly as soon as it starts moving.
Before handing the model to a rigger or animator:
- Apply a basic rig or test skeleton.
- Bend the shoulders, elbows, knees, hips, and wrists through their normal range of motion.
- Open and close the mouth if the character includes facial animation.
- Watch for pinching, collapsing, stretching, or loss of volume.
- Adjust the edge flow before moving to the next production stage.
Common animation artifacts include:
- Pinched elbows and knees
- Collapsed shoulder volume
- Twisted edge loops
- Facial distortion around the mouth or eyes
- Visible creases on smooth surfaces
Correcting these issues before final rigging saves significant production time.
Simulation Problems
Simulation software depends on clean, predictable geometry. Poor topology can produce unstable cloth, inaccurate soft-body behavior, and unwanted stretching during simulations.
When preparing a mesh for simulation:
- Check for non-manifold geometry.
- Remove overlapping or duplicated faces.
- Keep polygon density consistent across simulated areas.
- Avoid long, thin polygons that can create unstable calculations.
- Test the simulation using a simple animation before running the final version.
If the simulation behaves unpredictably, inspect the topology before changing simulation settings. In many cases, the mesh structure is the source of the problem rather than the physics solver.
Why Topology Affects Production Cost
Retopology influences both production quality and project cost. A clean mesh allows every department to work efficiently, while poor topology increases revisions, delays, and technical troubleshooting.
Professional studios reduce these risks by validating topology before the asset moves to the next stage. A typical quality-control checklist includes:
- Confirm clean edge flow around deformation areas.
- Check for mostly quad-based geometry.
- Verify consistent polygon density.
- Inspect the mesh for non-manifold geometry and flipped normals.
- Test subdivision and simple character poses.
- Review UVs before texture baking.
Completing these checks early helps prevent expensive revisions later in the pipeline.
Good retopology is an investment rather than an extra step. It reduces technical issues, improves collaboration between departments, and allows artists to spend more time creating high-quality work instead of fixing avoidable problems.
Where Retopology Fits in a Real Asset Pipeline
Retopology is one step in a much larger production pipeline. It connects sculpting with every stage that follows, including UV unwrapping, texture baking, rigging, animation, simulation, and rendering. If retopology is skipped or performed too early, problems often appear throughout the rest of the workflow.
Professional studios follow a structured pipeline because each stage depends on the previous one. Completing tasks in the correct order reduces rework and keeps every department working with reliable assets.
A typical character asset pipeline looks like this:
- Create the base model.
- Sculpt high-resolution details.
- Complete retopology.
- Inspect and clean the production mesh.
- Unwrap the UVs.
- Bake texture maps from the high-poly sculpt.
- Paint textures and assign materials.
- Build the character rig.
- Test deformations and correct any issues.
- Animate the character.
- Run cloth, hair, or physics simulations if required.
- Light, render, or export the asset to the game engine.
Following this sequence ensures that every stage builds on a clean, production-ready foundation.
Common Retopology Mistakes to Avoid
Avoid these common mistakes to create a clean, production-ready mesh:
- Using too many polygons where they are not needed.
- Creating uneven polygon density across the model.
- Building long, thin, or stretched polygons.
- Placing poles near joints or facial deformation areas.
- Using unnecessary triangles in animated regions.
- Ignoring proper edge flow around shoulders, elbows, knees, and hips.
- Creating messy topology around the eyes and mouth.
- Forgetting to test the mesh with subdivision.
- Starting UV unwrapping before finishing retopology.
- Baking textures without checking the low-poly mesh.
- Leaving non-manifold geometry or duplicate vertices.
- Not testing the model with a simple rig before animation.
- Adding extra edge loops that do not improve deformation or silhouette.
- Focusing only on polygon count instead of mesh quality.
- Skipping a final wireframe inspection before exporting the asset.
Final Thoughts
Retopology is much more than a cleanup step. It transforms a detailed sculpt into a production-ready mesh that supports animation, texturing, simulation, and rendering. Whether you’re building a game asset, an animated character, or a VFX model, clean topology creates a reliable foundation for every stage that follows.
The most successful artists do not judge retopology by polygon count alone. They evaluate how the mesh deforms, how easily it unwraps, how accurately it bakes textures, and how efficiently it performs in its final environment. By planning edge flow, maintaining balanced polygon density, and testing the model before moving to the next stage, you can avoid costly revisions and produce assets that meet professional production standards.
As your projects become more complex, investing time in good retopology will save far more time later in the pipeline. A clean mesh is easier to rig, faster to animate, simpler to texture, and more efficient to render, making it one of the most valuable skills in modern 3D modeling.