How to Transform 2D Concept Art into Rigged 3D Animation Assets
Turning a simple 2D sketch into a fully rigged 3D character is one of the biggest challenges beginners face in digital art. Many artists can draw great concepts, but they struggle when it comes to building a clean 3D model, fixing messy topology, or creating a rig that actually works in animation. Even with AI tools, results often look broken, unpolished, or not ready for games and real projects.
If you’ve ever felt stuck between your 2D ideas and a working 3D character, you’re not alone. The process can feel confusing without a clear roadmap.
In this guide, you will learn a complete and simple 2D to 3D character workflow from preparing your sketch to creating a rigged, animation-ready model. By the end, you’ll understand how to avoid common mistakes and confidently turn your ideas into professional 3D assets.
What is the 2D to 3D Character Workflow?
The 2D to 3D character workflow is the step-by-step process of turning a flat drawing into a fully functional 3D model that you can animate and use in games or films. It is not just about making a model; it includes building the structure, adding textures, and creating a rig so the character can move naturally.
Most beginners think they can jump straight from a sketch to animation, but the process has important stages. You first create a 3D model from the concept art. Then you fix the topology to make the model clean and animation-ready. After that, you apply textures to match the original design. Finally, you rig the character by adding bones and controls.
Understanding this workflow helps you avoid mistakes and build characters that actually work in real projects.
What Makes a Good 2D Concept for 3D Conversion?
A strong 2D to 3D character workflow begins with a technically sound concept that removes ambiguity before production starts. The silhouette must be clean and readable, with clearly defined primary and secondary shapes so artists can quickly establish volume during blockout when they convert a 2D sketch to a 3D model. Proportions need to follow a consistent system, whether realistic or stylized, with correctly placed joints and balanced anatomy, because even small inconsistencies can break deformation later in the character rigging process. Equally important are properly aligned front and side views, which provide orthographic accuracy and eliminate guesswork when building a 3D character from concept art inside 3D software. Finally, material clarity plays a critical role by explicitly defining surface types, roughness, and layering; this removes hidden confusion during texturing and ensures predictable results, especially in AI 2D to 3D character pipelines where the system depends on clear visual input. When all these elements are present, the concept becomes production-ready and significantly speeds up the creation of a game-ready 3D character.
Step-by-Step Process to Convert 2D Concept Art into 3D
Step 1 – Prepare Your 2D Concept Art
Open your 3D software (Blender or Maya) and start a new project. Set your scene scale to Metric (Unit Scale 1.0 in Blender) to ensure real-world proportions.
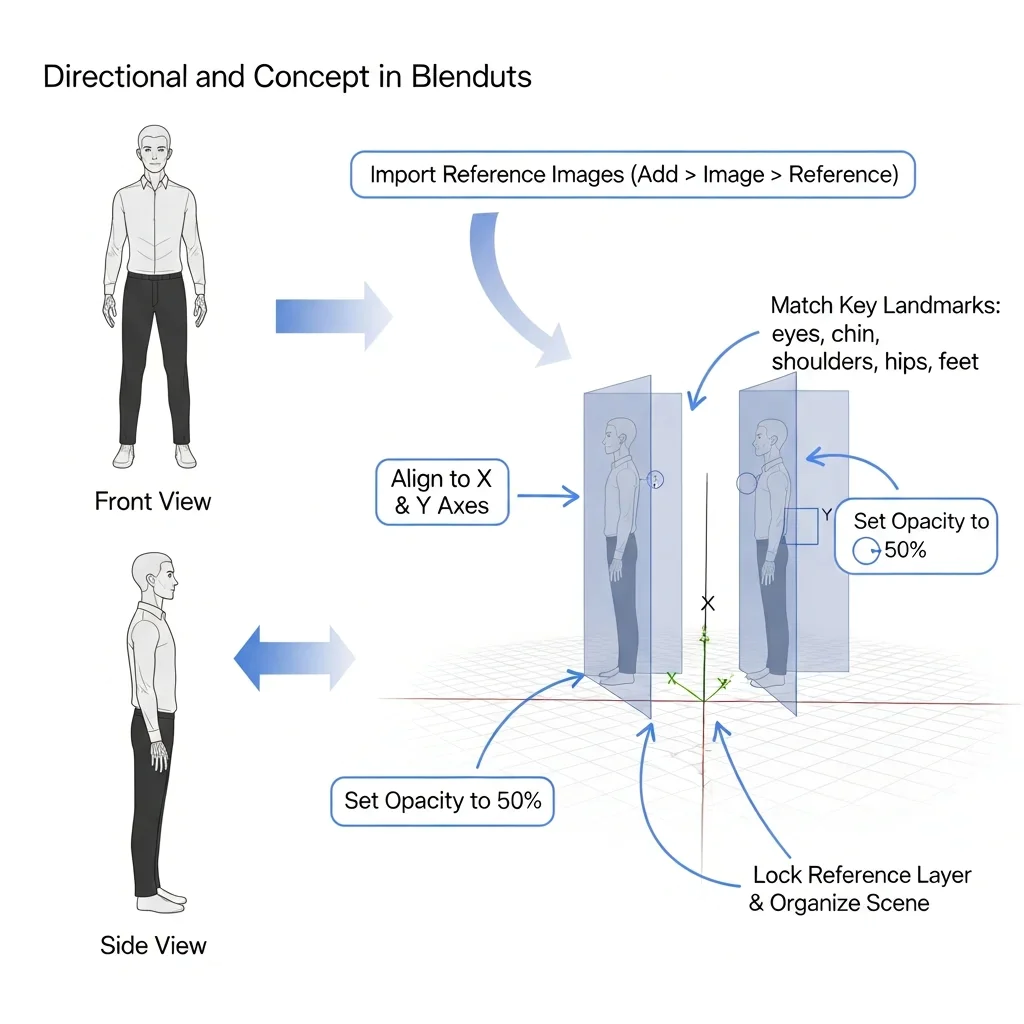
Import your concept art as reference images. In Blender, go to Add → Image → Reference, or in Maya, use Image Plane → Import Image. Load the front view first, then add the side view as a separate image.
Position the front view on the Y-axis and the side view on the X-axis. Align both views by matching key anatomical landmarks such as the eye line, chin, shoulders, hips, and feet to maintain consistent proportions across perspectives. Set image opacity to around 0.5 and lock transforms to avoid accidental movement during modeling.
Before importing, refine your concept externally in tools like Photoshop. Clean the silhouette, remove overlapping shapes, and ensure the design reads clearly in a solid form. Use a consistent proportion system (for example, 7–8 head height for humanoid characters) and correct any unintentional asymmetry.
Create a structured reference sheet with both front and side views in a neutral A-pose. Add simple material notes (such as skin, cloth, metal) and basic surface properties if needed to guide texturing decisions later.
Finally, organize your scene by placing reference images into a separate collection or layer and disabling selection for them. Enable symmetry on the X-axis to prepare for efficient modeling. This setup creates a clean, controlled foundation for converting 2D concept art into a 3D model.
Step 2 – Create the 3D Model
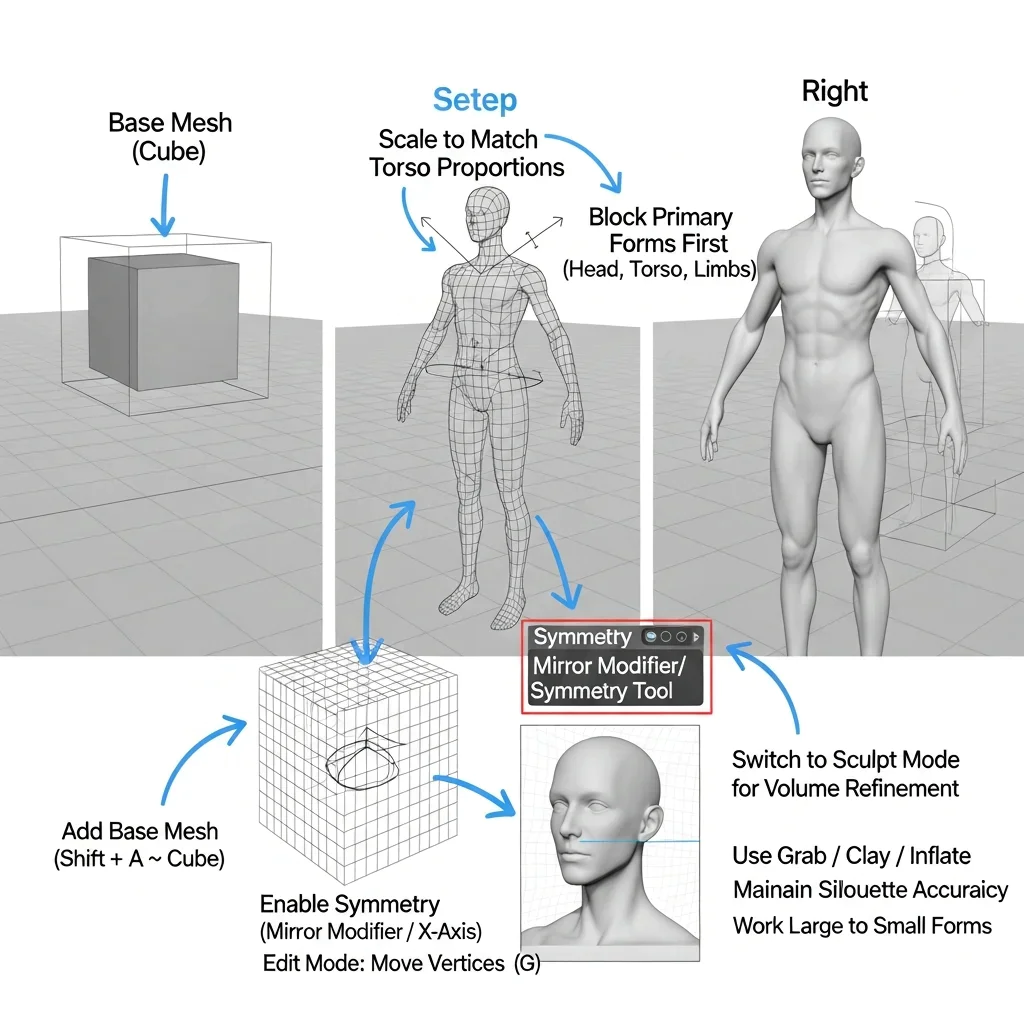
Open your scene and add a base mesh (Shift + A → Mesh → Cube in Blender, or Create → Polygon Primitives → Cube in Maya). Scale the mesh to match the torso area using your front and side references. Enable symmetry (Mirror Modifier in Blender or Symmetry in Maya) so both sides update simultaneously.
Block out the primary forms first. Move vertices in Edit Mode (Tab → select vertices → G to move) to match the head, torso, and limb proportions. Keep the mesh low-poly at this stage and focus only on silhouette accuracy. Do not add detail yet.
Switch to Sculpt Mode once the base proportions match. Use brushes like Grab, Clay, and Inflate to refine volumes and define anatomy. Maintain alignment with your reference images by constantly checking front and side views. If needed, use Dynamesh (ZBrush) or Remesh (Blender) to redistribute geometry evenly.
Work from large to small forms. Define major muscle groups and structure before adding secondary details. Keep checking the silhouette to ensure it matches the original design. This step builds the foundation to accurately convert a 2D sketch to a 3D model and keeps your 2D to 3D character workflow clean and controlled.
Step 3 – Retopology & UV Mapping
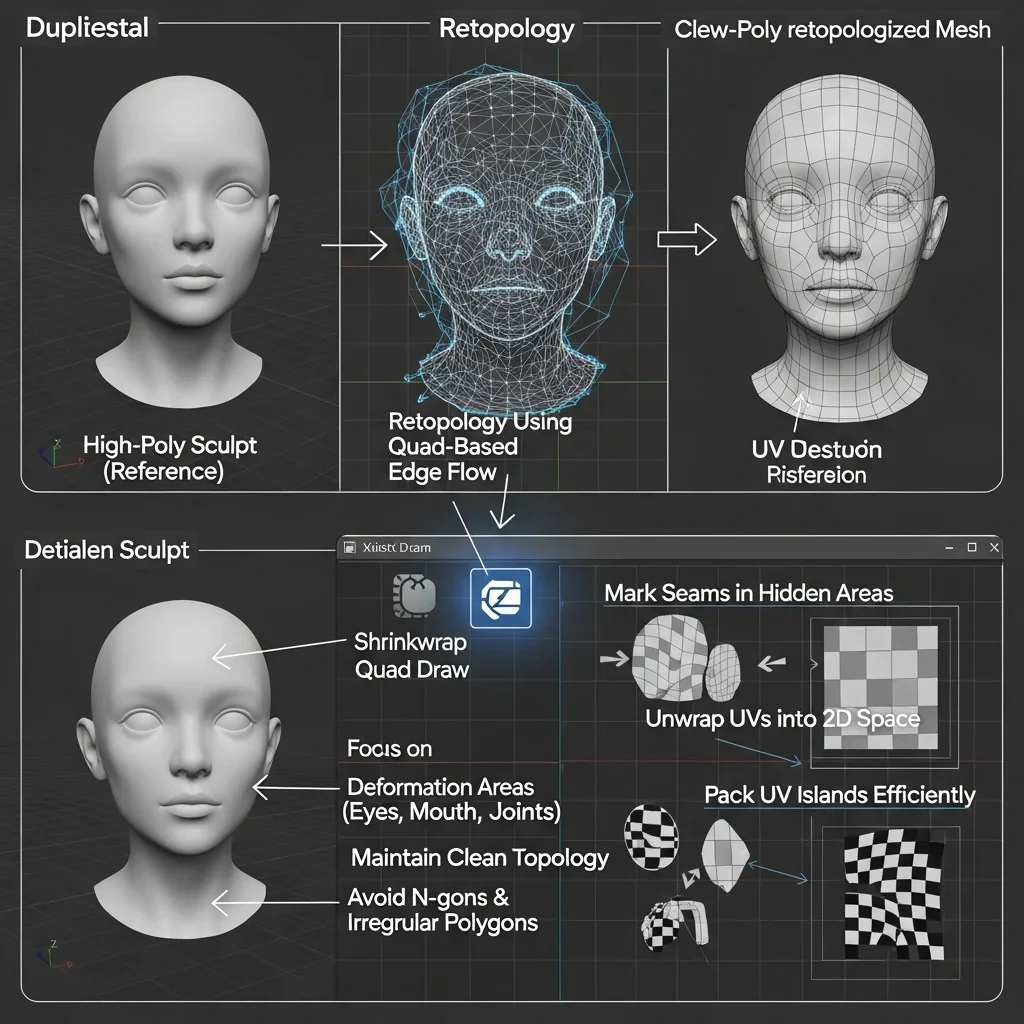
Duplicate your high-resolution sculpt and use it as a reference. Create a new low-poly mesh on top of it using tools like Shrinkwrap (Blender) or Quad Draw (Maya). Start placing polygons around key deformation areas: eyes, mouth, shoulders, elbows, hips, and knees. Build clean edge loops that follow natural muscle flow and joint movement.
Keep polygon density consistent and avoid unnecessary triangles or n-gons. Maintain a quad-based topology to support smooth deformation in the character rigging process. Regularly test edge flow by bending areas like elbows and knees to ensure the mesh deforms without collapsing.
After retopology, unwrap the mesh by marking seams along less visible areas (inner arms, back of legs). Use UV Unwrap tools to flatten the mesh into 2D space. Scale and pack UV islands efficiently to maximize texture resolution and minimize wasted space.
Apply a checker map to detect stretching or distortion and fix any issues by adjusting UVs. This step ensures your mesh is clean, optimized, and ready for animation, forming a solid base for a game-ready 3D character.
Step 4 – Texturing the Character
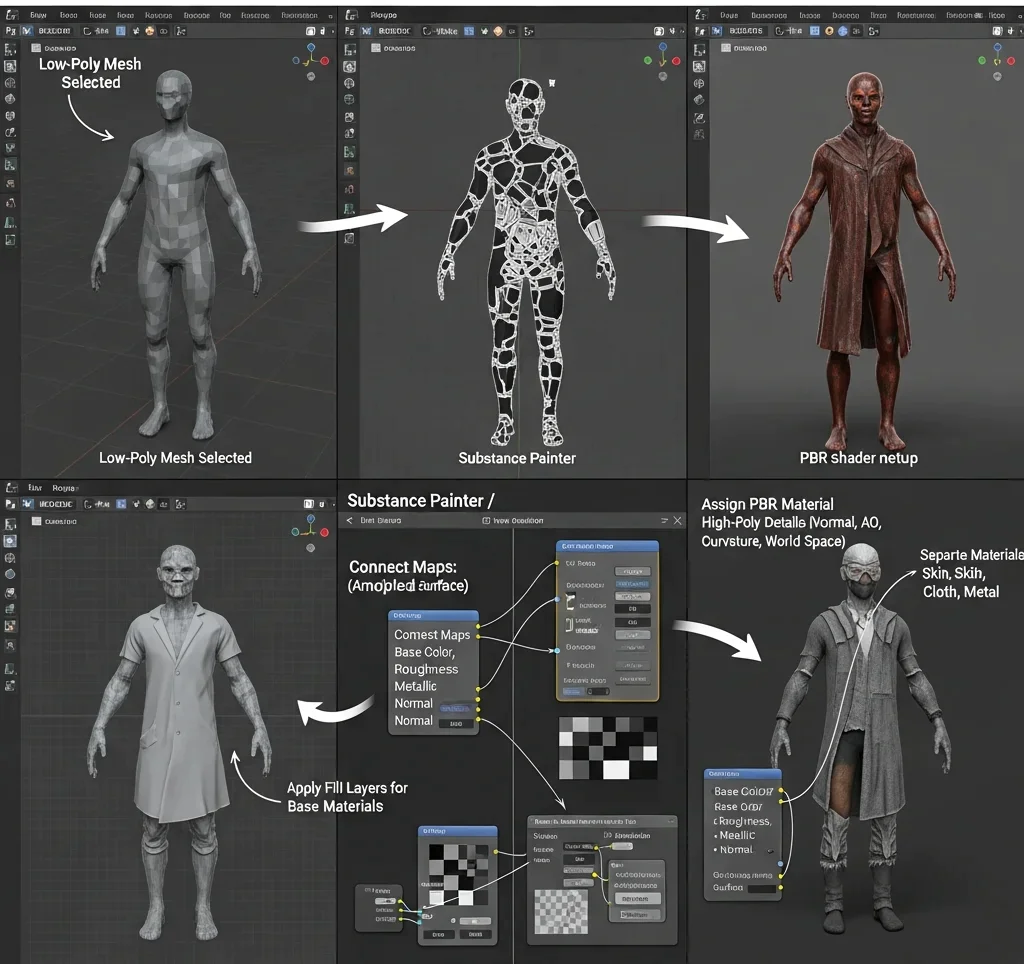
Select your low-poly mesh and assign a new material. Create a PBR shader (Principled BSDF in Blender or Arnold Standard Surface in Maya). Connect texture slots for Base Color, Roughness, Metallic, and Normal.
Export your mesh to Substance Painter (or similar) and bake maps from the high-poly model. Set the output resolution (2K or 4K), then bake Normal, Ambient Occlusion, Curvature, and World Space maps. Re-import baked maps into your project and verify there are no projection errors.
Apply base colors first using fill layers. Separate materials into distinct layers (skin, cloth, metal) and assign proper roughness values—keep metal low roughness and fabric higher. Add generators (edge wear, dirt, curvature-based masks) to introduce surface variation without breaking material consistency.
Paint manual details where needed using texture paint (seams, scratches, gradients). Keep all details aligned with the concept to maintain accuracy when building a 3D character from concept art.
Export texture maps in the correct format (PNG/TGA) and connect them back inside your 3D software. Verify shading under neutral lighting (HDRI) and adjust roughness/normal intensity if needed. This step ensures consistent material definition and prepares the asset for a game-ready 3D character pipeline.
Step 5 – Rigging the Character
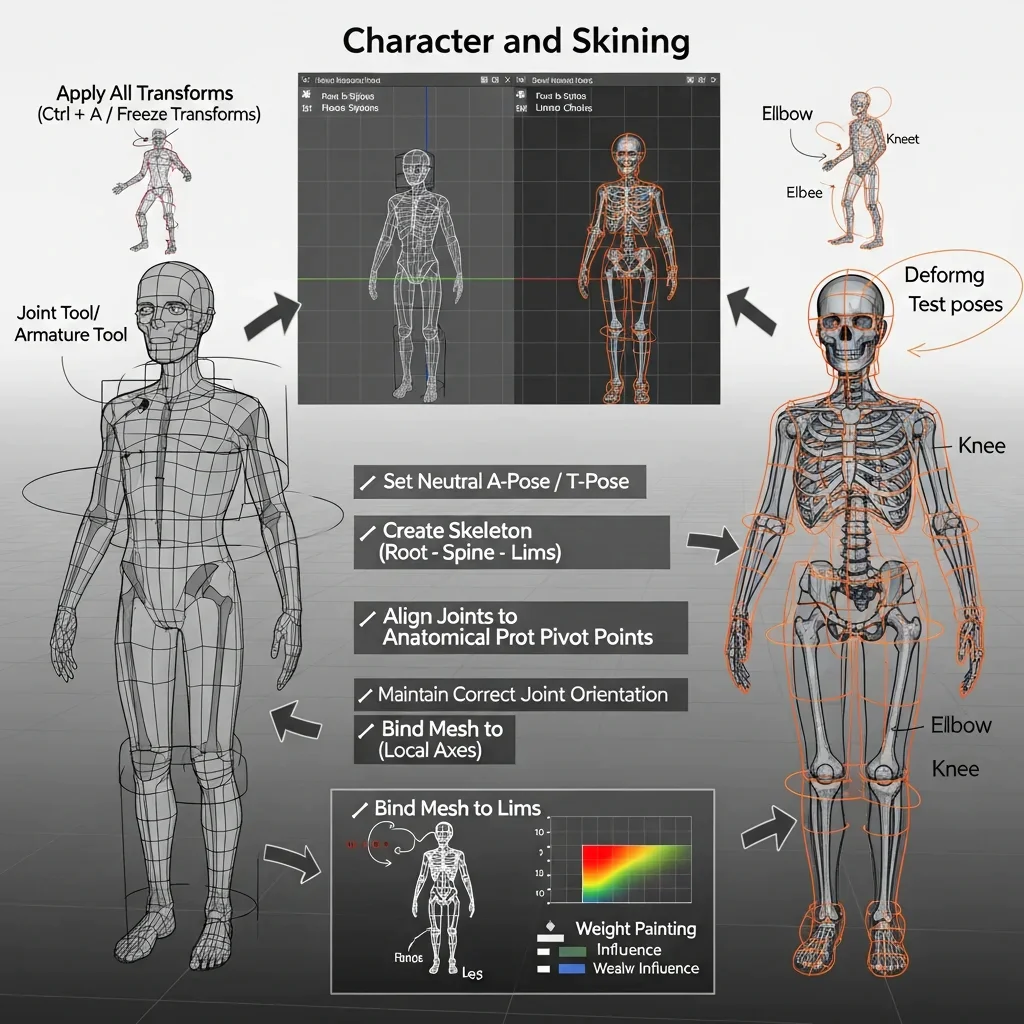
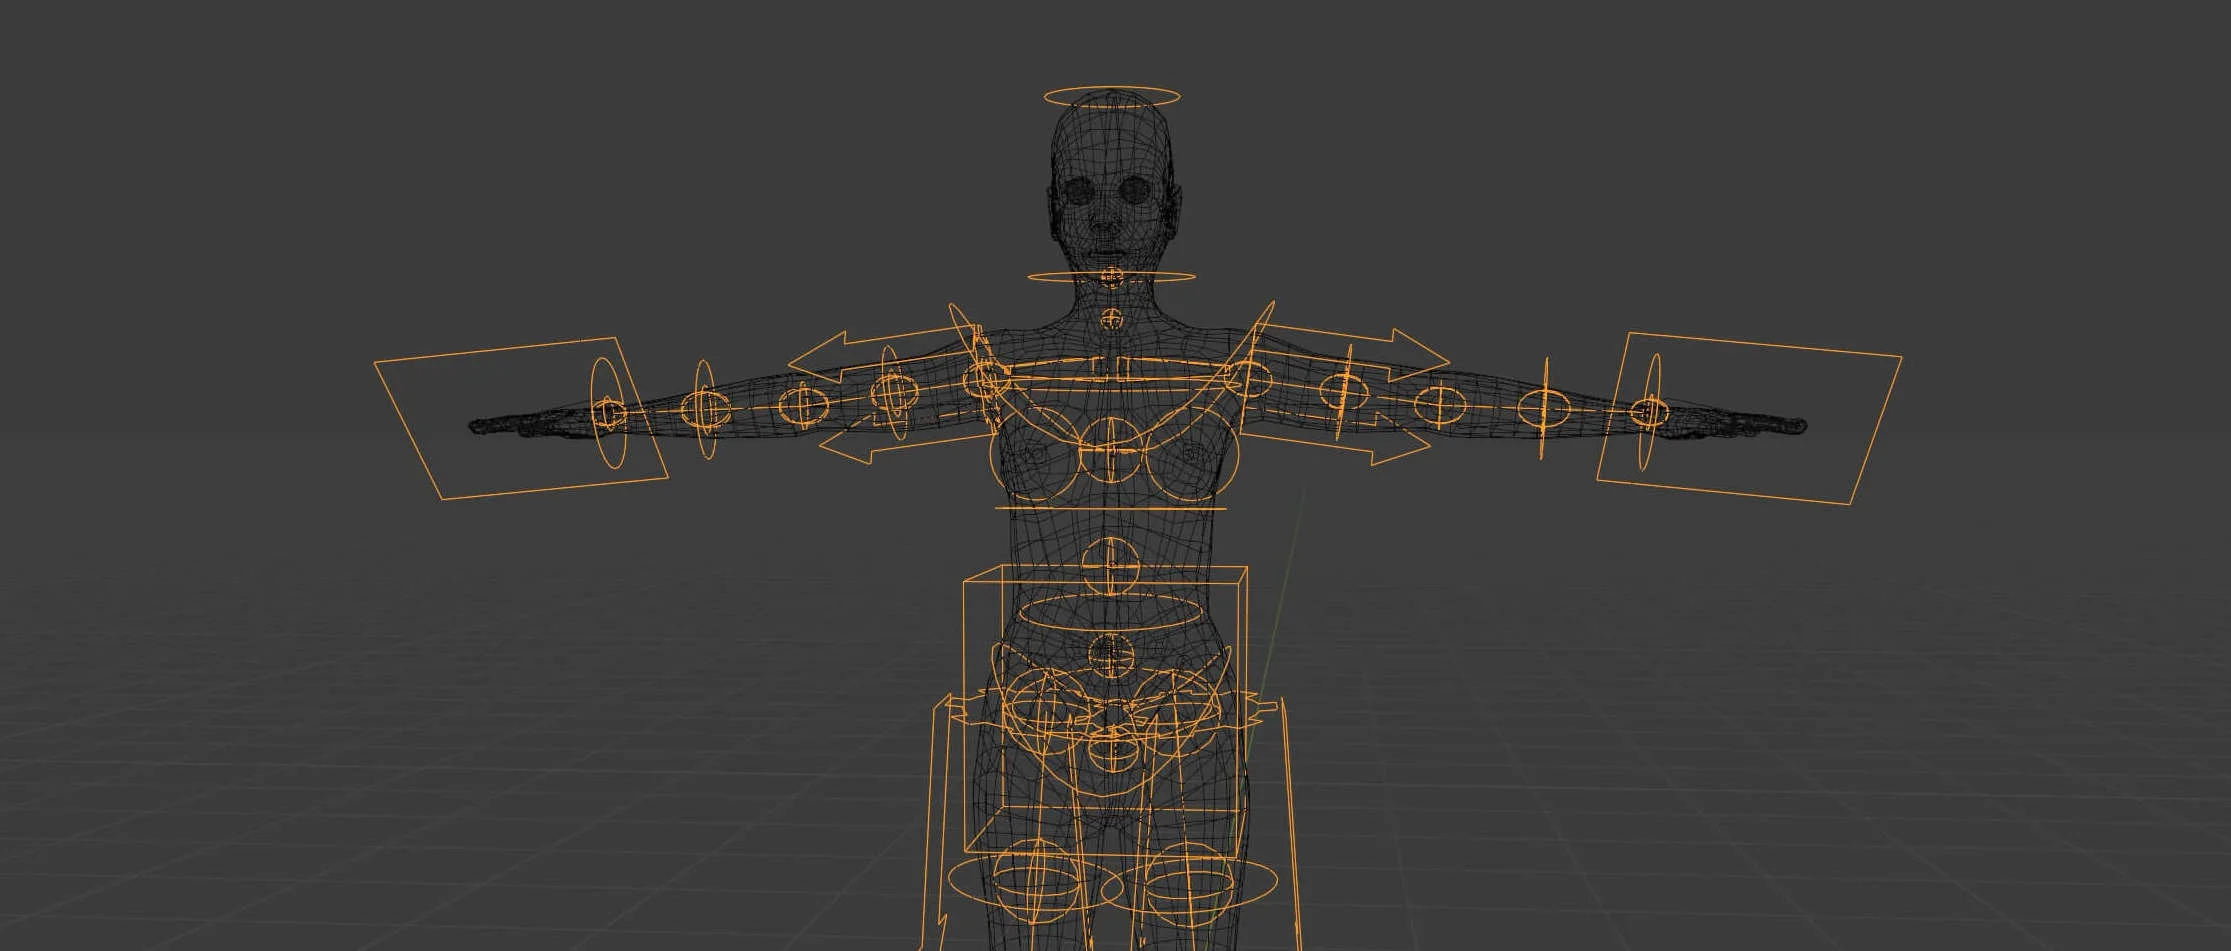
Import your finalized mesh and apply all transforms (Freeze Transformations in Maya or Ctrl + A → Apply All Transforms in Blender). Set the model in a neutral A-pose or T-pose to ensure clean deformation.
Create the skeleton (Armature in Blender or Joint Tool in Maya). Start from the root (pelvis), then build the spine chain, followed by the neck and head joints. Add limb joints (shoulder → elbow → wrist, hip → knee → ankle) and ensure all joints align precisely with anatomical pivot points. Maintain correct joint orientation (local rotation axes aligned) to avoid rotation issues later.
Bind the mesh to the skeleton using Smooth Bind (Maya) or Automatic Weights (Blender). This creates the initial skinning. Enter weight painting mode and refine vertex weights manually—ensure smooth transitions around joints and eliminate collapsing or candy-wrapper deformation.
Set up control rigs for animation. Add IK chains for legs and arms (IK Handle in Maya or Inverse Kinematics constraint in Blender) and create FK controls for manual rotation. Implement IK/FK switching where needed for flexibility. Add controllers (curves or custom shapes) and organize them into a clean hierarchy.
Test the rig by posing all major joints—bend elbows, knees, spine, and shoulders. Identify deformation issues and correct them by adjusting weights or joint placement. Lock and clean unused attributes, name all joints and controls properly, and organize the rig structure.
Step 6 – Lighting, Rendering & Presentation
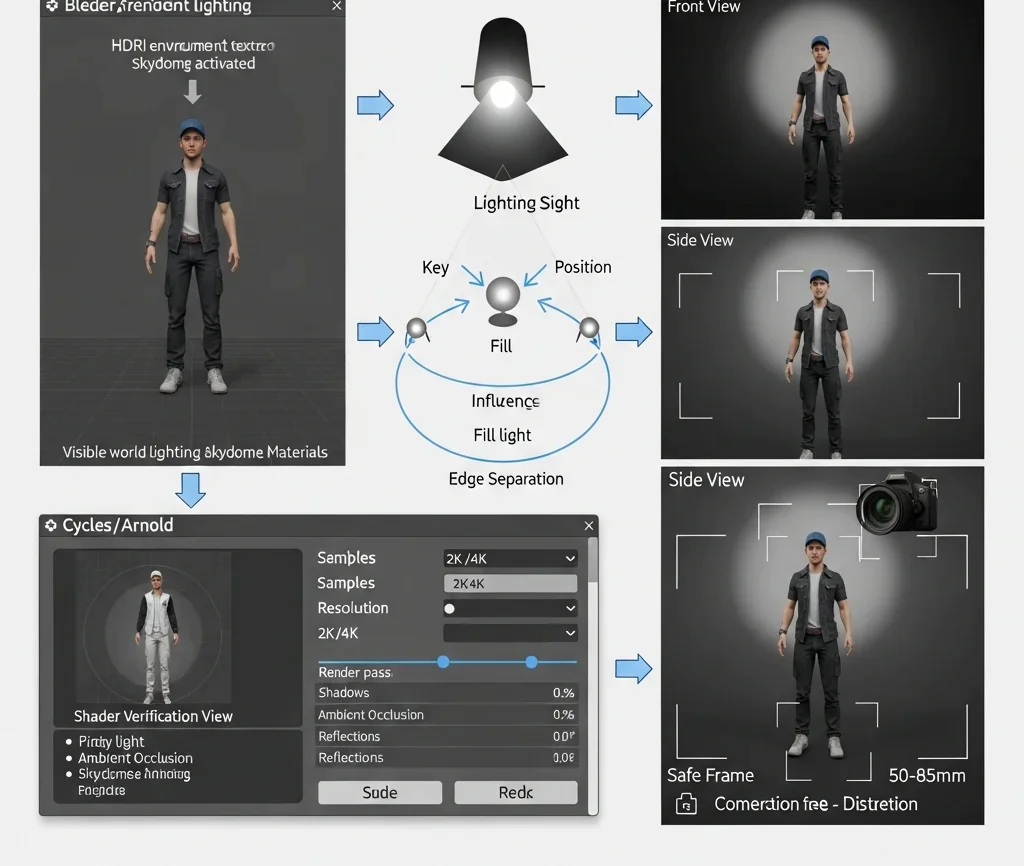
Open your scene and switch to the rendering workspace (Cycles in Blender or Arnold in Maya). Add an HDRI environment (World Settings → Environment Texture in Blender, or Skydome Light in Maya) to establish base lighting. Then set up a three-point lighting system: key light (main direction), fill light (softens shadows), and rim light (separates the silhouette).
Position the camera (Ctrl + Alt + 0 in Blender or Create Camera in Maya) and frame the character at eye level. Use a focal length between 50 and 85mm to avoid distortion. Lock the camera once framing is approved.
Apply final shaders and verify texture connections (Base Color, Roughness, Normal, Metallic). Adjust roughness values under lighting to ensure materials respond correctly. Enable subdivision (if required) for render smoothing without affecting the base mesh.
Set render quality (samples, resolution 2K/4K) and enable passes like Ambient Occlusion, Shadow, and Reflection for better control in post-processing. Render multiple angles—front, side, and 3/4 view—to fully present the model.
Finally, export high-quality images (PNG or EXR) and organize them for portfolio or client delivery. This step presents your work professionally and completes the visual output of your 2D to 3D character workflow.
Step 7 – Optimization & Export
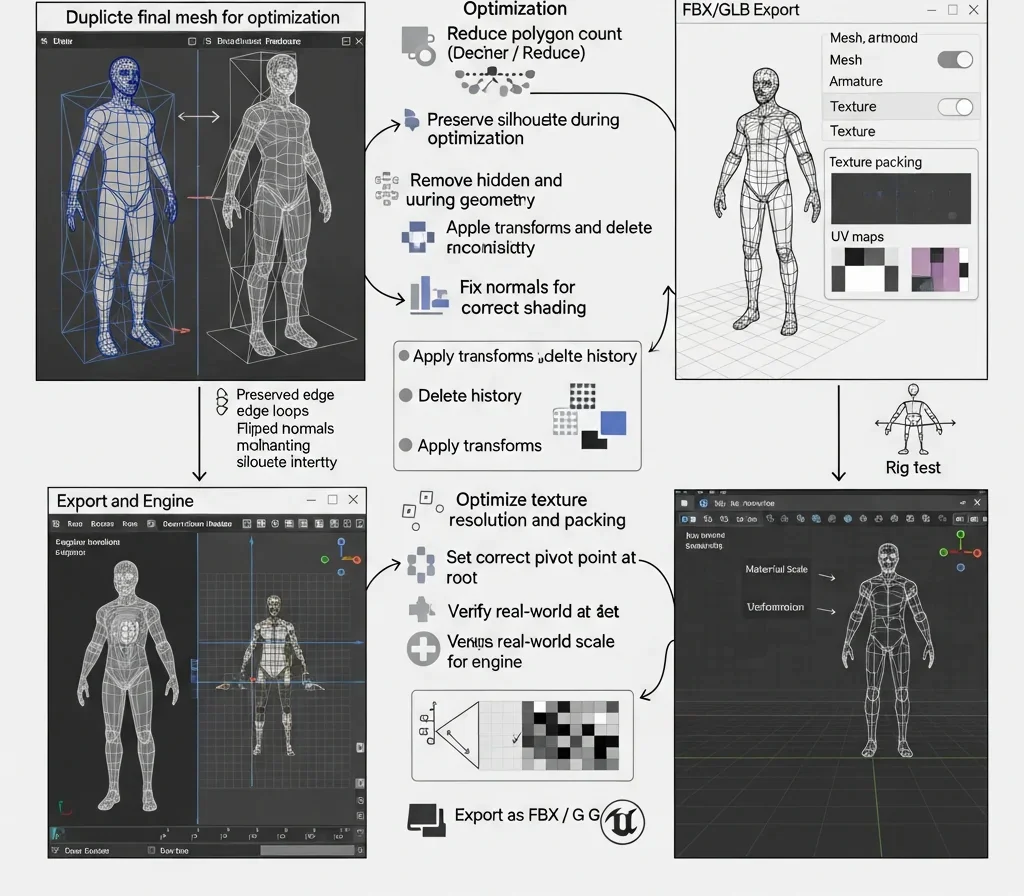
In this final step, optimize and export your character for production use. Duplicate the final mesh and reduce polygon count using tools like Decimate (Blender) or Reduce (Maya), while preserving the overall silhouette. Remove hidden or unnecessary geometry to improve performance. Apply all transforms, delete history, and fix normals to ensure clean shading. Next, optimize textures by adjusting resolution and packing maps efficiently based on engine requirements. Set the correct pivot point and ensure proper scale before export. Export the asset in FBX or GLB format with mesh, armature, and textures correctly configured. Finally, import the model into your target engine (Unity or Unreal) and test materials, scale, and deformation to confirm it works as a game-ready 3D character within a complete 2D to 3D character workflow.
AI vs Manual 2D to 3D Workflow
Use AI when you need speed. It can quickly convert a 2D sketch to a 3D model, making it useful for rough prototypes or early concept testing. However, expected cleanup AI often produces poor topology and weak structure, which can break during the character rigging process.
Use manual workflow when you need control and quality. You build clean topology, accurate forms, and proper materials from the start. This approach takes more time but delivers a stable, game-ready 3D character.
Best approach: use AI for a base, then refine manually to meet production standards in a complete 2D to 3D character workflow.
How to Use AI to Convert a 2D Sketch into a 3D Model
Prepare your input first. Clean the sketch, fix proportions, and export a high-resolution PNG with a clear silhouette and minimal background noise. If possible, generate or draw a side view to improve depth accuracy.
Open an AI 2D to 3D tool (e.g., Luma AI, Meshy, Spline AI, or similar). Upload your image and select the image-to-3D or character generation mode. Set generation parameters such as style (realistic/stylized), mesh density, and symmetry. Run the generation and export the result as an OBJ or FBX.
Import the generated mesh into Blender or Maya. Inspect the model for topology issues and look for stretched faces, holes, and uneven edge flow. Apply Remeshing (Voxel Remesh in Blender) to stabilize geometry, then rebuild clean topology manually over the mesh. This step is required to make the model usable in a proper 2D to 3D character workflow.
Recreate UVs by marking seams and unwrapping the mesh. Bake maps (Normal, AO) from the AI mesh if it contains usable detail. Then rebuild materials using a PBR workflow and match them to your original concept.
Finally, set up a basic rig and test deformation. Most AI outputs are not rig-ready, so adjust topology and weights as needed. This process lets you quickly convert a 2D sketch to a 3D model using AI, then refine it into a clean, usable asset.
Best Tools for 2D to 3D Character Creation
The best tools for 2D to 3D character creation combine AI systems with professional 3D software to complete the full production pipeline efficiently. You can use Blender for modeling, sculpting, UV mapping, rigging, and rendering because it provides an all-in-one workflow for turning 2D concepts into fully functional 3D characters. Studios also rely on Autodesk Maya for advanced rigging and animation, while ZBrush is used for high-detail sculpting to refine forms and add realistic surface detail after the base model is created.
Modern workflows also use AI tools to speed up the initial stage of production. Tools like Kaedim, Meshy AI, and Rodin convert 2D sketches or prompts into quick 3D base meshes, which you then clean and refine in Blender or Maya to fix topology, proportions, and animation readiness. This hybrid approach helps you move faster while still maintaining professional-quality results through manual control and technical refinement.
Conclusion
The 2D to 3D character workflow follows a clear production pipeline: you start with a clean concept, build a structured 3D model, refine topology through retopology, develop accurate UVs, apply PBR textures, and finish with proper rigging, animation testing, and export. Each stage builds on the previous one, so skipping any step leads to weak deformation, poor shading, or animation issues.
The most effective modern approach is a hybrid workflow that combines AI and manual control. AI tools help you quickly generate base meshes and speed up early blocking, while manual work in Blender, Maya, or ZBrush ensures clean topology, correct proportions, and production-ready rigging. This balance gives you both speed and quality without sacrificing technical standards.
If you want to improve, focus on consistency and practice the full pipeline instead of isolated steps. Start with simple characters, apply the workflow correctly, and refine your technical skills with every project. Over time, you will be able to turn any 2D concept into a fully rigged, animation-ready 3D asset with confidence.
