
How to Render 360° Product Views for E-Commerce
Poor product visuals can make online shoppers hesitate, especially when they cannot see the product’s shape, texture, finish, or side details clearly. For e-commerce brands, 3D artists, and product marketers, a 360° product view for e-commerce helps buyers inspect the product from every angle before they decide.
This tutorial explains how to render 360° product views in a practical way, from creating a realistic product spin to preparing it for an online store. It focuses on clean visuals, smooth rotation, fast loading, and a better shopping experience without making the process complicated.
Before You Render: Choose the Right 360° Product View Format
Before you start rendering, choose the format that fits your product and e-commerce store. This step matters because the format affects image quality, loading speed, mobile performance, and how shoppers interact with the product.
For most online stores, a 360° image sequence works best. In this method, you render the product from different angles and combine those frames into a smooth spin. It works well for clothing, accessories, electronics, furniture, tools, packaging, and other products where buyers need a clear view from all sides.
An interactive 3D model viewer gives shoppers more control. They can rotate, zoom, and sometimes view the product in AR. This format is useful for products with complex shapes, customization options, or size-related details. However, it needs better optimization because heavy 3D files can slow down the product page.
For a beginner-friendly e-commerce workflow, start with a rendered image sequence. It gives you more control over lighting, materials, angles, and final quality. It also works with many 360° product viewer plugins, so you can add it to Shopify, WooCommerce, or a custom product page more easily.
Image Sequence 360° Spin
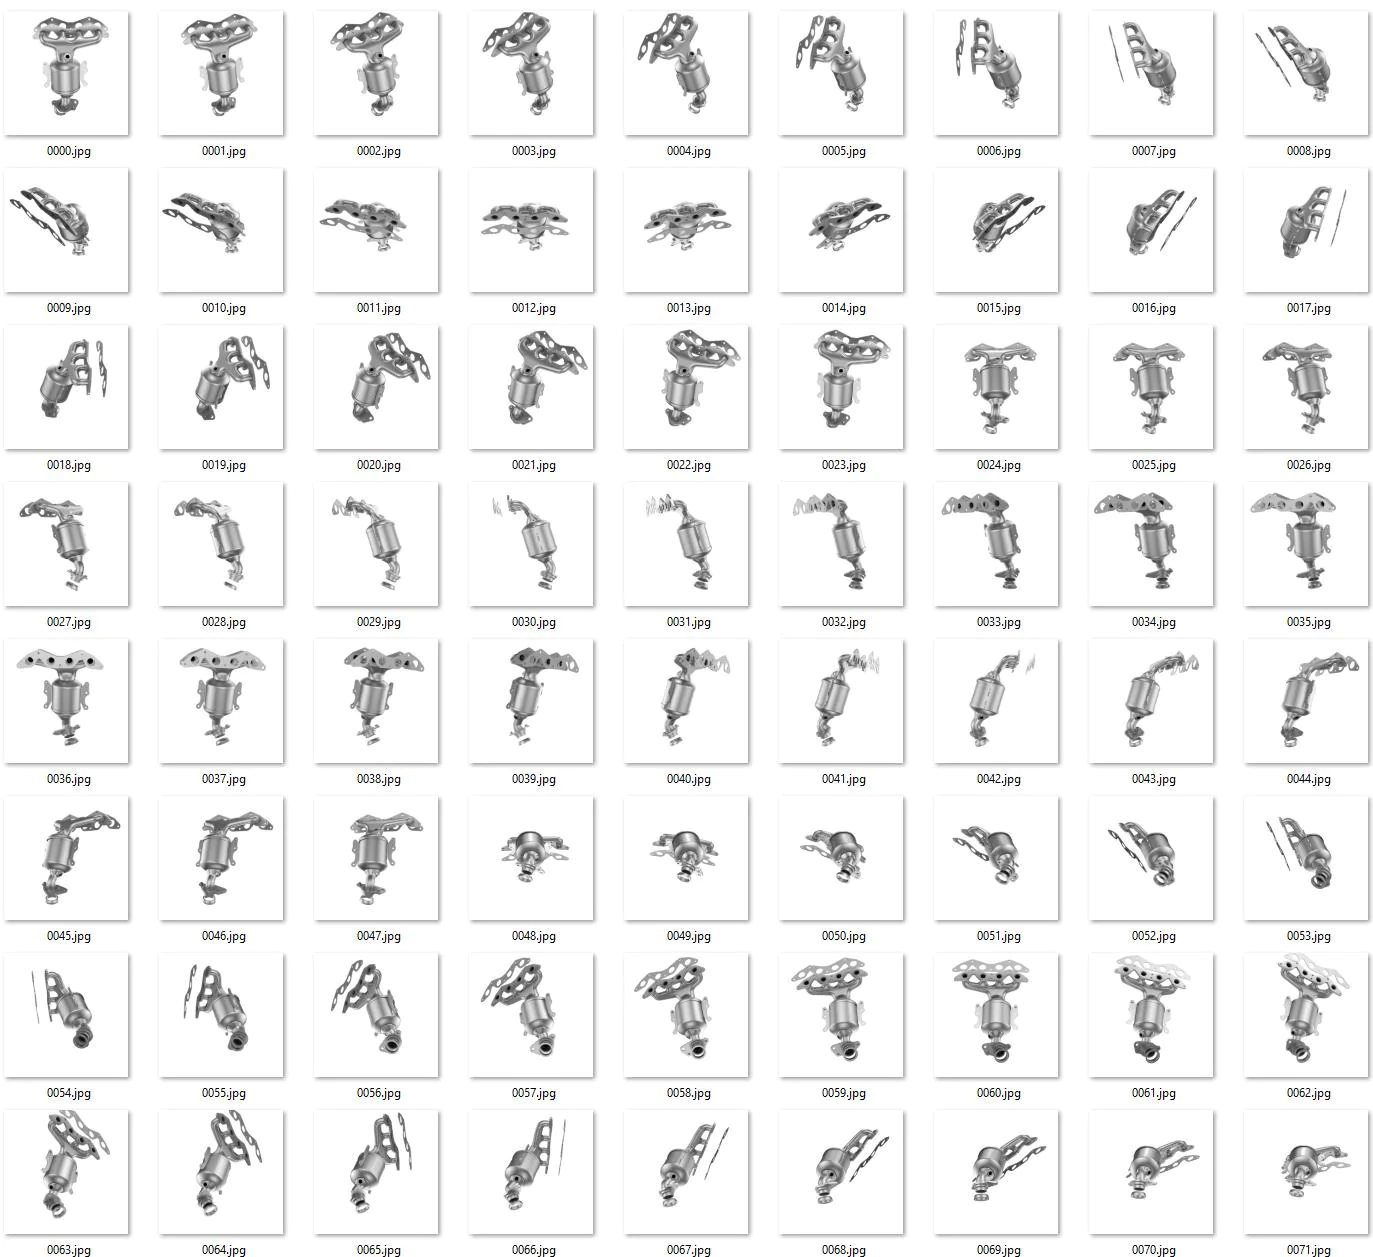
An image sequence is the safest format for most e-commerce 360° product views. In this method, you render the product from multiple angles and turn those frames into an interactive spin. Most 360° spins use frame sets like 24, 36, or 72 images; more frames create smoother rotation, but they also increase file size and loading time.
Use this format when you want full control over lighting, camera angle, background, and final image quality. It works well for products such as shoes, bags, electronics, furniture, bottles, jewelry, tools, and packaging.
For a clean e-commerce result:
- Render every frame with the same lighting and camera position.
- Keep the product centered in each frame.
- Use 24 frames for a basic spin, 36 frames for a balanced store view, and 72 frames for premium detail.
- Name the files in the correct order, such as product-001, product-002, and product-003.
- Compress the final images before uploading so the product page loads faster.
This format works best when you want a smooth 360° product view without making the website too heavy.
Interactive 3D Model Viewer
An interactive 3D model viewer lets shoppers rotate, zoom, and inspect the product directly on the page. Instead of showing many rendered images, this format loads a 3D file, such as a GLB or USDZ model, inside a web viewer. Tools like <model-viewer> support interactive 3D models on desktop and mobile, and they can also support AR on compatible devices.
Use this format when your product needs deeper interaction. It works well for furniture, shoes, gadgets, home decor, custom products, and items where buyers may want to check scale, depth, or small design details.
For a clean e-commerce result:
- Keep the 3D model lightweight before uploading.
- Use compressed textures to improve loading speed.
- Check the model on both desktop and mobile.
- Use simple controls so shoppers can rotate and zoom easily.
- Add AR only when it helps the buyer understand the product better.
This format gives shoppers more freedom, but it needs careful optimization. A heavy model can slow down the product page, so use it only when interactivity adds real value.
Best Format for E-Commerce Product Pages
- Choose a 360° image sequence for most e-commerce stores.
- It gives you better control over the product’s final look, including lighting, background, angle, color, and material finish.
- It works well for Shopify, WooCommerce, custom websites, and most 360° product viewer plugins.
- Use 36 frames for a balanced product spin. It looks smooth and keeps the page lighter.
- Use 24 frames if you want a basic 360° view with faster loading.
- Use 72 frames only for premium or detailed products because it creates smoother movement but increases file size.
- Choose an interactive 3D model viewer when the product needs more user control, such as zoom, free rotation, AR preview, or customization.
- Use 3D model viewers for products like furniture, shoes, gadgets, home decor, and customizable items.
- Avoid heavy 3D files if your store already loads slowly. A slow product page can hurt the shopping experience.
- For beginners, start with an image sequence because it is easier to render, optimize, upload, and test.
- The best format is the one that shows the product clearly, loads fast on mobile, and helps shoppers understand the item before buying.
Tools You Need to Render 360° Product Views
You do not need a large production setup to render a 360° product view. You need the right tools for three main jobs: creating the product render, preparing the product file, and showing the final spin on your e-commerce store.
For rendering, you can use software like Blender, 3ds Max, KeyShot, or Cinema 4D. Blender is a strong choice for beginners because it supports modeling, animation, rendering, and the full 3D workflow in one free tool. 3ds Max also works well for professional product rendering because it offers strong modeling, texturing, animation, and render control.
You also need a clean product model or CAD file before rendering. A messy model can create wrong shadows, broken edges, bad reflections, or uneven rotation. For better product detail, tools like Adobe Substance 3D can help you create realistic textures, materials, decals, and surface details.
After rendering, you need a 360° product viewer to display the final result on your store. For image-based spins, WooCommerce has 360° image tools that let you add a group of images to a product gallery and turn them into a controllable rotation. For interactive 3D models, <model-viewer> can display 3D files on the web and also support AR on compatible devices.
For most e-commerce projects, start with a simple setup: one 3D rendering tool, one clean product model, and one 360° viewer for your website. This keeps the workflow easy to manage and helps you create a smooth product view without slowing down the store
3D Rendering Software
- Choose software that gives you strong control over camera angle, lighting, materials, rotation, and frame export.
- For beginners, Blender is a good starting point because it supports modeling, animation, rendering, and the full 3D workflow in one tool. It also includes Cycles for realistic rendering and viewport preview for checking scenes before final output.
- Use KeyShot when you work with product design, CAD files, or fast product visualization. It focuses on physical product visuals and helps teams create marketing-ready product renders with quick material and lighting updates.
- Choose 3ds Max when you need advanced modeling, detailed scenes, texturing, animation, and full render control for professional product visuals.
- Use Cinema 4D when your workflow needs product animation, motion graphics, clean scene setup, and flexible rendering options.
- Do not choose software only because it is popular. Check whether it can create a turntable animation, keep the camera fixed, render frames in order, export high-quality images, and handle product materials accurately.
- For a simple e-commerce workflow, start with Blender if you want a free tool, use KeyShot if you want faster product rendering, and choose 3ds Max or Cinema 4D if you need a more advanced studio-level setup.
Product Model or CAD File
- Start with a clean 3D product model or CAD file before you render the 360° view.
- Check the product shape, edges, curves, and small parts carefully.
- Fix broken geometry, missing details, or extra objects before setting up the scene.
- Keep the model scale accurate so the product looks natural in every angle.
- Use a CAD file when you need exact product measurements, such as furniture, electronics, tools, or technical products.
- Use a 3D model when you need visual presentation, product styling, or marketing-ready renders.
- A poor model can create bad shadows, wrong reflections, uneven rotation, and low-quality product views.
- A clean model saves editing time and helps you create a smooth, realistic 360° product render.
360° Product Viewer for Website Integration
- Use a 360° product viewer to show your rendered frames on the product page.
- Choose a viewer that supports drag, swipe, zoom, and smooth rotation.
- For WooCommerce, you can use a 360° image plugin that turns product gallery images into a controllable product spin.
- For Shopify, check whether your theme supports product media like images, videos, or 3D models before adding advanced visuals.
- For custom websites, use a lightweight viewer that loads fast and works well on mobile.
- Use image sequence viewers when you have rendered frames like 001, 002, 003.
- Use a 3D model viewer when you want shoppers to rotate a real 3D file or use AR. <model-viewer> supports interactive 3D models on the web and AR on compatible devices.
- Test the viewer on desktop and mobile before publishing.
- Keep the controls simple so shoppers can rotate the product without confusion.
- A good viewer should make the product easier to inspect, not make the page slow or difficult to use.
Step 1: Prepare Your Product Model
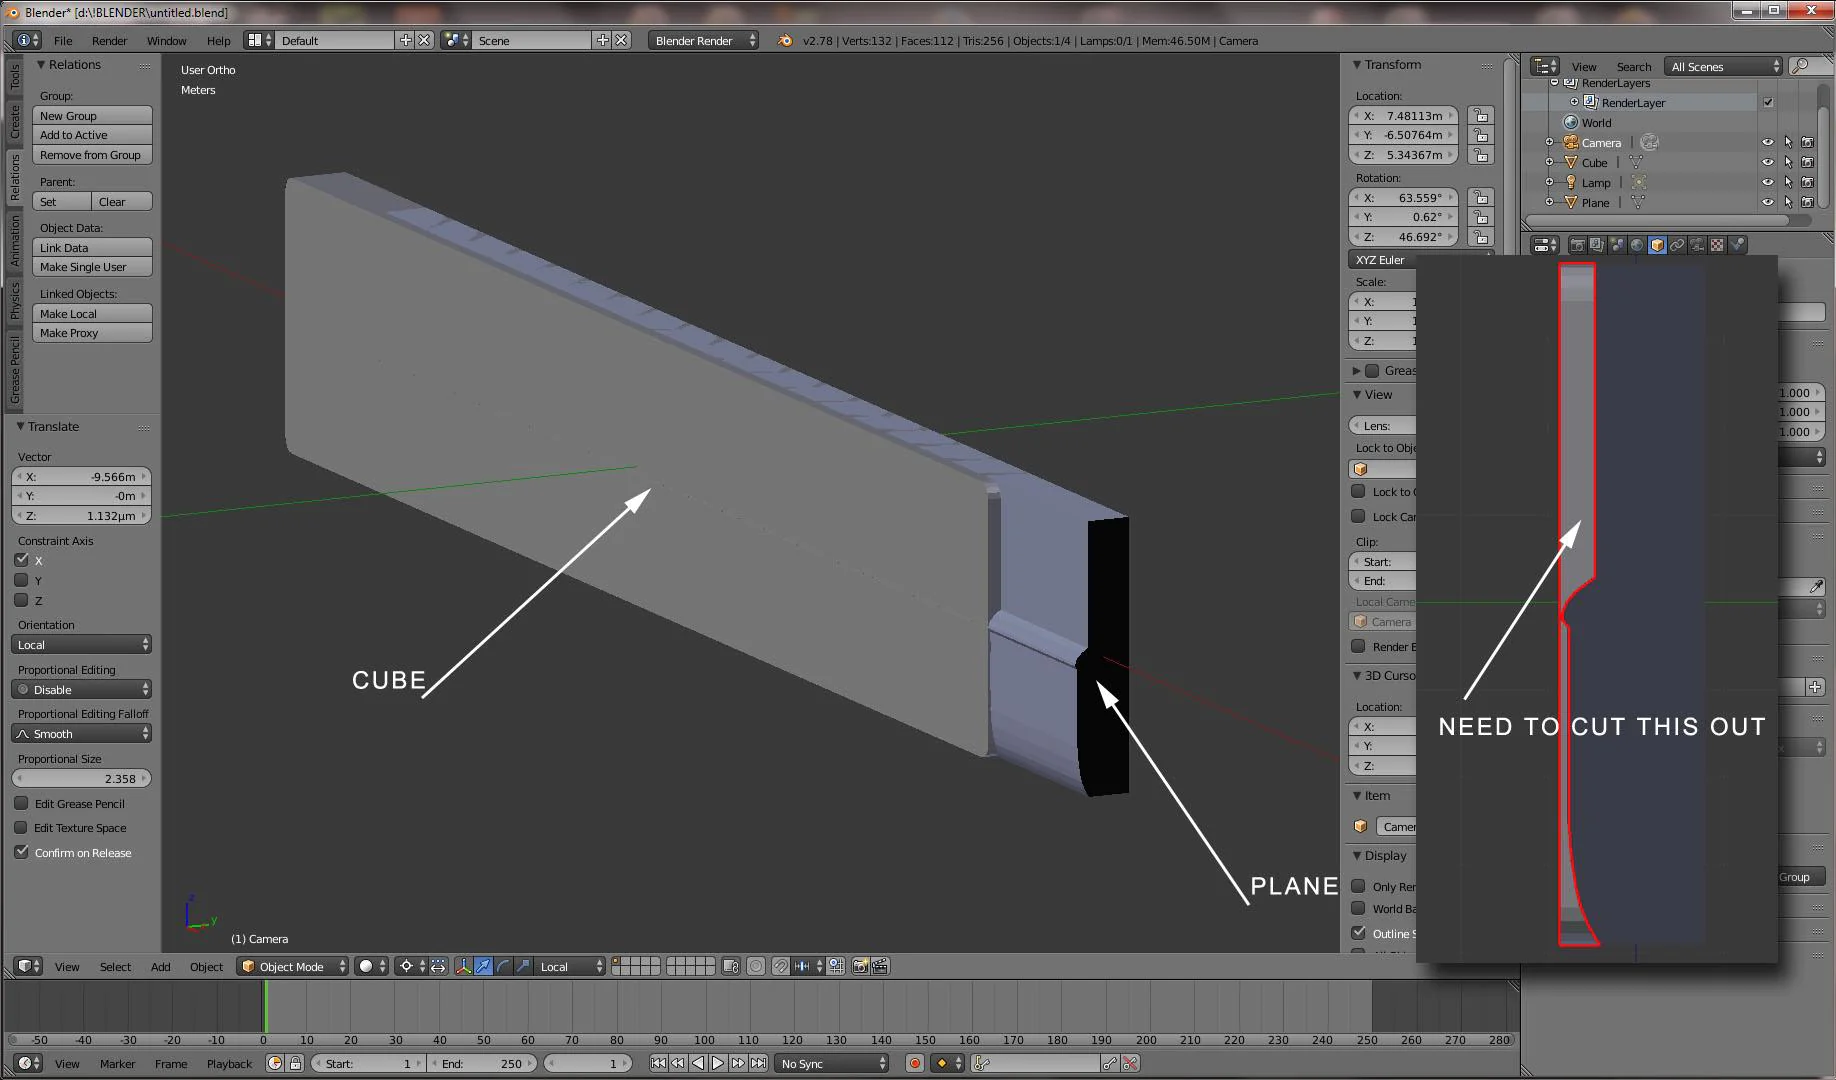
Before you render, open the product model and rotate it from all sides. Check the front, back, side, top, and bottom views. Remove any extra objects, hidden parts, duplicate pieces, or unwanted background elements from the scene. Then check the product edges, holes, curves, and small details because a 360° render will show every mistake during rotation.
Set the product pivot point in the center so it spins smoothly like a real turntable. Apply the correct scale, keep the product straight, and place it on the center of the scene grid. If the model has broken surfaces, sharp unwanted edges, missing parts, or floating pieces, fix them before moving to materials. This step makes the final 360° product view cleaner, smoother, and easier to use on an e-commerce page.
Step 2: Apply Materials and Textures
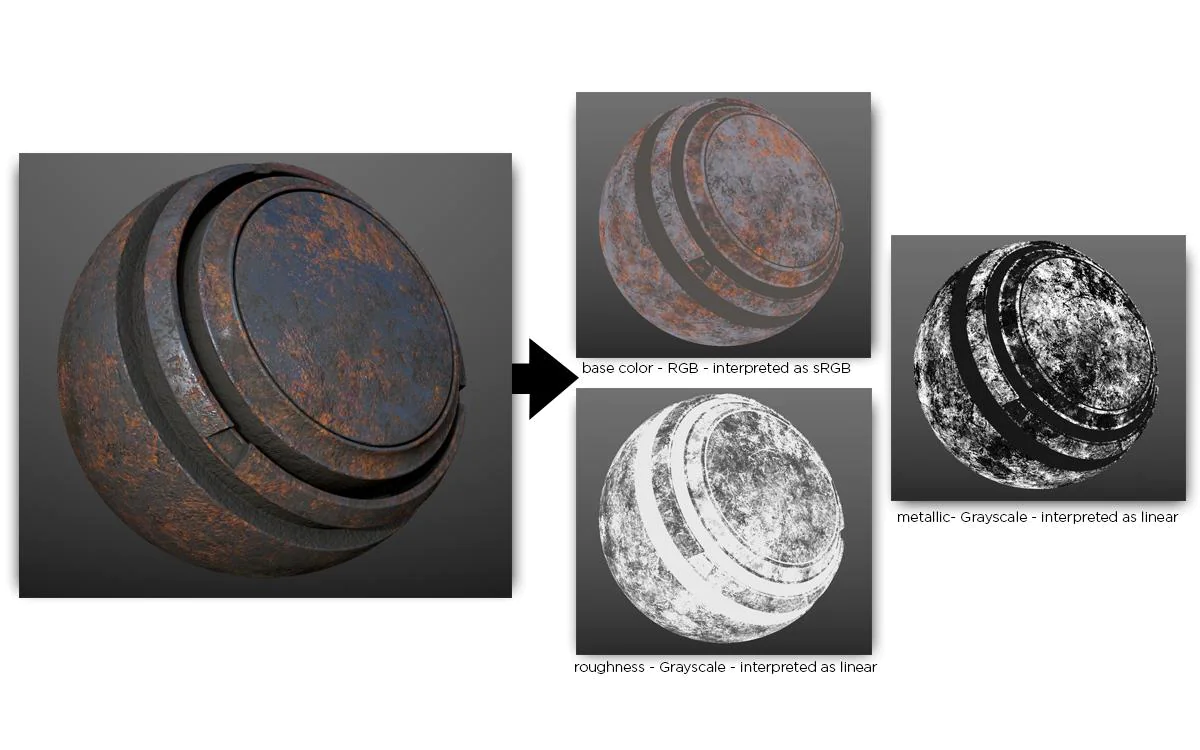
Materials decide how the product looks under light, so do not apply random colors or glossy effects. Match the material with the real product first. Check whether the item is plastic, metal, glass, leather, fabric, wood, rubber, or painted surface, then adjust the color, shine, roughness, and small texture details.
Use base color for the real product color. Use roughness to control how matte or glossy the surface looks. Use metallic only for real metal parts. Add normal or bump maps when the product has small details like fabric weave, leather grain, brushed metal lines, plastic texture, grooves, or embossed branding.
Keep the material realistic from every angle because a 360° render will expose weak textures during rotation. If the surface looks too shiny, too flat, or too clean, shoppers may not trust the product view. Test the material with light before rendering the full image sequence, and compare it with real product photos if available.
Step 3: Set Up Lighting for an E-Commerce Look
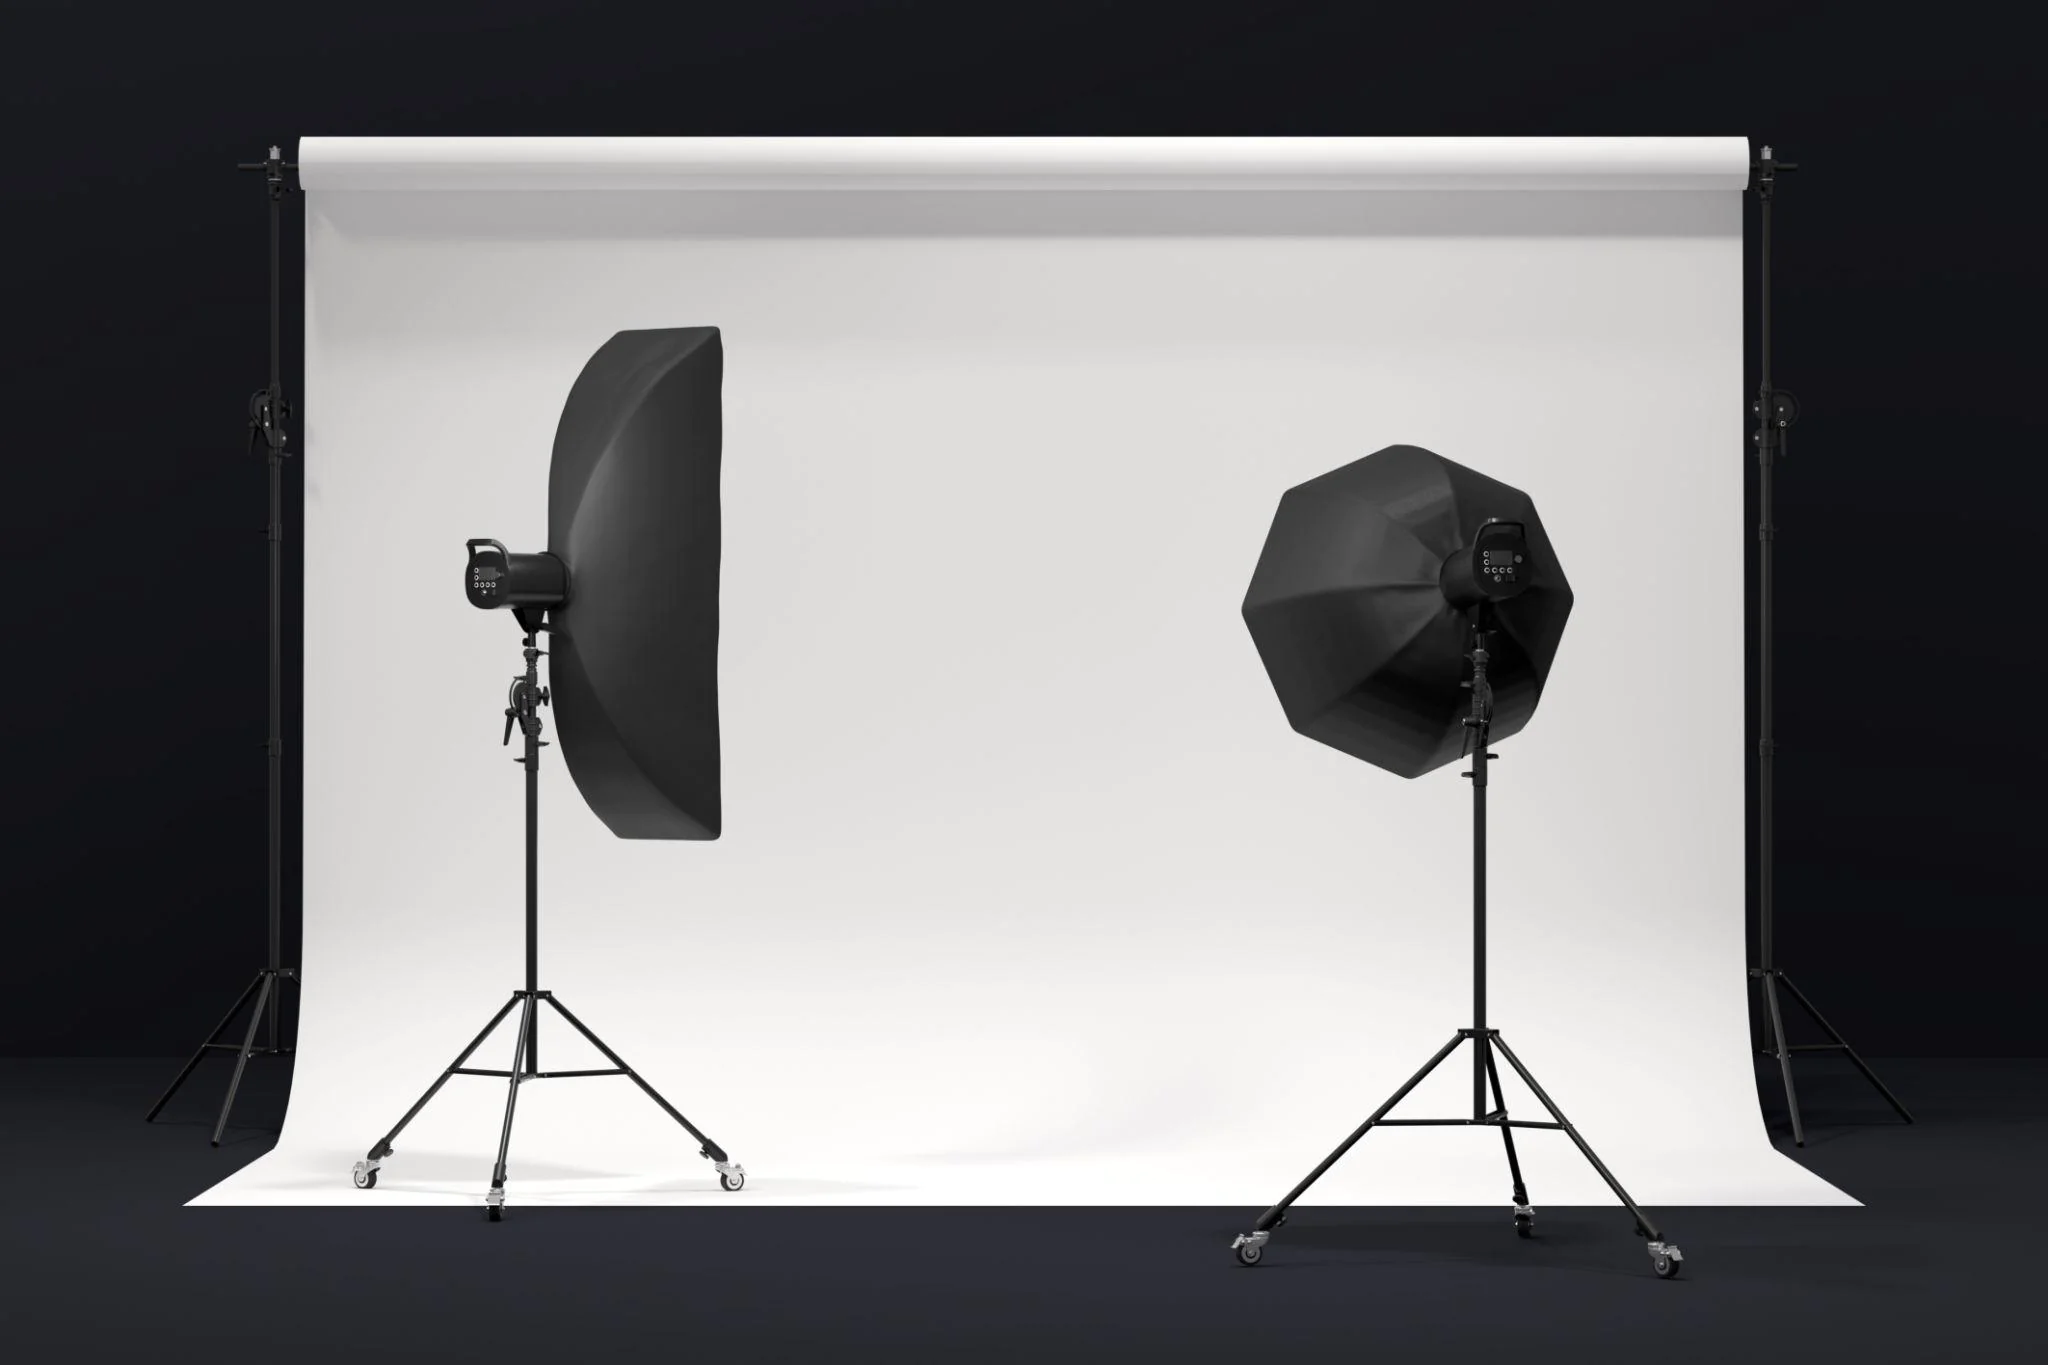
Lighting should make the product clear from every angle. Do not create a cinematic or dramatic setup here. For a 360° product view, use clean studio lighting because the product will rotate and every shadow, reflection, and dark spot will appear in the final spin.
Start with one large soft light above the product and slightly in front of it. Keep it at a 45-degree angle so the product shape looks clear without harsh shadows. If the opposite side looks too dark, add a weaker fill light on that side. Keep this fill light softer than the main light so the product still has natural depth.
Place a small back light behind the product only if the edges blend into the background. This helps separate the product from the white, gray, or transparent background. For glossy products like metal, glass, plastic, or jewelry, reduce strong highlights because bright reflections can hide product details.
Before rendering the full 360° sequence, render only four test angles: front, right side, back, and left side. Check each angle carefully. If one side looks dark, increase the fill light. If the product looks too shiny, reduce reflection or increase material roughness. If the shape looks flat, move the main light slightly higher or to the side.
Use the same lights for the full rotation. Do not move the camera or lighting during the spin. Only the product should rotate. This keeps every frame consistent and makes the final 360° product view look smooth on the e-commerce page.
Step 4: Create a 360° Turntable Animation
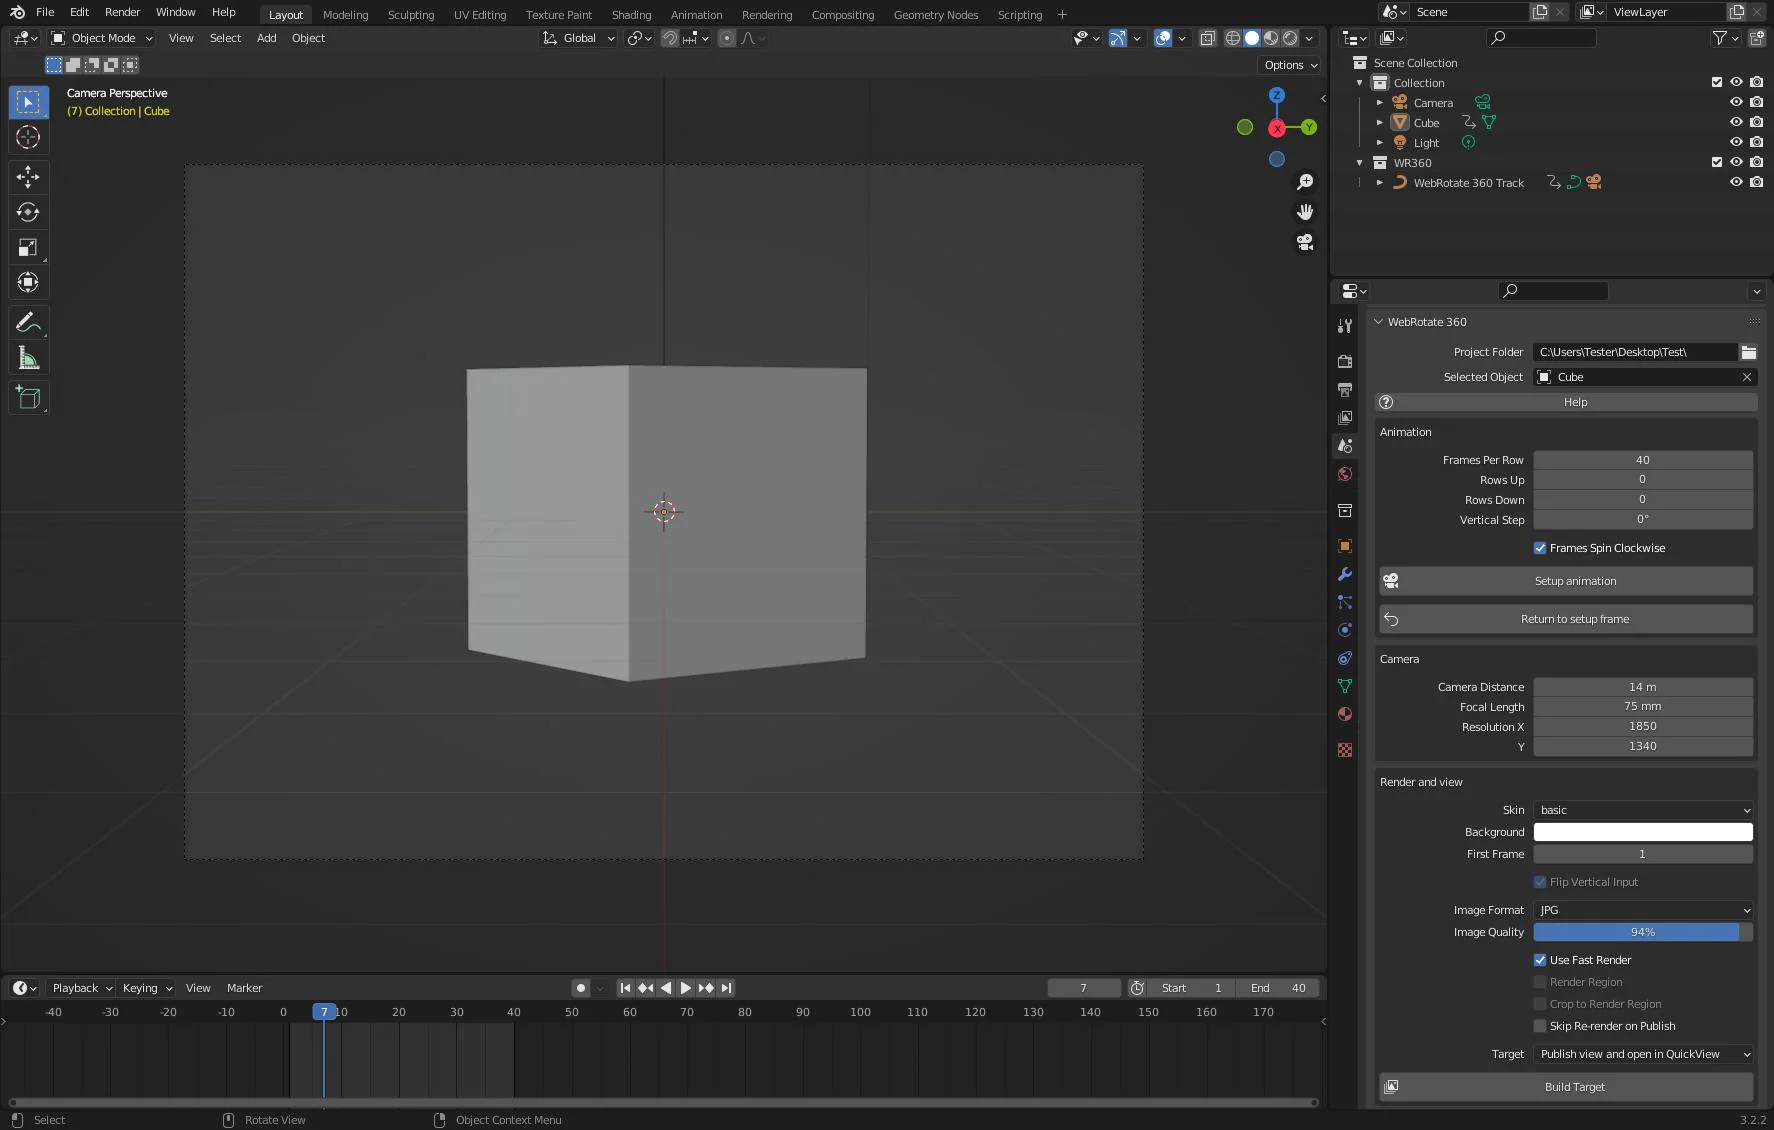
Create the 360° animation like a real product turntable. Keep the camera, lights, and background fixed. Rotate only the product around its center point. This keeps the product size, angle, and lighting consistent in every frame.
First, place the product in the center of the scene. Set its pivot point in the middle, not on the side or corner. If the pivot is wrong, the product will wobble during rotation. Then set the first frame at 0° rotation and add a keyframe. Go to the last frame, rotate the product 360° on the vertical axis, and add another keyframe. Blender uses keyframes to store object changes like rotation, and KeyShot also supports geometry keyframe animation through its animation timeline.
Use linear movement so the product rotates at the same speed from start to end. Do not use slow-in or slow-out animation because it can make the final product spin feel uneven. For most e-commerce spins, use 36 frames as a balanced option because it gives smooth rotation without making the page too heavy. Sirv also recommends 36 images for a smooth spin with acceptable loading speed.
Step 5: Choose the Right Number of Frames
Frame count controls how smooth your 360° product view feels and how fast the product page loads. Do not choose frames randomly. Match the number of frames with your product detail and website speed. For a simple product, 24 frames can work because it keeps the file size light. For most e-commerce stores, 36 frames is the best starting point because it gives a smooth spin without making the page too heavy.
Use a simple formula before rendering: 360 ÷ total frames. If you use 24 frames, rotate the product by 15° for each frame. If you use 36 frames, rotate it by 10°. If you use 72 frames, rotate it by 5°. This keeps every angle equal and makes the final spin look smooth.
Only use 72 frames when the product has premium details, such as jewelry, shoes, furniture, electronics, or luxury items. More frames create a better viewing experience, but they also take more time to render, optimize, and upload. For a normal product page, start with 36 frames, test the spin on mobile, and make sure the product stays centered from the first frame to the last.
Step 6: Render the 360° Image Sequence
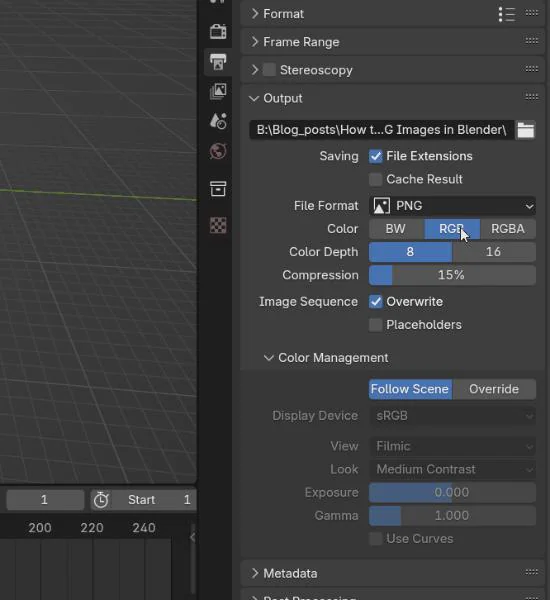
Render your 360° product view as separate image frames, not as a video. Most e-commerce 360° viewers work better with an ordered image sequence because they can load each angle and let shoppers drag or swipe the product smoothly. Before rendering, create a separate folder for all frames and name it clearly, such as product-name-360-frames. Choose your frame count based on the quality you need: use 24 frames for a basic spin, 36 frames for a smooth e-commerce view, and 72 frames for premium product detail.
Keep every frame in the correct order, such as product-001.png, product-002.png, and product-003.png. Use PNG if you need high quality or a transparent background. Use JPEG if the background is white or gray and you want smaller file sizes. Render a few test angles first, such as the front, side, and back. Check the product position, shadows, reflections, color, and edges before starting the full render. Once all frames are complete, review the folder and remove any blank, broken, duplicate, or wrong frame. A clean image sequence helps the 360° viewer run smoothly and prevents jumps during rotation.
Step 7: Optimize Images for Fast Loading
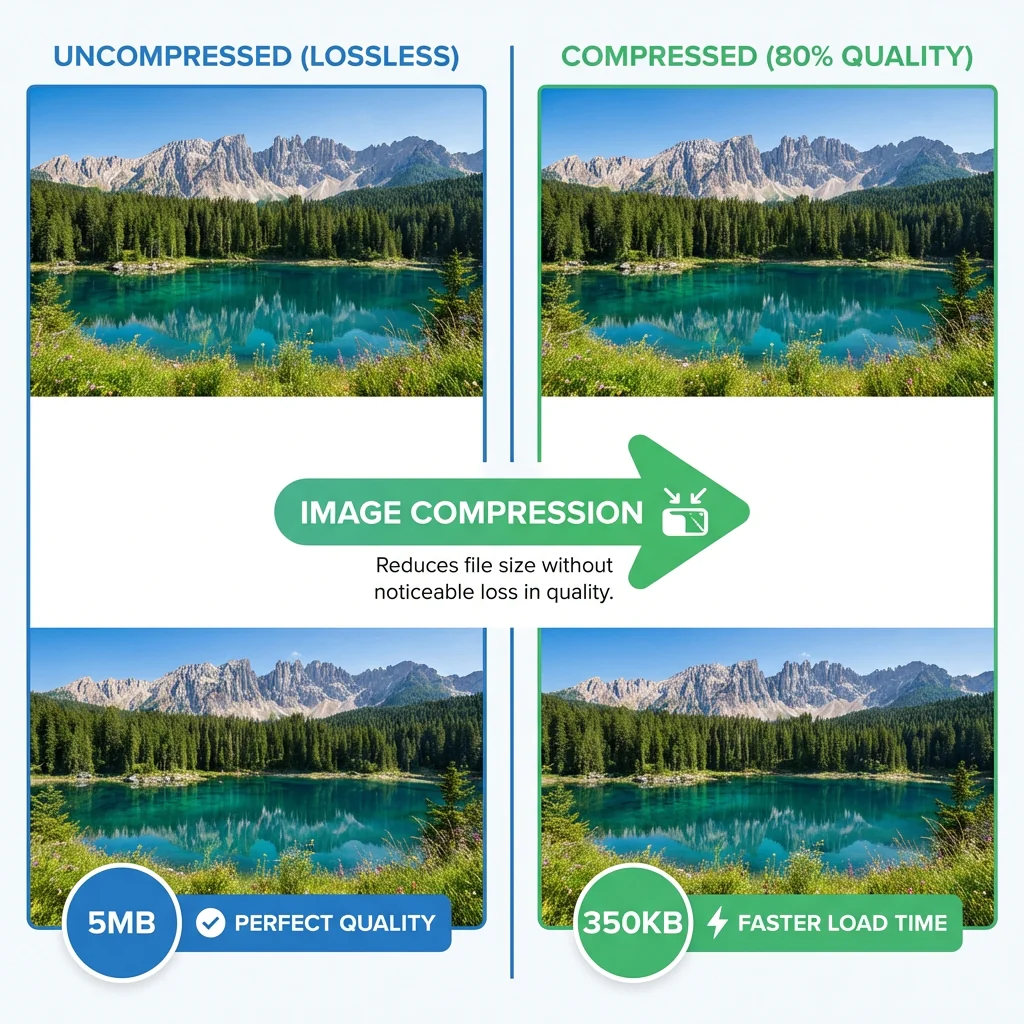
After rendering the 360° frames, optimize them before uploading them to your store. A product spin uses many images, so large files can slow down the product page, especially on mobile. Resize every frame to the exact size your 360° viewer needs, then compress the images without making the product blurry. Keep all frames the same width, height, crop, and background so the spin looks smooth.
Use WebP when your viewer supports it because it keeps good quality with smaller file sizes. Use PNG for transparent backgrounds and JPEG for white or light gray backgrounds. After compression, check important details like logos, labels, edges, texture, and product color. Then test the final 360° view on desktop and mobile. The product should rotate smoothly, load quickly, and stay clear enough for shoppers to inspect before buying.
Step 8: Add the 360° Product View to Your E-Commerce Store
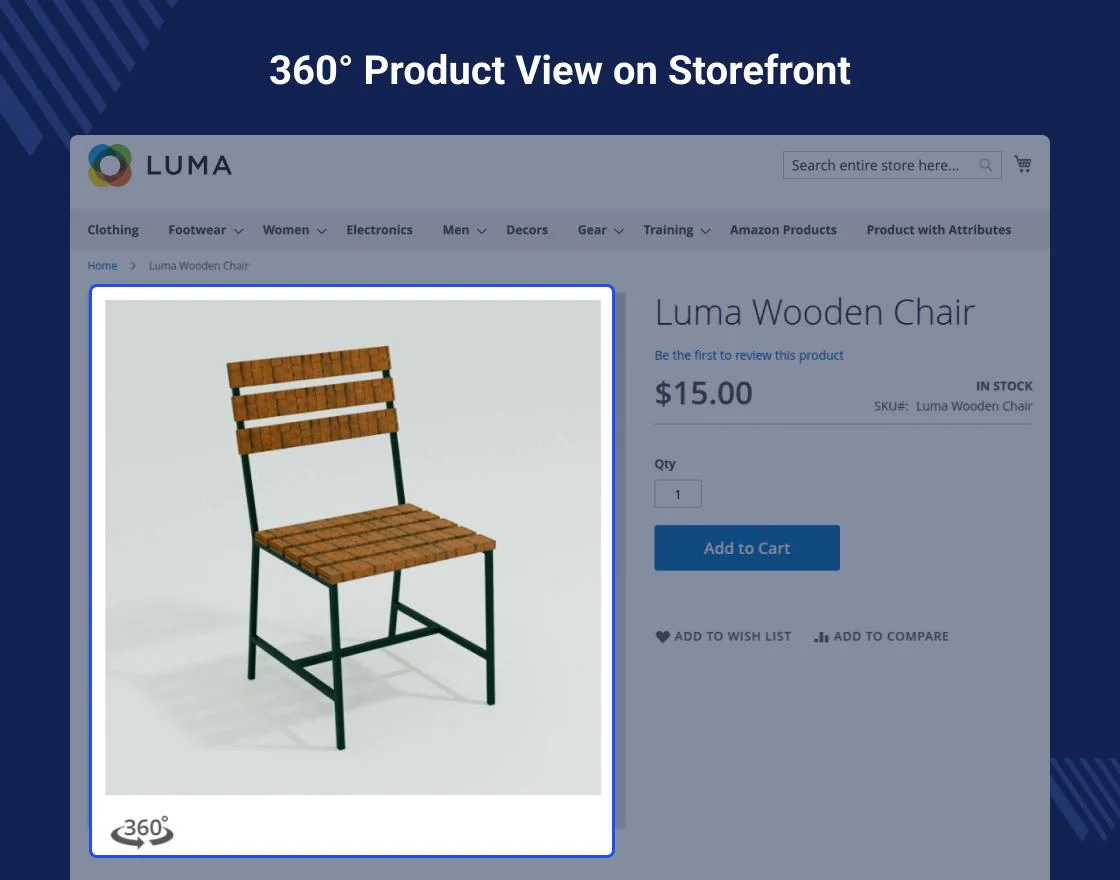
After you optimize the frames, upload them to your e-commerce store through a 360° product viewer. Keep the image order correct because the viewer reads the frames one by one to create a smooth spin. For WooCommerce, you can use a 360° image tool that turns a group of product gallery images into a controllable rotation. For Shopify, first check whether your theme supports the product media type you want to use, because Shopify supports images, videos, and 3D models on product pages.
Add the first frame as the main preview image so shoppers understand that the product can rotate. Then enable simple controls such as drag, swipe, and zoom. Test the product page on desktop and mobile before publishing. If the spin jumps, check the file order. If the page loads slowly, compress the frames again or reduce the image size. If you use an interactive 3D model instead of image frames, tools like <model-viewer> can display 3D models on the web and support AR where available
Why 360° Product Renders Improve E-Commerce Experience
360° product renders improve the shopping experience because they reduce doubt. Online buyers cannot touch the product, turn it in their hands, or check the back, sides, edges, texture, and finish like they can in a physical store. A 360° view gives them more visual control, so they can inspect the product before making a decision.
This matters most for products where shape, material, size, and small details affect the purchase. For example, jewelry, shoes, furniture, electronics, bags, tools, packaging, and home decor need more than one flat image. A clear 360° product render helps shoppers understand what they are buying and reduces confusion on the product page.
Interactive product visuals can also support buyer confidence. BigCommerce shared survey data showing that 66% of shoppers said 3D configurators increased their purchase confidence, and 60% were more likely to buy when products were shown in 3D or AR. Shopify also reported that shoppers who interacted with a 3D model were 44% more likely to add a product to cart and 27% more likely to place an order than those who did not.
For e-commerce stores, the real value is simple: a 360° product render makes the product page more useful. It helps buyers see the item clearly, compare details faster, and feel more confident before checkout. When the render loads quickly and looks realistic, it can improve trust without making the shopping experience complicated.
Common Mistakes to Avoid When Rendering 360° Product Views
- Using the wrong frame count
Do not choose frames randomly. Use 24 frames for a basic spin, 36 frames for a balanced e-commerce view, and 72 frames only for premium or detailed products. More frames make the spin smoother, but they also increase file size and production time. - Repeating the first frame at the end
Do not render both 0° and 360° as separate frames. They show the same angle and can create a small pause when the spin loops. Stop before the final repeated angle. - Moving the camera during rotation
Keep the camera fixed. Rotate only the product. If the camera moves, the product view can look unstable and unprofessional. - Using a wrong pivot point
Set the pivot point in the center of the product. A wrong pivot makes the product wobble or shift during the 360° spin. - Ignoring lighting consistency
Keep the same lights in every frame. Changing light position or strength can create uneven shadows and make the spin look broken. - Using heavy image files
Do not upload large uncompressed frames. Product spins use many images, so heavy files can slow down the page. Resize and compress images before uploading. - Choosing the wrong image format
Use WebP when your viewer supports it, PNG for transparent backgrounds, and JPEG for simple white or gray backgrounds. This keeps quality clean and file size manageable. - Forgetting mobile performance
Test the 360° view on mobile before publishing. A spin may look fine on a desktop but load slowly or feel laggy on a phone. - Uploading frames in the wrong order
Name files clearly, such as product-001, product-002, and product-003. Wrong order can make the product jump during rotation. - Using a 3D viewer without optimization
Do not upload a heavy 3D model just because it looks advanced. Use a 3D viewer only when zoom, AR, or deeper interaction adds real value. Even optimized viewers still need lightweight models and clean assets.
Final Thoughts
Rendering a 360° product view for e-commerce is not only about making the product look attractive. It is about helping shoppers understand the item clearly before they buy. A clean 360° render shows the shape, material, texture, edges, and small details from every angle, which a single product image cannot always do.
Start with a clean product model, apply realistic materials, use soft studio lighting, and create a smooth turntable animation. Then render the frames in the right order, optimize the images, and test the final view on desktop and mobile. This workflow keeps the product page fast, clear, and useful for real buyers.
For most online stores, a 360° image sequence is the safest option because it gives good control over quality, speed, and display. Use interactive 3D only when the product needs deeper rotation, zoom, AR, or customization. The best result comes when the render looks realistic, loads quickly, and makes the buying decision easier for the customer.
