How To Reduce Noise In Photoshop?
If you have a keen interest in photography you must have encountered digital noise at least once in your life as a photographer. Digital noise can potentially ruin your image’s sharpness and clarity. It even results in image dullness which makes it harder to distinguish colors from one another. By reading this blog until the very end you will come to know about 3 incredible ways by which you can easily remove digital noise in Photoshop. Photoshop is a well-known image editing tool used by professional photographers in various leading firms. This photo editing platform is best suited to fulfill your numerous image processing requirements in the right manner but one should remain conscious to not apply too many effects which can render the image unnatural or worsen digital noise a lot more. Therefore, it is essential to use guidelines when aiming for strategic editing in Photoshop. Here are 3 best practicable ways by which you can remove digital noise successfully.
How to Remove Digital Noise In Photoshop
Let us suppose you have already taken a photograph but there are some smallest artifacts scattered through the image. We are going to solve this issue in Photoshop using all three methods you can easily correct this problem with ‘Camera Raw’ and ‘Reduce Noise Filter’. The selected reference image as an example is given below;
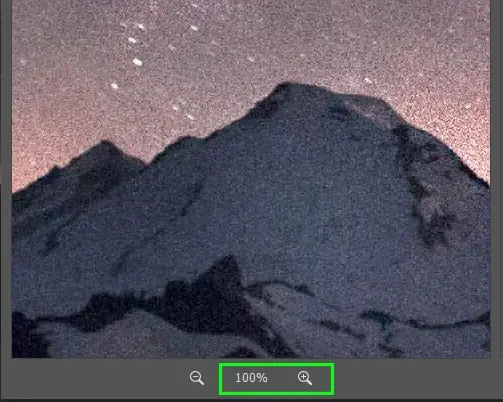
When you first have a bird’s eye view of the photograph you do not see anything wrong right? But as you magnify the image to print it you will encounter disturbing noise. To confirm if the image has noise you can zoom the image up to 100%. To do this you will need to hit ‘Control’ and ‘+’ on your keyboard. The above image is zoomed in at 100% to let you tell that there is heavy noise in the image. This happened because the image was clicked during nighttime when high ISO was required, Moving onwards let us begin with the first step to reduce noise in your photographs –
Method 1: Reduce Noise Filter – Advanced Mode
Step 1: Start by making a double of the image by pressing Control +J (On Windows) or Command + J (On Mac).
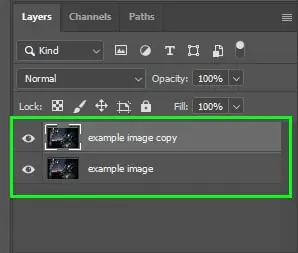
Step 2: Now cover the very top layers by clicking right on it, you can even select ‘Convert to smart object’. Converting the image to a smart object will enable the noise reduction adjustment filter to be applied. This is your way out to easily edit your image whenever it is required.
Step 3: Go to the (Filter > Noise > Reduce Noise) command in Photoshop.
Step 4: You can set the zoom to 100% from the dialog box, such that you can have a clear vision of the present noise.
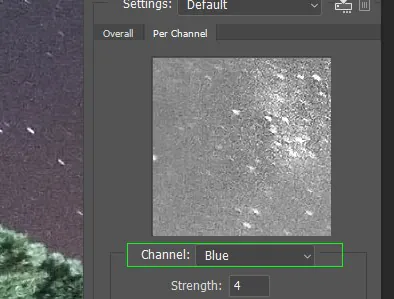
Step 5: You will find two options on the right side of the panel i.e. basic and advanced. Go for advanced as it will allow you to remove noise per channel (green, red, and blue). In our reference image blue channel is used;
Method 2: Reduce Noise Filter – Basic Mode
Eliminating noise per channel proves a good action but if your image has a scattered noise you can use the basic mode to carry out smooth noise removal successfully.
Step 1: The initial steps are the same as the one carried out in the previous method tutorial you can begin by supplicating the image, afterward convert it into a smart object and open the filter ‘reduce noise’. The following sliders are available in the basic model:
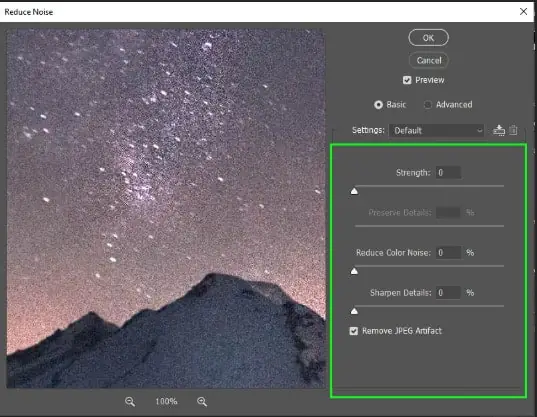
Step 2: The important slider is ‘strength’. You can effectively use this slider to remove noise. To reduce this high level of noise you can opt for 9 out of 10 maximum. Afterward, you can choose the ‘preserve details’ slider to restore image details because when you reduce the noise you can potentially lose a lot of image details. To cope with this level of noise let us go for 3%. If you notice color noise within your image you can also reduce it by using the ‘reduce color noise’ slider. In our reference image, 45% will be enough to reduce color noise beside the stars. Last but not the least, ‘sharpen details’, you should keep this slider at a lower level to reduce the chances of getting the noise back. For this image let us choose 8%.
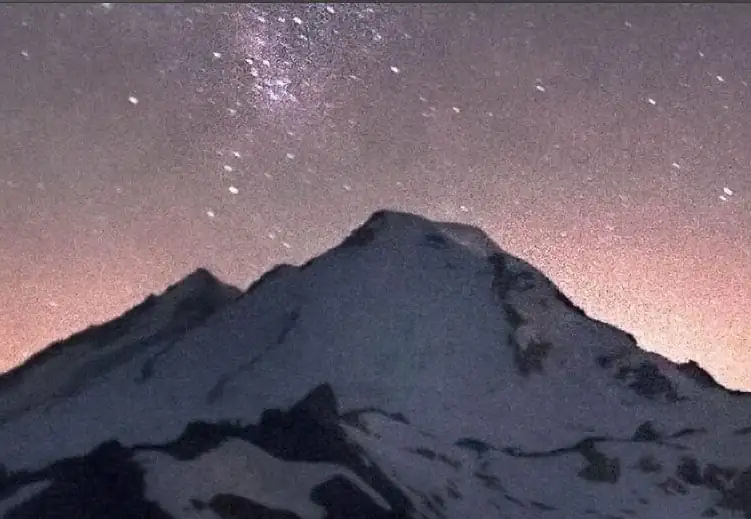
Step 3: When you complete all the required steps your last action should be to apply and save changes by pressing ‘Ok’ to go back to the canvas. Our reference image looks like this after successfully applying the ‘reduce noise filter’.
Method 3: Camera Raw Filter
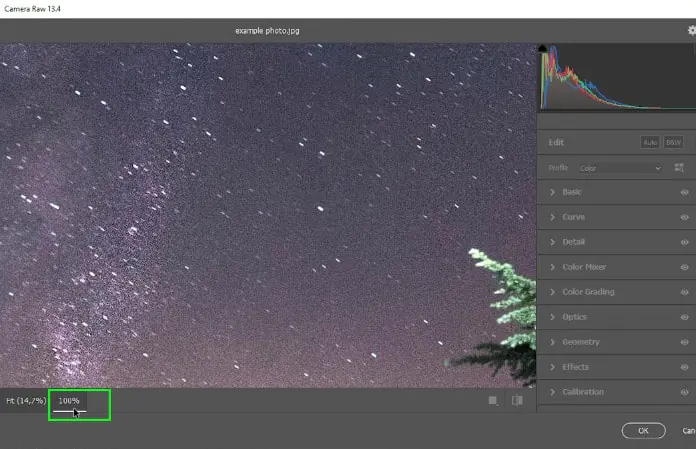
You can also remove an appreciably higher level of noise from your images by using ‘Camera Raw Filter’. This filter option is very much similar to Lightroom. Therefore, you can work easily if you are familiar with Lightroom.
Step 1: To begin with the editing venture you need to open your desired image and copy it. The next step is similar to earlier methods i.e. you need to convert the duplicated image to a smart object. The game changes in the next step.
Step 2: Carry out (Filter > Camera Raw filter) action in Photoshop.
Step 3: Zoom in the image up to 100% in ‘Camera Raw’, to enable the clear vision for the sake of applying a noise removal filter.
Step 4: You can enable the ‘before and after view’ mode to compare before and after edited results with that of the original image. In this way, you will not miss out on any important details.
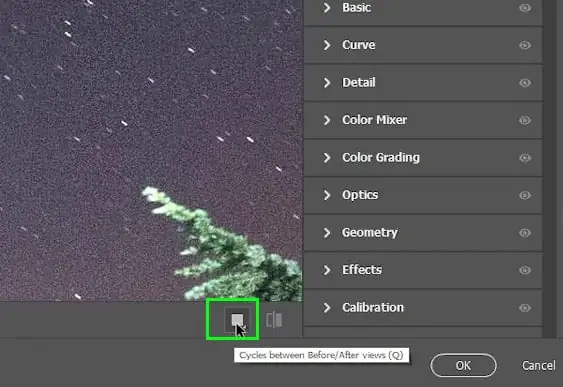
Step 5: By clicking on the very right side of the panel you will come across several options you can investigate all these for your interest’s sake. For noise removal, we will only work with the second and third sections.
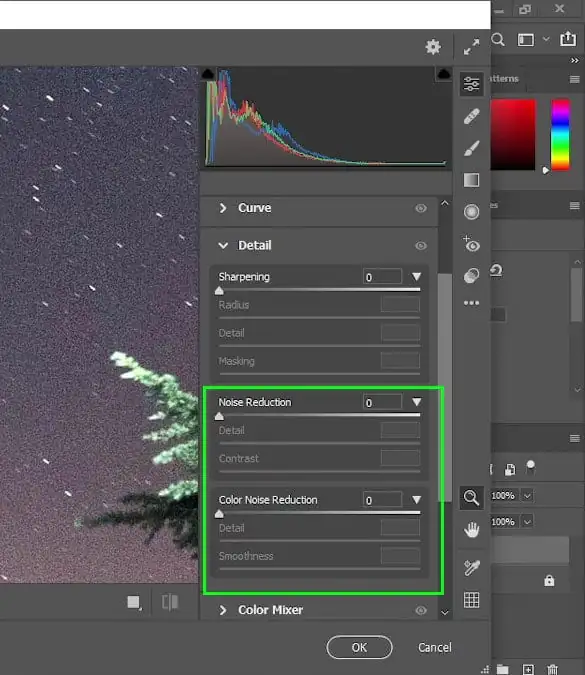
Step 6: You can easily remove unwanted noise by moving the slider to the right until you experience a difference. Try not to overdo this effect because you might not want to make your image look unnatural. For our reference image, 27 will do. It is a fact that when you reduce the noise you lose some image details. To keep your image safe during the process remember to go to the ‘details’ slider to keep the image details and prevent the noise from coming back. For our example 24 will be just fine. Another challenge is losing contrast during noise removal, to cope with this difficulty you will need to add the high value of the ‘contrast’ slider, let us stick with 57 to keep the image features in place.
Step 7: To reduce noise, you should select the ‘color noise reduction’ slider which allows you to reduce the noise to a greater extent. You can save your image details from being lost during the noise reduction process by enabling the ‘detail slider’. To smoothen out color noise areas you can drive benefit from the ‘smoothness’ slider. It helps to blend the image pixels and give a smooth effect.
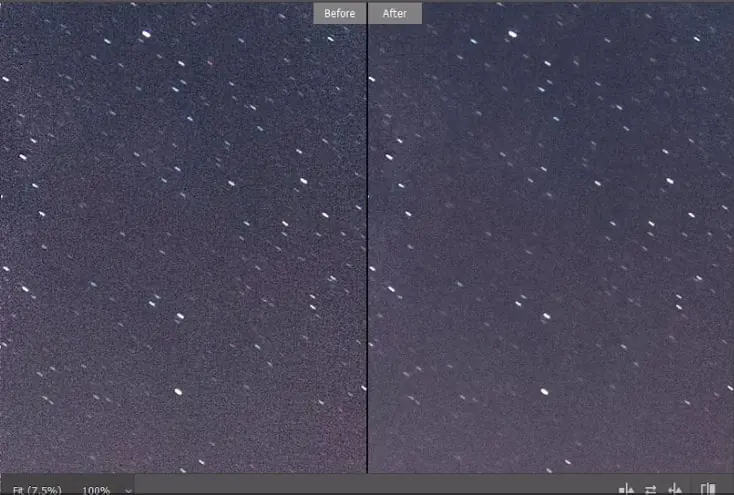
The above displayed image is the final result with considerable noise reduction without losing stars features. Similarly, you can carry out noise reduction in Photoshop by following these 3 practicable methods.
Happy Editing!
How ITS Can Help You With Professional Photo Editing Services?
Information Transformation Service (ITS) has been offering a wide range of photo editing, manipulation, processing, enhancement, clipping, and enrichment services for over 30 years now. If you are interested in ITS Photo Editing Services, You can ask for a free quote!
