How to Reduce GLB File Size Without Losing 3D Model Quality
GLB file size problems usually don’t come from the format itself. Most of the time, the issue starts when the model is created and exported, where the focus is more on looks than performance.Textures are the biggest reason for large file sizes. Designers often use several 2K or 4K images like base color, normal, roughness, metalness, and ambient occlusion. These add up quickly, even if the visual difference is hard to notice on web or mobile.Geometry is another big factor. Models from tools like CAD, Blender, or AI generators often have too many polygons, extra vertices, or hidden faces that are not needed but still increase file size.
Scene data also adds extra weight. Things like unused materials, animation data, and extra nodes stay in the file even when they are not needed for display.Because of all this, GLB files can become large very quickly, especially in use cases like Shopify product viewers, WebGL apps, and AR experiences where fast loading and smooth performance matter.
Why GLB Files Become Too Large in Real Production Workflows
GLB file size issues are rarely caused by the format itself. In most cases, the problem starts during asset creation and export, where models are built for visual accuracy rather than runtime performance.High-resolution textures are one of the most common causes of file bloat. Designers often use multiple 2K–4K image maps (base color, normal, roughness, metalness, ambient occlusion), which significantly increases file weight even if the visible difference is minimal in web or mobile environments.
Geometry is another major contributor. Models exported from CAD tools, Blender, or AI generators often contain unnecessarily high polygon counts, duplicated vertices, and internal faces that are never visible but still stored in the file.A third factor is embedded scene data, including unused materials, animation data, and extra nodes that are not required for rendering. These elements increase file size without improving visual output, but they are frequently carried over during export.
Because of these combined factors, GLB files tend to scale in size much faster than expected, especially when used in interactive environments like Shopify product viewers, WebGL applications, and AR-based experiences where performance is directly tied to load speed and GPU efficiency.
What Actually Makes a GLB File Heavy?
A GLB file grows in size because multiple components of a 3D model accumulate during export. In real production workflows, no single factor is responsible; instead, geometry, textures, materials, and scene data collectively determine the final file size.
Textures usually contribute the most. High-resolution maps such as base color, normal, roughness, and metalness significantly increase file size, especially when exported at 2K or 4K resolution. A single model often includes multiple texture files, which further increases overall weight.
Geometry is the second major factor. High polygon counts and unnecessary detail increase file size and also reduce rendering performance in browsers and mobile environments. This commonly occurs when models are exported directly from CAD systems or high-detail sculpting workflows without optimization.Materials and scene data also add overhead. Although they are lighter than textures and geometry, duplicated materials, unused nodes, and redundant scene elements still increase file size unnecessarily.
If a model includes animation, file size increases further due to keyframes and skeletal data, particularly in character rigs and mechanical motion systems.A GLB file becomes heavy when it carries excessive, unoptimized visual and structural data. Effective optimization reduces texture resolution, simplifies geometry, and removes unused scene elements instead of relying only on basic compression tools.
Lossless vs Visually Lossless Optimization
Before reducing a GLB file, it is important to understand that not all optimization methods work the same way. Some methods only remove unnecessary data, while others reduce actual visual data to achieve higher compression.
Lossless Optimization
- Removes data that is not needed for rendering
- Does NOT change how the model looks
- Safe for all production workflows
- Typical operations:
- Removing unused nodes and materials
- Deleting hidden or duplicate geometry
- Cleaning scene hierarchy
- Result: It results in small to moderate file size reduction while maintaining zero visual impact.
Visually Lossless Optimization
- Reduces actual model data to achieve higher compression
- May slightly change underlying data, but aims to keep visuals unchanged
- Requires careful testing depending on platform
- Typical operations:
- Geometry compression (Draco / Meshopt)
- Texture resizing (2K → 1K, etc.)
- Texture format conversion (PNG → WebP / KTX2)
- Result: The process reduces file size significantly while preserving visual quality when applied correctly.
Key Difference
- Lossless = clean the model
- Visually lossless = reduce and optimize the model
- Best results = combination of both methods
Practical Insight: Most GLB files are often left unoptimized because users depend only on basic compression tools. In practice, better performance is achieved when structural cleanup and visually lossless optimization are applied in the correct order.
How to Decide What to Optimize First
When a GLB file starts causing issues, the first step is not to compress everything at once. You need to figure out where the problem is actually coming from, because each issue needs a different fix.
- If the file feels too large, the main cause is usually textures. Large or multiple image files add up quickly and make the model heavier than expected.
- If the model starts lagging or feels slow in a viewer, the issue is often geometry. Too much mesh detail makes rendering harder, especially in browsers and on mobile devices.
- Sometimes the problem is not performance but what’s inside the file after export. This usually comes from unused objects, duplicate materials, or extra data that is not needed.
- On mobile and AR platforms, everything becomes more sensitive, so both textures and geometry usually need attention to keep things running smoothly.
How to Identify Why Your GLB File Is Heavy
Start by checking how the file is built instead of guessing the cause. Most GLB tools and viewers can show a breakdown of what is taking up space, which makes it easier to locate the issue.Begin with textures. If the file size is high, open the model and look at image resolutions. Multiple 2K or 4K textures usually point to textures as the main reason.
Next, check geometry. If textures are not the problem but the model still feels heavy or slow, review the polygon count. High-detail meshes or models exported from CAD or sculpting tools often carry unnecessary complexity.After that, look at scene data. Unused materials, hidden objects, and duplicate nodes can stay inside the file after export and quietly increase size without changing how the model looks.
You can also test the model in a real viewer. If it loads slowly or struggles on mobile, it usually confirms that either geometry or textures are too heavy for real-time performance.
Step-by-Step Workflow to Reduce GLB File Size Safely
Most GLB optimization problems come from using the wrong order of steps, not from missing tools. A proper workflow reduces file size while keeping the model’s visual quality intact.
Step 1 Keep a Backup of the Original File
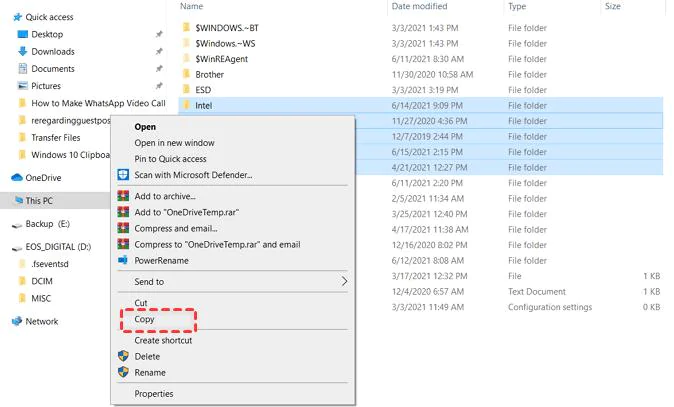
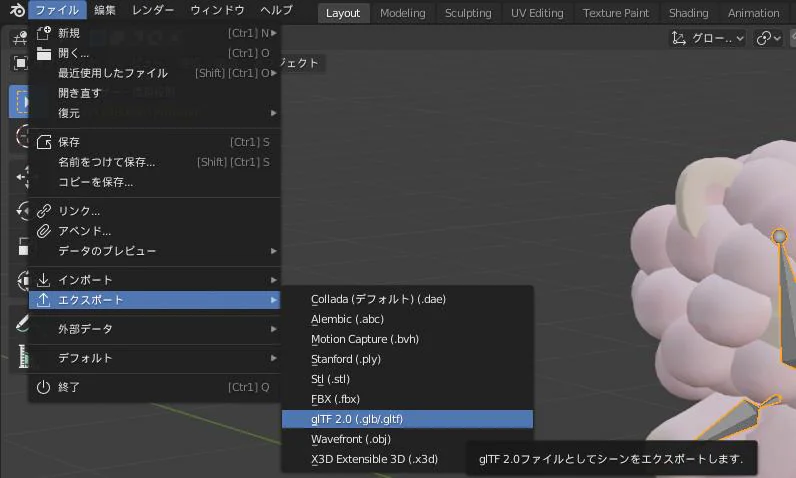
Before making any changes, always create a copy of the original file. This keeps your work safe if something breaks during compression, mesh reduction, or export settings.On Windows, open File Explorer, find the GLB file, right-click it, and select Copy. Paste it into the same folder or a separate backup folder, then rename it clearly (for example: model_backup.glb).In Blender, first save your project using File → Save As to keep a backup of the scene. Then export the GLB using File → Export → glTF 2.0 (.glb) while keeping the original project unchanged.This step is important because GLB optimization changes textures and geometry directly, and you cannot easily restore them after export.
Step 2 Remove Extra Objects That Are Not Needed

After creating a backup, open the GLB file in Blender and focus only on what is needed in the final model.Start with the Outliner panel, which shows every object in the scene. Go through each item and check whether it belongs to the final visible model.Remove anything that is not part of the final output. This includes duplicate objects, hidden parts, test geometry, extra lights, cameras, or leftover elements from the modeling process.To remove an object, select it and press Delete, or right-click and choose Delete.Keep only the elements that directly affect the final model. This removes unnecessary data from the file and makes the next optimization steps more effective without changing the visual result.
Step 3 Reduce Texture Size in Blender
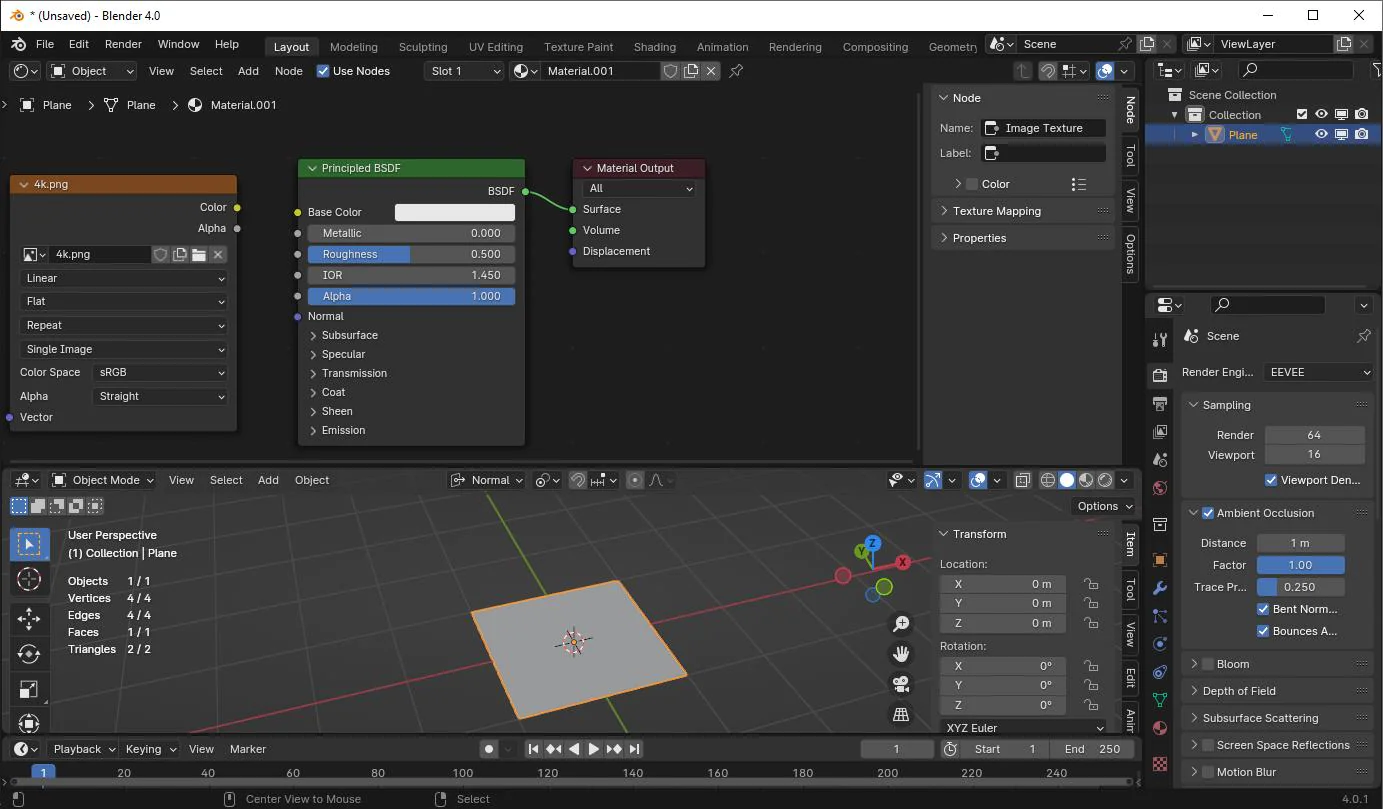
After cleaning the model, the next major impact on GLB file size comes from textures.Open the model in Blender and switch to Material Preview or the Shader Editor. Select each material one by one and check the image textures connected to it, such as base color, normal, roughness, and metalness maps.At this stage, you only work with the images, not the geometry. If you find large textures like 4K images or heavy PNG files, they are usually the main reason the file is still large.Replace them with smaller versions where possible. In most web, Shopify, or AR use cases, 1K or 2K textures keep the visual quality stable while reducing file size significantly. If transparency is not needed, converting PNG files to JPEG also reduces weight without changing visible quality.Go through each texture one by one instead of changing everything at once. This helps control quality and avoids unnecessary loss of detail.
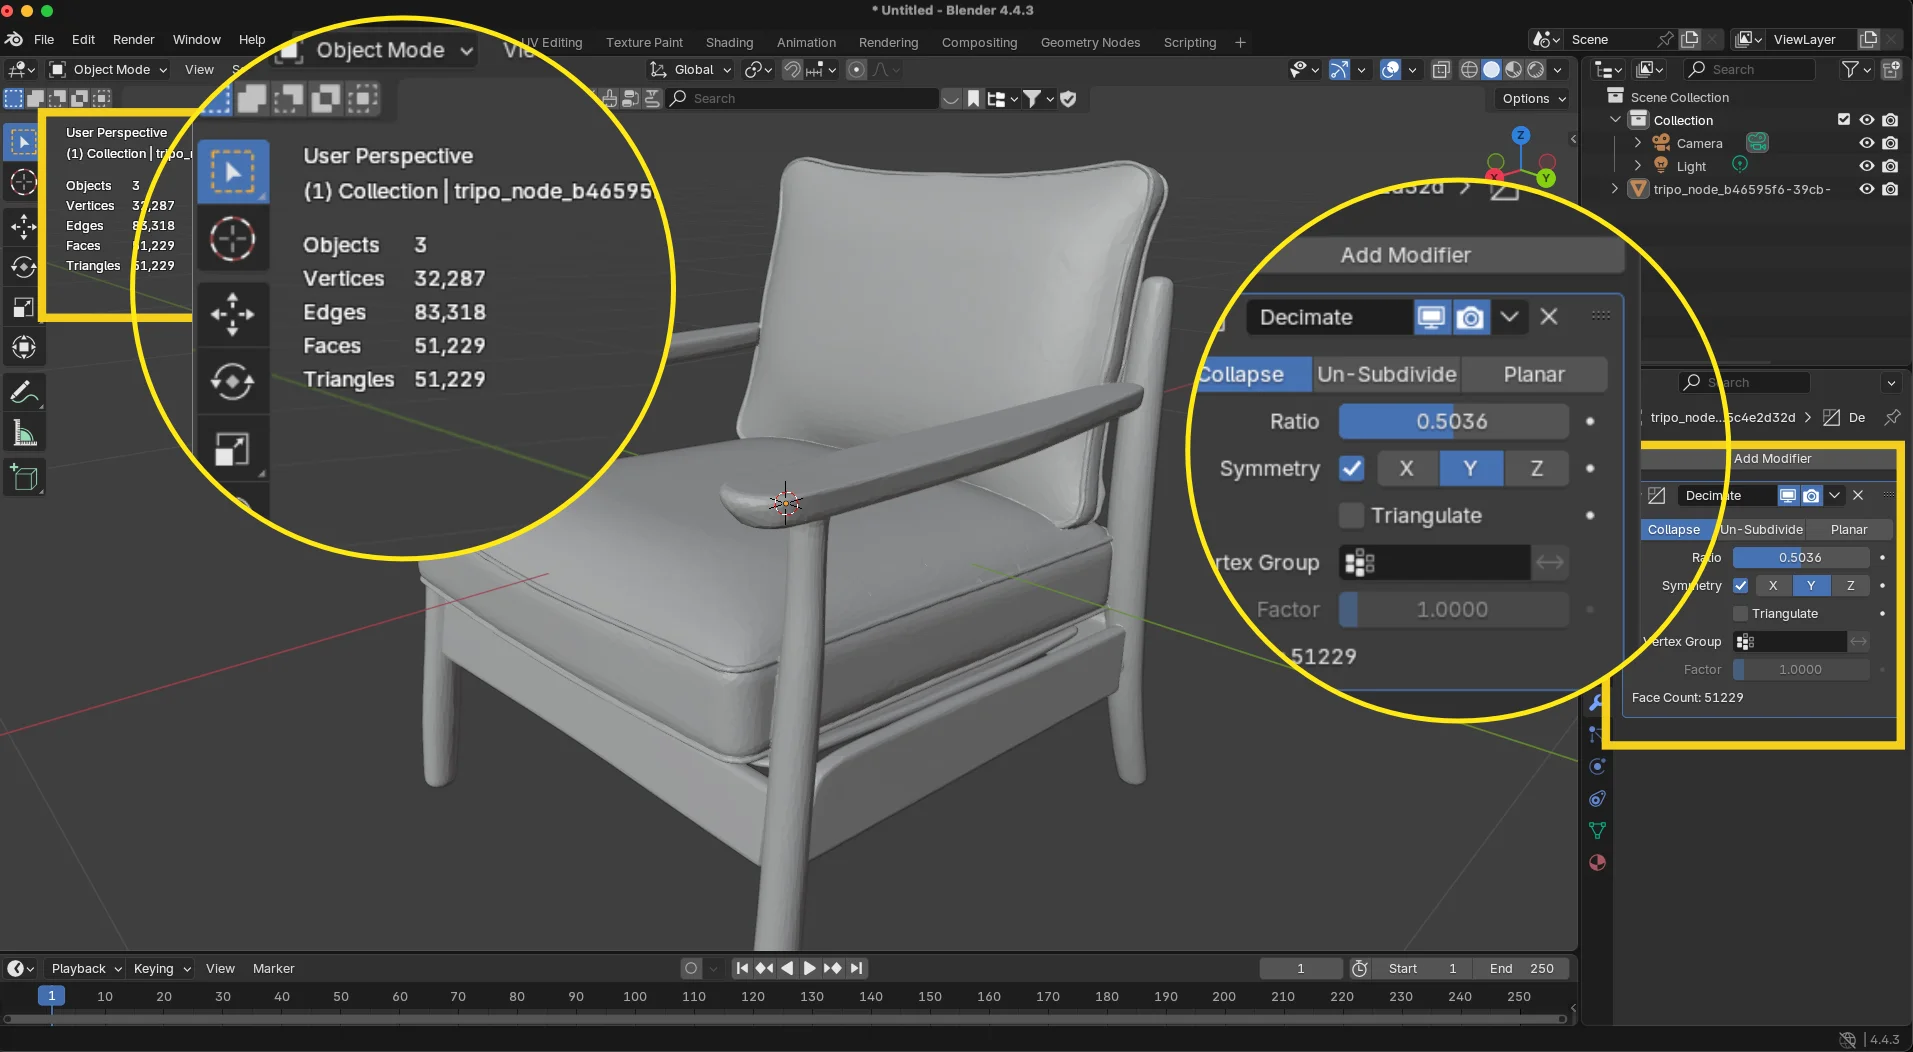
Step 4: Reduce Polygon Count in Blender
After optimizing textures, the next factor that affects GLB file size and performance is geometry.Open your model in Blender and select the object you worked on earlier. Switch to Edit Mode to view the full mesh structure.Zoom into the model and identify areas with unnecessary detail. Focus on smooth curved surfaces, tight edge loops, and small shapes that do not noticeably affect the final look when simplified.
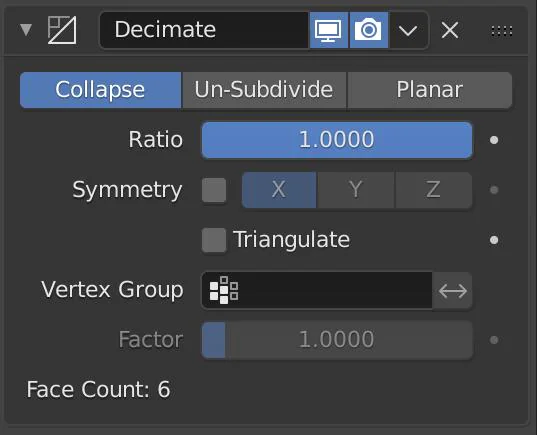
You don’t need to rebuild the model. Use Blender’s Decimate Modifier for a faster approach. Go to the Modifier panel, add Decimate, and gradually reduce the ratio while observing the model. Stop when the shape still looks correct and important details remain intact.For finer control, remove extra geometry manually. Select unnecessary edge loops and dissolve them, especially in areas that are not visible or do not affect the final appearance.After applying changes, rotate the model and inspect it from all angles to ensure the shape stays clean and no important details are lost.
Step 5 Apply GLB Compression After Cleanup
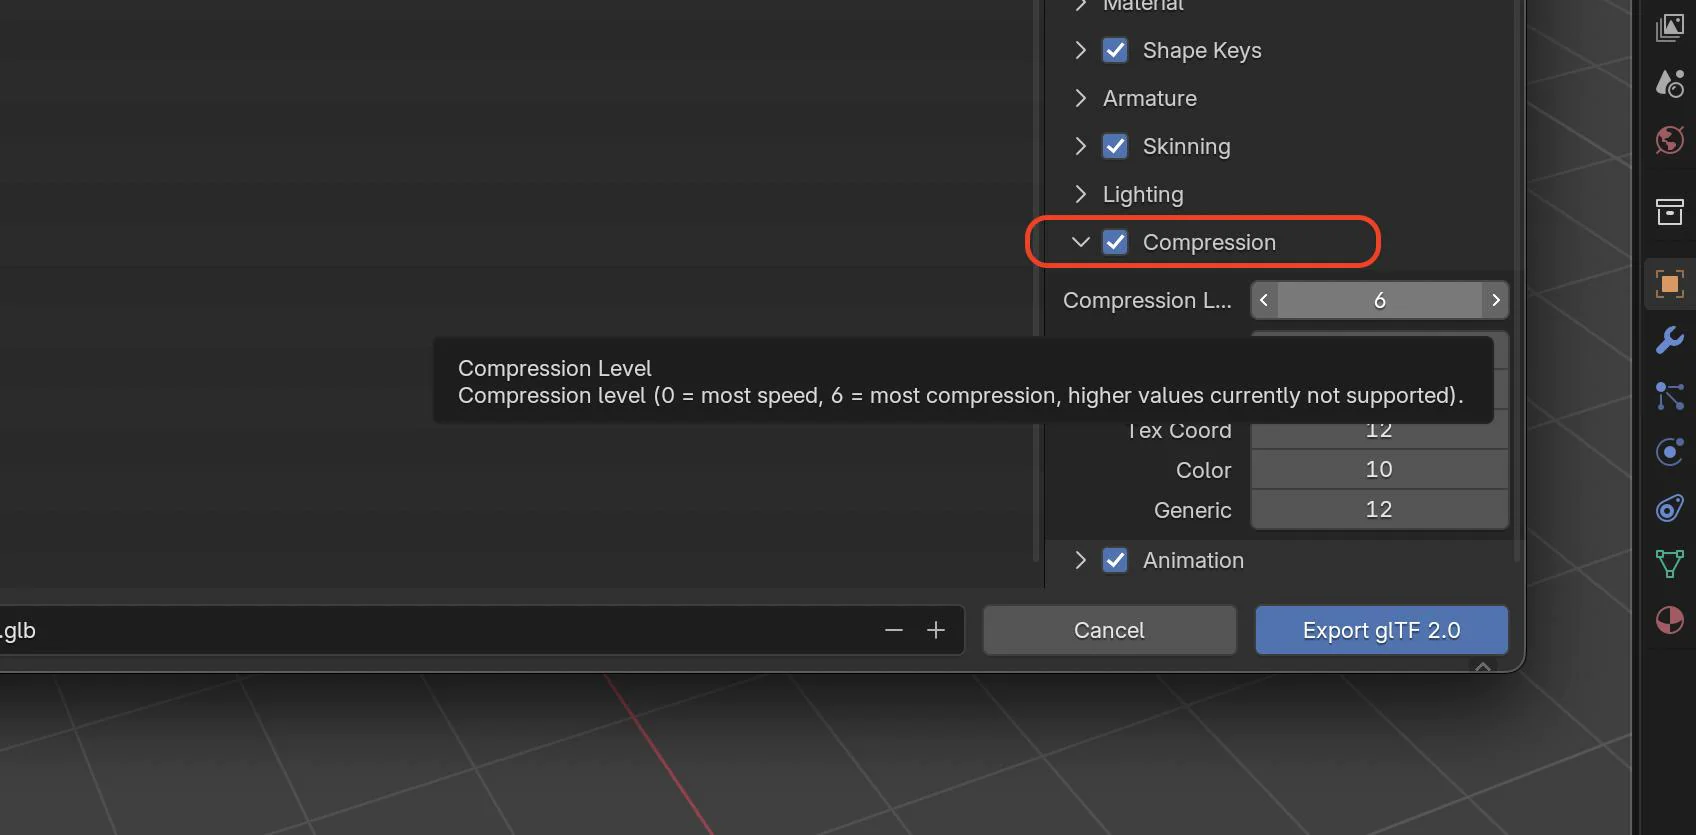
After reducing textures and polygon count, compress the GLB file structure itself. This step makes the already optimized model smaller and easier to load in web or app viewers.In Blender, go to File → Export → glTF 2.0 (.glb) and check the available compression settings. Blender commonly gives you Draco compression for mesh data. Use Draco when you want stronger file size reduction and your target viewer supports it.Do not use compression as the first fix. Compression works better after you clean unused objects, reduce large textures, and simplify heavy geometry. If you compress a messy model, the file may still stay heavier than needed.
For web-based viewers, you can also use Meshopt compression through tools such as glTF-Transform or gltfpack after exporting the GLB. Meshopt works well for real-time use because it focuses on smaller geometry data and faster loading, but your viewer must support it.After export, test the final GLB in the same place where users will see it, such as a Shopify product viewer, WebGL viewer, AR preview, or mobile browser. Check the loading speed, textures, materials, shape, and animation before replacing the original file.
Step 6 Test the GLB File Before Publishing
After compression and export, test the final GLB file in the environment where it will actually run. This step matters because a file that works in Blender can behave differently in real viewers.Open the GLB in the target platform such as a web viewer, Shopify product page, or Three.js scene. First check whether the model loads correctly without errors or missing textures. Then compare loading speed with the original version, especially on mobile where performance differences are easier to notice.Rotate and zoom the model to verify geometry. Confirm that important details still appear correctly and no shape has been damaged during optimization. Check textures closely around edges, logos, and detailed areas, since aggressive compression can make them appear slightly soft.
If the model includes animation, play it fully. Confirm smooth movement and ensure no keyframes are missing or broken.This step verifies real-world performance. A GLB file is only fully optimized when it loads fast and displays correctly in the environment where it will be used.
Draco vs Meshopt vs KTX2 Which One Should You Use?
GLB optimization depends on what makes the file heavy, so no single method works best in every case. Each compression type solves a different problem, and correct selection improves performance without affecting visual quality.
Draco (Geometry Compression)
Use this when the model has too many polygons or heavy mesh data. It reduces geometry size significantly, but it may slow loading because the data needs decoding.
Meshopt (Performance Optimization)
Use this for web-based projects like Three.js where fast loading and smooth interaction is important. It balances compression and runtime performance for smoother results.
KTX2 (Texture Compression)
Use this when textures are the main cause of a large file. It lowers GPU memory usage and improves performance on mobile and WebGL.
Common Mistakes That Increase GLB File Size Even After Optimization
Even after a proper GLB optimization workflow, many models still stay heavy due to common mistakes in export and compression.
Overusing 4K Textures
Many users keep high-resolution textures even when the model is used for web or mobile. This increases file size without improving visible quality.
Ignoring Unused Materials
Duplicate or unused materials often stay in the file after export and increase GLB size without adding value.
Applying Compression Too Early
Using Draco or Meshopt before cleaning the model reduces effectiveness and adds unnecessary processing overhead.
Not Reducing Hidden Geometry
Internal faces and unseen mesh parts remain in the model and increase file size without any visual benefit.
Exporting Without Scene Cleanup
Extra objects, test assets, and unused nodes from Blender exports often remain inside the GLB file and increase its size.
Best Tools to Reduce GLB File Size
GLB file size can be reduced using Blender for cleaning and optimizing models before export, glTF-Transform for advanced geometry and texture compression workflows, and online GLB compressors for quick file size reduction without setup, depending on whether the goal is manual control, developer-level optimization, or fast browser-based compression.
How Much Can You Reduce GLB File Size Without Losing Quality
In real production workflows, GLB file size reduction is not fixed and depends on the model structure, but most projects achieve around 10% to 70% reduction without noticeable quality loss when proper cleanup, texture optimization, and compression methods like Draco, Meshopt, or KTX2 are applied, while higher reductions are possible only with visible trade-offs in detail or texture quality.
Conclusion
Reducing GLB file size is not about using one tool or one technique. It depends on a structured workflow that starts with cleaning the model, moves through texture and geometry optimization, and ends with controlled compression and testing.Following this order produces a lighter GLB file that loads faster, runs smoothly on web and mobile platforms, and maintains the original visual quality of the model.
