
How to Make Textures for 3D Models
Your 3D model is built. The geometry is clean, the topology is solid, and the proportions are right. But the moment you render it, something is off. It looks like a grey plastic toy instead of the battle-hardened armor, polished wooden desk, or weather-beaten concrete wall you had in mind.That is a texturing problem. And it is one of the most common frustrations for 3D artists at every level.
This guide covers everything you need to know about 3D texturing. That includes what texture maps actually do, a full step-by-step workflow for texturing 3D models in Blender and Substance Painter, the best software options, and the common mistakes that make even well-modeled assets fall flat. Whether you are working on games, architectural visualization, or film, this guide gives you the complete picture.
What Is 3D Texturing and Why Does It Matter?
3D texturing is the process of adding surface detail, color, and material properties to a 3D model. It is how a model goes from a raw geometric shape, created through 3D Modeling Services, to something that looks like it belongs in the real world or whatever world you are building.
Three terms get used interchangeably in 3D but they mean different things:
- A texture is a 2D image that stores a specific type of surface data color, roughness, reflectivity, and so on.
- A material is the full set of instructions that tells a renderer how a surface behaves; it typically combines multiple texture maps together.
- A shader is the program that uses those material instructions to calculate how light interacts with the surface at render time.
When people talk about texturing 3D models, they usually mean the whole process: creating the texture maps, building the material, and setting up the shader so the final result looks right.
Why does it matter? Because no amount of clean geometry compensates for flat, unconvincing surfaces. 3D texturing is what separates a professional asset from a student project. It is also where the most visual information lives: a well-textured low-poly model will almost always look better than a poorly-textured high-poly one.
3D modeling texturing is used across virtually every visual industry. Game studios rely on it to build immersive environments and characters. Architectural firms use it to produce photorealistic visualizations of buildings before they are constructed. Film and VFX studios use it to create creatures, vehicles, and environments indistinguishable from reality. Product manufacturers use it to present designs before physical prototypes are made.If you are working with 3D in any professional capacity, mastering 3D modeling texturing is not optional.
Types of 3D Model Textures You Need to Know
Most beginners start with a single color image and call it a day. But professional 3D texturing uses multiple texture maps working together, each responsible for a different property of the surface. Here is what each one does and why it matters.
Diffuse / Albedo Map This is the base color of the surface what it looks like under perfectly neutral lighting with no shadows or highlights. In PBR (Physically Based Rendering) workflows, this is called the albedo map. It tells the shader what color each part of the surface is, without any lighting baked in.
Normal Map A normal map fakes surface detail scratches, bumps, engraved text, pores in skin without adding any actual geometry. It stores directional data in the RGB channels of an image. The shader uses that data to calculate how light hits each pixel as if the surface had real depth. It is one of the most powerful tools in 3D model texturing because it adds visual complexity at almost no performance cost.
Roughness Map This map controls how rough or smooth a surface is. White areas reflect light diffusely (rough, like concrete or unfinished wood). Black areas are mirror-like (smooth, like polished metal or glass). In older workflows this was called a glossiness or specular map the logic is simply inverted.
Metallic Map In PBR workflows, the metallic map defines which parts of a surface are metal and which are not. White means metal, black means non-metal (dielectric). This single distinction changes how the entire lighting calculation works for that surface.
Ambient Occlusion (AO) Map An AO map stores pre-calculated shadow information specifically, how much ambient light reaches each point on the surface. Areas in crevices, corners, or under overhangs get darker values. It is baked from the geometry and adds a sense of depth and grounding that pure lighting often misses.
Displacement Map Unlike a normal map, a displacement map actually moves geometry. The renderer reads the grayscale values and physically pushes vertices in or out, creating real surface detail that catches light and casts proper shadows. It is more expensive than a normal map but far more convincing for close-up renders.
Emissive Map An emissive map defines parts of the surface that emit light glowing screens, neon signs, lava cracks, LED strips. White or colored areas in the map glow in the render regardless of scene lighting.
Understanding all of these is foundational. Once you know what each map controls, the entire 3D texturing workflow becomes logical rather than mysterious.
Static Texturing vs. Surface Texturing Which One Do You Need?
Not every 3D asset requires the same approach. The two main categories are static texturing and surface texturing. Choosing the right one depends on what you are building and where it will be used.
Static Texturing
Static texturing means applying a flat 2D image to a 3D model texture without any geometric variation. The texture purely carries visual information color, perhaps some simulated shading baked in but it does not change the actual shape of the surface.
This is the faster, lighter approach. It works well for background assets in games, props that will never be seen up close, or any situation where performance matters more than up-close detail. Static textures are easier to tile and optimize, making them a practical choice for large environments.
The trade-off is realism. Under close inspection or dramatic lighting, static textures can look flat because there is no actual surface variation responding to light.
Surface Texturing
Surface texturing uses displacement maps, normal maps, and high-resolution detail to create genuine three-dimensional variation on the model’s surface. Light responds to these variations realistically, shadows form in crevices, and highlights catch on raised edges.
This is the approach used in cinematic rendering, architectural visualization, and any context where close-up realism is required through Photorealistic Rendering Services.
The cost is higher polygon counts, longer render times, and more texture memory requiring stronger hardware and more careful optimization.
| Static Texturing | Surface Texturing | |
|---|---|---|
| Geometric variation | None | Yes (via displacement) |
| Performance cost | Low | High |
| Realism up close | Limited | Excellent |
| Best for | Game backgrounds, props | Hero assets, arch-viz, film |
| Software | Any | Substance Painter, ZBrush, Blender |
In practice, most professional pipelines use both surface texturing for hero assets and focal points, static texturing for everything else.
The Complete 3D Modeling Texturing Workflow
Step 1: UV Unwrap Your 3D Model
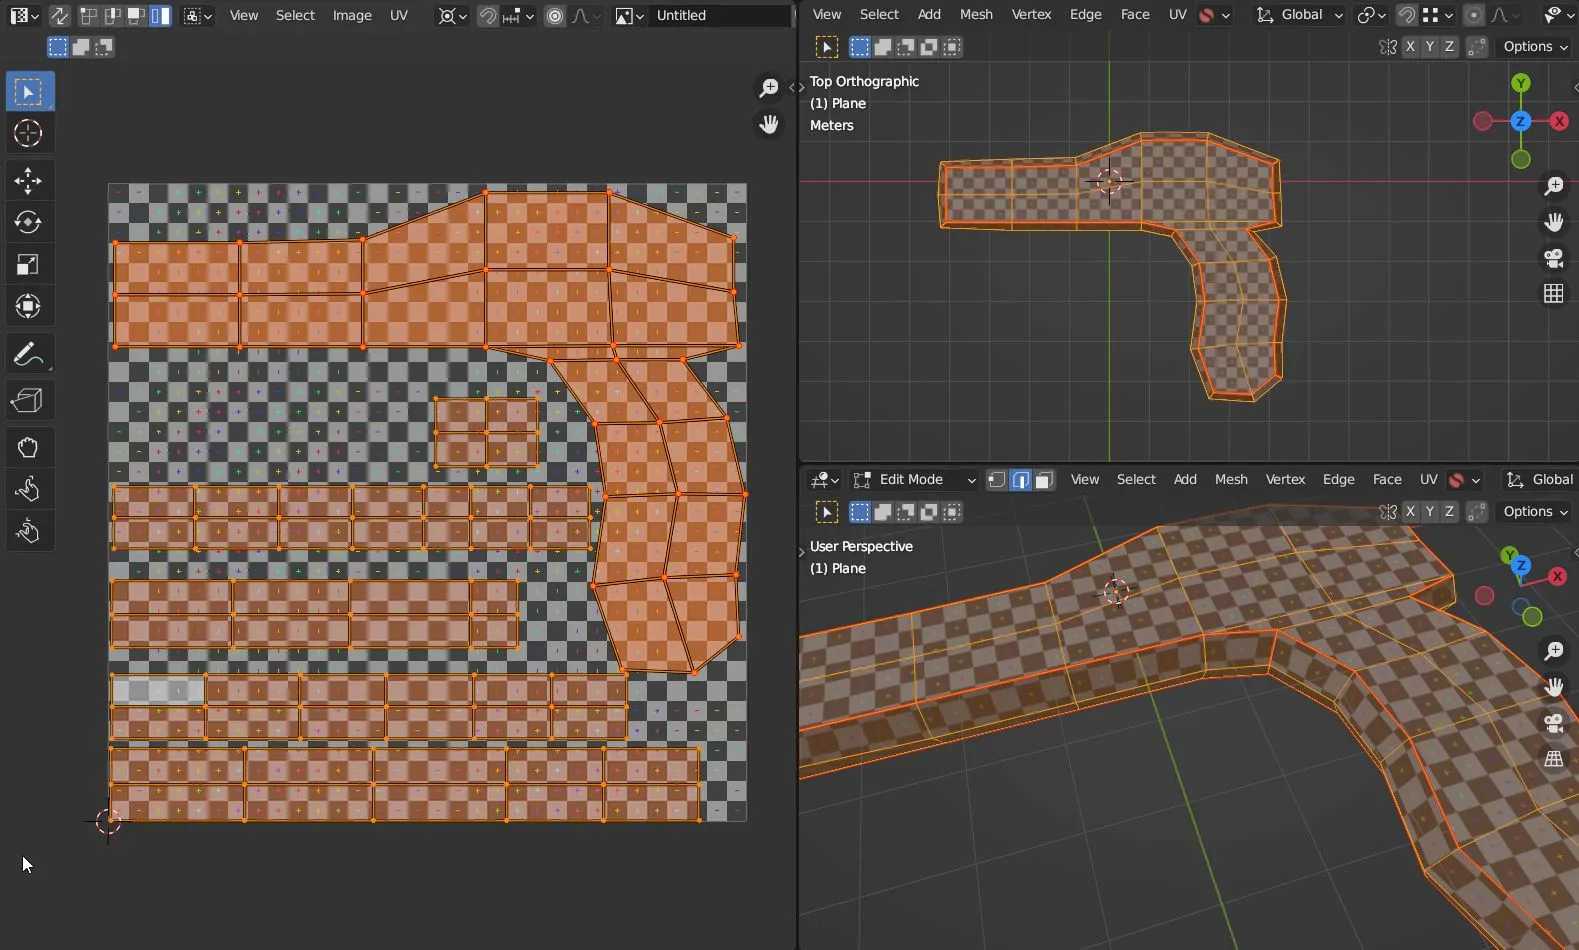
Before any texture can be applied correctly, your model needs a UV map. A UV map is a flat 2D representation of your entire 3D surface. Imagine cutting a cardboard box apart along its edges and unfolding it flat. The U and V axes represent the horizontal and vertical coordinates of this flat layout.
Without a clean UV unwrap, textures for 3D models will stretch, distort, or tile incorrectly no matter how good they look in isolation.
In Blender, select your model and press Tab to enter Edit Mode. Press A to select all faces, then press U to open the UV Unwrap menu. For hard-surface models (furniture, weapons, vehicles), choose Smart UV Project. For organic shapes (characters, creatures), choose Unwrap after manually placing seams with Ctrl+E > Mark Seam. Open the UV Editor workspace to inspect the layout. Check that no islands overlap and that scale is consistent across the model.
Step 2: Set Up Your Texture Maps in the Shader Editor
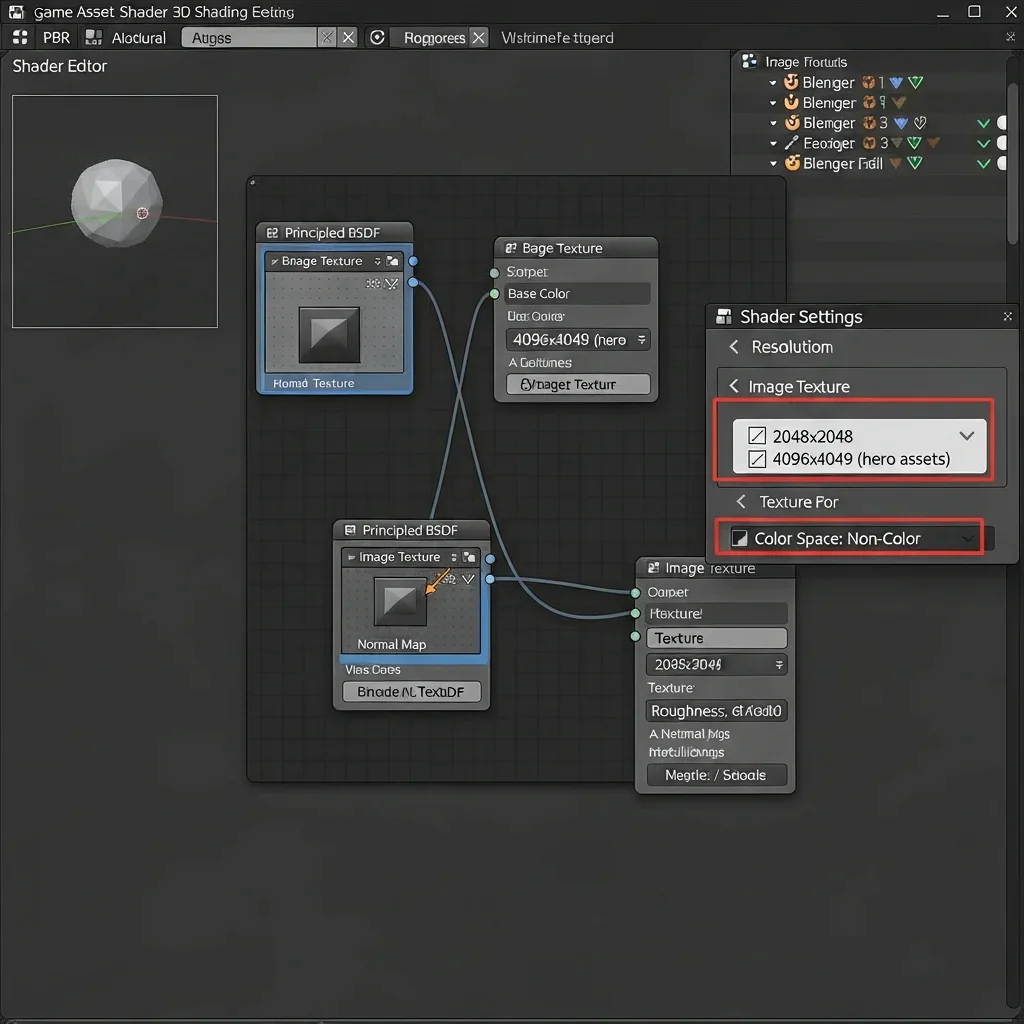
With the UV map in place, the next step is creating the image textures and connecting them to your material shader. In Blender this happens in the Shader Editor using the Principled BSDF node, which handles the full PBR workflow in a single, unified shader.
Go to the Shading workspace. With your model selected, click New Material. In the Shader Editor, press Shift+A and navigate to Texture > Image Texture to add a texture node. Click New to create a new image and set the resolution 2048 x 2048 for most game assets, 4096×4096 for hero assets. Connect the Color output of the Image Texture node to the Base Color input of the Principled BSDF.
Repeat this for each map type. For normal maps, add a Normal Map node between the Image Texture and the Normal input on the BSDF. Critically, set the Image Texture color space to Non-Color for any map that is not a color map (normal, roughness, metallic, AO). Failing to do this is one of the most common mistakes in 3D model texturing.
Step 3: Choose Your Texturing Method and Paint

There are four main ways to make textures for 3D models. The method you choose depends on the type of asset and the level of realism required.
Photograph-based texturing is the fastest way to achieve photorealism. Capture or source high-quality photos of real surfaces (wood, concrete, fabric, metal), make them tileable using offset tools in Photoshop or GIMP, and apply them as your albedo map. This works best for architectural surfaces and environment assets.
Procedural texturing generates texture mathematically using nodes, no image files required, no UV stretching, infinite resolution. In Blender’s Shader Editor, noise, wave, and musgrave nodes can produce convincing stone, wood, and fabric entirely from scratch. The limitation is that procedural textures can look repetitive on complex shapes.
3D texture painting lets you paint directly on the surface of the model in 3D space, eliminating seam problems and giving you intuitive control over where detail goes. Blender’s Texture Paint mode and Adobe Substance Painter both support this workflow. Substance Painter is the industry standard for game and film assets because of its layer-based approach, smart masks, and material generator tools used in Gaming Assets Services.
Hand-painted texturing involves creating stylized texture artwork in Photoshop or Krita, then applying it via the UV map. This is the standard approach for stylized games (think mobile games, cartoon aesthetics), where photorealism is not the goal.
Step 4: Bake Your Textures

Texture baking converts complex shader calculations, procedural textures, lighting, AO, normal maps from a high-poly model into flat image files. These files can then be used in real-time game engines or shared across software.
In Blender, select your model and go to the Render Properties panel. Set the render engine to Cycles. In the Bake section, choose what you want to bake (Combined, AO, Normal, Diffuse, etc.). Create a new Image Texture node in the Shader Editor, select it (but do not connect it), and hit Bake. Blender will render the selected pass into that image node and save it as a file.
For baking normals from a high-poly to a low-poly mesh, select the low-poly first, then Shift-select the high-poly. Enable Selected to Active in the Bake settings and set an appropriate Extrusion value usually 0.02 — 0.05 depending on the scale of the detail.
Step 5: Test Under Different Lighting Conditions

A texture that looks good under one light will often reveal problems under another. Before calling a texture done, always test it across multiple lighting setups.
In Blender, switch your world lighting between different HDRI environments: a neutral grey studio, a warm sunset, a cool overcast sky. Watch for areas where roughness looks wrong (too shiny or too dull), where the normal map looks reversed (use the Flip Green Channel option if needed), or where color values look oversaturated in bright light.
In game engines, import your 3D model textures into Unity or Unreal Engine and test them in the actual scene lighting. Real-time rendering handles PBR textures differently from Blender’s offline renderer, and discrepancies between the two are common.
Best Software for 3D Modeling Textures in 2026
Choosing the right tool makes a significant difference in your 3D modeling texturing workflow. Here is a straightforward comparison of the most widely used options.
| Software | Best For | Free? | Platform |
|---|---|---|---|
| Blender | All-round texturing, procedural, baking | Free | Win / Mac / Linux |
| Adobe Substance Painter | Game and film industry texturing | Paid (subscription) | Win / Mac |
| Quixel Mixer | Photorealistic surface blending | Free (with UE5) | Win / Mac |
| ArmorPaint | Open-source 3D texture painting | Free (build) | Win / Mac / Linux |
| Adobe Photoshop | Manual 2D texture creation | Paid (subscription) | Win / Mac |
| ZBrush | High-detail sculpted texture projection | Paid | Win / Mac |
| Marmoset Toolbag | Texture baking and real-time preview | Paid (one-time) | Win / Mac |
Blender 5.1 is the best starting point for most artists. It handles UV unwrapping, procedural 3D modeling textures, painting, and baking all within a single application and it is completely free.
Adobe Substance 3D Painter 12.0 is the professional industry standard for game and film assets. Its layer-based approach, PBR smart materials, real-time viewport, and the new Warp to Geometry feature make it faster and more powerful for complex textured 3D models than any other tool. If you are working professionally, learning Substance 3D Painter is not optional.
Quixel Mixer is worth knowing if you work with architectural visualization or environments. Its surface blending approach stacking photogrammetry-based materials together produces exceptionally realistic results quickly. It is free for Unreal Engine projects.
Marmoset Toolbag is the preferred choice for baking textures in game pipelines because of its accuracy and control over cage-based baking, which eliminates the artifacts that Blender sometimes introduces on complex meshes.
How to Make Textures for 3D Models Using Blender
Step 1: Create a New Material
Select your model in Object Mode and open the Properties Panel on the right. Click the material icon (sphere with a circle) and click New. Name it something descriptive “Metal_Worn” or “Wood_Oak” so you can identify it later as your scene grows.
Switch to the Shading workspace using the tabs at the top. The Shader Editor opens at the bottom and the 3D viewport sits at the top. The Principled BSDF node and a Material Output node are already connected by default.
Step 2: Add Image Texture Nodes
Press Shift+A in the Shader Editor and navigate to Texture > Image Texture. Place it to the left of the Principled BSDF. Click Open and load your albedo (base color) image. Connect the Color output to the Base Color input on the Principled BSDF.
Repeat for each additional map. For each non-color map (Normal, Roughness, Metallic, AO), click on the Image Texture node and change the Color Space from sRGB to Non-Color. Failing to do this causes washed-out or incorrect material responses under lighting; it is one of the most overlooked settings in 3D model texturing.
Step 3: Build a Procedural Wood Texture
Press Shift+A > Texture > Wave Texture. Set the type to Rings and adjust the Distortion value to around 2.0 to break up the perfect ring pattern. Press Shift+A > Color > Color Ramp and connect the Wave Texture’s Color output to the Color Ramp’s Factor input. Set the left color stop to a dark brown and the right stop to a lighter tan. Connect the Color Ramp’s Color output to the Base Color input on the Principled BSDF.
To add surface roughness variation, press Shift+A > Texture > Noise Texture and connect its Fac output to the Roughness input on the BSDF. This makes the wood look subtly more or less shiny in different areas, exactly as real wood does.
Step 4: Add a Normal Map for Surface Detail
Even a procedurally generated material benefits from a normal map to add fine surface detail, wood grain direction, small scratches, or surface imperfections.
Press Shift+A > Texture > Image Texture and load a wood grain normal map (download one free from Polyhaven). Set the color space to Non-Color. Press Shift+A > Vector > Normal Map and connect the Image Texture’s Color output to the Normal Map’s Color input. Connect the Normal Map’s Normal output to the Normal input on the Principled BSDF.
Adjust the Strength value on the Normal Map node to control how pronounced the surface detail appears. A value between 0.5 and 1.5 works for most surfaces.
Free 3D Model Texture Resources Where to Get High-Quality Textures
You do not need to create every texture for 3D models from scratch. These resources offer high-quality, production-ready 3D model textures that you can use in commercial projects.
Polyhaven is the best free texture library available. Every texture is CC0 licensed, no attribution required, free for commercial use. All textures come as full PBR sets including albedo, normal, roughness, displacement, and AO maps, typically at resolutions up to 8K.
AmbientCG offers a large library of seamless, tileable PBR materials also under the CC0 license. The site is well-organized by material category and includes quick previews on simple geometry so you can evaluate a 3D model texture before downloading.
Quixel Megascans is the most comprehensive photogrammetry-based texture library in existence, with thousands of scanned real-world surfaces. It is free for use in Unreal Engine projects. Subscriptions are available for other software.
Texture.ninja provides a large collection of seamless photo textures particularly strong for architectural surfaces like brick, concrete, and stone.
3DTextures.me is a clean, easy-to-navigate resource for tileable PBR textures for 3D models with consistent quality across the library.
3D Texturing for Games vs. Film vs. Architecture Key Difference
The same core skills apply across industries, but the technical requirements differ meaningfully. Understanding these differences will save you from optimizing for the wrong target.
Game Texturing
Game 3D model texturing is defined by constraints. Every texture has budget resolution limits, memory limits, draw call limits. A common setup for a game-ready prop is a single 2048×2048 texture set covering albedo, normal, roughness, and metallic maps in four separate files.
Texture atlasing combining multiple objects onto a single UV sheet is standard practice because it reduces draw calls. UDIM tiles are rare in real-time workflows because of the GPU overhead.
Normal maps do the heavy lifting in game 3D texturing because they add enormous visual complexity with minimal performance cost. The bake-from-high-poly workflow sculpting extreme detail in ZBrush or Blender and baking it down to a normal map for a low-poly game mesh is the foundation of character and prop texturing in games.
Film and VFX Texturing
Film 3D modeling texturing operates without the constraints that define game workflows. There is no real-time rendering, no polygon budget, no texture memory limit. Assets are rendered frame by frame on powerful hardware or in render farms
Displacement maps are used heavily in real geometric detail, not faked normal map detail. 3D model textures are typically 4K to 16K resolution, often using UDIM tiles to cover separate areas of a complex model at full resolution. A single film character might have 20 or more UDIM tiles covering different body regions.
Architectural Visualization
Arch-viz 3D texturing is entirely focused on material accuracy and photorealism. The goal is to make a render indistinguishable from a photograph of the finished building or interior.
This workflow relies heavily on material libraries, manufacturer-accurate wood species, specific stone finishes, fabric weaves. Tools like Quixel Mixer and D5 Render offer pre-built material libraries that match real-world products. Lighting accuracy is more critical here than in game or film work because clients are making construction and design decisions based on these renders.
Common 3D Texturing Mistakes
These are the problems that make even well-built 3D model textures look wrong and each one has a specific fix.
Inconsistent texel density Texel density is the relationship between the size of your UV islands and the texture resolution. In other words, it controls how many texture pixels cover each part of the model’s surface. When texel density is inconsistent, some surfaces look sharp while others look blurry on the same asset.
Fix: In Blender, use the Texel Density Checker add-on (free, available in the Blender Market) to visualize and equalize texel density across your UV islands before painting any texture for 3D models.
UV stretching and distortion Stretched UVs cause 3D modeling textures to look pulled or squashed on certain faces most obvious on patterns, wood grain, or brick.
Fix: In Blender’s UV Editor, enable Overlays > Stretch to visualize stretching. Blue means no stretch, red means heavy distortion. Re-unwrap problem areas and place additional seams to relieve the distortion.
Wrong color space on non-color maps Loading a normal map or roughness map with sRGB color space instead of Non-Color causes the shader to interpret the data incorrectly. The result is blown-out roughness or a normal map that appears inverted.
Fix: For every non-color texture map (normal, roughness, metallic, AO, displacement), set the Image Texture node’s color space to Non-Color in Blender, or ensure the correct designation in Substance Painter’s texture channel settings.
Tiling that is too obvious Seamless textures for 3D models that tile at the same scale across a large surface create a visually repetitive pattern that immediately reads as synthetic.
Fix: Layer two versions of the same texture at different scales and rotation values, then blend them using a noise-based mask. This breaks up the tiling pattern without requiring a unique high-resolution texture. The Stochastic Texturing technique in Blender achieves this procedurally.
Over-relying on geometry instead of normal maps Some artists add excessive geometry to represent surface detail that could be handled far more efficiently by a normal map especially in game pipelines where polygon count directly impacts performance.
Fix: Sculpt or model the fine detail on a high-poly version of the asset, bake it to a normal map, then apply the normal map to the optimized game-ready low-poly mesh.
Over-saturated textures 3D model textures with high color saturation look vivid in isolation but unconvincing in a scene with other assets and realistic lighting.
Fix: Reference real-world surface photos before painting. Real surfaces are almost always less saturated than artists intuitively expect. Reduce the saturation of your albedo map and check it against reference under neutral grey lighting before the final render.
Conclusion
3D texturing is where geometry becomes believable. Understanding the full pipeline from clean UV unwrapping to selecting the right 3D model textures, choosing the right workflow for your industry, and avoiding the mistakes that kill realism is what separates professional assets from amateur ones.
The skills covered in this guide apply across every major 3D application and every industry that uses 3D content. Whether you are building game-ready assets, architectural visualizations, or film-quality characters, the fundamentals of 3D modeling texturing are the same.
If your project requires professional-quality textured 3D models game assets, furniture visualization, architectural renders, gaming assets, or character models ITS has a dedicated team of 3D artists with experience across the full production pipeline. From modeling and UV unwrapping through to final 3D model texturing and render-ready delivery, we build assets to your exact specifications.
