How to Bake Normal Maps in Blender for Game Assets
Most developers don’t struggle with creating detail; they struggle when that detail breaks after baking. You’ve probably seen it before: a normal map that looks fine in Blender, but once it’s inside Unity or Unreal, seams appear, surfaces look warped, or flat areas suddenly show unwanted gradients. In real production work, these issues don’t come from lack of effort, they come from small mistakes in setup that quietly multiply.
In my experience working with Blender-based game asset workflows, the real pain points are rarely obvious at first. It’s usually things like incorrect UV alignment, inconsistent normals, subtle cage projection errors, or wrong color space settings that distort the final bake. Beginners tend to notice black or broken maps, while more experienced artists often waste time tracking down deeper issues like shading artifacts or engine-side mismatches.
Normal map baking in Blender for game assets becomes a critical step here, not just a technical feature. It controls how high-poly detail gets translated into low-poly efficiency, and that directly affects how your asset behaves under real-time lighting. When the bake is correct, the model holds detail without losing performance. When it’s not, even a well-modeled asset starts to look unstable in-engine.This guide focuses on those real, production-level problems and the decisions that actually fix them, not just the button clicks inside Blender.
Step 1: Set Up High-Poly and Low-Poly Models Correctly
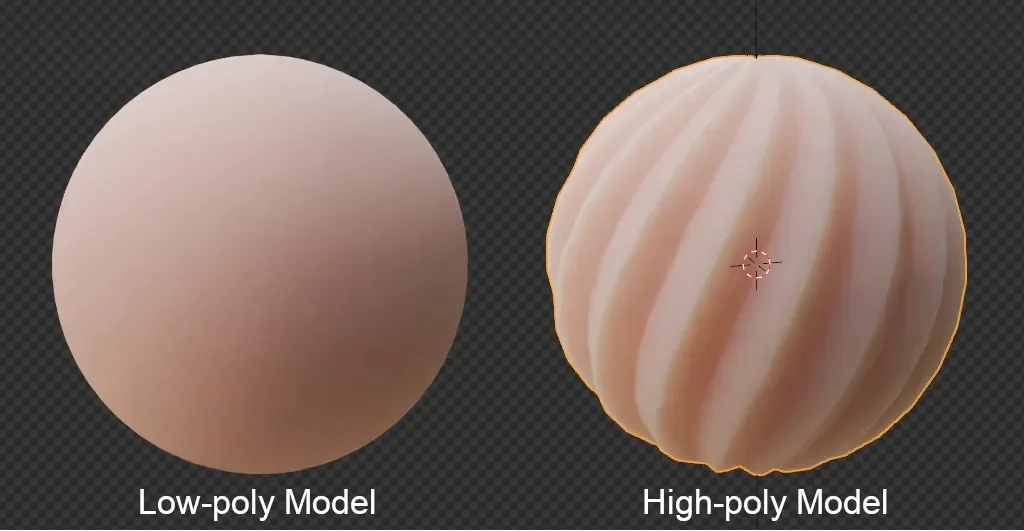
In the first step, you need to prepare both versions of the same asset inside Blender. The low-poly model is the optimized game mesh that will later go into Unity or Unreal, while the high-poly model contains the detailed surface information that will be baked into the normal map. Place both models in the same scene and align them perfectly in the same 3D space. Even a small offset can create stretched details, broken shading, or missing normal information during the bake.
Use Blender’s transform tools to check the position, rotation, and scale of both models. Press G to move, R to rotate, and S to scale if adjustment is needed. The goal is to make the high-poly and low-poly models sit directly over each other without visible mismatch. At this stage, you should focus only on clean alignment and matching shape. The object selection order will come later in the baking setup, so do not mix that part into this step. A properly aligned model pair gives you a stronger base for a clean normal map bake.
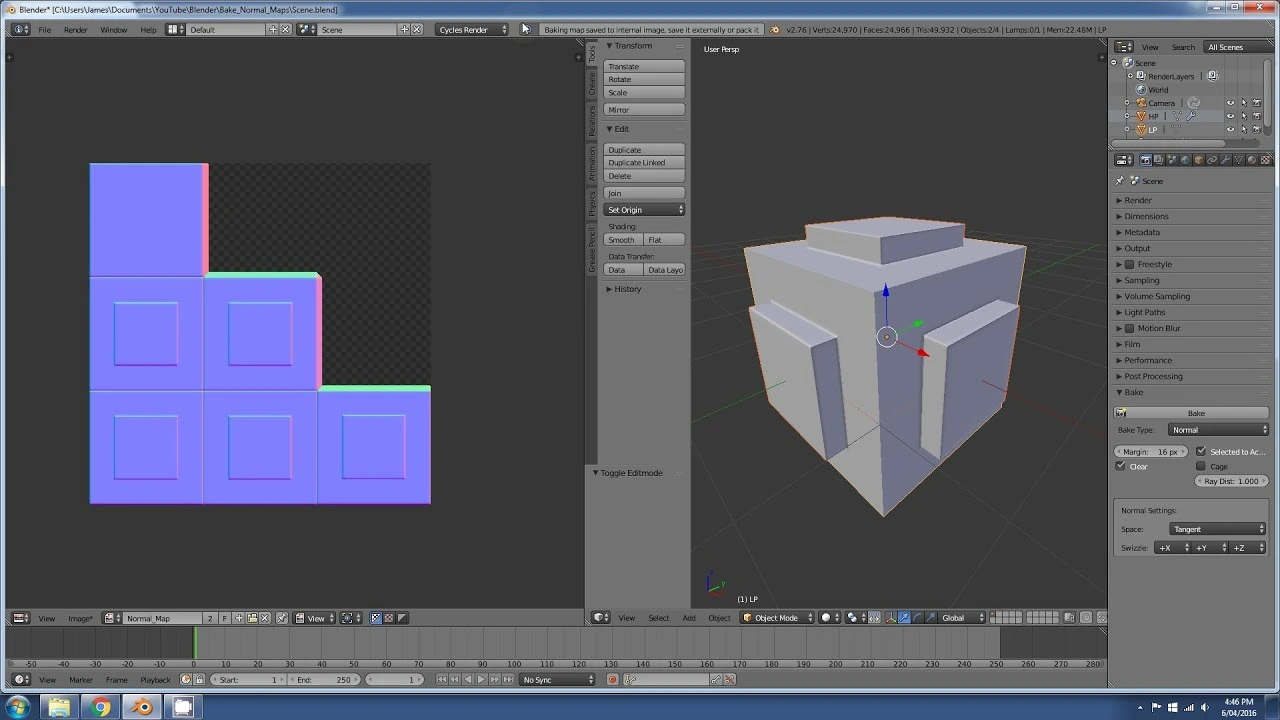
Step 2: Switch to Cycles Render Engine for Normal Map Baking
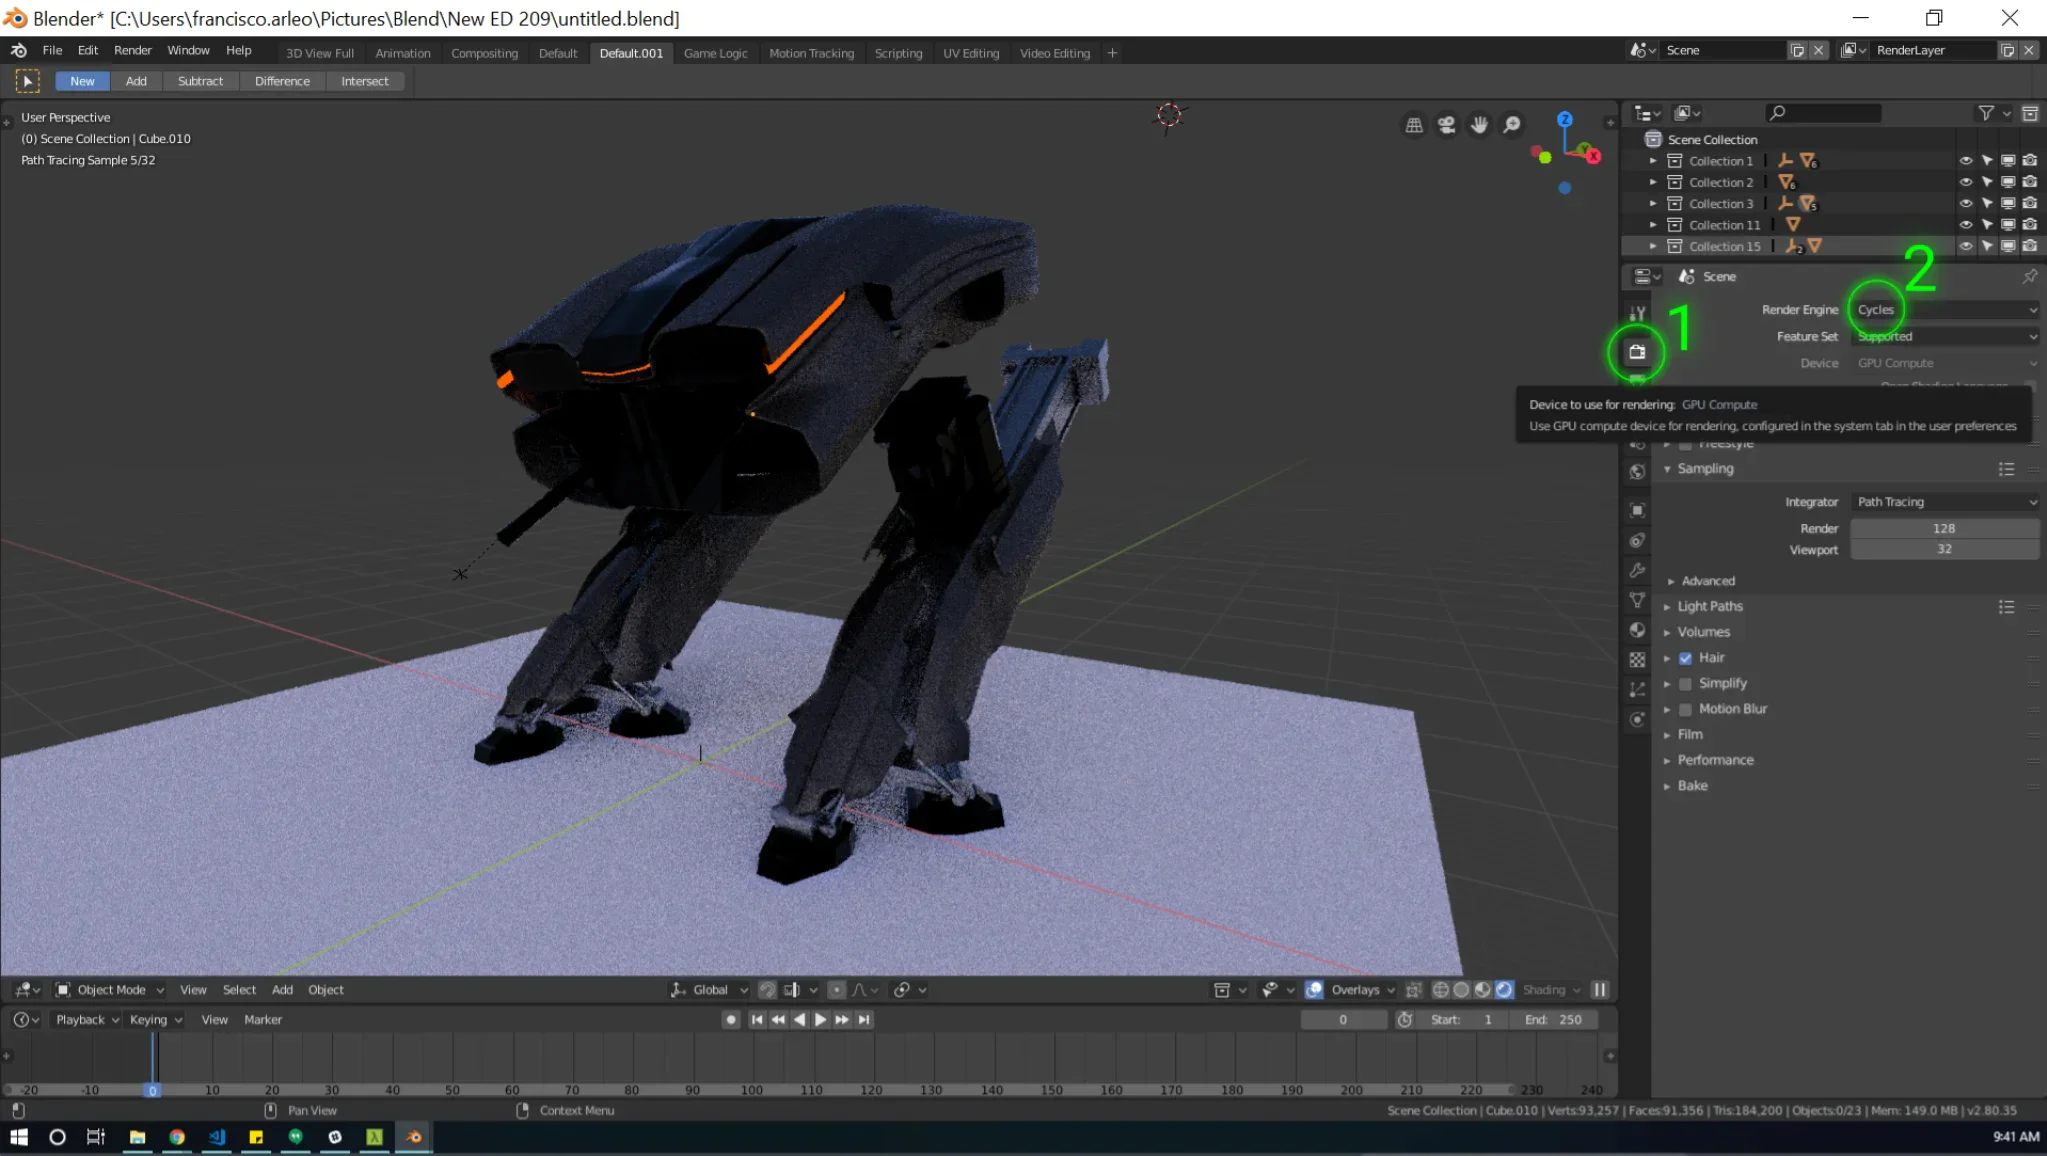
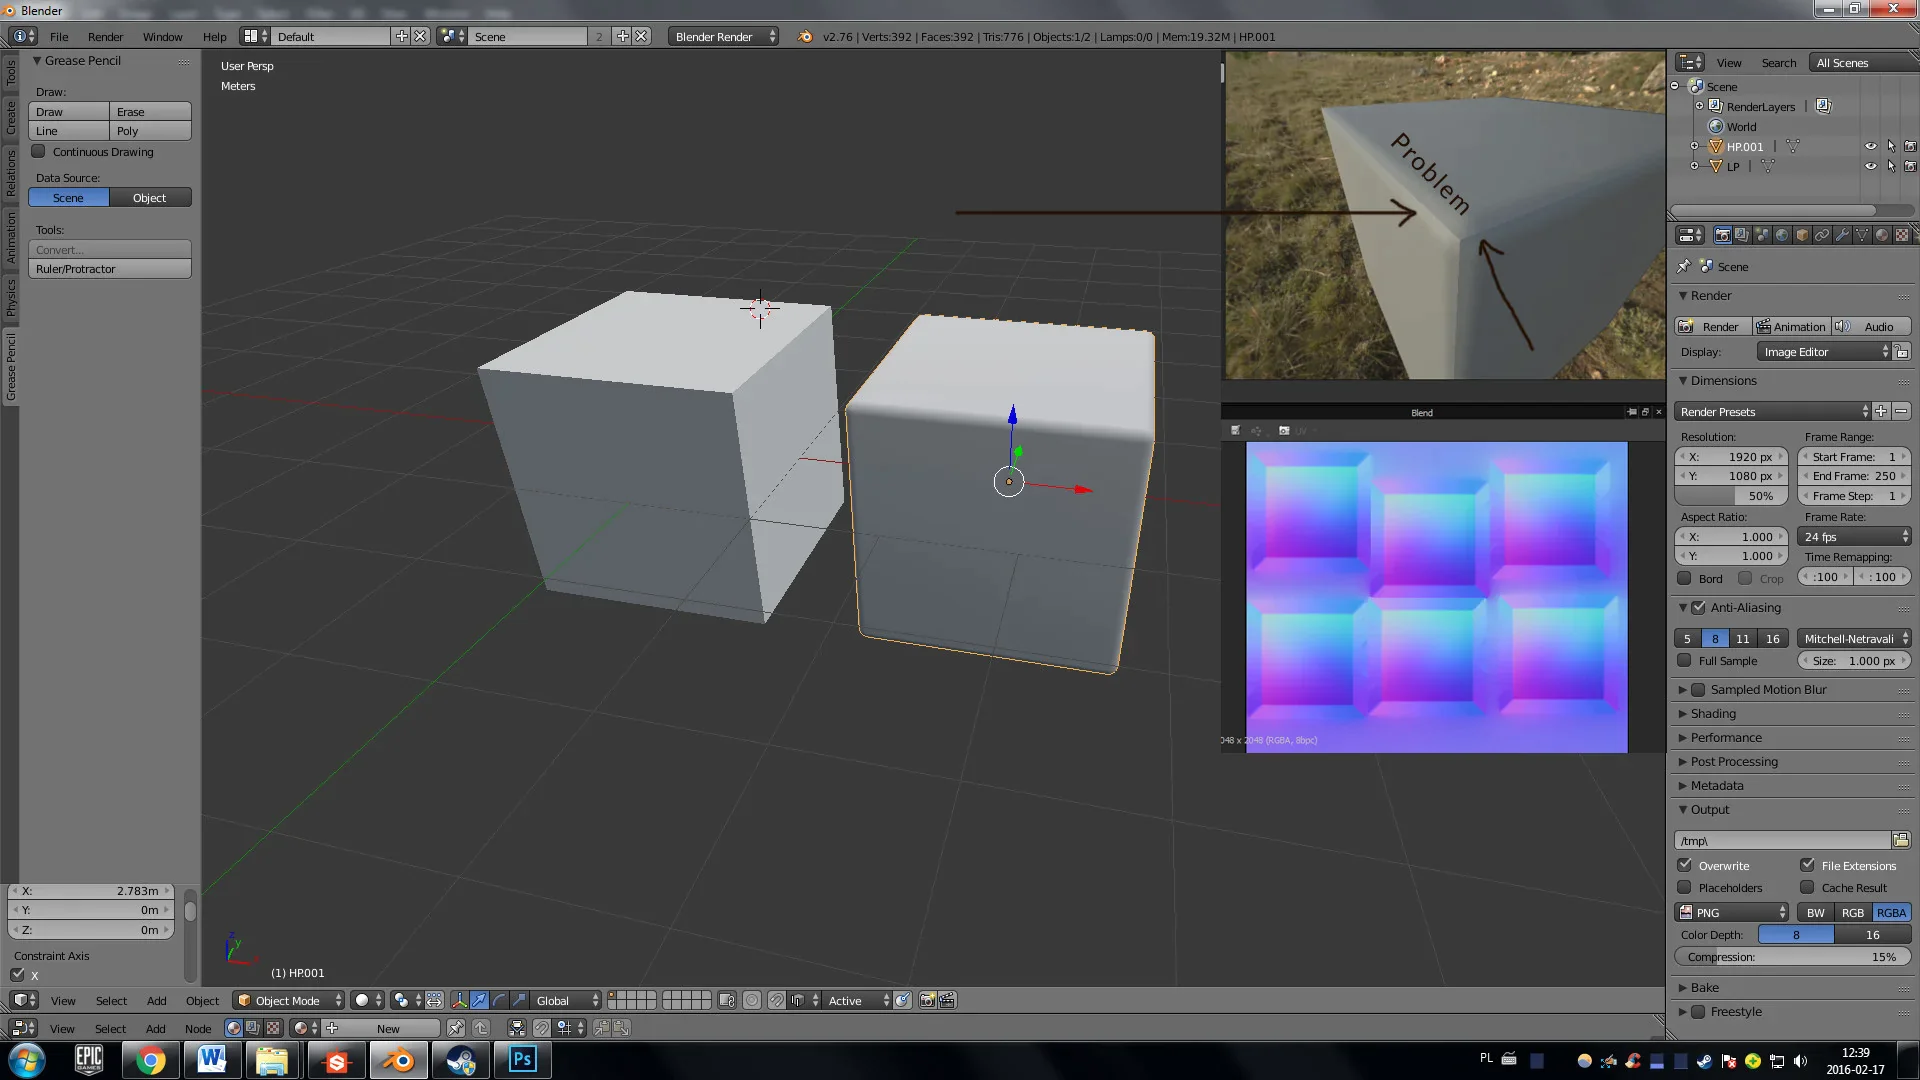
After aligning your high-poly and low-poly models in Step 1, move to the right side of your screen and go to the Properties panel. Now click on the camera icon (Render Properties) as shown in the image this is where you control rendering settings. At the top, you will see the Render Engine dropdown. Click on it and select “Cycles” to activate Blender’s baking system, because Blender’s baking tools are available through Cycles, so switch the Render Engine to Cycles before baking. Eevee is mainly a real-time viewport/render engine and is not used for this baking workflow .Once you switch to Cycles, move slightly down to the Device option. Click and choose “GPU Compute” if your system has a graphics card, or keep it on CPU if not. This directly affects your baking speed. By following these exact clicks, you enable Blender to accurately transfer surface detail from your high-poly model to your low-poly mesh, and your scene becomes fully ready for the normal map baking process in the next step.
Step 3 : Create a New Image Texture
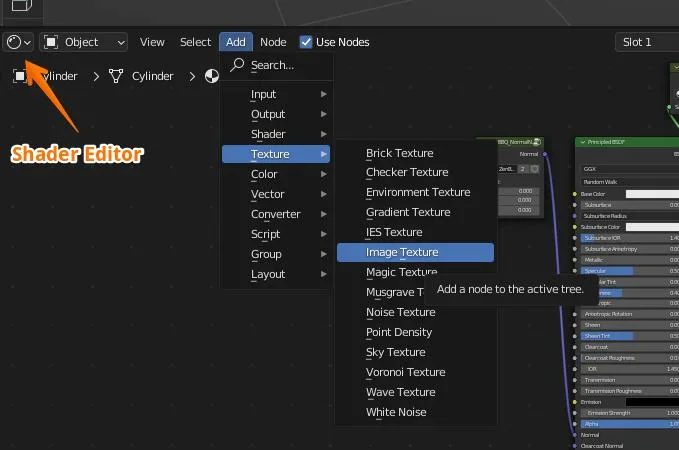
After switching Blender to Cycles, you need to create a new image texture for the normal map bake. This image works like an empty canvas where Blender stores the surface detail from the high-poly model. First, you should select the low-poly model and open the Shader Editor. Then press Shift + A, go to Texture, and choose Image Texture. In the Image Texture node, click New and give the image a clear name, such as Normal_Bake or LowPoly_Normal_Map. You can set the size to 2048×2048 for most game assets, while 4096×4096 works better for larger or more detailed models. Keep this image blank, because Blender will fill it during the bake. Before baking, make sure you select the Image Texture node. Blender bakes the normal map into the active image node, so this small step helps you avoid failed bakes, missing details, or maps that do not save correctly.
Step 4 :Select Bake Settings

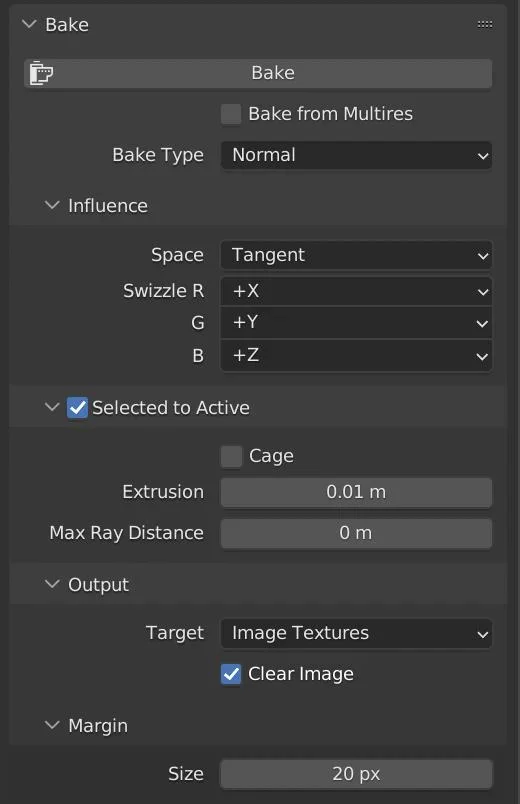
Creating the new Image Texture, you need to set the correct bake settings so Blender knows what type of map to create. Go to the Render Properties panel and scroll down to the Bake section. In the Bake Type dropdown, choose Normal because you want Blender to transfer surface direction and detail from the high-poly model onto the low-poly model. Next, enable Selected to Active. This option is very important because it tells Blender to bake detail from the selected high-poly object onto the active low-poly object. Make sure you select the high-poly model first, then select the low-poly model last, so the low-poly mesh becomes active. Keep the normal space set to Tangent, because game engines like Unity and Unreal use tangent-space normal maps for real-time lighting. These settings help you create a clean normal map that keeps high-poly detail while keeping the final game asset optimized and lightweight.
Step 5: Select the High-Poly and Low-Poly Models in the Correct Order
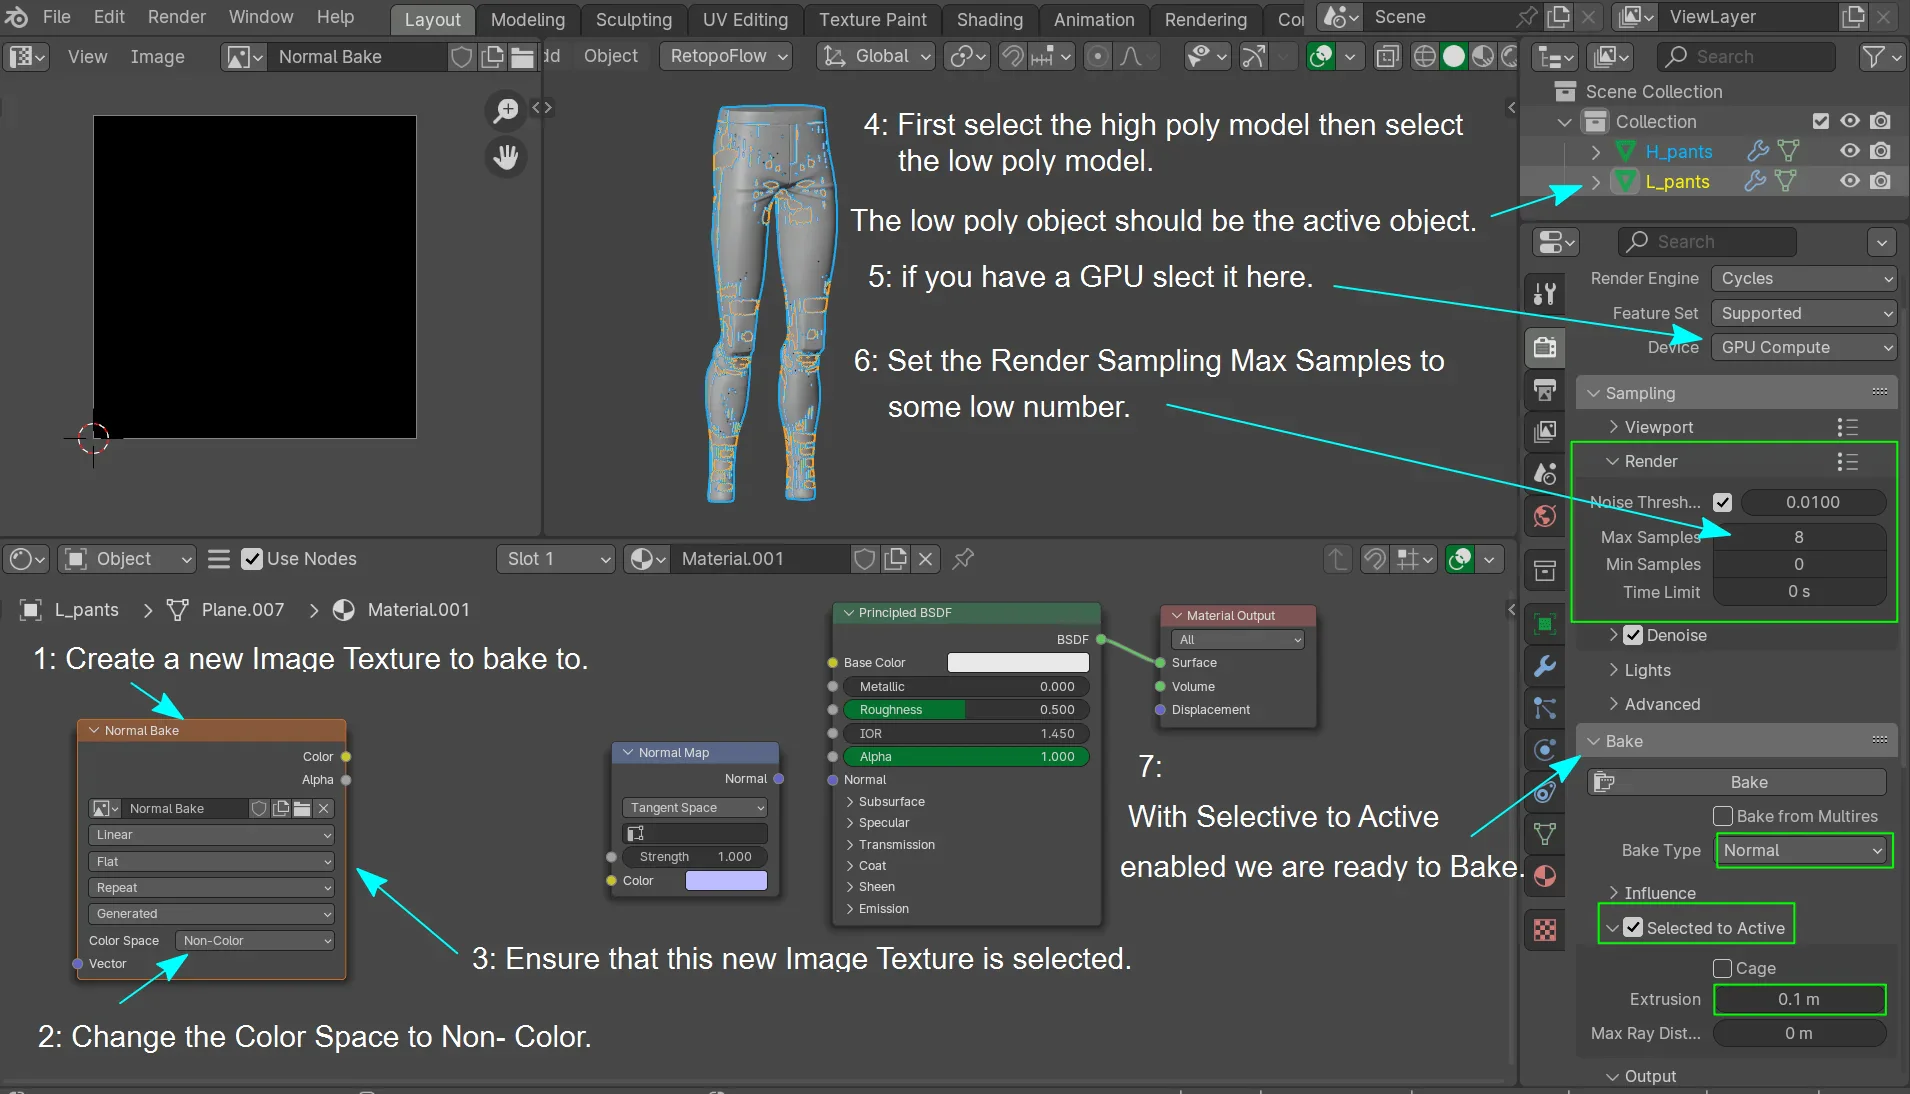
After selecting the bake settings, you need to select your models in the correct order before clicking Bake. In this step, you first select the high-poly model because it contains the detailed shape, bevels, cuts, dents, and surface information. After that, hold Shift and select the low-poly model last. Blender treats the last selected object as the active object, so the low-poly mesh becomes the object that receives the baked normal map.
This step is very important for Selected to Active baking. Blender reads the detail from the high-poly model and projects it onto the active low-poly model. If you select the low-poly first and the high-poly last, Blender may bake in the wrong direction, and the result can look broken, empty, or distorted. Before you press the Bake button, check the selection highlight carefully. The low-poly model should be the active object, and the high-poly model should only be selected as the source. This simple selection order helps you create a clean normal map that works better inside game engines like Unity and Unreal.
Step 6 : Adjust Cage Settings
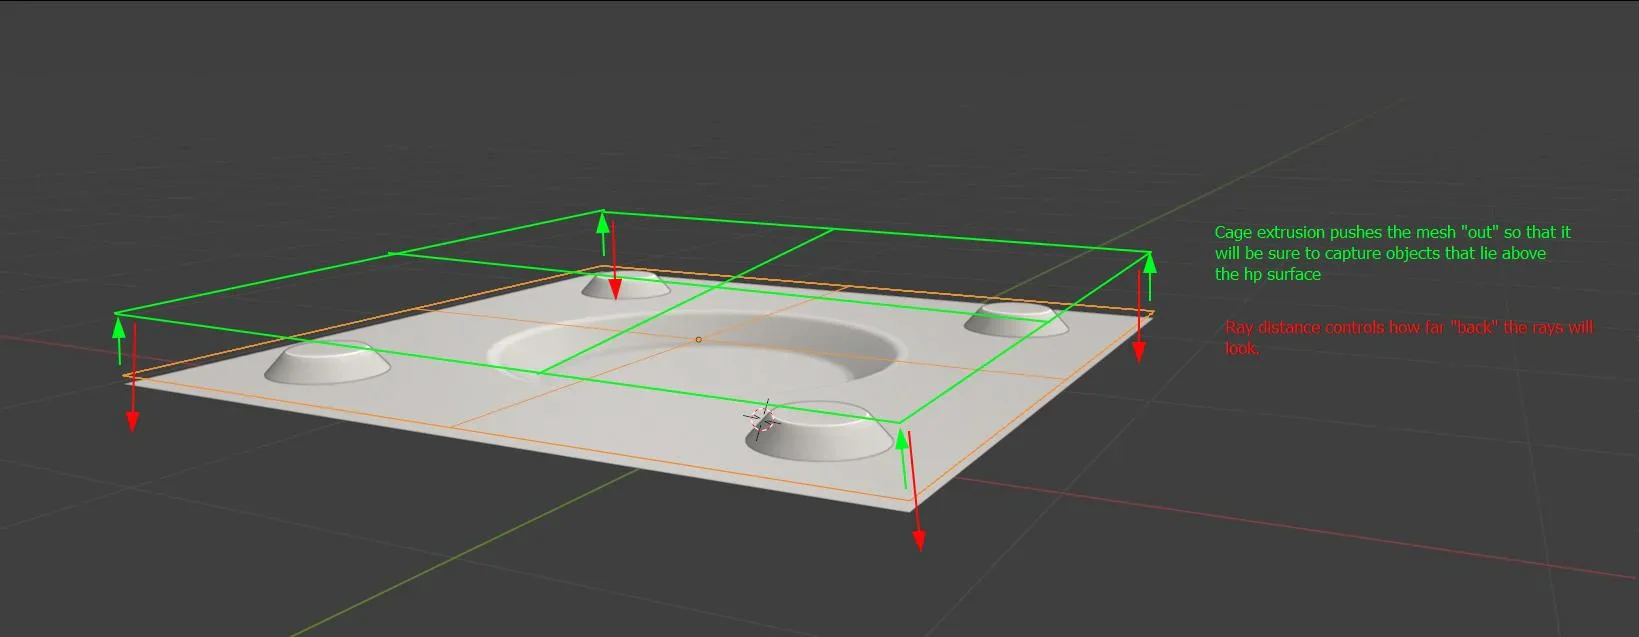
After selecting the objects in the correct order, you should check the cage settings if the normal map shows broken colors, missing detail, or strange projection marks. In this image, you can see how cage extrusion and ray distance work during baking. Cage Extrusion pushes the projection area outward from the low-poly mesh, so Blender can capture the high-poly detail more safely. Ray Distance controls how far Blender looks for the high-poly surface during the bake. If this distance is too low, you may lose details. If it is too high, Blender may capture the wrong nearby surfaces.
You do not always need a cage, but it becomes useful when the high-poly and low-poly shapes do not match perfectly. Start with a small Extrusion value, such as 0.01 m, and test the bake. If parts of the normal map look empty or clipped, increase the value slowly. Avoid using a very high value because it can create unwanted gradients, color artifacts, or overlapping projection errors. For clean game assets, you should adjust the cage only enough to cover the high-poly detail without reaching other parts of the model.
Step 7: Click Bake to Generate the Normal Map
At this Point, the baking setup is ready. The high-poly model is selected as the detail source, the low-poly model is active, and the Bake Type is set to Normal. Now press the Bake button inside Blender’s Bake panel. Blender will start reading the high-poly surface detail and transfer that information into the selected Image Texture node. During this process, avoid changing the object selection, material setup, or image texture target, because Blender needs the same active setup to complete the bake correctly.
Once the bake finishes, a purple-blue normal map appears in the Image Editor. This map stores the lighting direction and surface detail from the high-poly model, but it keeps the low-poly mesh lightweight for game engines. A clean bake should show clear edges, smooth color transitions, and no strange black spots or broken seams. If the result looks distorted, check the cage distance, selected object order, UV unwrap, and image texture selection before baking again.
Step 8: Save the Baked Normal Map Image
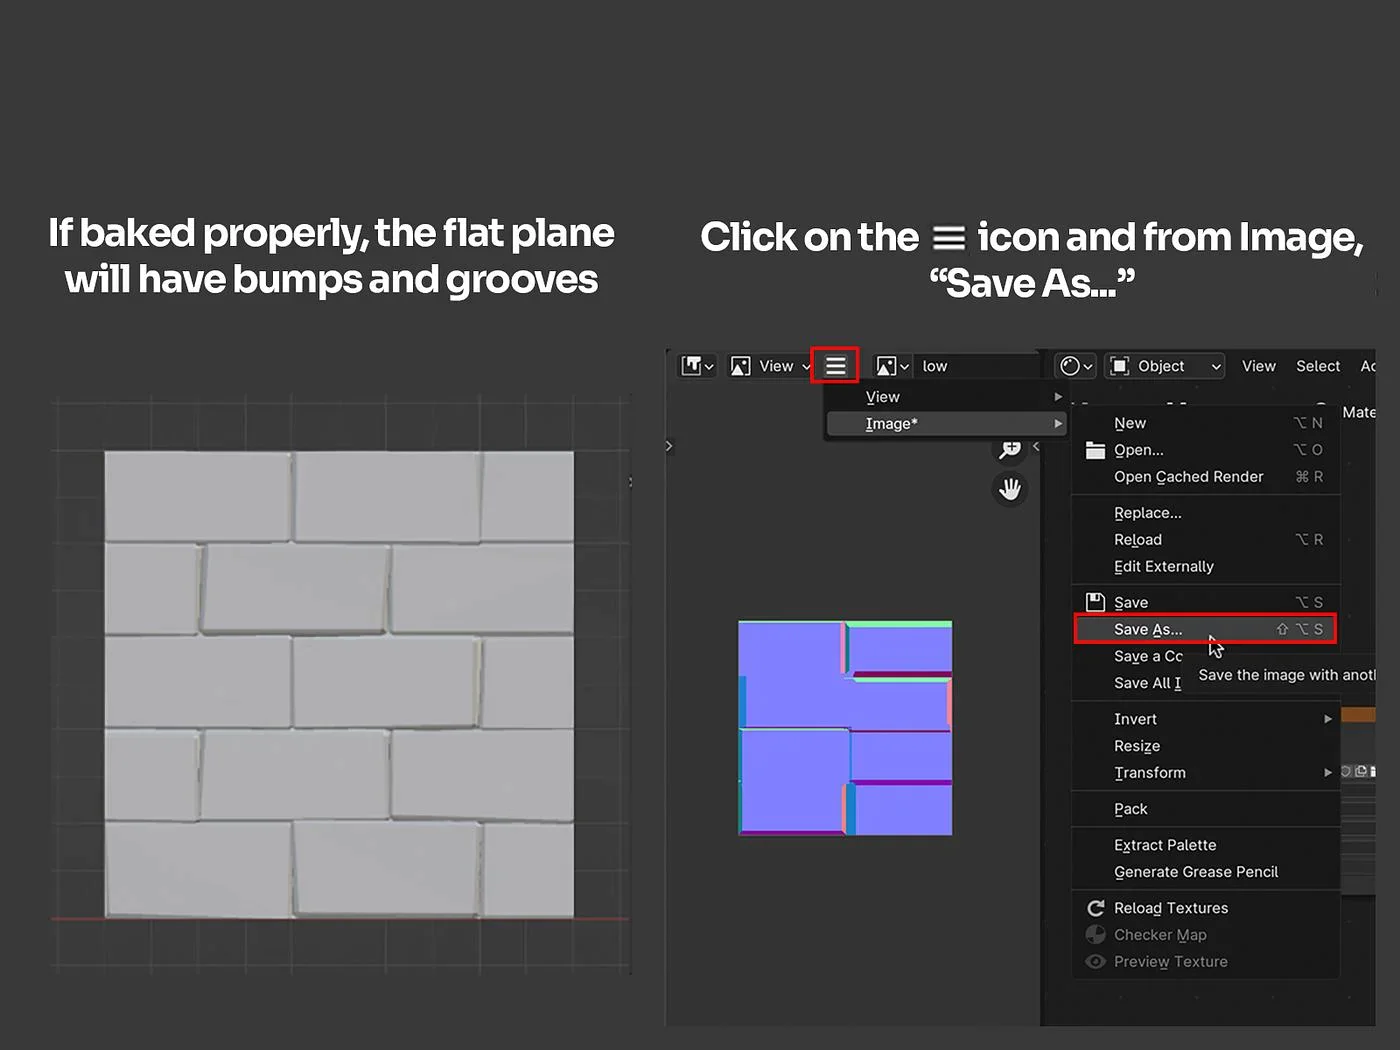
Once the normal map appears in the Image Editor, you should save it as an external file right away. Blender may show the baked texture inside the project, but it does not always save it automatically on your computer. This is why many users lose their baked normal maps after closing the file. To avoid this issue, go to the Image Editor, click Image, and choose Save As. Give the file a clear name, such as AssetName_Normal.png or LowPoly_Normal_Map.png, so you can find it easily later.
You should save the normal map in the same folder where you keep the model and other texture files. This keeps the game asset organized and ready for export. For most game assets, PNG works well because it is clean and easy to use in Unity or Unreal. In some production workflows, TGA is also a good option. Before moving forward, open the saved file once and check that you can see the purple-blue normal map clearly. This simple check helps you protect the bake result and prevents missing texture problems inside the game engine.
Step 9: Test the Normal Map in a Game Engine
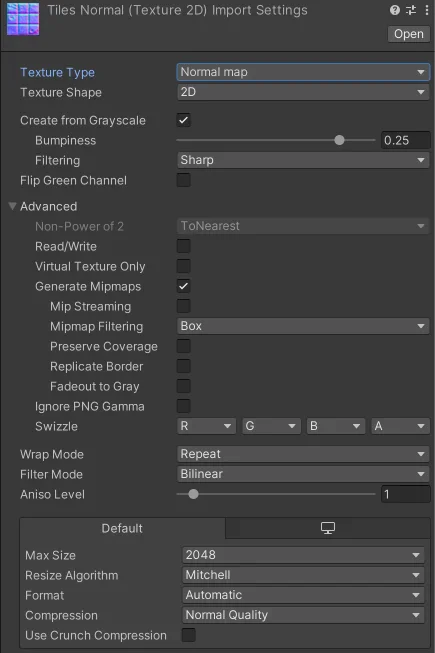
At the final step, you need to test the baked normal map inside a real game engine. A normal map may look fine in Blender, but the real test happens in Unity or Unreal, where real-time lighting shows seams, flipped details, or shading problems. Import the low-poly model and the saved normal map into the engine. In Unity, select the texture and set Texture Type to Normal Map. In Unreal, import the texture and make sure it uses the correct normal map settings. This tells the engine to read the image as surface detail, not as a normal color texture.
Now you should apply the normal map to the material and place that material on the low-poly model. Add a light, rotate it around the asset, and check the model from different angles. A clean normal map should show high-poly detail without black spots, broken seams, strange gradients, or inverted dents. If you see flipped bumps or wrong shading, check the green channel, normal map direction, UV seams, and compression settings. This final check gives you confidence that the asset is ready for a real game workflow, not just a successful bake inside Blender.
Pro Tips for Better Normal Maps
Optimize the Low-Poly UV Map
Your low-poly UV map decides where Blender places the baked normal detail. Keep UV islands clean, avoid unwanted overlap, and leave enough padding between islands. This helps you prevent seams, texture bleeding, and stretched normal details
Use the Right Resolution
For clean game assets, you should start with 2048×2048. Small props can use 1024×1024, while close-up or hero assets may need 4K. Good resolution keeps bevels, dents, and surface details sharp without wasting texture memory.
Set Texture to Non-Color Data
A normal map stores direction data, not color. Set the baked texture to Non-Color Data in Blender. This helps you avoid weak details, wrong lighting, and strange shading in Unity or Unreal.
Automate Repeated Baking
If you bake many assets, use Blender Python to speed up repeated tasks like creating image textures, setting bake type, naming files, and saving maps. Automation helps you save time, but you should still check UVs, cage settings, and final engine results.
Test Under Real Lighting
Before final approval, test the normal map in Unity or Unreal. Rotate a light around the model and check for seams, black marks, flipped dents, or strange gradients. This final check helps you confirm the asset is production-ready.
Common Mistakes to Avoid
In real baking work, small mistakes often create the biggest problems. A normal map can look fine in Blender but show seams, black spots, or strange lighting in Unity or Unreal. Check these common issues before you bake.
Wrong Selection Order
Select the high-poly model first and the low-poly model last. The low-poly model must stay active because it receives the normal map. Wrong order can create an empty or broken bake.
Poor UV Unwrap
Your low-poly model needs clean UVs. Avoid unwanted overlap, stretched islands, and very tight spacing. Leave padding between UV islands so the bake does not bleed over the edges.
Wrong Color Space
Do not treat a normal map like a color texture. Set it to Non-Color Data. This helps you avoid weak details, odd colors, and incorrect shading.
Bad Cage Distance
A cage that is too small can miss details. A cage that is too large can capture the wrong surface. Start with a small value and increase it slowly until the bake looks clean.
Unapplied Scale or Rotation
Apply scale and rotation before baking. Use Ctrl + A > Rotation & Scale on both models. This keeps the projection clean and predictable.
Forgetting to Save the Image
Blender shows the baked map in the Image Editor, but it may not save it automatically. Use Image > Save As right after baking so you do not lose the texture.
No Engine Test
Do not trust the bake until you test it in Unity or Unreal. Apply the normal map, rotate a light around the model, and check seams, dents, edges, and shading.
Can Blender Bake Normal Maps for Game Engines?
Yes, you can bake normal maps in Blender for game engines like Unity and Unreal. Blender lets you take detail from a high-poly model and transfer it onto a low-poly model. This helps you keep the game asset light while still showing bevels, cuts, dents, and surface detail under real-time lighting.
To get a clean result, use the right setup. Switch Blender to Cycles, create a new image texture, set Bake Type to Normal, and enable Selected to Active. Keep the normal map in Tangent Space, because most game engines use tangent-space normal maps for real-time assets.
After baking, save the normal map as an external file. Then import it into Unity or Unreal and set the texture as a Normal Map. This final check helps you catch seams, flipped details, or shading issues before you use the asset in a real game project.
Fixing Normal Map Issues
Even with the right bake settings, normal maps can still show problems. The good thing is that most issues have a clear cause. When your bake looks wrong, do not restart the full workflow immediately. Check the problem, fix the setting, and bake again.
Black Normal Map
If the normal map turns black, Blender usually does not have a proper bake target. Go back to the Shader Editor and select the Image Texture node before pressing Bake. Also check that you created a new blank image for the normal map. Blender needs an active image texture to store the baked result.
Baking Artifacts
If you see strange marks, color patches, or distorted details, check the cage and ray distance first. A low cage value may miss details, while a high value may capture the wrong surface. Increase the value slowly and test again. Also check mesh smoothing, face normals, bevels, and overlapping geometry.
Visible Seams
If seams appear on the model, inspect the low-poly UV layout. Make sure UV islands have enough padding and do not sit too close together. Increase the Bake Margin to reduce edge bleeding. Clean UVs and proper padding help your normal map hold detail better inside Unity or Unreal.
Wrong Shading
If the model looks flat, inverted, or oddly lit, check the normal map color settings. Set the baked texture to Non-Color Data in Blender. When importing into Unity or Unreal, make sure the engine reads it as a Normal Map, not a regular color texture. This small setting can fix many lighting issues.
Need Professional Normal Map Baking for Game Assets?
If you need clean and optimized 3D assets for Unity or Unreal, ITS can help with normal map baking, low-poly optimization, UV cleanup, texture preparation, and asset polishing. With experience serving 2,000+ customers and ISO-certified service standards, ITS can support safer and more reliable production work.Contact ITS for a free quote and make your 3D game assets production-ready.
