How to convert any 2D image to 3D model in Blender using Displace Modifier
Many beginners try to convert a 2D image to 3D model in Blender, but the process often becomes confusing. A simple image may look perfect in an image viewer, yet it does not automatically turn into a 3D surface inside Blender. Instead, the mesh stays flat or produces strange shapes after applying displacement.
This problem usually happens because the mesh does not have enough geometry, or the image does not work well as a displacement map. Many users also struggle to configure the Displace Modifier, adjust the strength correctly, or prepare the image so Blender can read the depth information properly. As a result, the final model may appear blocky, distorted, or completely flat.
Another challenge appears when working with high-detail images. If the plane is not subdivided properly, Blender cannot push and pull the surface to create accurate depth. This leads to poor results and forces artists to spend extra time fixing geometry, adjusting modifiers, and testing different settings.
This guide explains how to convert a 2D image to 3D model in Blender using the Displace Modifier with a clear and practical workflow. You will learn how to prepare the image, set up the mesh correctly, apply displacement, and adjust the modifier to produce clean 3D results. By following these steps, you can quickly turn a flat image into a detailed 3D mesh ready for rendering, animation, or 3D printing.
Step 1 – Open Blender and Delete the Default Cube
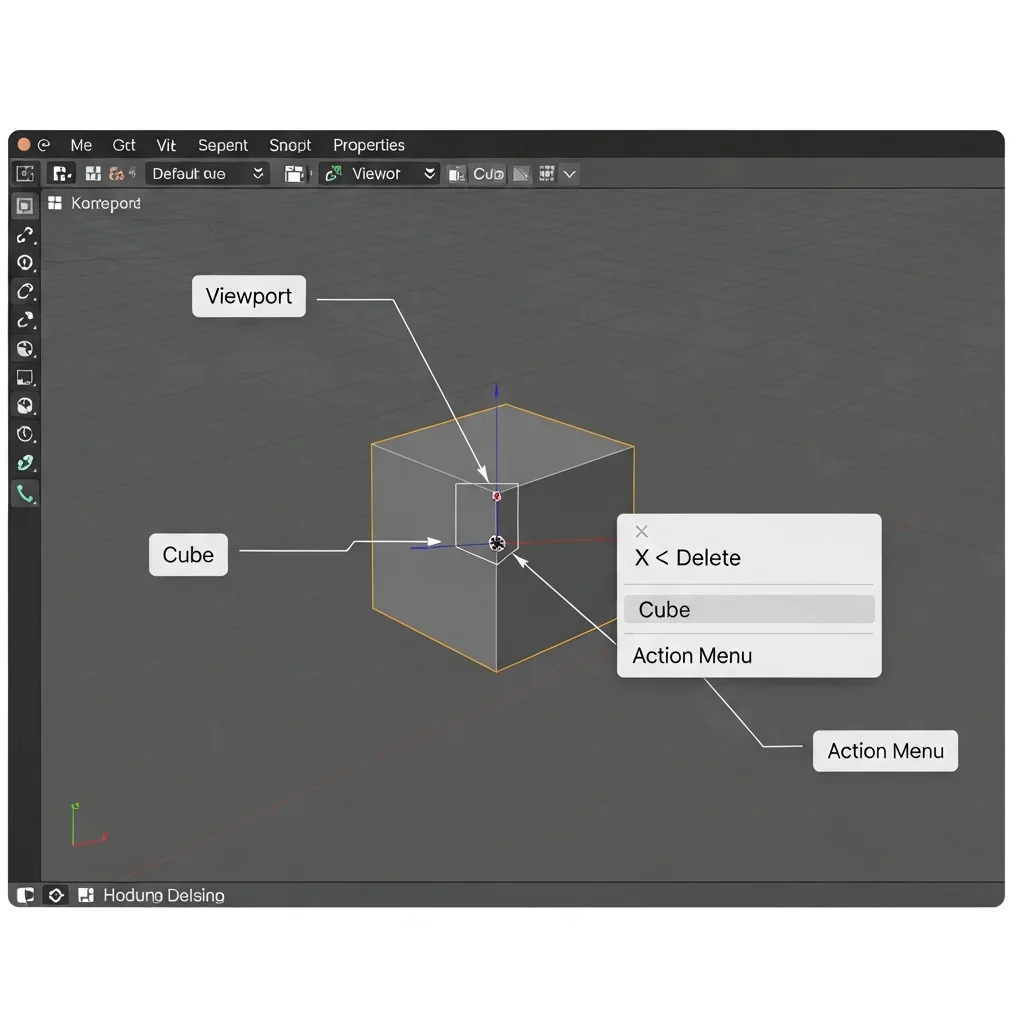
Open Blender and start a new project. In the viewport, select the default cube by left-clicking on it. Press X on your keyboard and choose Delete from the menu to remove the cube from the scene. This clears the workspace so you can create a new mesh that will help you convert a 2D image to 3D model in Blender using the Displace Modifier. After deleting the cube, keep the empty scene ready for the next step where you will add the base mesh for the displacement process.
Step 2 – Add a Plane Mesh
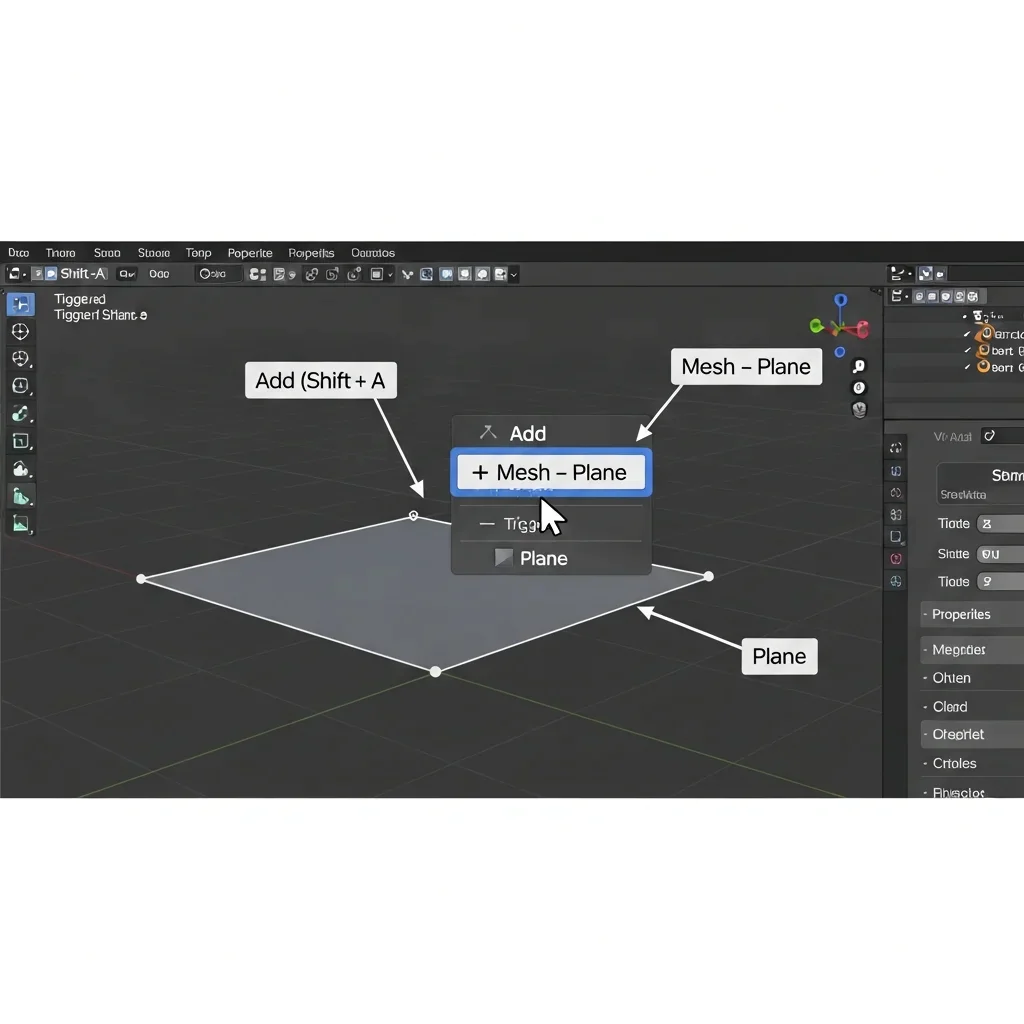
Press Shift + A to open the Add menu in the viewport. Move your cursor to Mesh, then click Plane to add a flat plane to the scene. Blender will place the plane at the center of the workspace. Select the plane if it is not already selected. This plane will act as the base surface where Blender will apply the displacement from your image. Keep the plane selected so you can modify its geometry in the next step.
Step 3 – Subdivide the Plane to Increase Geometry
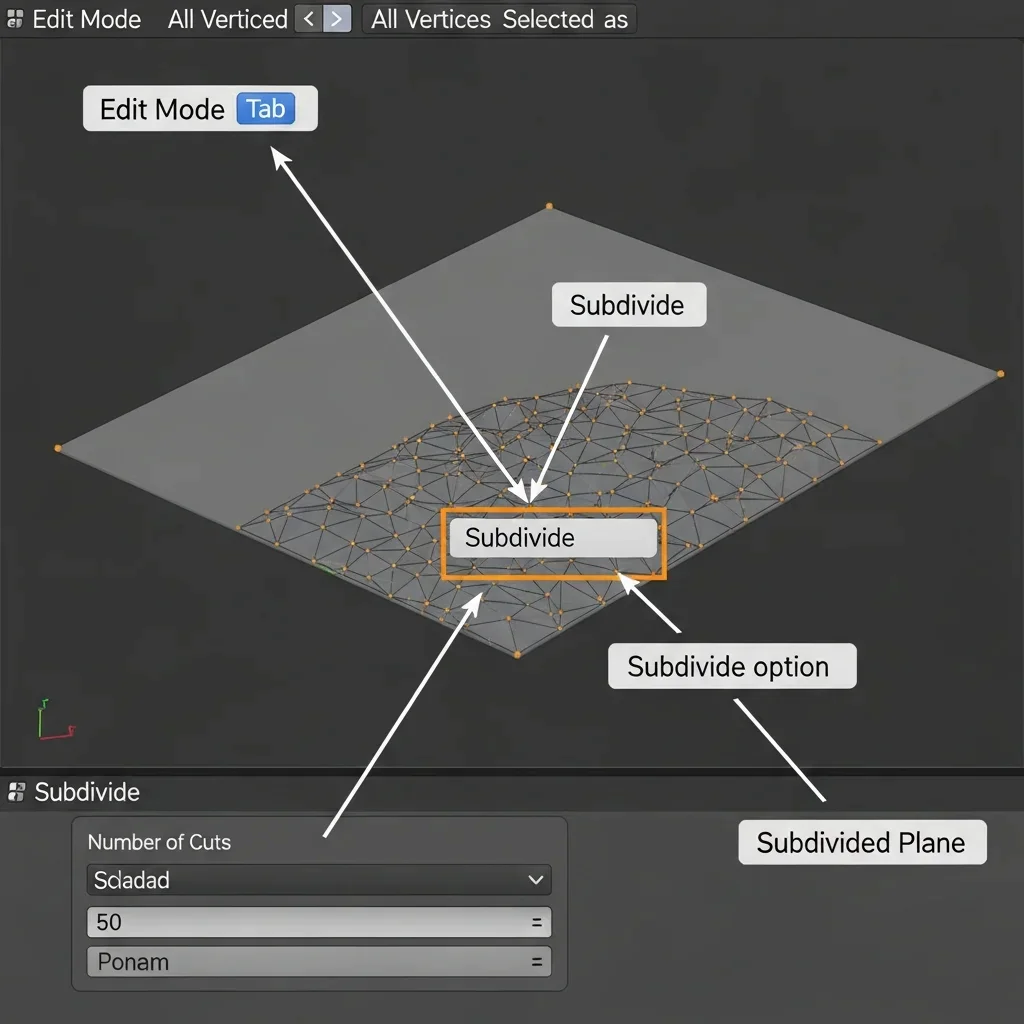
Select the plane in the viewport if it is not already selected. Press Tab on your keyboard to switch from Object Mode to Edit Mode. In Edit Mode, press A to make sure all vertices of the plane are selected. Right-click anywhere on the plane to open the context menu, then click Subdivide.
After you click Subdivide, look at the bottom-left corner of the viewport for the Subdivide panel. In this panel, find the Number of Cuts option. Increase this value to 50 or higher, depending on how much detail you want. Increasing the cuts will divide the plane into many smaller faces, which gives Blender enough geometry to push and pull when the displacement is applied.
Once you finish adjusting the cuts, press Tab again to return to Object Mode. The plane now contains many vertices, which prepares the mesh for the displacement process in the next step.
Step 4 – Apply the Subdivision Surface Modifier
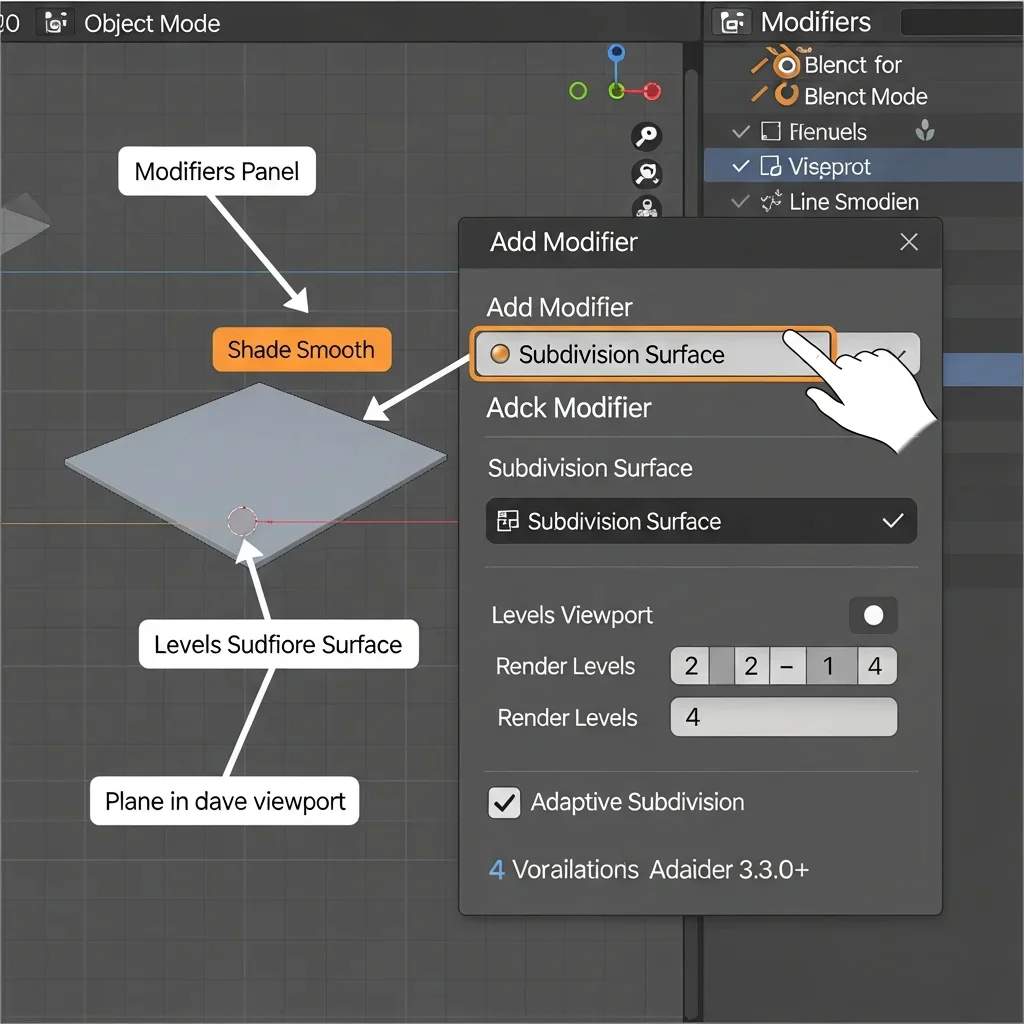
Select your plane in Object Mode by left-clicking it in the viewport or choosing it from the Outliner. Open the Modifiers Panel by clicking the wrench icon in the Properties Editor on the right. Click Add Modifier → Subdivision Surface to add the Subdivision Surface modifier, which increases the number of vertices on your plane and makes the mesh smooth enough for displacement. In the modifier settings, set Levels Viewport to 2–4 to control how smooth the mesh appears while working, and set Render Levels to the same value to ensure detailed results when rendering. Right-click the plane and choose Shade Smooth to eliminate blocky edges and improve visual smoothness.
If you are using Blender 3.0+ with Cycles, enable Adaptive Subdivision to automatically subdivide areas with more detail, creating cleaner displacement without overloading your computer. Make sure the Subdivision Surface modifier is above the Displace Modifier in the stack, so Blender applies subdivision first, providing enough geometry for your image to create realistic 3D depth. Rotate the viewport and inspect your plane; if it still looks blocky, increase the Levels or subdivide more in the previous step. After this, your mesh is ready for the displacement process.
Step 5 – Add the Displace Modifier
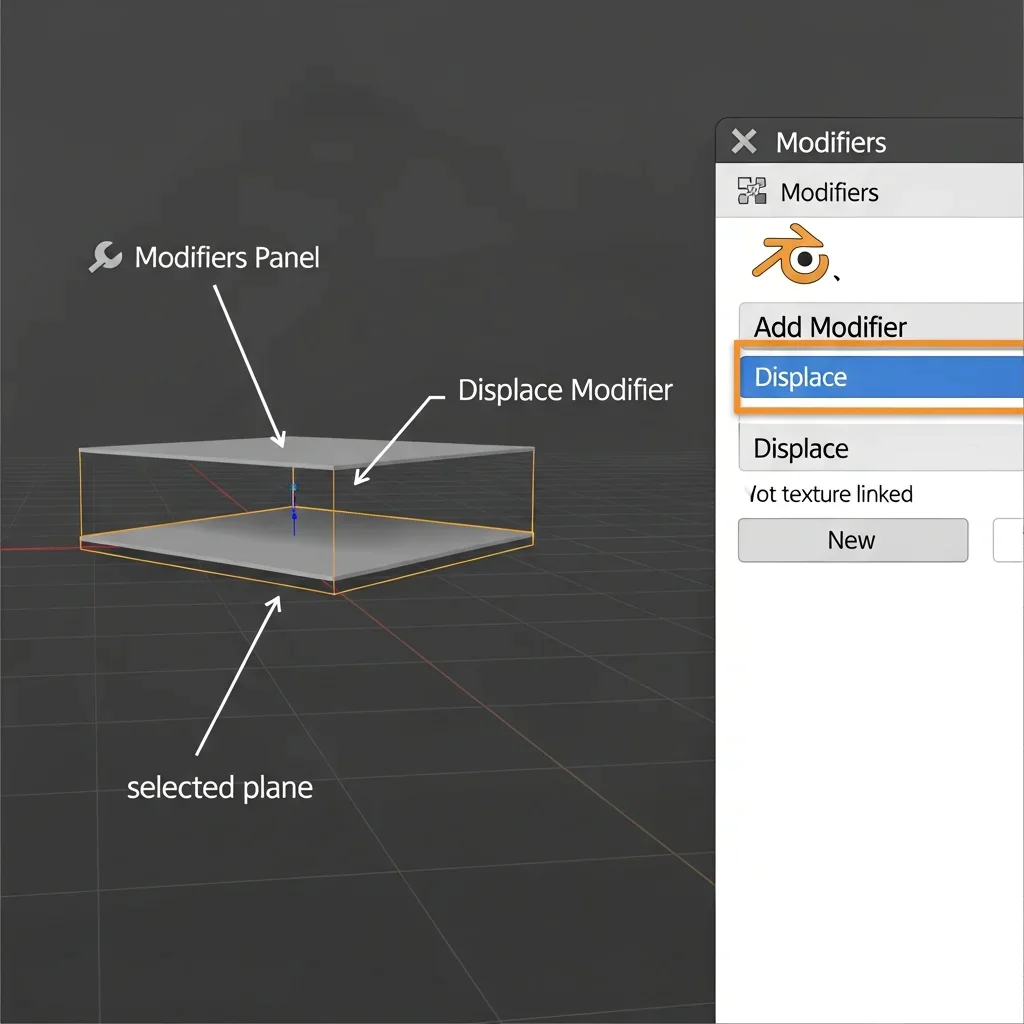
Select your plane in Object Mode to make sure it is active. Open the Modifiers Panel by clicking the wrench icon in the Properties Editor on the right side of Blender. Click Add Modifier and choose Displace from the list. This adds the Displace Modifier to your plane, which will allow Blender to use an image to push and pull the vertices of your mesh, creating real 3D depth. Keep the modifier un-applied for now because you need to load a texture and adjust the settings before finalizing the displacement. Check that the modifier appears in the stack above your plane, and leave the plane selected so Blender can link it with the texture properly. You are now ready to create a new texture that will control the displacement in the next step.
Step 6 – Create a New Texture

Select your plane in Object Mode to make sure it is active. Open the Modifiers Panel by clicking the wrench icon in the Properties Editor on the right side of Blender. Click Add Modifier and choose Displace from the list. This adds the Displace Modifier to your plane, which will allow Blender to use an image to push and pull the vertices of your mesh, creating real 3D depth. Keep the modifier un-applied for now because you need to load a texture and adjust the settings before finalizing the displacement. Check that the modifier appears in the stack above your plane, and leave the plane selected so Blender can link it with the texture properly. You are now ready to create a new texture that will control the displacement in the next step.
Step 7 – Load the Image Texture
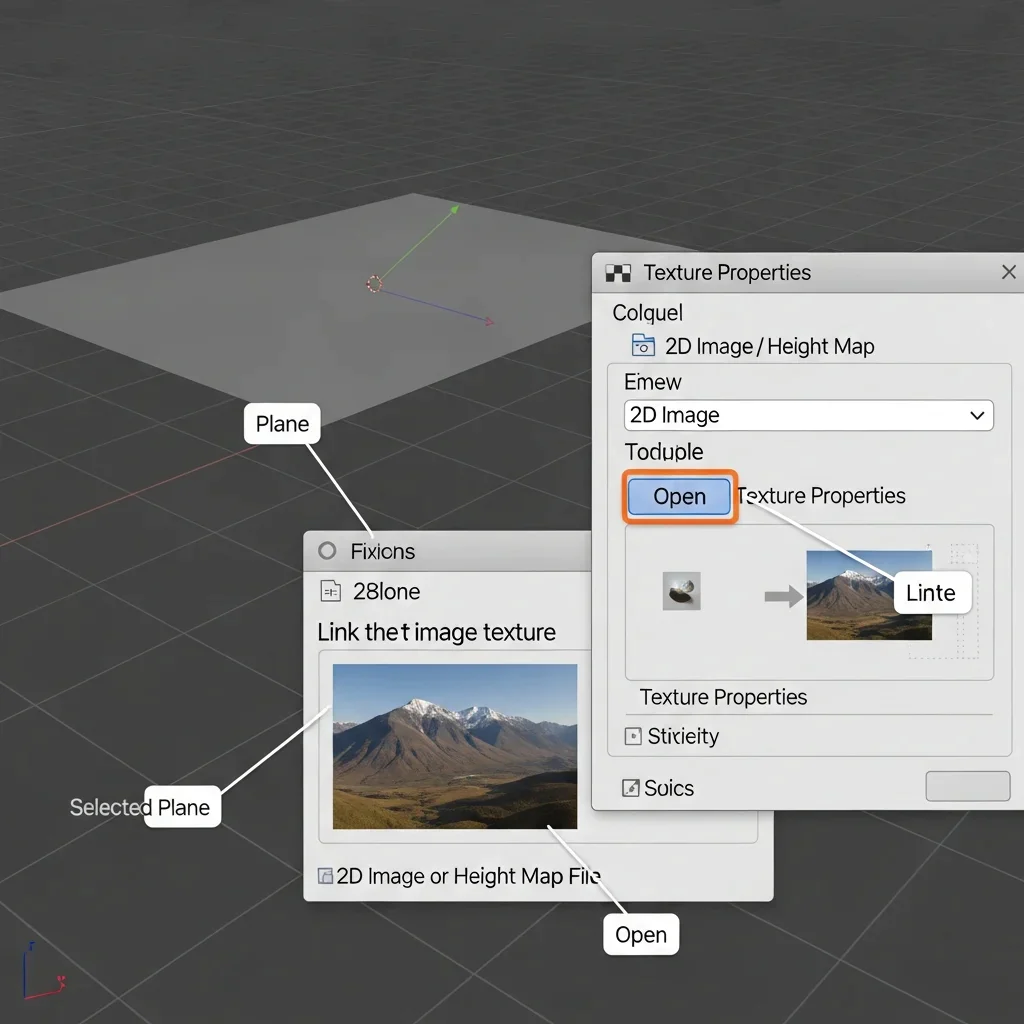
Click Open in the Texture Properties panel and navigate to the folder on your computer where your 2D image or height map is stored. Select the image file and click Open Image to load it into Blender. Once loaded, check the small preview in the Texture Properties to confirm that Blender is reading the correct file. The image’s grayscale values will control the displacement: white areas push the mesh upward, black areas pull it downward, and gray areas remain neutral. Make sure the plane is still selected in the viewport so the Displace Modifier can apply the texture correctly. After loading the image, your mesh is ready to start converting the 2D image into a 3D model in the next step by adjusting the displacement strength and midlevel.
Step 8 – Adjust Displacement Strength and Midlevel
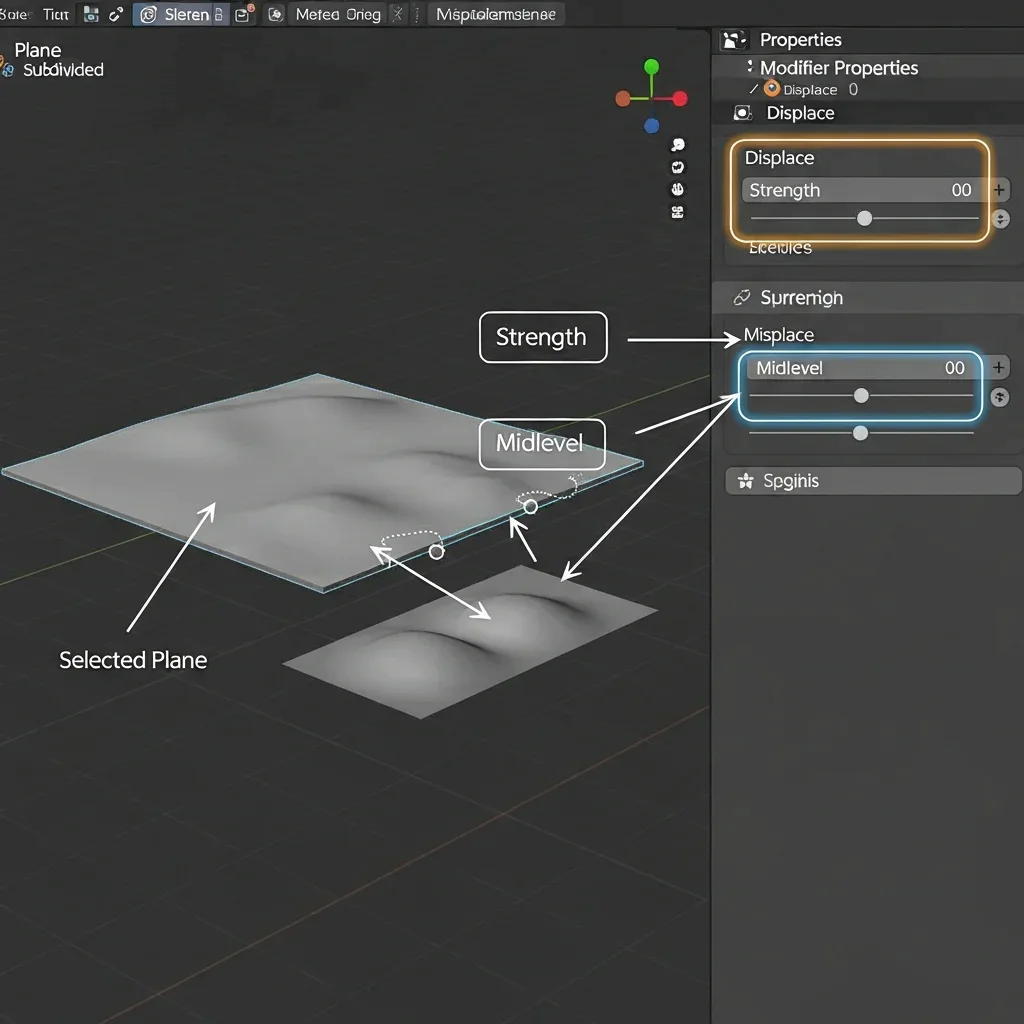
Return to the Displace Modifier panel with your plane still selected. Adjust the Strength slider to control how much the mesh is pushed or pulled by the image; start with a value around 0.2–1.0 and increase or decrease it while observing the mesh in the viewport until the depth looks correct. If the mesh rises too high or sinks too low, adjust the Midlevel value to center the displacement; the default 0.5 works for most images, but small tweaks may be needed depending on your height map. Rotate the viewport, zoom in and out, and check the mesh from multiple angles to ensure the displacement looks smooth and accurate. Make small adjustments gradually to avoid exaggerating the surface or creating distortions. After you are satisfied with the depth and shape, the mesh is ready to have the Displace Modifier applied in the next step.
Step 9 – Apply the Displacement Modifier
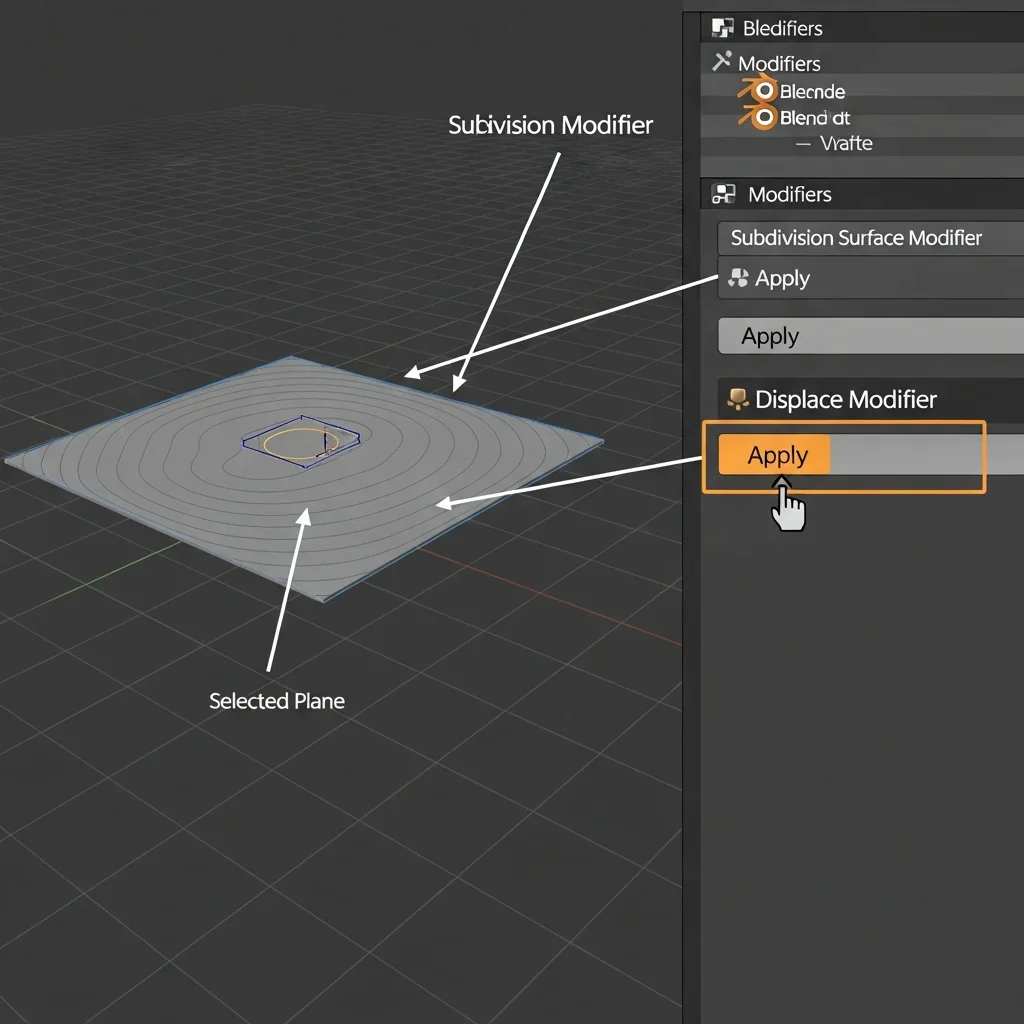
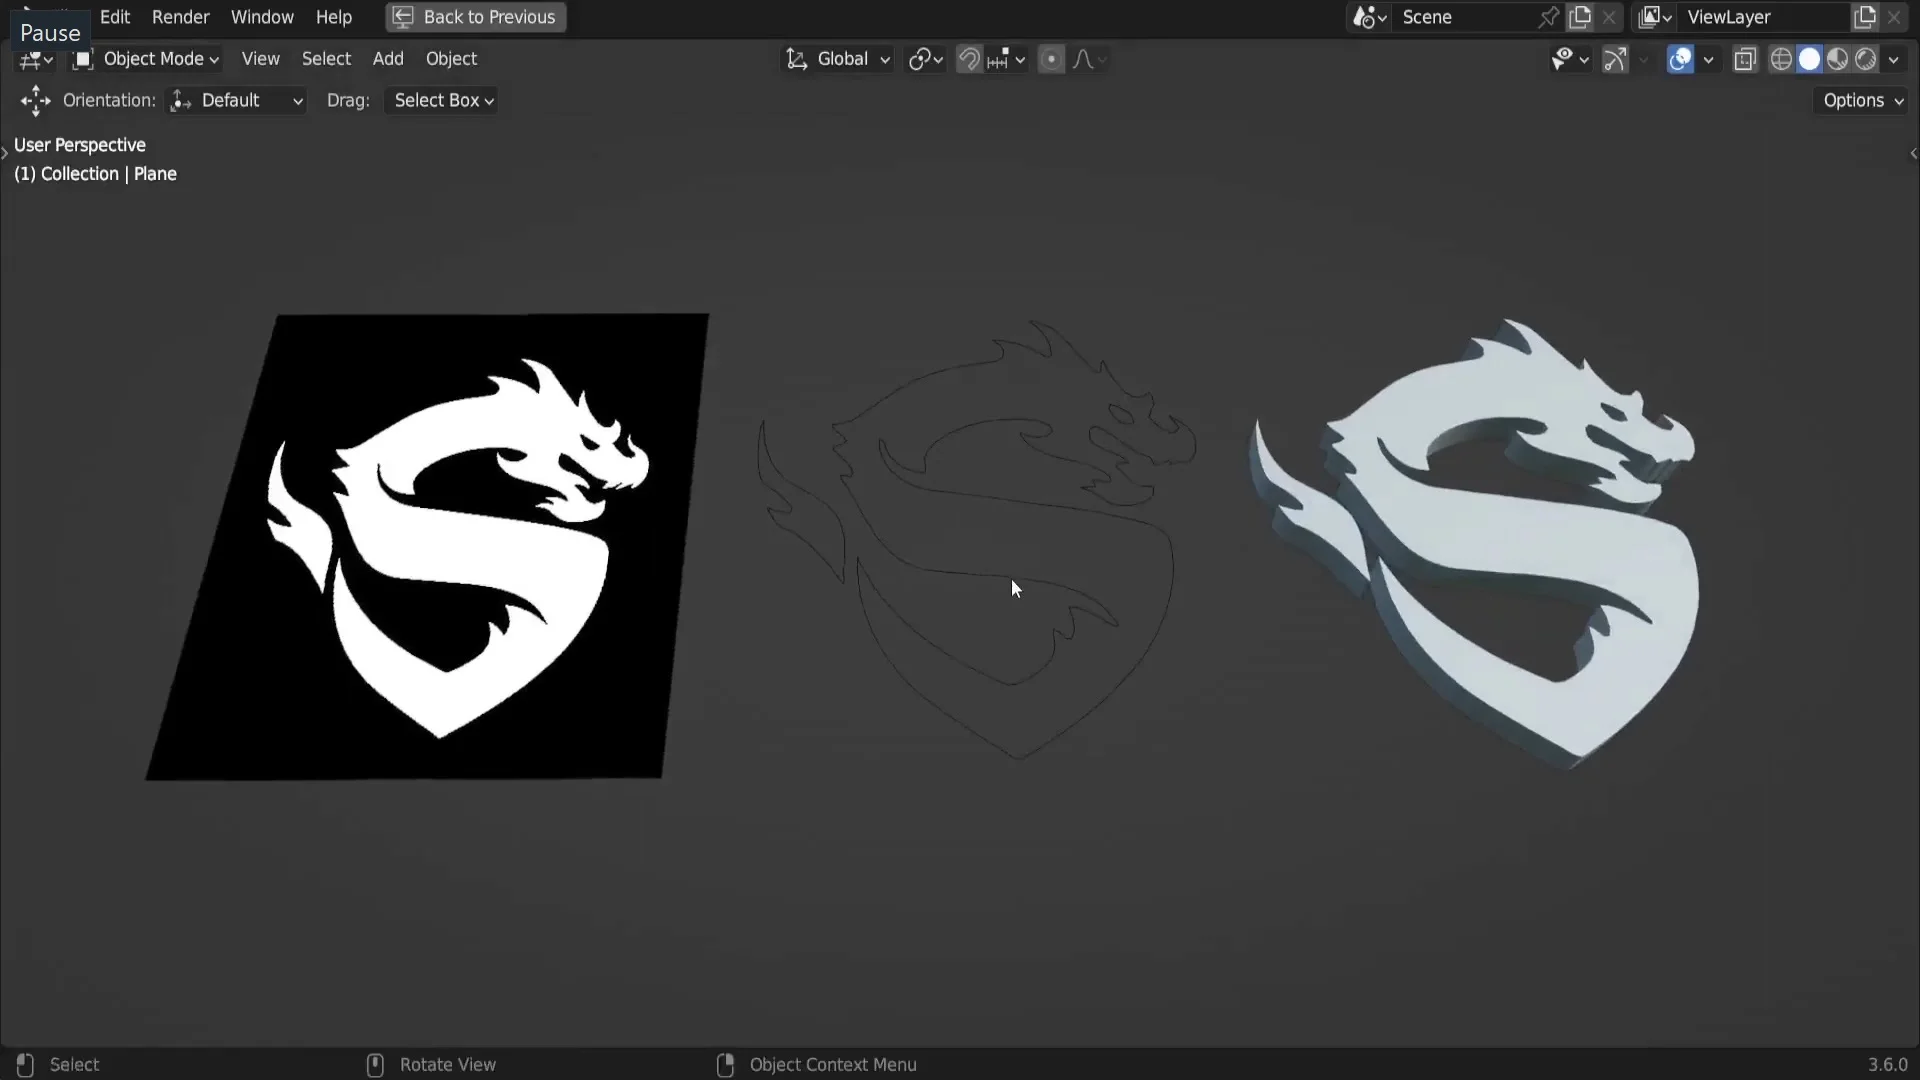
Once you are satisfied with the displacement on your mesh, go to the Modifiers Panel with your plane still selected and click Apply on the Displace Modifier to make the 3D changes permanent. If you also want to finalize the Subdivision Surface Modifier, click Apply on it as well. Applying these modifiers converts the procedural adjustments into real geometry, allowing Blender to treat the plane as a fully detailed 3D mesh. Rotate and inspect the mesh in the viewport to ensure the displacement has created the correct depth and shape. Make any final tweaks in Strength or Midlevel before applying, because once applied, you cannot change the displacement using the modifier. After applying, your 2D image has successfully been converted into a detailed 3D model ready for exporting, further editing, or 3D printing.
Step 10 – Export the Final 3D Model
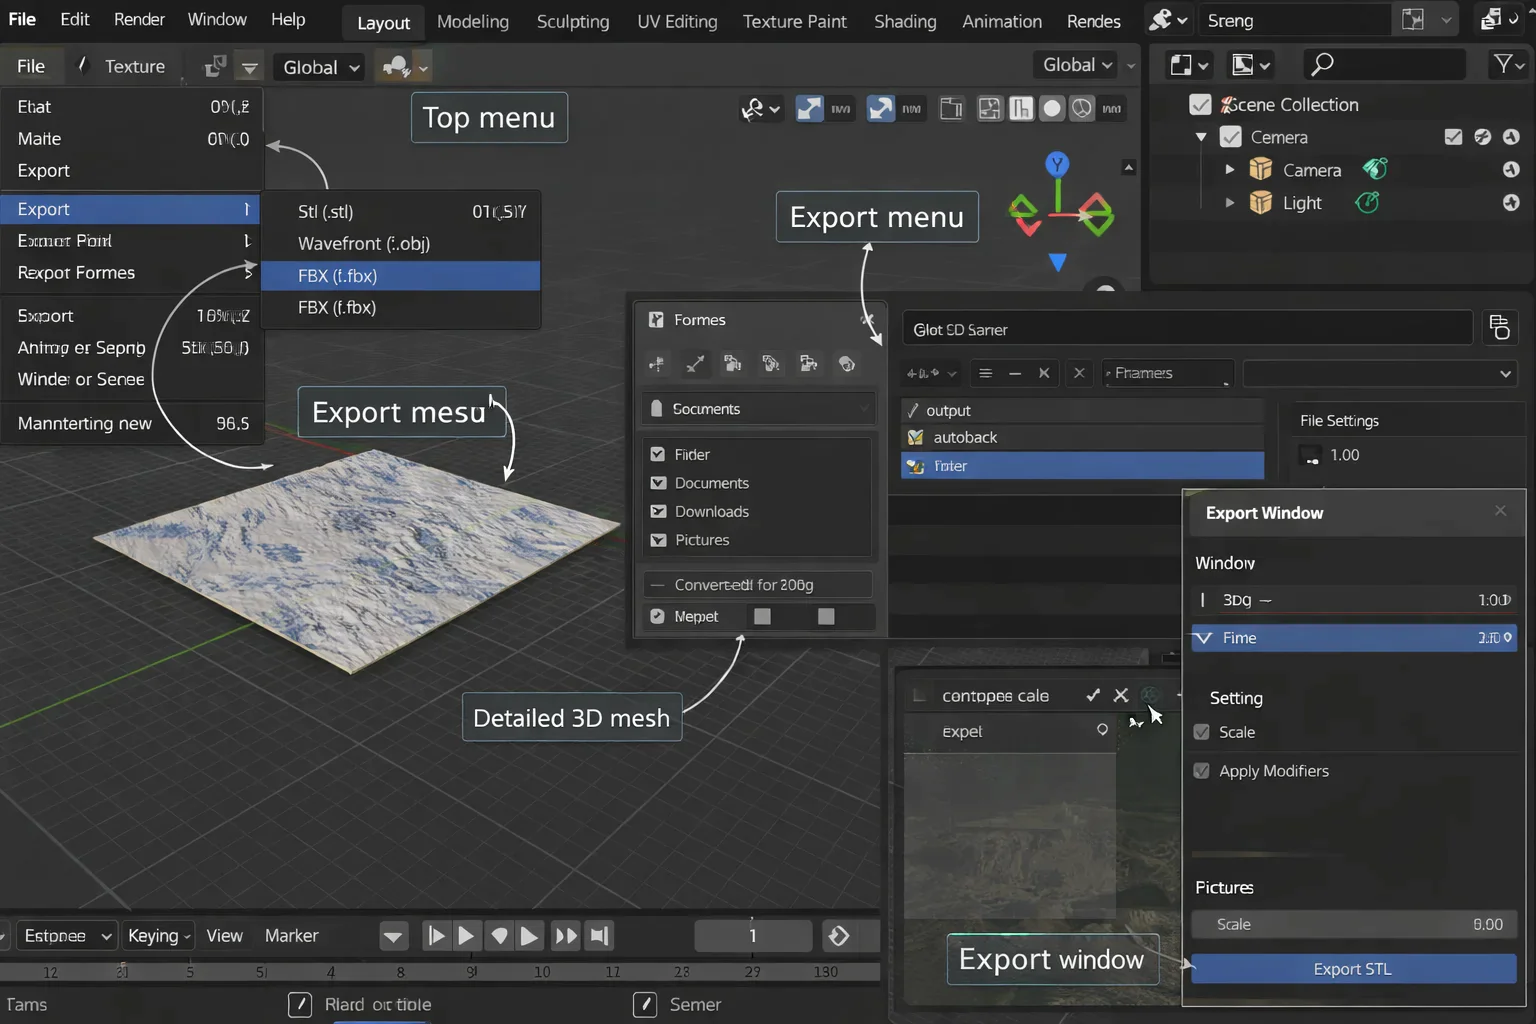
With your 3D mesh ready, go to the top menu and click File → Export, then choose the file format you need for your project. Select STL if you plan to 3D print the model, or choose OBJ or FBX if you want to use it in games, animation, or other Blender projects. In the export window, navigate to the folder where you want to save the file, type a name for your model, and check the export settings to ensure they match your requirements (for example, scale or apply modifiers). Click Export to save the 3D model to your computer. Once exported, your 2D image has been fully converted into a detailed 3D mesh that is ready for rendering, printing, or integration into other 3D workflows.
Best Image Settings for Clean Displacement Results
To get clean and accurate displacement results in Blender, always start with a high-quality image or height map. Use grayscale images because Blender reads brightness values to determine mesh depth: white areas push the mesh up, black areas push it down, and gray areas stay neutral. Increase the contrast of your image to emphasize depth differences, which helps Blender create sharper and more defined 3D surfaces. Avoid low-resolution images, as they produce blocky or blurry displacement. Before importing, remove any noise or unnecessary details using an image editor like Photoshop or GIMP, because random pixels can create unwanted bumps on the mesh. By preparing the image properly, you ensure the Displace Modifier converts your 2D image into a smooth, detailed 3D model with minimal cleanup afterward.
Common Blender Displacement Problems and Fixes
When working with displacement in Blender, you may encounter common problems, but you can fix them quickly. If the displacement looks flat, increase the subdivisions on your plane or raise the Strength value in the Displace Modifier to give the mesh more depth.
If the mesh appears blocky or low-detail, subdivide the plane further or enable Adaptive Subdivision to create finer geometry only where needed. If the mesh distorts or stretches too much, lower the Strength or adjust the Midlevel value to center the displacement properly. If your image does not affect the mesh, double-check that the image is loaded correctly in the Texture Properties and that the Texture Type is set to “Image or Movie.” Following these fixes ensures your 2D image converts into a clean, detailed 3D model without errors or unexpected results.
Exporting the Model for 3D Printing or Game Assets
Once your 3D mesh is finalized, you can export it for 3D printing or use in games and animation. Go to File → Export in the top menu and choose the format you need. Select STL if you want to 3D print your model, or choose OBJ or FBX for use in games, animation, or other Blender projects. In the export window, navigate to the folder where you want to save the file, enter a clear name for your model, and check the export settings, such as scale, apply modifiers, and orientation, to ensure the model imports correctly elsewhere. Click Export to save the file. After exporting, your 2D image has been fully converted into a detailed 3D mesh, ready for printing, rendering, or integration into any 3D workflow.
Conclusion
Converting a 2D image to a 3D model in Blender is simple once you follow the correct workflow. By preparing a high-quality image, applying subdivisions, and using the Displace Modifier, you can turn any flat image into a detailed 3D mesh ready for rendering, 3D printing, or game assets. Adjusting Strength and Midlevel ensures accurate depth, while proper image settings and modifier order produce smooth, clean results. With these steps, beginners and advanced users alike can confidently create realistic 3D models from images. Experiment with different images, subdivision levels, and displacement settings to discover how powerful Blender is for turning 2D visuals into 3D geometry.
