What Is Box Modeling?
Box modeling is one of the commonly used 3D modeling techniques. In this technique, a primitive shape is used as a baseline to develop other primary shapes of a 3D model. The technique can be used to create the final prototype of the object. You can render it unique by adding object details. 3D modeling has unlimited potential especially when it comes to the design process. Object surfaces can be mathematically represented in three-dimensional space by using 3D modeling software tools.
Box modeling technique is done by sculpting the model in 3D design software from its fundamental which is a box in most cases otherwise cylinder or any other primitive shape object. Various tools can help you model object primitive shapes from scratch. However to add intricate details to the object model you need to carry out the box modeling technique precisely.
Box Modeling vs. Edge Modeling
A clear modeling difference between the two techniques is that the latter does not require any base shape to develop an object prototype. The process includes placing polygon loops with outlines. In the Edge modeling technique, the object model is developed piece by piece while box modeling helps you to create both topology and form of the object model side by side.
Various Steps in Box Modeling
To carry out box modeling technique you need to adhere to certain steps to get outstanding results, these steps include –
Setting up the Work Environment
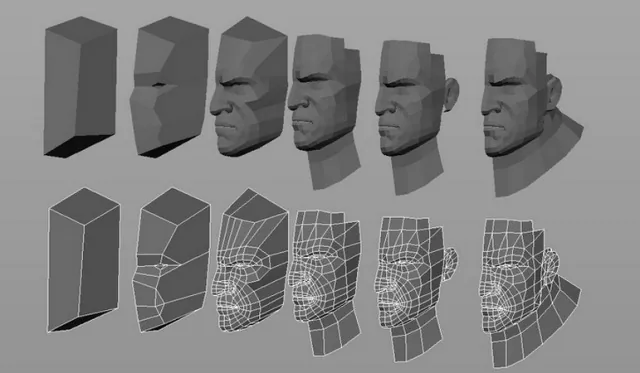
Initially, you are required to search for relevant object model reference material. You can use the reference material by adding your desired details in 3D. Afterward, you will need to step up several angles and views of the object model. Map the number of details required to cover the model with perfection. Finally, you can begin your work on box modeling to make the process faster and efficient. Begin by optimally setting the work environment before placing the reference image in the background. Properly set all layouts and shortcuts related measures. If you are a beginner, start from a basic shape in 3D software to complete the model draft.
Defining the Rough Draft
Try out defining the draft by adding customized iterations and segments to the basic shape. In Maya, you can find segments in the Channel Box, while in 3DS Max you can readily create iterations from the Command Panel/Modify Panel.
You can play with the rough draft by adding details of your choice. Use Connect Command to extrude your desired. You can make use of other basic tools to complete the draft model. The object should form a workable outline. The model might as well appear in a roughly connected mass shape. By using Insert Face Command you can extrude the face negatively or positively to evenly extend the face area. This will result in symmetrical model face geometry.
In 3DS Max, you can control any four-sided polygons tessellation by using Connect Vertices Command. Also, to combine the model shape with Ring and Loop you should opt for the Connect Edges Command. You can include geometry by using the command without any trouble. To make the process move in a streamlined flow you can merge clean redundant geometry and the edges using the 3DS Command “Target Weld Vertices”. To remove the additional geometric shapes you can employ the “Remove Vertices or Edge” Command.
To maintain the accuracy of model geometry you should start by carefully removing the edges and then slowly moving towards the ones that are combined to the vertices. Using the “Cut Edge” Command you are better able to adjust the edges according to your model object. Improper use of the command can result in inaccurate geometry and the need to do unwanted adjustments. All gaps in faces can be filled in by using the “Create Face” Command.
It is advised to create the face clockwise. After getting done with common modeling techniques you can now start adding further minute details to redefine the object model in a precise manner. You can make the edges round or create edge loops etc.
Rough Detail Stage
The rough model can be easily refined by following the below-mentioned tools –
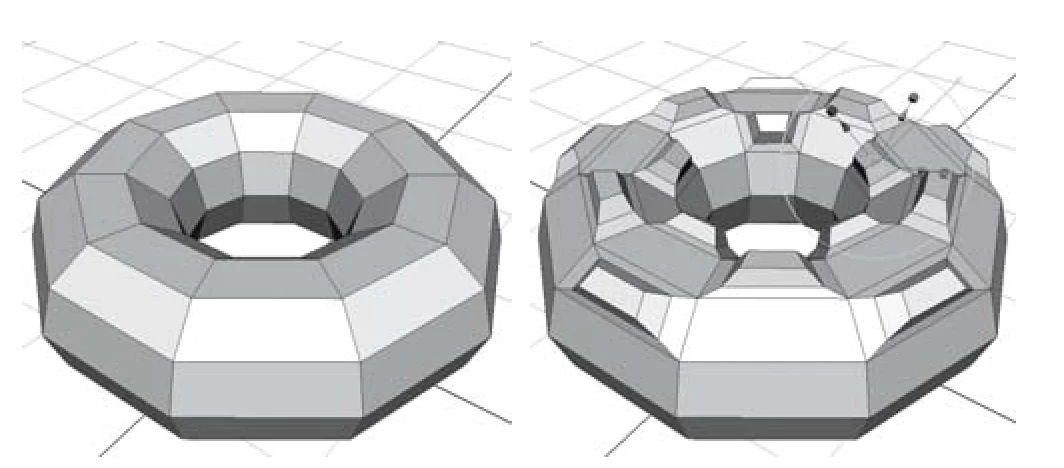
You can precisely fill in all the gaps that are created as an outcome of face deletion using the “Create Face” Command. Use the command in the clockwise mode.
Edges can be rounded off by using the command “Chamfer Edge”. The command is also used to create two edges out of one edge.
To move the edges or vertices a little within the set model you can utilize the constraints tool provided in the 3DS Max modeling tool.
The path along which the edge or vertex of the face is to be moved can be precisely defined using constraints.
If the face orientation is wrongly done it can be altered using the “Normal or Flip Face” Command.
Clean-up stage
In this final detail addition stage popularly known as the Clean-up stage, the surface of the object model is smoothened out by repeating tools and commands over and over again. The addition of subtle details like fabric folds can be done according to project requirements. This will help you achieve sharp edges and smooth geometric flow.
Remember to model the object silhouette in all directions to remove the possibility of unfinished vertices or edges as it would ruin your final object model appearance. Animation geometry can also be added here. Adding textures is a good way to add depth to the model but when the texture looks rough you can also reduce its appearance by pinching it optimally. Similarly, to manage silhouette rectifying challenges you must check face geometry. A quick rig can be set up if the game character model is being created.
The geometry of any character can be deformed according to the project demand. The shoulder region or the hip region of the character might include maximum deformations. Therefore, all polygonal modeling techniques must be carried out in the right way. Individual box modeling shapes must be symmetrical to form one shape. Before finalizing the project model make sure that all clumsy imperfections are taken care of for good.
How ITS Can Help You With 3D Modeling Service?
Information Transformation Service (ITS) has been providing 3D Modeling Services for over a time now. Information Transformation Services knows all about the modern-day industry and its trends in the Online Marketing Business. ITS is light on the budget and heavy in terms of quality and stature. Our highly responsive and interactive team specializes in 3D Product and Asset Modeling Services and will note down every essential detail provided by you and in return turn your dream into a real-life realistic or virtual reality. Information Transformation Service (ITS) also caters to a wide variety of services relating to efficient 3D Modeling and Designing services. If you are interested in ITS 3D Modeling Services, you can ask for a free quote!
