How to Render an Image in Photoshop?
Rendering an image or cutting it out around the edges was no possible in earlier days but with the advent of technological advancement in the photography field, the task has now become quite quick to comprehend with the help of 3D Photo Rendering Software. In this blog, Photoshop, highly celebrated software by both professionals and beginners is employed for rendering images to utmost perfection.
The software lets you create and render multiple copies of any image with options of the addition of many kinds of professional visual effects inclusion to enhance the beauty of an image. With such a latest editing styles, you can create sceneries and backgrounds from whimsical to practical. Furthermore, you can advertise your product mages well with the help of this portable and amazing editing tool. From only a single copy, you can render many versions which will prove fruitful in developing new product images. Adobe created a “Refine Mask Tool”, to cater to all kinds of images. It efficiently detects and pinpoints all the crucial points (edges) within a picture.
What is Rendering Image?
Rendering an Image is a whole process that involves careful modeling through 2D &3D applications and programs. Rendering is most commonly applied to the creation of Video Games, Architectural Planning Designs, and high-quality Animated Movies. Furthermore, for the addition of special effects within different mass media projects such as simulators, design visualizations, and TV advertisements, the rendering method is quite popularly employed. Such features and techniques can increase a project’s repute and demand for better business. Also, rendering helps to increase proficiency and reduce cost overheads with its professional results.
You can create your new digital world that fits your taste and style more accurately like a jig-saw puzzle. All classic to modern editing effects and tricks have been listed down to give you all the aesthetic pleasing feeling that your images long for. Are you ready to get your photos rendered the right way? Let us take a look at all the steps needed to render an image perfectly
8 Step to Rendering Image in Photoshop
Image Rendering starts with the separation of an object within an image from its dull backdrop. It is used to fix everything from web designing to digital graphics. Rendering creates many different versions of the same image with many kinds of visual effects. This makes it look as if there are multiple photographs of the product. This in return pays a lot more in case of advertisements of different products at times. You can even make it look like you have multiple copies of the product.
Adobe created the “Refine Mask Tool” especially for these kinds of images. Refine Mask detects edges of objects appearing in a picture.
How To Render An Image In Photoshop?
Step#1
Load the image that you intend to edit, to focus on the main image that you wish to render. Such as, upload an image of yours, whose background you find less appealing and needs to be replaced by an attractive one.
Step#2
Just click on the tools palette icon and you will come across a “Lasso Tool”. Click the select option and start moving a cursor around the edges of the image which is uploaded for rendering purpose. After completing the action, Press the left click, and drag it around the picture. Remember to stay within the limitations of the image background and not overdoing it. It is okay if the outline is not exactly on point as “Refine Mask” will further refine it. It is significant not to stray from the picture during the lining process.
Step#3
For further action, release your mouse after tracing the edges of the image and then right-click the layer panel (shaped like a circle concealed within a rectangle). The “Add Layer Mask Tool” will start its action and will create a big mask that will eventually cover up the whole background of the image. This mask is in the form of a black and white thumbnail. For convenience, the option is right next to the “Layers Panel”.
Step#4
Right-Click on the thumbnail, while doing so many options will appear on the screen. Accept “Refine Mask” in the dialog box. Drag the slider “Radius” very slowly towards the right. While doing so, you must examine the image positioning. When the background pixels indicate or appear red, then it is a signal to intrude into the picture being edited and drag the “Radius” left a little slow again. However, at times the red background still pertains to some gap in the image and its backdrop.
Step#5
Using the “Refine Radius Brush”, over and across the portion of the gap n between the background and the image by dragging the mouse. Photoshop can easily remove the gap which resides in between the red background which fits the image from behind like a burglar.
Step#6
By using the “Refine Radius Brush”, you can simply move between the gaps which remain between the image and the red background. You will notice that slowly the redness is decreasing as you swipe through with the help of the mouse. After completion click “OK” to close the taskbar. The image will appear covered in white background. This is a default background and appears every time you remove any background from any image. This “Background Layer” can be replaced by any desired background within the image in the progress of editing.
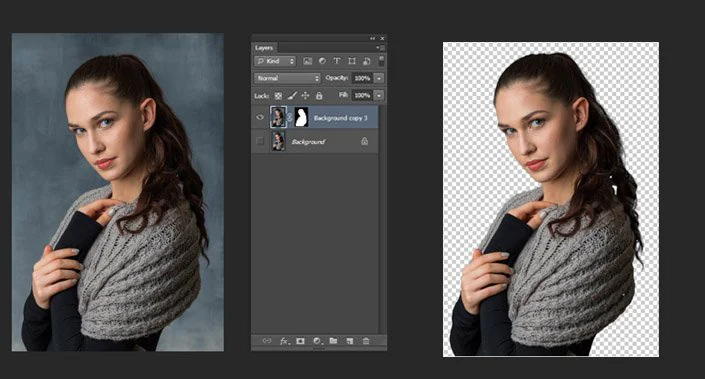
Step#7
At last, it is time to add some colorful background within the image to further beautify and glorify the elements and objects being portrayed in it. All you need to do is that you need to select the background transparency option and enable the background transparently. Photoshop indicates a level of transparency with a checkerboard pattern that’s colored in white and gray.
Step#8
To save the rendered image, select from the menu, the option “File” and right-click to continue to select the option “Save As” to command the server to save the rendered image in type PNG. This format will preserve the transparency of the rendered image and will retain the essence of all elements present within the image.
Such an interesting and happening 3D effect will boast up your images repute among the ordinary mass images. You can reach your target goals by applying such realistic 3D effects in your images to make them send signals to human senses and drive more traffic towards your rendered image. Your Photos will go LIVE! In comparison other less simple old school images and become the star of the event.
How ITS Can Help You With Professional Photo Editing Services?
Information Transformation Service (ITS) also provides solutions for long term economical outsourcing plans to marketing giants and state of the art enterprises whenever you like. ITS has organized a variety of teams holding professional and experienced editors for your convenience. There are numerous categories to choose from along with customized packages that can be formulated according to your requirements. ITS Professionals employ the latest Photoshop techniques, tools, and software to render your images realistic and clear.
ITS will deliver at your intended time saving both money and extra cash. With over 30 years of Excellence, we can assist your company with faster and reliable service which is 100% likely to increase your market value and your business product/service reputation among existing and new clients. If you are interested in ITS Photo Editing Services, You can ask for a free quote!
