How to Make Low Poly models in Blender
Are you tired of trying to make 3D models in Blender and ending up with something super complicated, full of too many polygons, and not looking right for games? The biggest problems are usually starting without a plan, adding too many details by mistake, not knowing how to keep the polycount low, and ending up with ugly topology or broken UVs.
This guide fixes all that. It’s a simple, step-by-step Blender low-poly tutorial made for total beginners. You’ll learn exactly how to make low poly models in Blender from scratch – setting up your scene, blocking out the basic shape, keeping everything clean and low-poly, fixing common mistakes, adding quick colors for that nice stylized low-poly look, and exporting it properly for games. By the end, you’ll have your first cool low-poly character or object ready, and you will actually enjoy the process instead of getting frustrated.
Step 1: Get Blender Ready and Set Up Your Scene
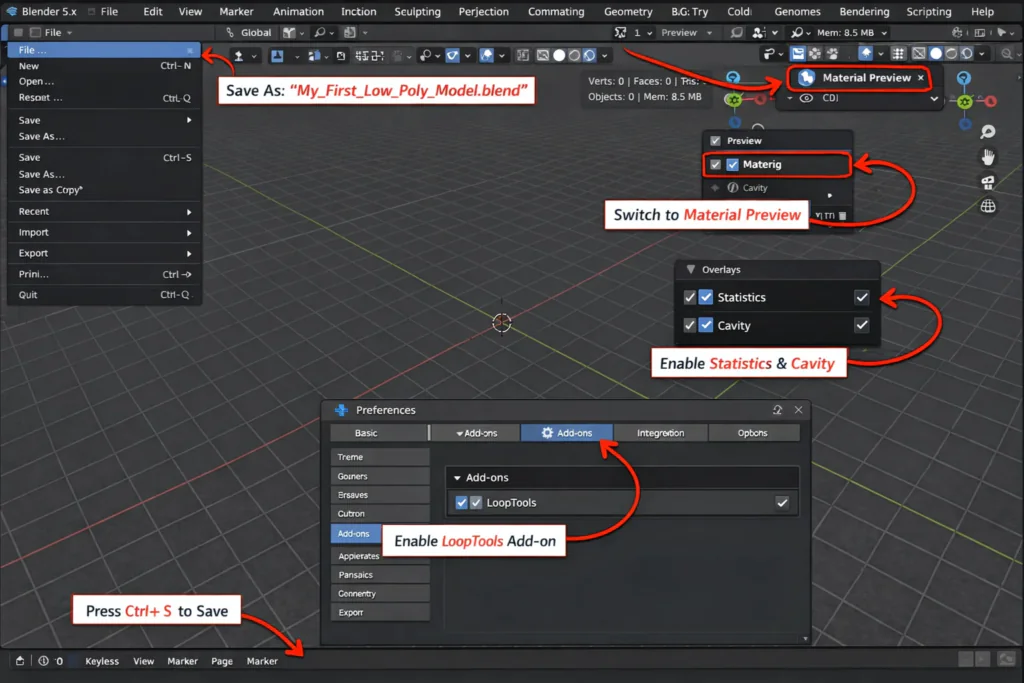
First things first, open Blender on your computer if you don’t have it yet, head to blender.org and download the latest version right now in 2026, that’s Blender 5.x or whatever the newest free one is. When Blender starts, you’ll see the default scene with a cube, camera, and light. Click on the cube to select it, then press X on your keyboard and choose Delete to clear everything out so you start fresh.
Now go to the top menu: click File > Save As, name your file something like My_First_Low_Poly_Model.blend, pick a folder on your desktop or documents, and hit Save. This way you won’t lose work if something goes wrong.
Next, let’s make the viewport easier to work in for low-poly modeling in Blender. In the top-right corner of the 3D viewport, click the little dropdown next to the shading icons (it looks like a sphere). Switch to Material Preview mode so colors and edges show up better. Then, in the same area, click the Overlays dropdown (it’s the two overlapping circles icon) and turn on Statistics. This shows your polycount live, which is super helpful for keeping things low-poly. Also, turn on Cavity under the shading options to make edges pop more clearly.
If you want some extra help with clean shapes later, go to Edit > Preferences > Add-ons tab, search for LoopTools, check the box to enable it, and close the window. That’s it for setting up your scene is now clean and ready for how to make low-poly models in Blender. Save again quickly (Ctrl+S), and you’re good to move on to adding references in the next step.
Step 2: Prepare and Add Your Reference Images
Before you start shaping anything in low poly modeling in Blender, grab some good reference pictures. This is the key to getting proportions right without guessing. Search online for free images like low poly character front and side view” or “low poly animal reference sheets try sites like Pinterest, ArtStation, or Pixabay for clean, aligned front + side drawings. Save two clear ones to your desktop or a folder: one for the front view and one for the side view. They should match in scale, like the same character facing forward and from the side.
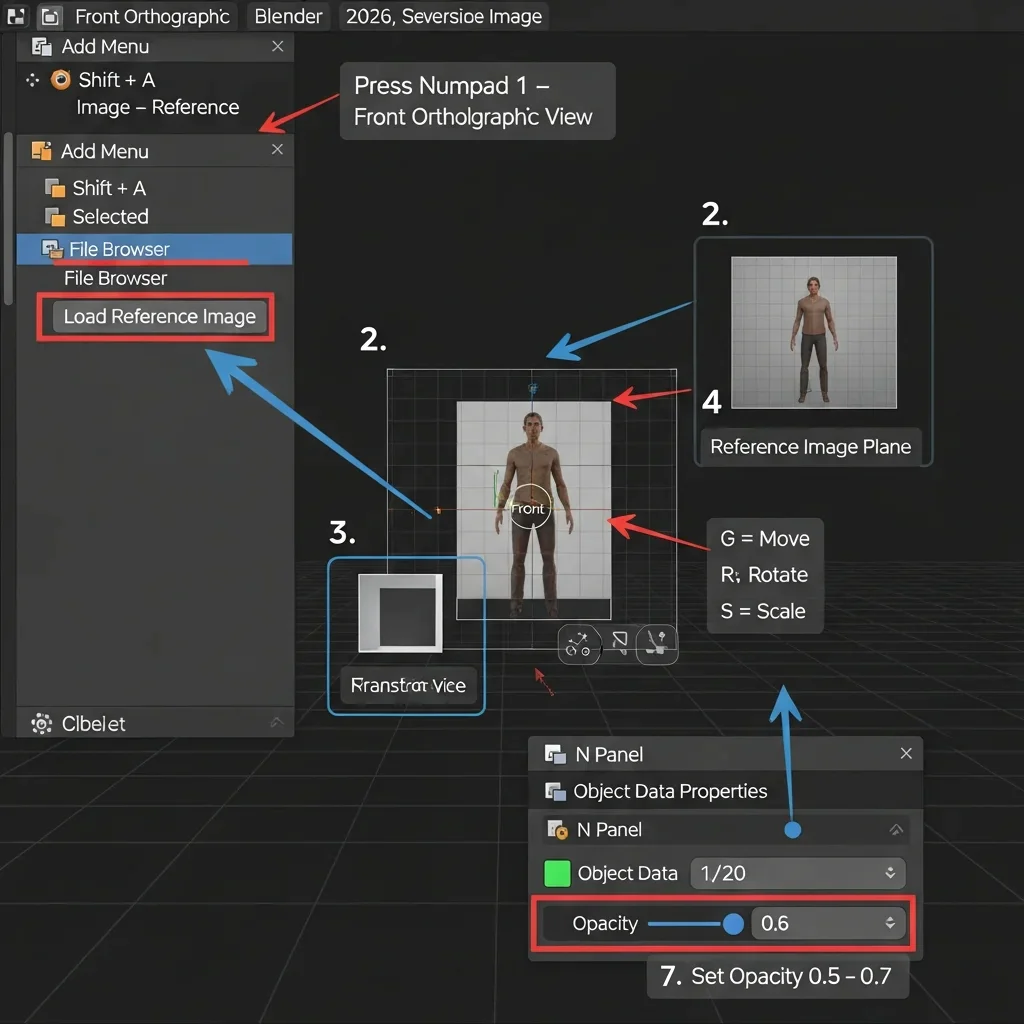
Back in Blender, switch to Front Orthographic view by pressing Numpad 1 (or just press 1 if you have numpad emulation on). This locks your view straight on for the front reference.
Now add the front image: press Shift + A to open the Add menu, hover over Image, and click Reference (not Background – Reference shows up in all views and is better for moving around freely in how to make low poly models in Blender). A file browser pops up, navigate to your saved front reference image, select it, and click Load Reference Image. The image appears as a flat plane in your scene.
Select the new image object (it looks like an empty with the picture), then press G to grab/move it, R to rotate (usually no rotation needed for front), and S to scale it bigger or smaller so the character/object lines up nicely with the grid center (aim for the head or body to sit around the origin point). In the Properties panel (press N to open the side panel if it’s hidden), go to the Object Data Properties tab (green icon that looks like a square with lines), and under Empty, adjust Opacity to about 0.5–0.7 so it’s see-through but visible while modeling
Duplicate this for the side view: with the front image selected, press Shift + D to duplicate, then R Z 90 (rotate 90 degrees on the Z axis) so it faces sideways. Press Numpad 3 (or 3) to switch to Right Orthographic view, grab it with G, and position/scale it to match the side profile perfectly (line up eyes, nose, feet, etc. from both views)
To keep things organized, select both images, press M (Move to Collection), choose New Collection, name it References, and hit OK. Now you can toggle the eye icon next to the collection in the Outliner (top-right panel) to hide/show them easily when you don’t need them.
Save your file again (Ctrl + S). Your scene is now set up with proper guides for accurate low-poly character Blender or whatever you’re making, no more wonky proportions.
Step 3: Block Out the Basic Shape
With your references set up, it’s time to start the fun part, roughing out the main shape of your model in low poly modeling in Blender. This block-out stage keeps things super simple, so you nail the overall proportions fast without getting bogged down in details yet.
Press Shift + A to open the Add menu, go to Mesh, and pick Cube (most low-poly characters or animals start with a cube for the torso/body – if you’re making something rounder like a head or rock, choose Cylinder or UV Sphere instead). A cube pops in at the center of your scene.
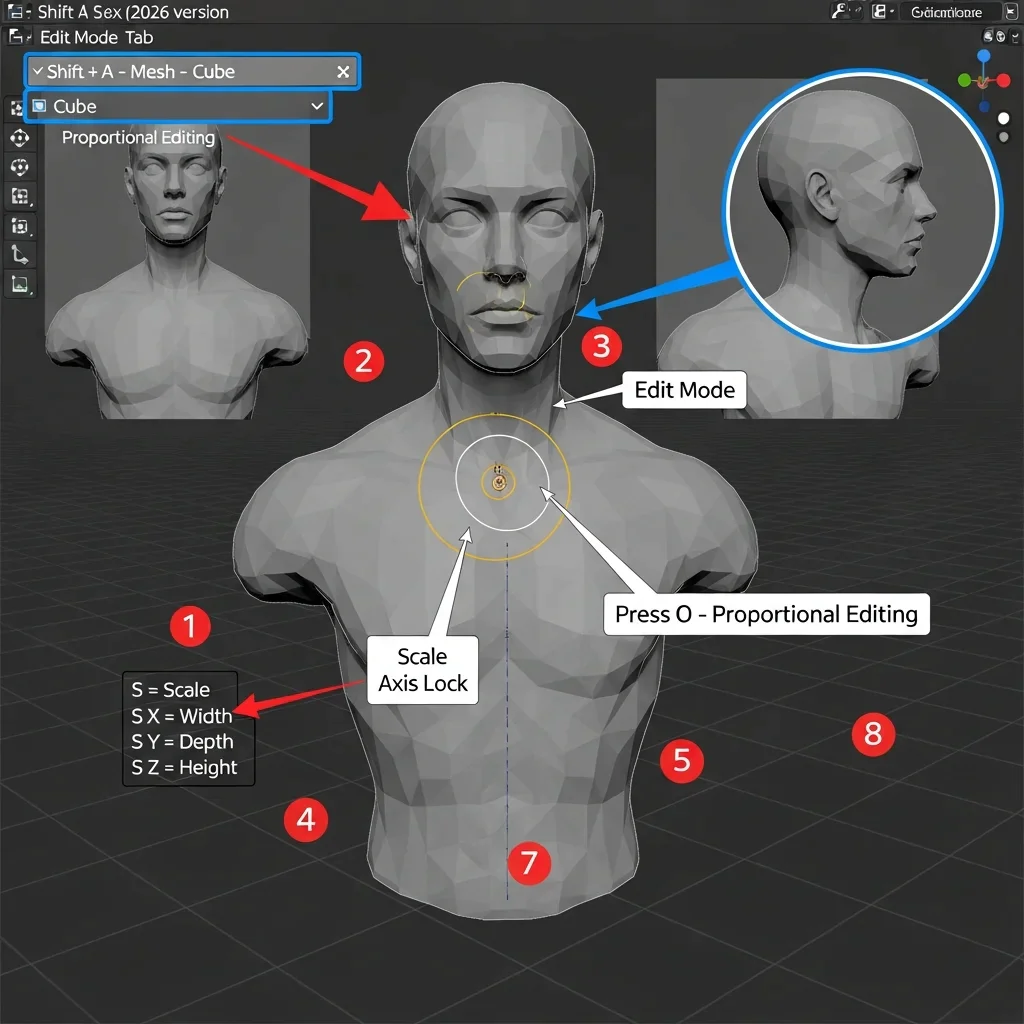
Press Tab to jump into Edit Mode (you’ll see the vertices, edges, and faces light up orange when selected).
First, enable Proportional Editing right away – press O on your keyboard (a little circle appears near your cursor). Scroll your mouse wheel to make the influence circle bigger or smaller – this lets you pull groups of verts smoothly for organic shapes.
Now scale the cube to roughly match your front reference: press S to scale, then drag your mouse or type numbers (like S 2 to double size). Lock to one axis if needed, S X for width, S Y for depth, S Z for height. Switch views (Numpad 1 for front, Numpad 3 for side) and adjust until the cube fills the main body area on both references.
Start extruding limbs or parts: in Edit Mode, select a face on the side of the cube (right-click or left-click depending on your settings), press E to extrude, drag out an arm/leg/tail, then left-click to confirm. Move it with G to a better position. Repeat for other parts – extrude from the top for a head, bottom for legs, etc. Keep extrusions big and blocky – no tiny details yet.
If your model should be symmetrical (like most low-poly character Blender stuff), add a Mirror modifier now: press Tab to go back to Object Mode, select your object, go to the Modifiers tab (wrench icon in Properties panel on the right), click Add Modifier → Mirror. Set the Axis to X, turn on Clipping and Merge (this glues the center seam and prevents gaps). Now model only one side – the other mirrors automatically.
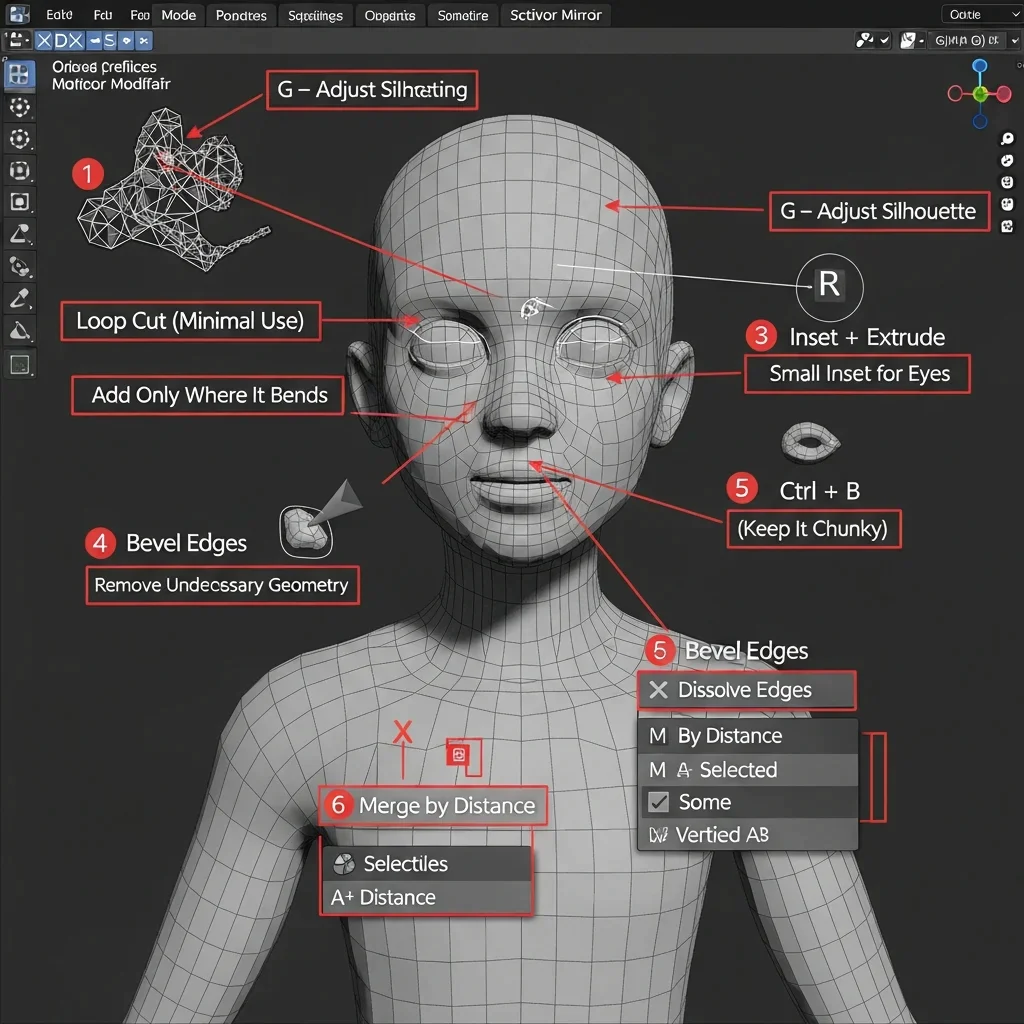
Use G to grab and move vertices/edges/faces to match the silhouette in both views. Add a quick loop cut if you need more control: press Ctrl + R, hover over an edge, scroll to add one loop, and left-click twice to place it. But remember, stay low-poly. Only add loops where the shape really bends (like elbows or knees).
Keep checking your polycount in the Overlays Statistics (should be under 200–500 faces at this stage). Save often (Ctrl + S). This rough block out gives you a solid base for how to make low poly models in Blender, proportions locked in, ready to refine next.
Step 4: Refine the Shape & Keep It Low Poly
Now that your basic block-out looks roughly like the reference, switch to refining it while staying true to low poly modeling in Blender. The goal is clean, faceted shapes with as few polygons as possible.
Stay in Edit Mode (Tab if you’re not already there). Select vertices, edges, or faces (right-click or use box select with B) and move them with G to better match the outlines in both front and side views. Switch views often (Numpad 1 front, Numpad 3 side, Numpad 5 to toggle perspective/ortho) so nothing looks stretched or flat.
To add just enough control without adding tons of polys, use loop cuts sparingly: hover your mouse over an edge where you need a bend (like elbow, knee, or waist), press Ctrl + R, scroll the mouse wheel for 1 or 2 loops, left-click to place, then left-click again or press Enter to confirm. Slide the new loop with the mouse or G if needed.
For subtle details like eye sockets or mouth indent: select a face on the head, press I to inset (creates a smaller face inside), then press E and drag inward a tiny bit for depth. Keep insets small – low poly hates tiny details.
To round corners a bit for that nice stylized low-poly look (without going high-poly), select an edge loop (Alt + right-click on an edge), press Ctrl + B to bevel, drag the mouse slightly or type a small number like 0.05–0.1, scroll the wheel for 1–2 segments only, then Enter. This gives soft edges that still feel chunky and game-ready.
Clean up extra geometry to drop polycount: select edges or verts you don’t need (they create bad shading or n-gons), press X → Dissolve Edges or Dissolve Vertices. If faces look messy, select them → X → Dissolve Faces. Merge overlapping verts: select all (A), press M → By Distance (default 0.001m is fine).
Watch your polycount in the top-left Overlays Statistics – aim to stay under 1000–2000 faces for most beginner models like a low-poly character, Blender, or animal. If it climbs too high, dissolve more aggressively.
Fix common issues quickly: weird dark shading? Select all (A), press Shift + N to recalculate normals outside. Holes or gaps? Check Mirror modifier clipping is on, or manually merge center verts.
Save your progress (Ctrl + S). Your model now has good shape, clean topology, and stays properly low-poly – ready for UVs and coloring in the next steps.
Step 5: UV Unwrapping Basics

UV unwrapping is the part where you flatten your 3D model into a 2D map so textures can stick on properly without stretching or squishing super important for clean low poly texturing in Blender and that nice stylized low poly look.
Switch to the UV Editing workspace: at the top of Blender, click the tab that says UV Editing (it’s between Modeling and Shading). This splits your screen – 3D viewport on one side, UV Editor on the other.
In the 3D viewport, press Tab to enter Edit Mode if you’re not already there, then press A to select all faces/verts of your model.
For a quick and beginner-friendly start on most low-poly models in Blender (especially simple characters or animals), go to the top menu: UV → Smart UV Project. In the pop-up that appears on the bottom-left, keep defaults or set Angle Limit to around 66°, Island Margin to 0.02–0.05 (this adds tiny gaps between islands so they don’t bleed), then click OK. Blender automatically cuts and lays out your UVs into neat islands inside the 0–1 square in the UV Editor.
Check the UV Editor (right side): you should see colorful islands spread out without much overlap or crazy stretching. If things look too messy or stretched, select all in UV Editor (A), then try UV → Pack Islands (or press Ctrl + P) to tidy them up neatly.
For better control of more complex parts (like a head or limbs that twist), mark seams manually: in Edit Mode, switch to Edge Select mode (top bar or press 2). Select edges where you want “cuts” (hidden places like back of head, inside arms, under feet –think like seams on clothes). Press Ctrl + E → Mark Seam (they turn red). Then select all (A), press U → Unwrap. This gives cleaner, less distorted results than Smart UV alone.
Quick check for issues: in the UV Editor, go to Overlay dropdown (top-right of UV window) and turn on Stretch – blue is good (low stretch), red means bad distortion (adjust seams or scale islands). Also, add a checker texture temporarily: in Material Properties, add a new material if needed, set Base Color to Image Texture → New (512×512 or whatever), and choose Checker pattern – this shows stretching clearly.
Scale and position islands if needed: in UV Editor, select an island (hover and press L to select connected), press S to scale, G to move, R to rotate. Keep everything inside the square box without overlapping.
Save your file (Ctrl + S). Your model is now UV unwrapped and ready for easy coloring or painting in the next step no more weird texture warping
Step 6: Materials, Coloring & Simple Texturing
Your model is shaped and unwrapped – now let’s make it look good with quick colors and that classic stylized low-poly vibe without complicated textures.
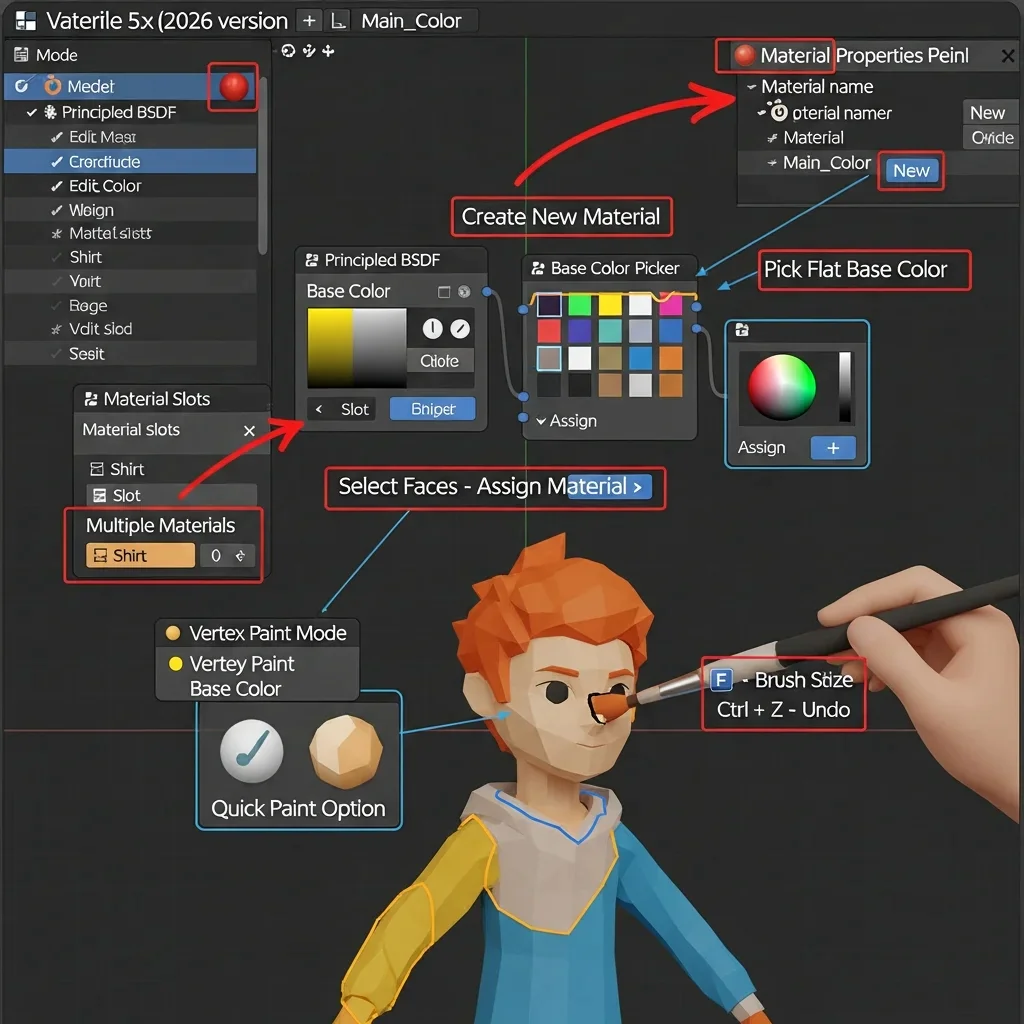
In the right Properties panel, click the Material tab (red sphere icon). If there’s no material yet, click New to create one. Name it something like “Main_Color” for easy tracking.
In the Principled BSDF node (it’s already there by default), click the yellow Base Color box and pick a flat color from the picker – for example, a skin tone for a character face, brown for fur, or bright blue for clothes. This gives your whole model one solid color right away.
For multi-color models (like shirt + pants + hair on a low poly character Blender), add more materials: click the + button next to the material list to make a new slot, name it (e.g., “Shirt”), pick a different Base Color, then go back to Edit Mode (Tab), select the faces you want colored that way (use L to select connected islands if helpful), and in the Material Properties, with the new slot highlighted, click Assign. Repeat for each color block eyes white + black pupil, mouth pink, etc.
For even faster coloring without materials, try Vertex Paint: switch to Vertex Paint mode from the top-left dropdown (next to Object/Edit Mode). Pick a color in the top bar, then paint directly on the model like a brush – great for quick gradients or blocky low-poly texturing in Blender style. Press Ctrl + Z if you mess up
If you want hand-painted details: in the Material tab, under Base Color, click the yellow dot → Image Texture → New (make it 512×512 or 1024×1024 for low poly). Switch to Texture Paint mode (top dropdown), and paint right on the model in the 3D viewport – your UVs guide where the brush goes. Use the brush tools (size with F, strength with Shift+F) for simple patterns like eyes or stripes.
To see colors better: in the top-right viewport shading dropdown, switch to Material Preview or Rendered (Eevee is fast). Add a quick light if it’s dark: Shift + A → Light → Sun or Area, move it up high with G.
Common quick fix: if colors look flat or wrong, make sure your model normals are good (Edit Mode → A → Shift + N to recalculate). For that retro PS1 style low poly Blender feel, keep colors flat – no fancy roughness or metallic.
Save your file (Ctrl + S). Your model now pops with color and personality – ready for final touches, lighting, and export in the coming steps.
Step 7: Lighting, Quick Render & Viewport Polish
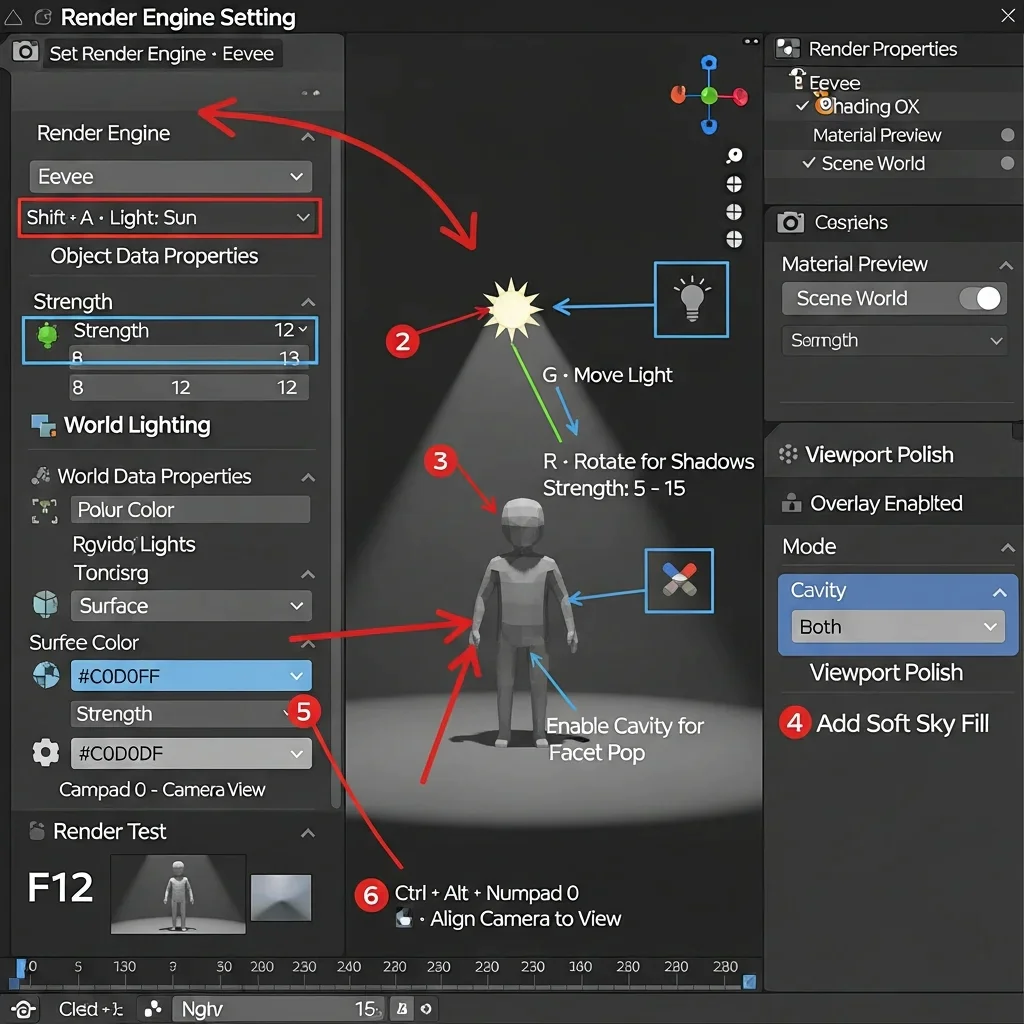
First, check your render engine: in the top-right Properties panel (or press F3 and search render engine), make sure it’s set to Eevee (it usually is by default in new files).
Add a basic light: press Shift + A → Light → Sun (great for an even, natural look in low-poly scenes) or Area for softer control. A light object appears – select it, press G to move it up, and angle it toward your model (like from the top-front for nice shadows). In the Object Data Properties tab (green light bulb icon), bump Power or Strength to 5–15 (play until it looks bright but not blown out). For more dramatic, stylized low poly shadows, rotate the Sun light (R) to create longer casts.
For quick global lighting (fills dark areas nicely without extra work): go to the World Properties tab (globe icon in the Properties panel). Under Surface, click the yellow Color dot → choose a light blue or grayish color (like #C0D0FF) for soft sky-like fill. Set Strength to 0.5–1.0. This gives even ambient light, so nothing looks too black.
Polish the viewport: in the top-right shading dropdown, switch to Material Preview (if not already) – it shows your colors + lights instantly. Turn on Scene Lights and Scene World in the same dropdown if they’re off. For extra edge pop (helps see low poly facets), go to Overlays → enable Cavity and set it to Both with a low radius.
Quick render test: position your view nicely (orbit with middle mouse, zoom with scroll), press Numpad 0 to view through the camera (or add one with Shift + A → Camera and align with Ctrl + Alt + Numpad 0). Press F12 to render – Eevee is super fast, so you get a clean image in seconds. If it’s noisy (rare in simple low poly), go to Render Properties (camera icon) → Sampling → set Render to 64–128 samples.
To save the render: in the render window, Image → Save As (pick PNG for transparency if needed).
Common fix: if shadows look blocky or light leaks, in Render Properties → Shadows → increase Cube Size to 2048 or higher for sharper shadows (costs a tiny bit of speed). For that retro PS1 style low poly Blender feel, keep lights simple and avoid too much bounce.
Save your file (Ctrl + S). Your model now lights up beautifully in the viewport and renders quickly – perfect for previews or final shots before export.
Step 8: Final Optimization & Export (Game-Ready Touches)
Your low-poly model is looking great with colors and lighting. Now, let’s clean it up one last time and export it so it works perfectly in game engines like Unity or Godot without weird issues like wrong scale, flipped normals, or broken shading.
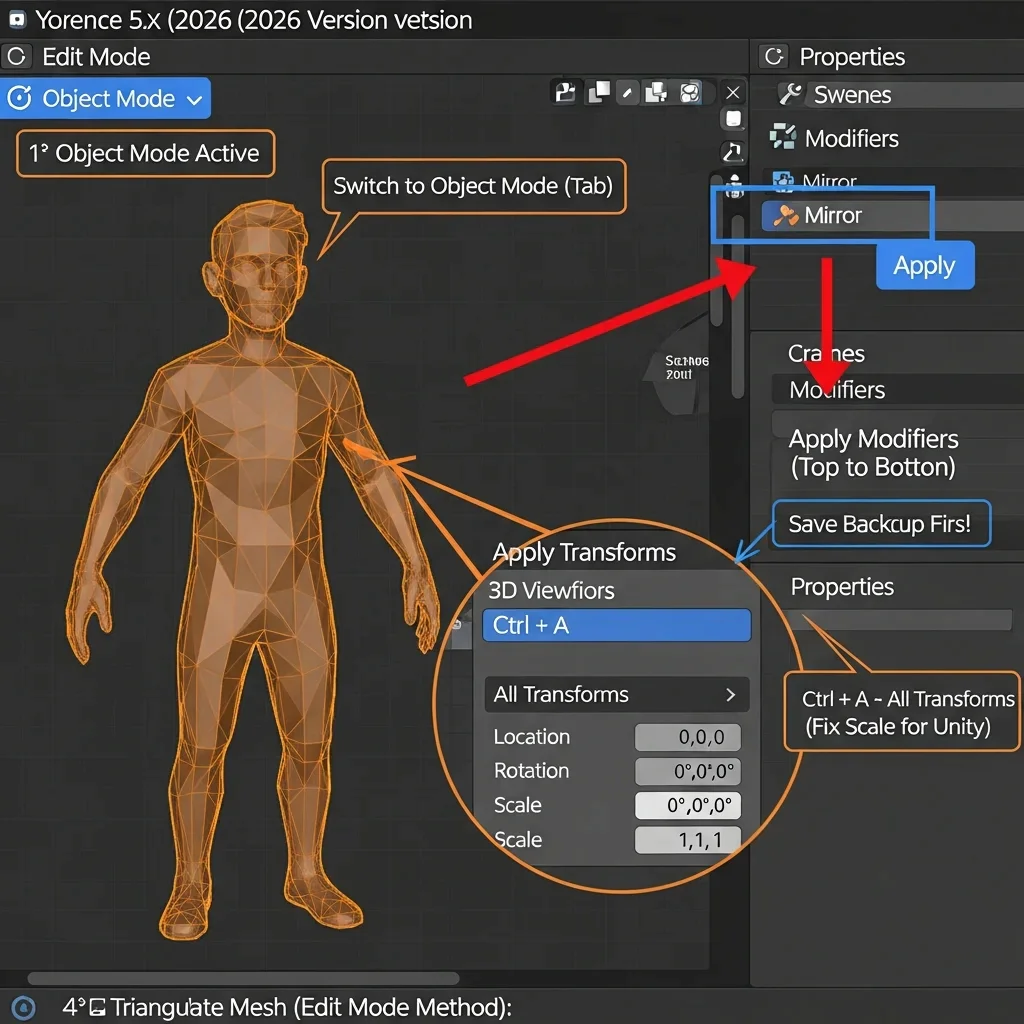
Go back to Object Mode (press Tab if needed). Select your main model (and any separate parts like accessories, if you have them hold Shift to multi-select. First, apply all modifiers so they’re baked in permanently: in the Modifiers tab (wrench icon), for each modifier (like Mirror or any others), click the dropdown arrow and choose Apply. Do this from top to bottom if you have multiple. This locks in the changes – you can’t undo after, so save a copy first if you’re nervous (File → Save As → name it “_backup”).
Next, fix scale and transforms: with everything selected, press Ctrl + A → All Transforms (or Location, Rotation & Scale separately if you prefer). This resets location/rotation to 0 and scale to 1 – super important because many engines like Unity expect models at 1:1 scale, and Blender’s default can cause import glitches.
For game-ready low poly, triangulate faces now (most engines prefer triangles over quads/n-gons to avoid shading artifacts): in Edit Mode (Tab), press A to select all, then Ctrl + T to triangulate. Or add a Triangulate modifier in Object Mode (Modifiers → Generate → Triangulate), set Method to Beauty or Fixed, then Apply it. This ensures a clean export without surprises.
Quick final checks:
Check Polycount: Keep your model light and game-ready. Go to Overlays → Statistics and make sure your face count stays under your target (like 2000 faces).
Check Normals: Ensure shading looks correct. In Edit Mode, press A to select all, then Shift + N to recalculate normals outside.
Check for Doubles: Remove overlapping vertices that can cause shading or export issues. In Edit Mode, press A → M → By Distance to merge any duplicates.
Check Origin: Make sure your model is centered for consistent placement in scenes. Right-click the model → Set Origin → Origin to Geometry (or to the 3D Cursor at world center).
Now export: go to File → Export → choose glTF 2.0 (.glb/.gltf) (best for modern games – lightweight, includes materials/colors) or FBX (great for Unity/older pipelines). In the export panel on the right:
Test it quickly: drag the exported file into a new Blender scene (File → Import → glTF/FBX) or open it in your game engine to check that scale, rotation, colors, and shading look correct.
Save your Blender file one more time (Ctrl + S). Congrats – you’ve got a clean, optimized, game-ready low poly model from start to finish using how to make low poly models in Blender
Troubleshooting & Common Beginner Mistakes
Even when following the steps carefully on how to make low-poly models in Blender, little things can go wrong and make your model look off. One common issue is weird, dark, or black faces, which usually happens due to flipped normals. You can fix this by going into Edit Mode (Tab), pressing A to select everything, and then Shift + N to recalculate normals outside. If it flips the wrong way, try Alt + N → Flip on selected faces instead, and check in Material Preview—it should brighten up immediately.
Another headache is holes, gaps, or missing parts, often caused by Mirror modifier issues. Ensure that in Object Mode, the Mirror modifier has Clipping and Merge turned on (threshold around 0.001–0.005). If the modifier is already applied, go to Edit Mode, select the center vertices, and press M → Merge by Distance, zooming in closely to merge any doubles.
High polycount can also be a problem, even after dissolving. Select extra edges, vertices, or faces you don’t need (use C for circle select or B for box), then press X → Dissolve Edges or Dissolve Vertices. For larger reductions, add the Decimate modifier in Object Mode (Modifiers → Generate → Decimate → Collapse, Ratio 0.3–0.6), preview it, and then Apply, keeping an eye on the Statistics overlay to monitor the count.
Texture stretching or warping after UV unwrap can occur if UV islands aren’t well laid out. In the UV Editor, turn on the Stretch overlay (red indicates issues), add more seams (Ctrl + E → Mark Seam in Edit Mode), unwrap again (U → Unwrap), or select islands in the UV Editor (L), scale (S), or rotate (R) to fit better, and pack islands (Ctrl + P) for efficient space usage.
Exported models may appear rotated, tiny, or lose colors in Unity or Godot. Always apply transforms (Ctrl + A → All Transforms) in Object Mode, check “Apply Transform” during glTF/FBX export, set Forward/Up axes correctly (usually -Z Forward, Y Up), and test import in a blank scene. If colors vanish, ensure materials are exported properly—glTF handles them better.
Sometimes the viewport looks flat or has no shadows even with lights. In the shading dropdown (top-right), make sure Scene Lights and Scene World are enabled, and if it’s still flat, add stronger lights or increase World Strength in World Properties.
Finally, Blender can freeze or run slowly due to too many unnecessary vertices or a high-res viewport. Turn off fancy overlays (keeping only Statistics and Cavity), switch to Solid shading temporarily, or lower viewport samples in Render Properties → Eevee → Viewport section.
Conclusion
By following this guide, you’ve learned how to make low-poly models in Blender step by step, from a blank scene to a finished, game-ready model. You set up Blender properly, added reference images to get proportions right, blocked out the basic shape with simple tools, refined it while keeping the polycount low and clean, unwrapped UVs for good texturing, added flat, simple colors, set up basic lighting, fixed common beginner mistakes like bad normals or export problems, and exported everything correctly for Unity or Godot.
The main things you’ve gained are how to keep models clean and truly low-poly, smart topology and easy texturing, how to avoid typical errors, and how to export models that actually work in games without issues. Now you can confidently start creating your own low-poly characters, animals, props, or environments.
