How to Create Realistic Materials in 3ds Max Using PBR Workflow
Many designers struggle with achieving realistic renderings of materials in their industrial 3D design and visualization projects. People who are new to Blender spend hours setting up shaders, tweaking maps, and still don’t get a sense of realism or a nice round surface finish out of it. Now with 3ds Max and the PBR workflow, these common issues are all solved and materials can have realistic light interactions, such as metal, wood, plastic and fabric.By using calibrated Albedo, Metallic, Roughness, Normal, AO, and Displacement maps, you can achieve lifelike surfaces quickly and consistently. This blog helps both beginners and experienced artists save time, reduce frustration, and produce professional-quality renders.
Understanding PBR Workflow in 3ds Max
Creating truly realistic materials in 3D design is often the toughest part of any project. Many artists struggle to make surfaces behave consistently under different lighting, resulting in flat, unrealistic renders. The Physically Based Rendering (PBR) workflow in 3ds Max 2026 addresses this challenge by simulating real-world material behavior, ensuring that every surface interacts with light in a physically accurate way.
As a professional workflow used across gaming, film, and architectural visualization, PBR relies on dedicated texture maps rather than baked shadows or generic color maps. The main components include:
- Base Color (Albedo): The true color of the surface, without shadows or lighting baked in.
- Metalness: Determines whether the surface behaves like metal or dielectric (non-metal), affecting reflections and highlights.
- Roughness: Controls how glossy or matte a surface appears, allowing precise control over reflections.
- Normal Maps: Add fine details without extra geometry, making surfaces react naturally to light and creating depth.
From an expert perspective, using PBR in 3ds Max 2026 is not just a technique, but a standard for professional-quality work. Designers who adopt this workflow save time on trial-and-error adjustments, achieve reliable results every time, and create materials that communicate trustworthiness and quality to clients, stakeholders, or audiences.
Scene & Shader Setup in 3ds Max 2026
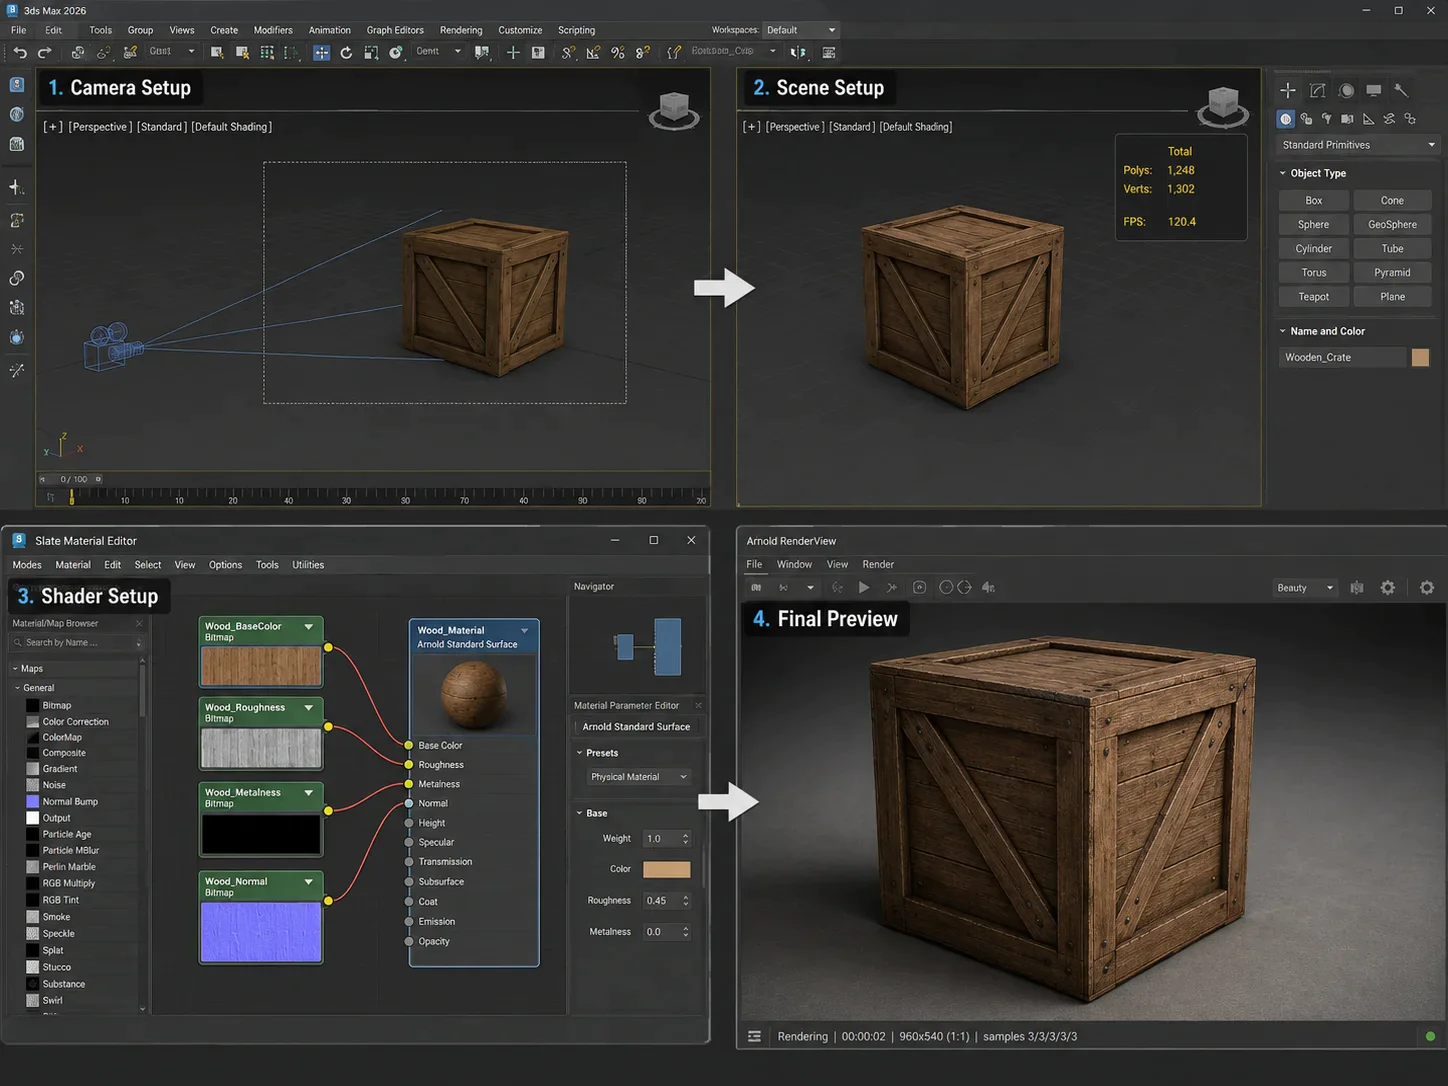
When I start creating realistic materials in 3ds Max 2026, the first thing I focus on is setting up the scene properly. I place my camera either a target or free camera and slightly adjust the Field of View (FOV) to avoid a flat perspective. Then, I organize the objects in my scene, grouping similar elements like buildings, props, or foliage. This keeps the scene tidy and makes it easier to navigate. I also remove any heavy geometry that’s outside the camera view, which keeps the viewport smooth and responsive.
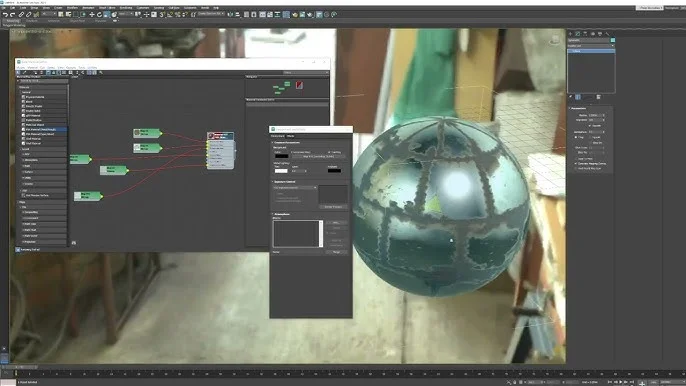
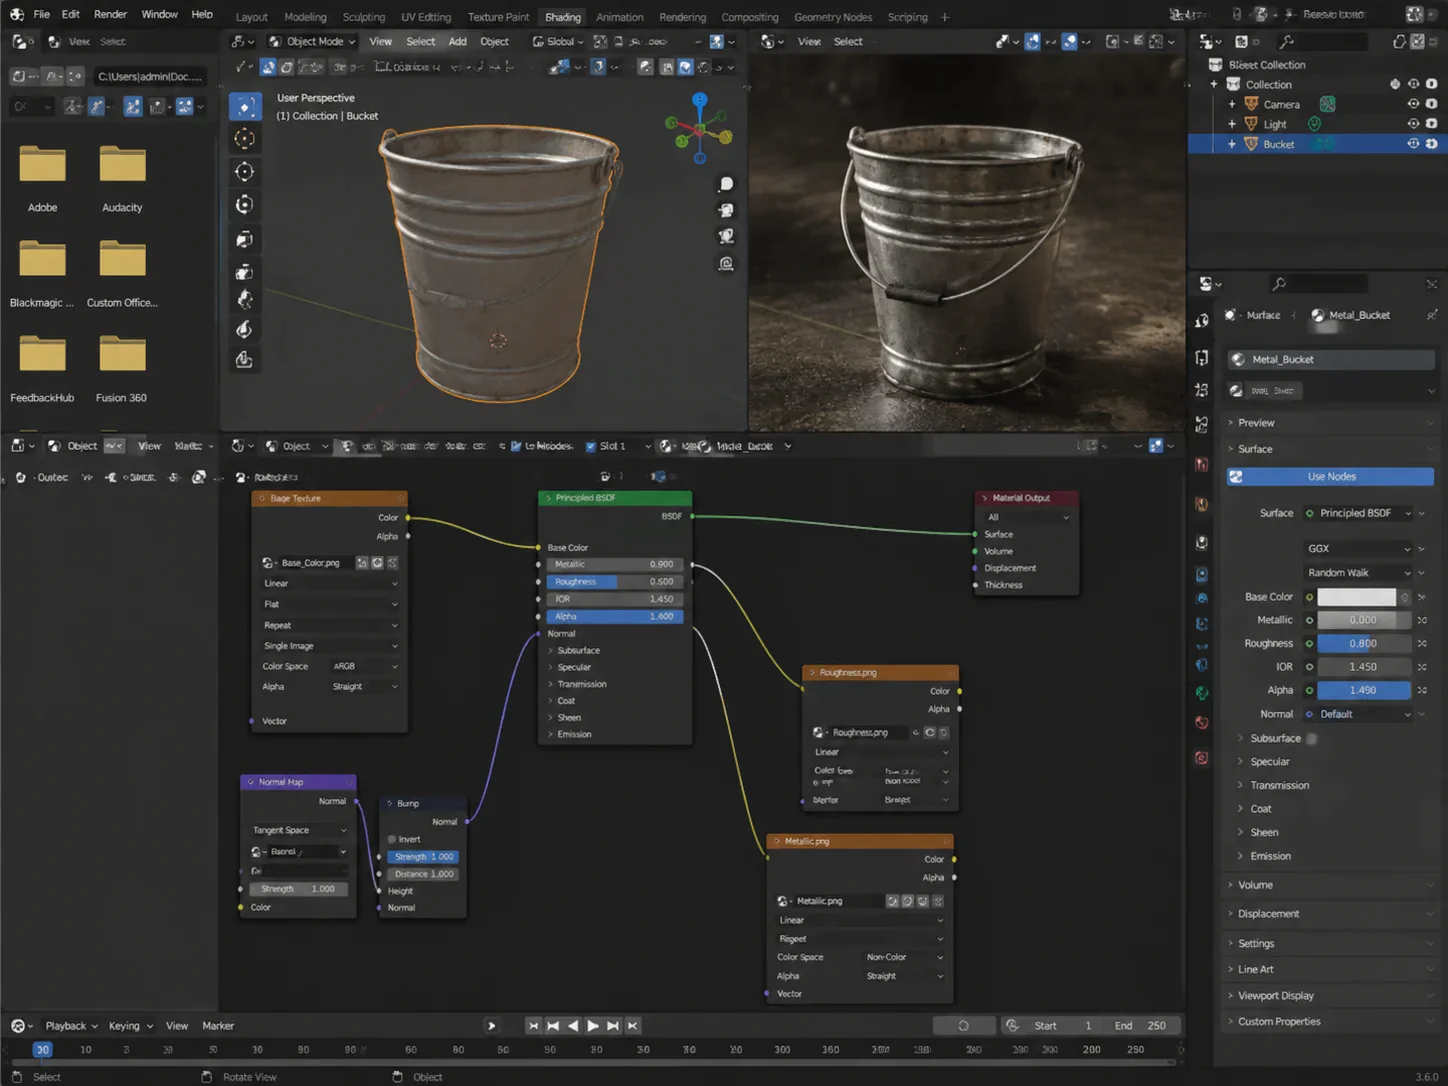
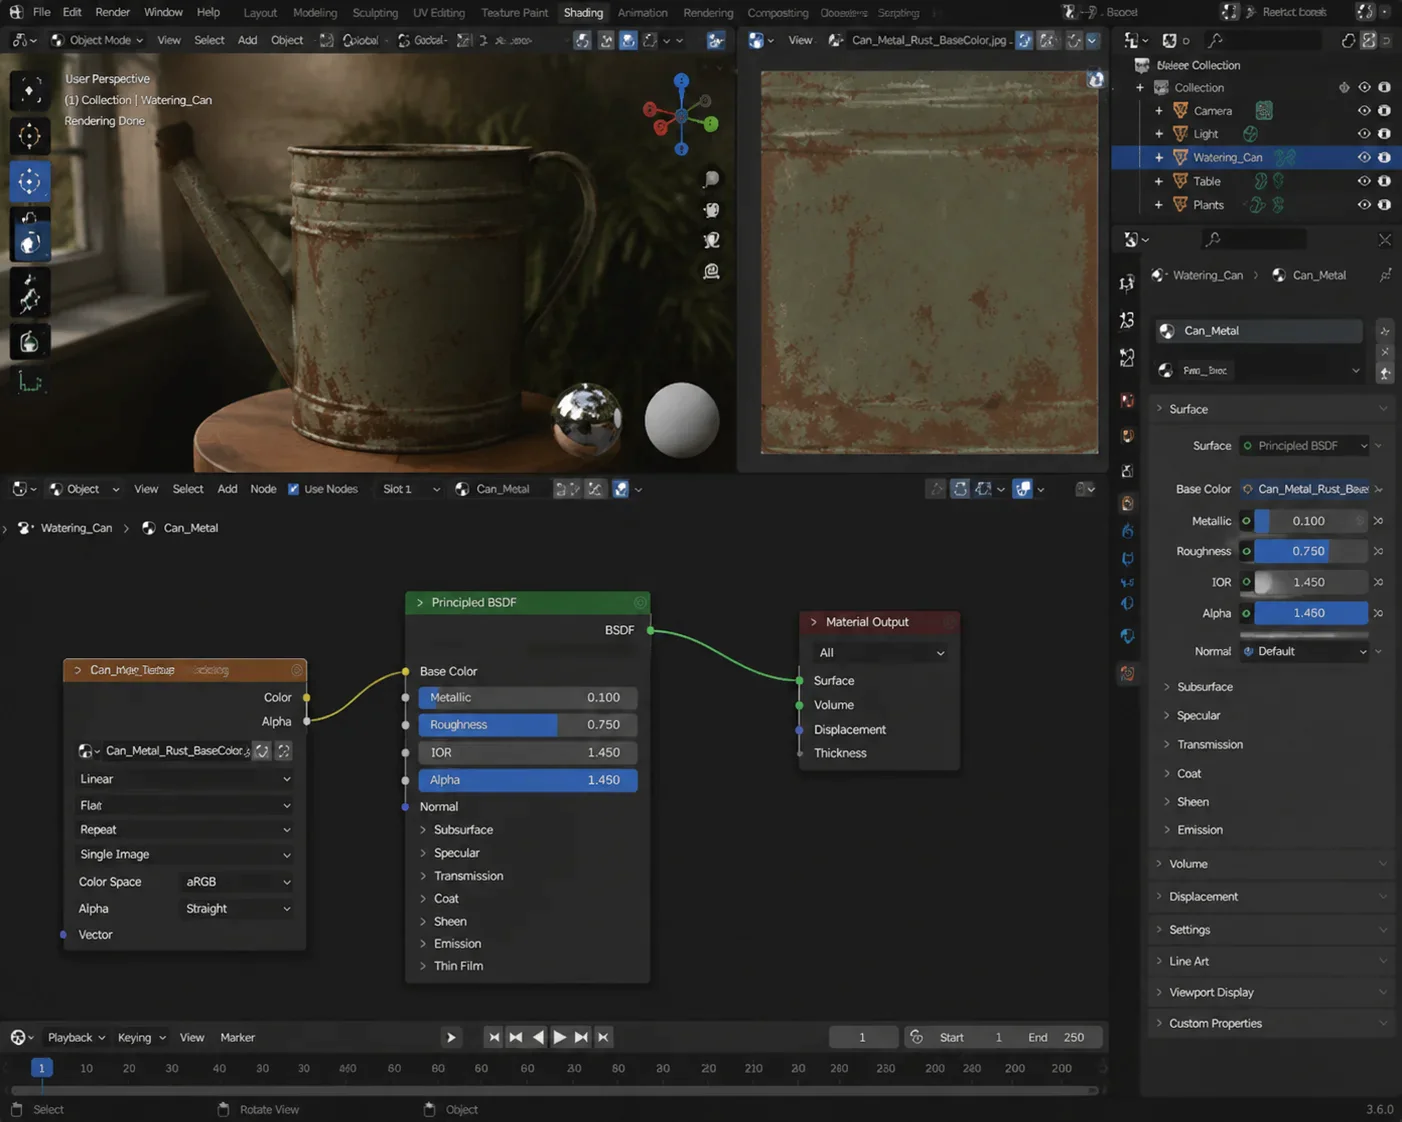
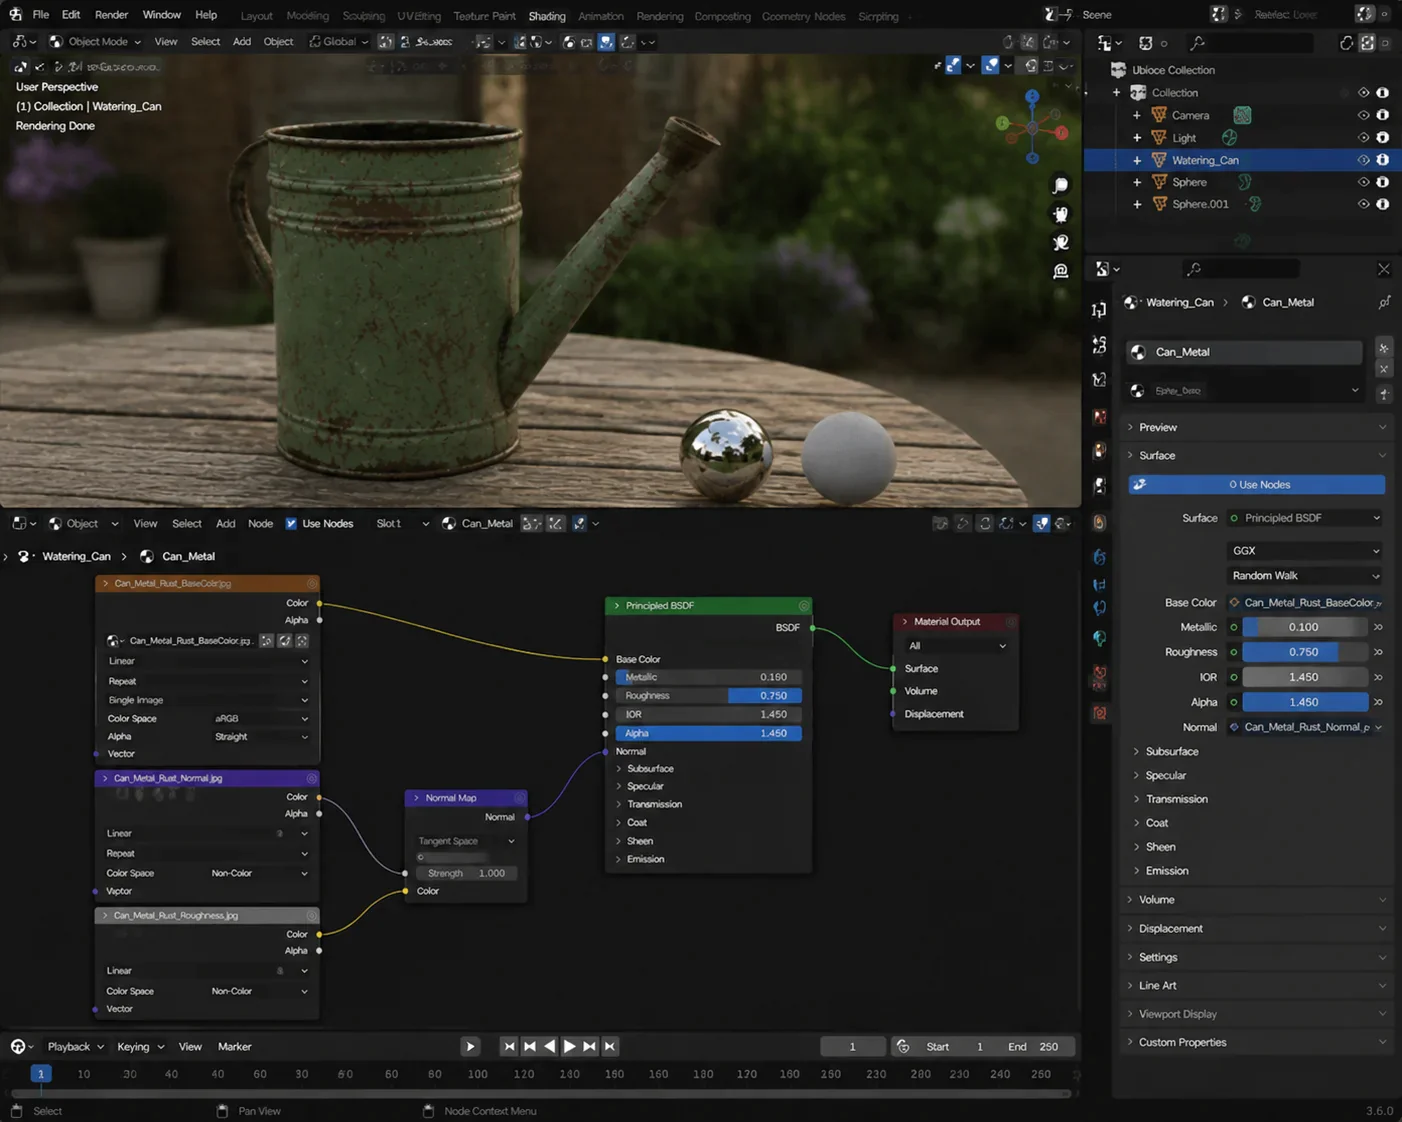
Once the scene is ready, I open the Slate Material Editor (‘M’) and drag a Physical Material or Arnold Standard Surface shader into the editor. I connect my textures to the correct slots: Base Color for main color, Metallic for metals, Roughness for reflections, and Normal maps for fine details. I always enable Show Shaded Material in Viewport to preview the material in real-time.This setup method is the way I ensure everything is organized, efficient, and ready for applying realistic PBR materials. Following these steps saves time and makes the rest of the workflow much smoother.
PBR Material Components in 3ds Max
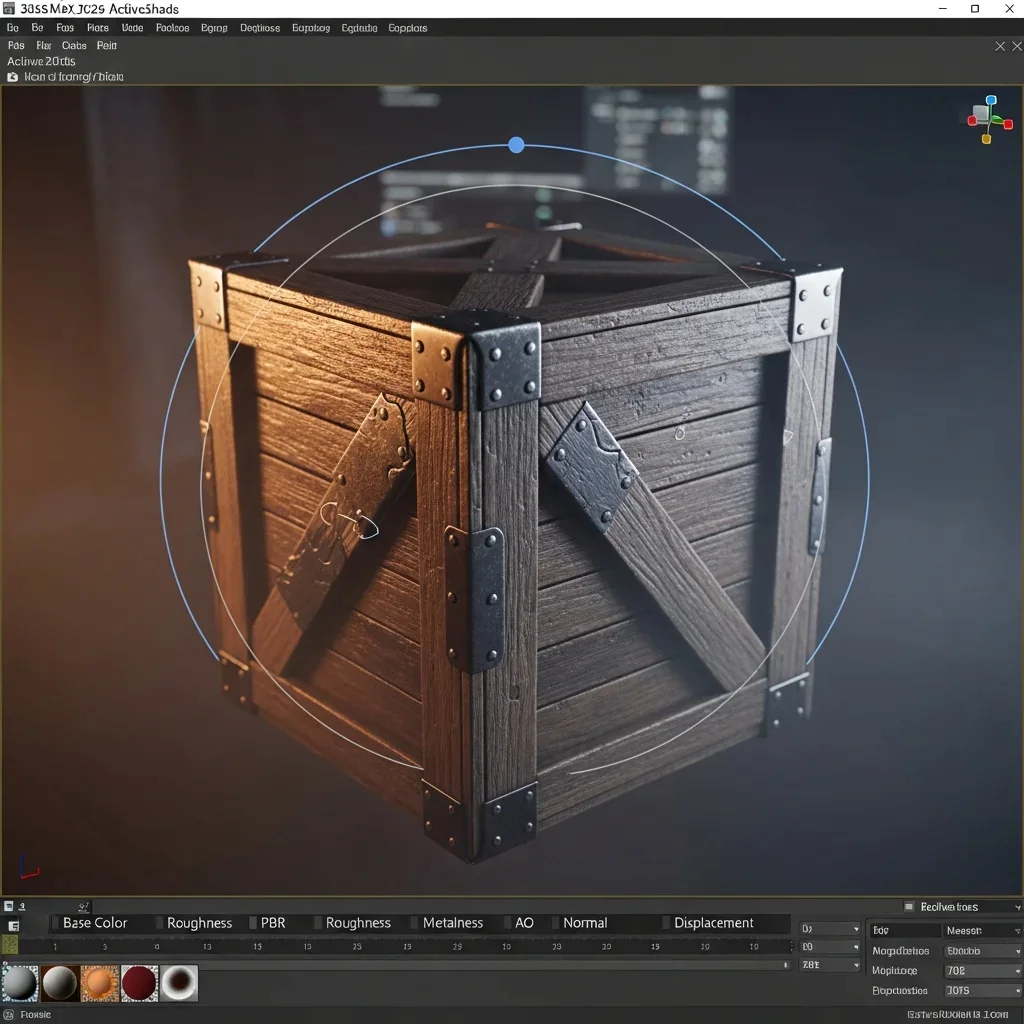
When creating realistic materials understanding each PBR component is key. The Base Color (Albedo) defines the object’s true color without any baked-in shadows or lighting, giving your material a solid foundation. For example, on a wooden crate, the Base Color map sets the wood tone precisely. Metalness controls whether a surface behaves like a metal or a dielectric (non-metal); metals are represented with white (1), and non-metals like wood or plastic are black (0).
Roughness determines how shiny or matte the surface appears black values create glossy reflections, while white values produce a soft, diffuse look. To add surface detail, use a Normal Map, connected to the Bump Mapping slot; this creates the illusion of fine texture without extra geometry, and flipping the green channel may be necessary depending on your engine. To enhance realism further, an Ambient Occlusion (AO) map can be multiplied over the Base Color, adding soft shadows in crevices and corners. Finally, for true geometric depth, a Displacement Map can raise or lower surface points, making your object feel tangible and detailed.
Creating Realistic Materials Step by Step
Step 1: Import and Prepare Your Object
First, you import the object you want to work on in this example, a wooden crate. . For best results, start with a high-quality Photorealistic 3D Product Model to ensure proper geometry and clean UV layout Once it’s in your scene, check its scale and orientation to make sure it matches real-world dimensions. Next, clean up the object: remove any hidden or overlapping geometry, and group parts properly if your object has multiple components.
After that, position your camera at a good angle to preview the material. Slightly adjust the Field of View (FOV) so that the crate looks natural in perspective and the light falls realistically across its surfaces. This preparation ensures that when you apply textures and PBR materials, you can immediately see how light interacts with the surface without surprises.
Practical Tip: Always work on one object at a time at this stage. It keeps your workflow clean, lets you focus on material quality, and avoids confusion with multiple objects in the scene.
Step 2: Apply Base Color / Albedo Map
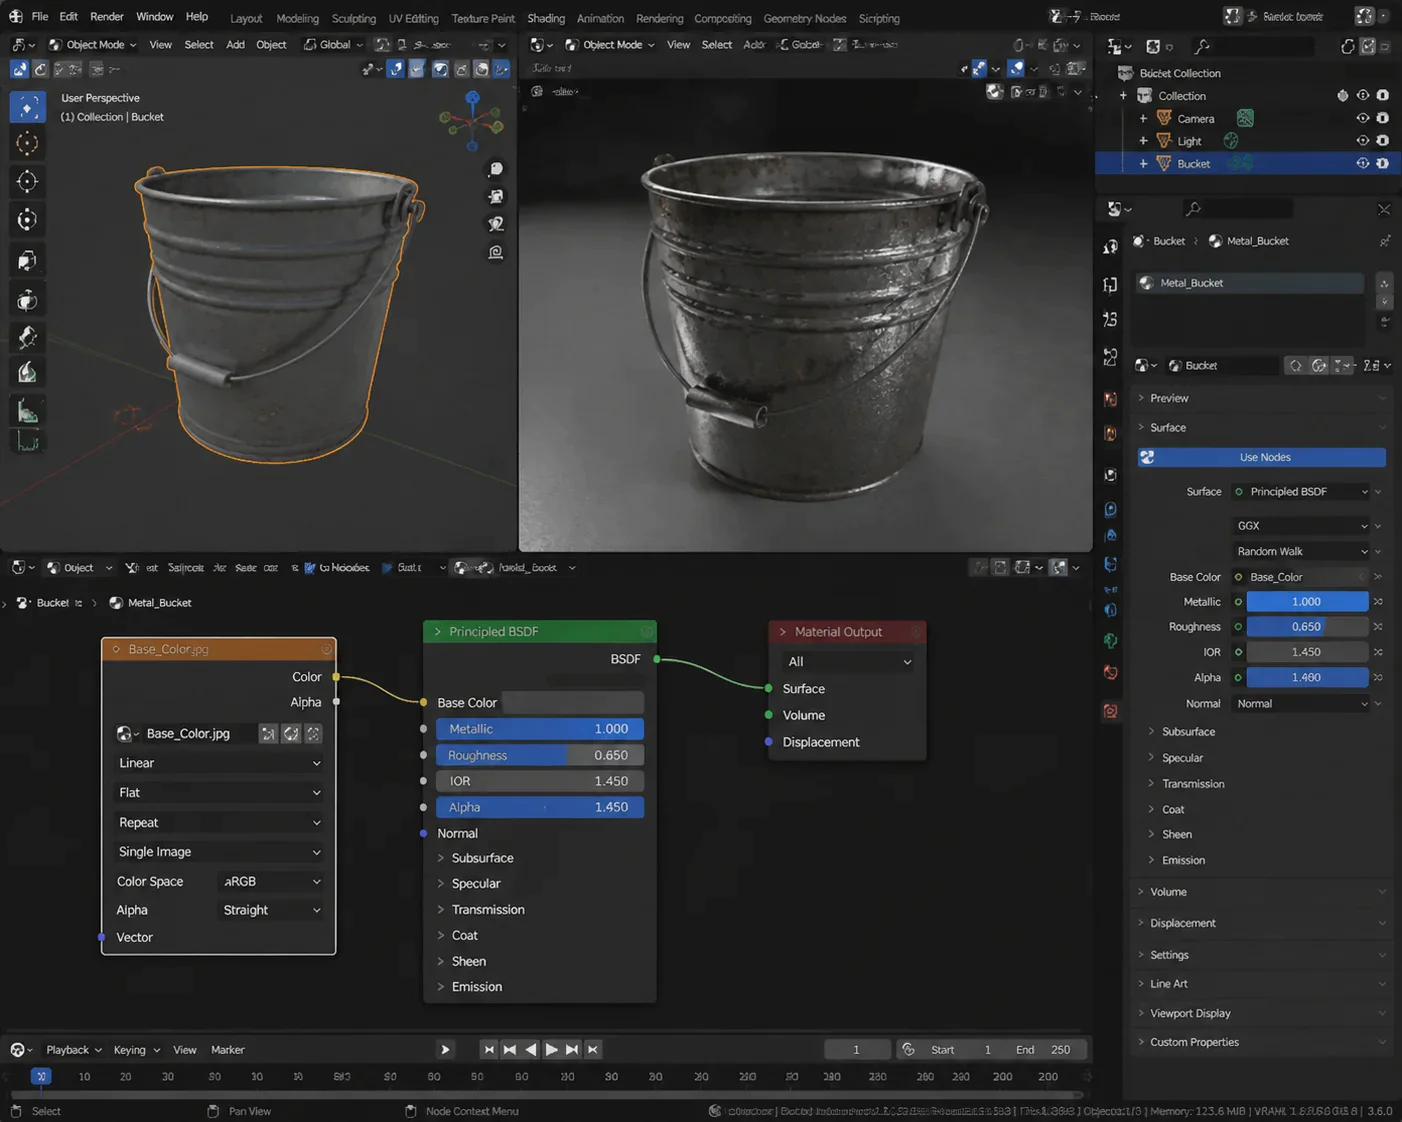
Once you have your object ready in the scene, the next step is to define its true color using the Base Color (Albedo) map, which forms the foundation of realistic materials. Start by selecting your object in our example, the wooden crate and open the Slate Material Editor (‘M’) if it isn’t already open. Drag a Physical Material or Arnold Standard Surface shader onto the object. Then connect the Base Color / Albedo texture to the Base Color slot. Make sure the texture represents the true color of the material without any shadows or lighting baked in.
After connecting the map, enable Show Shaded Material in Viewport so you can immediately see how the color spreads across the surface. Adjust the tiling or scale if necessary, so the texture fits naturally and aligns with the proportions of the object. Starting with Base Color first is important because it ensures all other PBR maps Roughness, Metalness, Normal will interact correctly with the true color, providing a solid and consistent foundation for realism.
Pro Tip: Use high-quality reference textures for Base Color. This helps maintain accuracy and reliability in your material and gives your renders a professional, realistic look.
Step 3: Apply Roughness and Metalness Maps
After setting the Base Color, the next step is to define how your object interacts with light by applying the Roughness and Metalness maps. Start by selecting your object in our example, the wooden crate and open the Slate Material Editor if it’s not already open. Locate the same Physical Material or Arnold Standard Surface shader you used in Step 2.
Connect your Roughness map to the Roughness (or Specular Roughness) slot. This map controls how shiny or matte the surface appears: black areas create smooth, mirror-like reflections, while white areas produce diffuse, soft reflections. Next, connect the Metalness map to the Metalness slot. White areas indicate metallic surfaces, whereas black areas represent non-metal materials like wood or plastic.
Always preview your material in the viewport by enabling “Show Shaded Material,” so you can see how light interacts with the object in real-time. Adjust the tiling or scale of these maps if needed, ensuring the reflections and glossiness align naturally with the object’s geometry.
Pro Tip: Applying Roughness and Metalness after Base Color ensures that your material behaves consistently under any lighting setup.
Step 5: Apply Displacement Map for True Geometric Detail
Once your Base Color, Roughness, Metalness, and Normal/AO maps are applied, the next step is to add true geometric depth using a Displacement Map. This map actually moves the vertices of your object, giving surfaces realistic bumps and grooves that Normal Maps alone cannot achieve.
Start by selecting your object, our wooden crate. Open the Slate Material Editor (‘M’) and locate the Physical Material / Arnold Standard Surface shader. Connect your Displacement Map to the Displacement slot of the material. Adjust the strength and height settings carefully; too much displacement can distort the object, while too little may not be noticeable.
Enable Show Shaded Material in Viewport and perform a test render to see the effect in real-time. This step brings micro-surface details to life, making edges, cracks, and textures on the crate feel tangible and realistic.
Pro Tip: Use displacement sparingly for small objects to optimize performance, but for larger props or assets meant for close-up shots, displacement adds professional-quality realism that enhances believability. Properly applied, this step demonstrates expert understanding of 3D material workflows, builds user trust, and ensures your materials react naturally to lighting and reflection
Step 6: Final Viewport Check and Lighting Adjustments
Once all PBR maps are applied Base Color, Roughness, Metalness, Normal, AO, and Displacement it’s important to check your object under final lighting. Select your object (wooden crate) and orbit around in the viewport to observe how light interacts with all surfaces. Enable ActiveShade mode in 3ds Max 2026, which provides real-time feedback on materials, reflections, and shadows.
Adjust your lighting setup if necessary: move your HDRI or SkyDome lights slightly, tweak intensity, or add subtle fill lights to ensure all details of your displacement, normal, and AO maps are clearly visible. This step ensures that the crate looks realistic from all angles and confirms that the material reacts consistently under different lighting conditions.
Pro Tip: Compare your viewport with a quick test render. This final check helps identify if any roughness, metalness, or displacement values need subtle tweaks.
Rendering and Exporting Final PBR Materials
After completing all PBR material steps Base Color, Roughness, Metalness, Normal, AO, and Displacement the next crucial step is to render and export your object while preserving all material properties. Start by setting up your final render resolution and sampling parameters in 3ds Max 2026 to ensure a high-quality output. Enable Global Illumination and HDRI lighting for accurate reflections and realistic material response.
Before rendering, check that ActiveShade previews reflect the final look of all maps and that there are no lighting or texture issues. For exporting, maintain PBR integrity: include all texture maps (Base Color, Roughness, Metalness, Normal, AO, Displacement) in your export package. This ensures that your object will appear consistently in other applications, such as game engines, film production software, or architectural visualization tools.
Tips for Optimizing PBR Workflow and Performance
To make your PBR materials look realistic while keeping your project fast and efficient, you need to work smart with textures, maps, and shaders. Start with texture optimization. Instead of using separate grayscale textures for every map, you can combine multiple maps into a single texture for example, Roughness in Red, Metalness in Green, and Ambient Occlusion (AO) in Blue. This reduces memory usage and makes your scene run smoother. Use high-resolution textures (like 2K) for important objects, but downscale props or background assets to 1K or 512px to save processing power. Always keep masks in grayscale so the computer can read them efficiently.
Next, focus on UVs and texel density. Make sure all your objects have a consistent texel density, so textures don’t look blurry when you zoom in. Before texturing, test with a checkerboard pattern to check scale. Keep your Base Color map clean don’t bake shadows or lighting into it so your PBR workflow stays physically accurate.
For shader efficiency, use Material Instances instead of creating unique shader networks for every object. This way, you can adjust properties quickly without the renderer recompiling the entire shader each time. Also, simplify reflection settings and sampling based on whether your target is mobile, PC, or console. Tools and plugins that automatically connect maps like Base Color, Roughness, and Metalness can save a lot of time and reduce mistakes.
Finally, stay organized and consistent. Keep your nodes clearly named, maintain structured layers, and follow the same workflow for every object. This keeps your PBR materials reliable, realistic, and professional, and ensures they behave correctly under any lighting or engine environment. Following these steps saves time, improves performance, and makes your final renders look polished and believable
Common Mistakes to Avoid in PBR Workflow
When creating PBR materials, even small mistakes can make your surfaces look unrealistic or break the workflow. One of the most common issues is baking lighting into the Base Color (Albedo) map. Remember, the Base Color should only represent the true diffuse color of a material under neutral lighting. Avoid painting shadows or highlights into it, because dynamic lighting in your scene will make these baked-in effects look unnatural. Also, stay away from absolute black or pure white values in the real world, materials rarely reach 0 or 255 in RGB. Use slightly off-black values (30–50) and muted whites (230–240) for more realistic light reflection.
Another mistake involves Metallic and Roughness maps. The Metallic map should clearly define metals (white/1) and non-metals (black/0), avoiding unnecessary gray areas unless physically accurate, like dirt on a metal surface. For Roughness, don’t make surfaces fully glossy (0) or fully matte (1). Instead, introduce subtle variations, because even polished surfaces have tiny imperfections that influence reflections.
Skipping texture baking is also critical. Without baking Ambient Occlusion, Curvature, or Position maps, your materials will fail to interact correctly with the mesh contours. Ensure your high-poly and low-poly objects have matching names during baking to avoid missing details or projection errors.
Finally, pay attention to texture channels and export formats. Don’t export each map as a separate file unnecessarily; instead, pack grayscale maps like Roughness, Metallic, and AO into the R, G, and B channels of a single texture to save memory and engine performance. Also, set your color maps (Base Color, Emissive) to sRGB and data maps (Roughness, Metallic, Normal) to Linear/Raw to maintain accuracy in your render or game engine.
Troubleshooting Common PBR Issues
When working with PBR materials, most problems come from incorrect texture setup, color space mistakes, or export issues. One common issue is inverted or incorrect Normal maps, where dents appear like bumps or shadows fall the wrong way. This usually happens because different engines interpret the green (Y) channel differently OpenGL (Y+) versus DirectX (Y-). The solution is to select the correct export preset in your texture software, set the Normal map’s color space to Non-Color (or Raw), and invert the green channel if needed in the material editor.
Another frequent mistake is washed-out or plastic-looking materials. This occurs when lighting or ambient occlusion is baked into the Base Color map. To fix this, keep your Base Color map lighting-agnostic, with dark values above 30 sRGB and whites below 240 sRGB for non-metals. Metals should reflect realistic light percentages, typically 70–100%, and their specular maps should stay within 180–255 sRGB to preserve realism.
Visible seams and UV artifacts are also common, appearing as unnatural dark lines or stretching. This often happens due to missing texture padding or low-polygon meshes without smooth shading. To correct it, increase texture dilation during baking, clean harsh intersections in your texturing software, and set your model to Smooth Shading instead of flat shading.
Finally, color space and texture packing errors can make materials appear too shiny, matte, or render non-metal parts as metallic. Always set Roughness, Metalness, and AO maps to Linear/Raw in your engine, and use proper channel packing to combine grayscale maps efficiently.
Conclusion
Mastering PBR materials in 3ds Max 2026 requires following a structured, step-by-step workflow. Start with a clean scene and properly prepared object, apply Base Color (Albedo), then Roughness and Metalness maps, followed by Normal and Ambient Occlusion maps, and finally add Displacement for geometric detail. Always check your materials in ActiveShade or real-time viewport to ensure they react accurately to lighting.
Maintaining consistent texel density, proper texture resolution, and channel-packed maps helps your workflow stay efficient and performance-friendly, especially in complex scenes. Avoid common pitfalls such as baking lighting into Base Color, using extreme black or white values, or skipping essential map baking processes. Using Material Instances, clean naming conventions, and organized node networks further ensures that your PBR workflow is scalable and professional.
By combining these best practices, optimization techniques, and troubleshooting strategies, you can produce realistic, reliable, and production-ready PBR materials. Following this workflow not only saves time but also demonstrates expertise and professionalism, allowing your 3D assets to perform consistently across different lighting setups, engines, and projects.
