How to Create Stable Mesh Deformations in Unity
If you have ever tried mesh deformation in Unity, you probably hit the same wall most developers hit. You write a loop, move some vertices, hit Play and watch your mesh either explode into random geometry, go completely black, or vanish off the screen entirely. It feels like Unity is working against you, but the truth is that mesh deformation follows a very specific set of rules. Once you understand those rules, everything clicks into place and the system becomes completely reliable.
This guide walks you through every step of building a stable deformation system from scratch. You will learn why each problem happens, how to fix it properly, and how to scale the system up when you need more performance.
What Is Mesh Deformation and Why Does It Matter?
Every 3D object in Unity is made up of vertex tiny points in space that connect to form triangles, which form the surface of your mesh. Mesh deformation means moving those vertices at runtime to change the shape of the object while the game is running. This is different from skeletal animation, where bones drive surface movement. With mesh deformation, you are working directly on the geometry itself.
This technique is used for a wide range of effects. Vehicle dents on impact, terrain that responds to footsteps, soft-body characters that squish when hit, real-time sculpting tools, water surfaces that ripple all of these come down to the same fundamental idea: move some vertices, update the mesh, and do it fast enough that it feels seamless.Unity exposes this through the Mesh class, specifically through the vertices property. The concept is simple. The execution, however, has some very specific traps that most tutorials skip over.
The One Thing You Must Know Before You Start
This is the most important concept in the entire guide, and if you miss it, nothing else will work correctly no matter what you do.
Unity’s MeshFilter component gives you two ways to access a mesh:
csharp
GetComponent<MeshFilter>().sharedMesh
GetComponent<MeshFilter>().mesh
When you access .sharedMesh, you are reaching into the original mesh asset stored in your project. Any changes you make to it are permanent and affect every single object in your scene that uses that mesh. This can cause truly bizarre bugs you deform one car, and three other cars in the scene deform in exactly the same way at the same time. Even worse, the changes can persist after you stop Play Mode, corrupting your asset.
When you access .mesh instead, Unity automatically creates a unique copy of that mesh just for that MeshFilter. Your changes stay completely isolated to that one object. This is always what you want when doing runtime deformation.
Step 1: Setting Up Your Mesh for Deformation
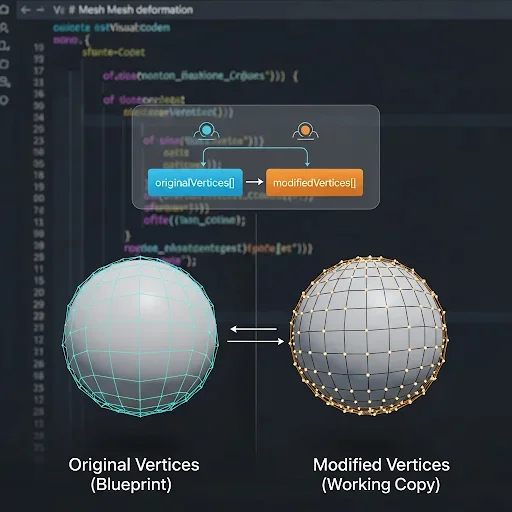
Now that you understand the foundation, you can start building the system. The first thing you need to do is set up your mesh correctly in Start() and cache the original vertex positions in a separate array.
This separate array is your safety net. Every time you apply a deformation, you need to calculate the new vertex positions as offsets from the original shape not from the current deformed state. If you skip this and keep reading from the live mesh vertices instead, your deformations will compound. Each frame adds more offset on top of the last, and within a few seconds the mesh looks like it went through a grinder. The original cache prevents that entirely.
Here is how to set it up:
csharp
using UnityEngine;
public class MeshDeformer : MonoBehaviour
{
private Mesh mesh;
private Vector3[] originalVertices;
private Vector3[] modifiedVertices;
void Start()
{
// .mesh creates a safe unique instance just for this object
mesh = GetComponent<MeshFilter>().mesh;
// Save the original shape — never write to this array
originalVertices = mesh.vertices;
// Create a working copy that we will modify during deformations
modifiedVertices = new Vector3[originalVertices.Length];
System.Array.Copy(originalVertices, modifiedVertices, originalVertices.Length);
}
}
Think of originalVertices as the blueprint and modifiedVertices as the working copy. Every deformation is calculated fresh against the blueprint. You never deform the already-deformed version.
Step 2: Solving the Local Space vs World Space Problem
This is the second most common reason deformations go wrong, and it is almost never explained clearly in tutorials. Understanding this will save you a lot of debugging time.
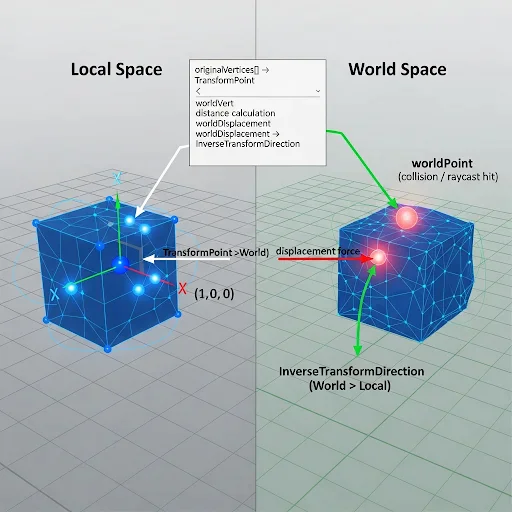
Mesh vertices are stored in local space. That means a vertex at position (1, 0, 0) is one unit to the right of the object’s pivot point, not one unit to the right in the world. If your object has been rotated, scaled, or moved, that local position could point in a completely different world direction.
Your deformation input an impact point from a collision, a mouse raycast hit, a contact position comes into world space. If you compare a local-space vertex position directly against a world-space impact point, you are comparing two completely different coordinate systems. That is exactly why vertices fly off to random positions when you first try to write a deformation without this conversion.
The fix is straightforward. You need to convert the vertex position to world space when measuring distance from the impact point, and then convert your deformation direction back to local space before storing it. Here is what that looks like in practice:
csharp
void DeformAt(Vector3 worldPoint, float radius, float strength)
{
for (int i = 0; i < modifiedVertices.Length; i++)
{
// Bring the vertex into world space so we can measure distance correctly
Vector3 worldVert = transform.TransformPoint(originalVertices[i]);
float dist = Vector3.Distance(worldVert, worldPoint);
if (dist < radius)
{
float falloff = 1f – (dist / radius);
// Define the push direction in world space
Vector3 worldDisplacement = Vector3.down * strength * falloff;
// Convert it back to local space before storing
modifiedVertices[i] = originalVertices[i] +
transform.InverseTransformDirection(worldDisplacement);
}
}
mesh.vertices = modifiedVertices;
mesh.RecalculateNormals();
mesh.RecalculateBounds();
}
TransformPoint converts a local position to world space and accounts for the object’s position, rotation, and scale. InverseTransformDirection converts a world-space direction back to local space, accounting for rotation and scale but not position — which is exactly what you want when working with offsets and directions rather than absolute positions.
Step 3: Making Your Deformation Look Natural With Falloff

Right now, your deformation has a hard edge. Vertices either move fully or not at all depending on whether they fall inside the radius. That sharp boundary looks unnatural and immediately reads as a code artifact to anyone playing your game.
What you need is a falloff curve, a way of gradually reducing the deformation strength as you move away from the impact center. Near the center, the deformation is at full strength. As you move toward the edge of the radius, it fades smoothly to zero. This is what makes dents, squishes, and impacts feel physically believable.
You have a few options depending on the look you are going for. For a sharp, controlled dent like a car door getting hit a smoothstep curve gives you a clean, professional result:
csharp
float t = dist / radius;
float falloff = 1f – (t * t * (3f – 2f * t));
For something more organic and flowing — a soft body character, a water ripple, anything biological — a gaussian curve produces the softest and most natural result:
csharp
float sigma = radius * 0.4f;
float falloff = Mathf.Exp(-(dist * dist) / (2f * sigma * sigma));
You can adjust the sigma value to control how tightly the effect concentrates around the center. A smaller value gives you a sharper peak; a larger value spreads the influence more evenly. Try both and see which one fits your game’s aesthetic.Replace the basic linear falloff line in your DeformAt function with whichever curve you choose, and you will immediately notice the difference in how the deformation looks.
Step 4: Recalculating Normals and Bounds
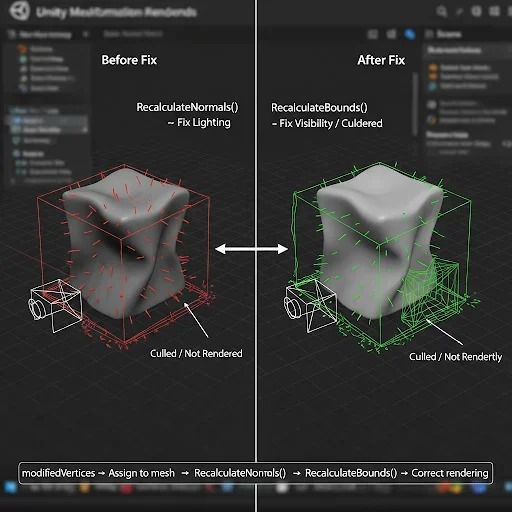
After every deformation, you need to call two specific methods. These are not optional, and forgetting either one causes bugs that look completely unrelated to deformation at first glance.
The first is mesh.RecalculateNormals(). Normals are per-vertex vectors that tell the lighting system which direction is “outward” on the surface. When your mesh was flat, those normals were calculated from the original geometry. After you move the vertices, those normals are wrong. The lighting system is still using the old directions, which is why deformed areas look flat, washed out, or sometimes completely black. Calling RecalculateNormals() after each deformation recomputes them from the current vertex positions and fixes all of that automatically.
The second is mesh.RecalculateBounds(). Unity uses the mesh’s bounding box to decide whether the object is inside the camera’s view. If it is outside the view, Unity skips rendering it entirely this is called frustum culling. The bounding box is calculated from vertex positions, but Unity does not update it automatically when you change those positions. When you deform vertices past the edges of the original bounding box, Unity still uses the old smaller box and may conclude the mesh is off-screen. This is where the “mesh randomly disappears when I move the camera” bug comes from. RecalculateBounds() fixes it in one call.
Always put both calls together at the end of your deformation function, right after you assign the modified vertices back:
csharp
mesh.vertices = modifiedVertices;
mesh.RecalculateNormals();
mesh.RecalculateBounds();
This sequence, assign, recalculate normals, recalculate bounds should become automatic muscle memory whenever you write any mesh deformation code.
Step 5: Connecting Deformation to Physics Collisions

Now that your deformation system is stable, you can connect it to something meaningful in your game. The most common and satisfying trigger is a physics collision. Here is how to do it cleanly.
Unity calls OnCollisionEnter whenever a Rigidbody on your object makes contact with another collider. Inside that callback, you get a Collision object that gives you the contact point in world space and the relative velocity between the two objects. The relative velocity is perfect for determining impact strength a slow touch barely dents, a high-speed crash dents deeply.
csharp
void OnCollisionEnter(Collision collision)
{
// Get the world-space contact point
ContactPoint contact = collision.contacts[0];
// Use relative velocity to scale the impact strength
float strength = Mathf.Clamp(collision.relativeVelocity.magnitude * 0.1f, 0f, maxDentDepth);
DeformAt(contact.point, deformRadius, strength);
}
The Mathf.Clamp is important. Without it, a very fast collision could push your vertices way past any sensible depth, producing a visible spike in the mesh. Clamping gives you control over the maximum dent depth regardless of how fast the impact is.
Here is the complete component putting everything together:
csharp
using UnityEngine;
[RequireComponent(typeof(MeshFilter), typeof(MeshCollider))]
public class MeshDeformer : MonoBehaviour
{
[Header(“Deformation Settings”)]
public float deformRadius = 0.5f;
public float maxDentDepth = 0.3f;
private Mesh mesh;
private Vector3[] originalVertices;
private Vector3[] modifiedVertices;
void Start()
{
mesh = GetComponent<MeshFilter>().mesh;
originalVertices = mesh.vertices;
modifiedVertices = new Vector3[originalVertices.Length];
System.Array.Copy(originalVertices, modifiedVertices, originalVertices.Length);
}
void OnCollisionEnter(Collision collision)
{
float strength = Mathf.Clamp(
collision.relativeVelocity.magnitude * 0.1f, 0f, maxDentDepth);
DeformAt(collision.contacts[0].point, deformRadius, strength);
}
void DeformAt(Vector3 worldPoint, float radius, float strength)
{
bool changed = false;
for (int i = 0; i < modifiedVertices.Length; i++)
{
Vector3 worldVert = transform.TransformPoint(originalVertices[i]);
float dist = Vector3.Distance(worldVert, worldPoint);
if (dist < radius)
{
float t = dist / radius;
float falloff = 1f – (t * t * (3f – 2f * t));
Vector3 displacement = Vector3.down * strength * falloff;
modifiedVertices[i] = originalVertices[i] +
transform.InverseTransformDirection(displacement);
changed = true;
}
}
if (!changed) return;
mesh.vertices = modifiedVertices;
mesh.RecalculateNormals();
mesh.RecalculateBounds();
// Keep the physics collider in sync with the visual mesh
GetComponent<MeshCollider>().sharedMesh = mesh;
}
}
One thing worth noting here is that if your object has a MeshCollider, you need to sync it after every deformation. The physics engine runs on the collider shape, not the visual mesh. If you deform the visual but leave the collider untouched, objects will start passing through or bouncing off invisible geometry. Reassigning sharedMesh on the collider (yes, sharedMesh is correct in this specific case you are telling the collider which mesh shape to simulate, not deforming it) keeps everything in sync.
Step 6: Adding a Smooth Reset Animation
A good deformation system should also be able to undo itself. For some games a snap-back is fine, but for most gameplay scenarios a smooth animated reset feels much more polished. It gives the impression that the material has memory and elasticity.
To do this, you lerp each vertex back toward its original position in Update() when a reset is triggered. The lerp runs every frame until every vertex is close enough to its original position, at which point you snap to exact zero and stop:
csharp
public bool isResetting = false;
public float resetSpeed = 2f;
public void TriggerReset()
{
isResetting = true;
}
void Update()
{
if (!isResetting) return;
bool stillMoving = false;
for (int i = 0; i < modifiedVertices.Length; i++)
{
modifiedVertices[i] = Vector3.Lerp(
modifiedVertices[i],
originalVertices[i],
Time.deltaTime * resetSpeed);
if (Vector3.Distance(modifiedVertices[i], originalVertices[i]) > 0.001f)
stillMoving = true;
}
mesh.vertices = modifiedVertices;
mesh.RecalculateNormals();
mesh.RecalculateBounds();
if (!stillMoving)
{
isResetting = false;
// Snap to exact original to avoid floating point drift
System.Array.Copy(originalVertices, modifiedVertices, originalVertices.Length);
mesh.vertices = modifiedVertices;
mesh.RecalculateNormals();
mesh.RecalculateBounds();
}
}
You can control how quickly the mesh snaps back by adjusting resetSpeed. A value of 1 gives you a slow, elastic recovery. A value of 5 or above gives you a fast, springy snap. The right value depends on the feel you are going for in your game.
Performance: When the Basic Loop Is Not Enough
The CPU loop approach works perfectly well up to around 5,000 vertices per mesh. For a car door dent, a simple prop, or an enemy that squishes on hit, you will never need to go further. But once you start dealing with dense terrain meshes, water surfaces, or multiple objects deforming at the same time, the frame cost starts to add up.
Here is how to think about scaling up.
When your profiler starts showing consistent spikes above 1ms from the deformation loop, the first upgrade to reach for is Unity’s Job System combined with the Burst Compiler. The Job System splits your vertex loop across multiple CPU cores automatically. The Burst Compiler then applies SIMD math optimizations to each thread. Together, they can give you anywhere from 5 to 15 times the performance of a single-threaded C# loop often completely free of frame spikes because the work runs in parallel on background threads while the main thread keeps going.
When you are dealing with very large meshes think 50,000 vertices and above, like detailed terrain grids or large ocean planes the CPU is no longer the right place for this work at all. At that scale, you want to move the deformation entirely onto the GPU using a Compute Shader. A Compute Shader launches thousands of parallel threads, one per vertex, and writes results directly into a buffer that the render pipeline reads without any data having to come back to the CPU. The tradeoff is that Compute Shader deformation is more complex to set up and does not integrate naturally with Unity’s physics system, so it is best for visual-only deformations like water or large terrain effects.
There is also one more option worth knowing about that fits a specific use case very well. If your deformation maps cleanly onto a fixed set of target shapes a character’s face moving between expressions, armor flexing between open and closed states, a creature’s body transitioning between relaxed and tensed Unity’s Blend Shapes (also called Shape Keys) are a far better tool than any of the above. Blend Shapes are handled entirely on the GPU, support weighted blending between multiple shapes at once, and integrate directly with the animation system. You define the shapes in your 3D modeling software, bring them into Unity, and drive them with a single float parameter. No RecalculateNormals() needed.
Common Bugs and Their Exact Fixes
Even with everything set up correctly, small mistakes can produce confusing results. Here are the most common bugs and the exact cause behind each one.
If your mesh goes black or the lighting looks wrong after deforming, you are missing mesh.RecalculateNormals(). The vertex normals are still pointing in the directions calculated from the original flat mesh. Add the call right after you assign mesh.vertices.
If your object disappears when you move the camera but comes back when you move it back, you are missing mesh.RecalculateBounds(). The bounding box is out of date and Unity is incorrectly culling the object as out-of-view.
If your deformation keeps getting worse every frame and never stabilizes, you are reading from the live mesh.vertices instead of your cached originalVertices. Every read picks up the previous frame’s deformation, and the offsets keep stacking.
If vertices are flying off in random directions on the first deformation, the world-to-local space conversion is missing or incorrect. Double-check that you are using TransformPoint to bring the vertex into world space for distance measurement and InverseTransformDirection to bring the displacement back into local space.
If every object with the same base mesh is deforming together, you are using .sharedMesh in Start() instead of .mesh. This is a one-word fix, but it makes all the difference.
Conclusion
Mesh deformation in Unity has a reputation for being unpredictable, but as you have seen throughout this guide, the instability almost always comes from the same small set of root causes. Using the shared mesh, not caching original vertices, skipping space conversions, or forgetting to update normals and bounds fix those four things, and the system becomes completely solid.
The pattern you have built here instance the mesh on start, cache the original, convert spaces correctly, apply smooth falloff, and always recalculate will hold up whether you are building a simple dent system for a vehicle, a real-time terrain editor, or a soft-body enemy. From this foundation, exploring the Job System for performance, Compute Shaders for GPU-side scale, and Blend Shapes for animation-driven deformation all become natural next steps, each building on exactly what you learned here.
