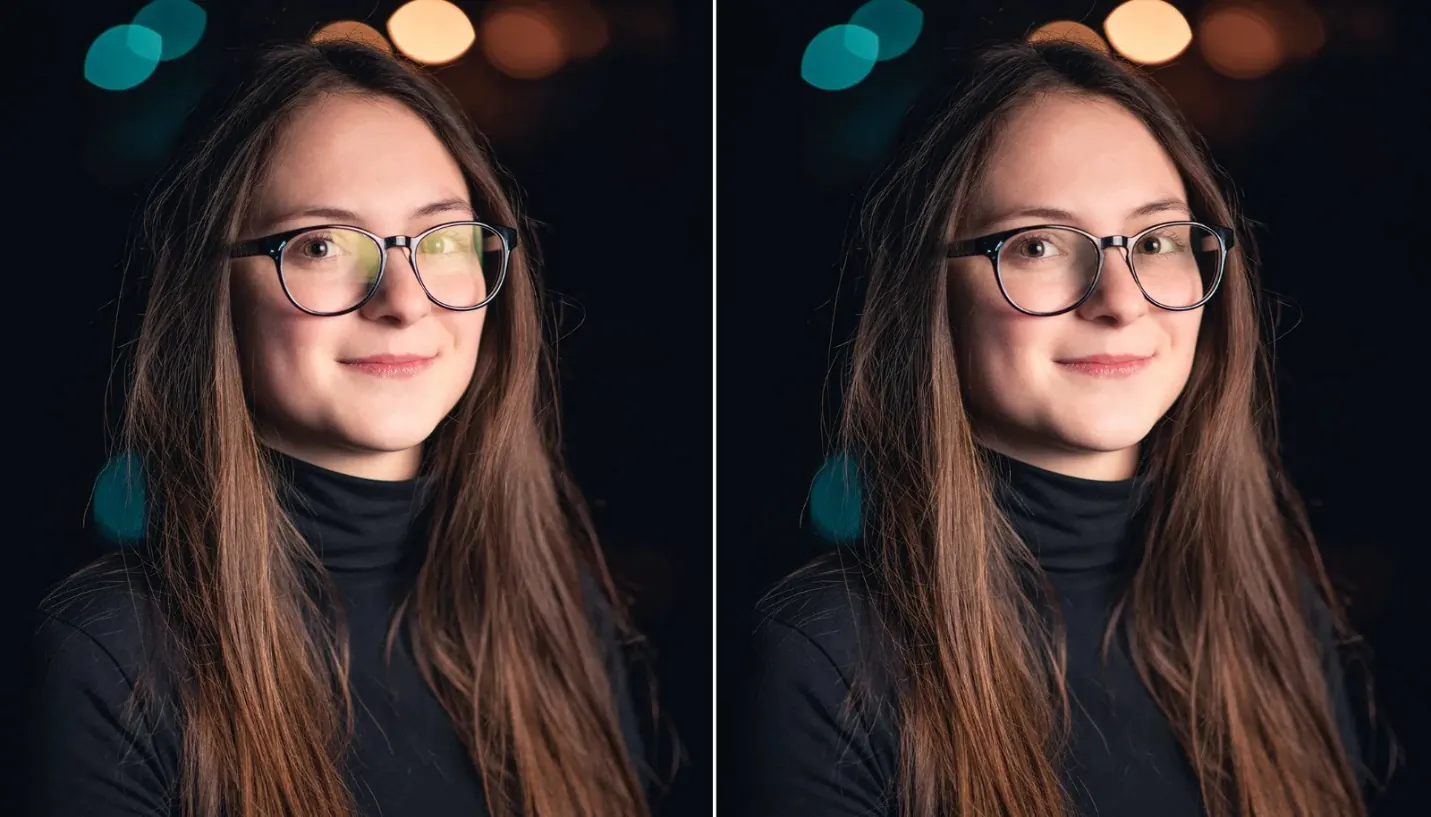
How to Easily Remove Glare from Glasses in Photos
Capturing appealing portraits or group shots is usually hampered by distracting glare on eyeglasses. Reflections can detract from the subject’s eyes and the overall image quality. Fortunately, with the correct techniques and tools, you can remove glare from glasses in images and produce professional-looking results. This blog post will review many approaches and step-by-step directions for quickly removing glare from glasses, regardless you’re a professional photographer or an amateur trying to improve your images.
Step 1: Adjusting Lighting and Positioning
Properly adjusting the lighting setup and the positioning of your subject is a crucial first step in minimizing and removing glare from glasses in photos. Here’s how to do it:
Assess the lighting conditions: Evaluate the intensity, direction, and type of lighting available. Whether you’re working with natural or artificial lighting, understanding the characteristics of the light source will help you determine the best approach for minimizing glare.
Modify the angle of the light source: Experiment with changing the angle of the light to find the most flattering position that minimizes reflections on the glasses. Adjusting the light’s direction can alter how it interacts with the glasses, reducing glare and enhancing the subject’s eyes.
Adjust the subject’s position: Have your subject slightly adjust their head or body positioning. Encourage them to tilt their head slightly downward or move their face at different angles to minimize the reflection on their glasses.
Use diffusers or reflectors: If you’re working with harsh or direct light, consider using diffusers or reflectors that soften the light and create a more even illumination. Diffusing the light source can help diffuse the reflections on the glasses, reducing glare.
Step 2: Shooting with Polarizing Filters
One effective technique for reducing glare on glasses in photos is to use polarizing filters. These filters are specifically designed to minimize reflections and can enhance your images. Follow these steps to shoot with polarizing filters:
Understand polarizing filters: Polarizing filters selectively block certain light waves, reducing glare and reflections. Familiarize yourself with the characteristics and functionality of polarizing filters to make the most of their potential.
Attach the polarizing filter: Screw the polarizing filter onto the front of your camera lens. Ensure it is securely attached, allowing you to adjust the filter as needed.
Adjust the filter orientation: Look through the camera’s viewfinder and slowly rotate the polarizing filter while observing the impact on the glasses. Rotate it until you achieve the desired reduction in glare. Remember that the effect can vary based on the angle of the light source and the glasses’ position.
Fine-tune the filter settings: Experiment with different filters to find the optimal balance between glare reduction and overall image quality. Adjust the filter intensity based on the specific lighting conditions and the level of reflection on the glasses.
Monitor the results: Regularly check the camera’s LCD screen or viewfinder to assess the impact of the polarizing filter. Make adjustments to ensure the glasses appear clear and free from distracting reflections.
Step 3: Post-Processing Techniques
Post-processing offers a powerful way to remove glare from glasses in photos and enhance the overall quality of your images.
Select suitable editing software: Choose a reliable photo editing software like Adobe Photoshop or Lightroom that provides the tools and features for glare removal.
Zoom in and assess the glare: Zoom in on the areas with glare and analyze the intensity and location of the reflections. That determines the most effective approach for removing the glare.
Utilize cloning and healing tools: Use the cloning and healing tools to carefully sample and blend nearby pixels, gradually eliminating the glare while maintaining the natural look of the glasses and the subject’s eyes.
Apply frequency separation: Employ the frequency separation technique to separate the image’s texture and colour information. That allows for targeted adjustments and precise glare removal while preserving the overall image quality.
Make targeted adjustments: Utilize tools like adjustment brushes or layer masks to apply specific adjustments to the glare areas. Adjust brightness, contrast, and saturation to eliminate any remaining reflections.
Evaluate and refine: Continuously review your edits and make refinements as necessary. Compare the before and after versions to confirm that the glare has been adequately removed without affecting the overall balance.
Step 4: Utilizing Cloning and Healing Tools
Cloning and healing tools in photo editing software can be valuable assets when removing glare from glasses in photos. Follow these steps to use these tools effectively:
Zoom in on the affected area: Begin by zooming in on the glasses where the glare is present. That will allow for more precise editing and better visibility of the details.
Select the cloning or healing tool: Choose the appropriate one in your editing software. It could be the clone stamp tool, healing brush, or spot healing brush, depending on the specific software you are using.
Sample nearby pixels: With the selected tool, sample an area of the glasses free from glare but with a similar texture and colour. That is a reference for replacing the glare-affected pixels.
Carefully clone or heal: Begin cloning or healing the glare by carefully painting over the affected area using the sampled pixels. Use small, precise strokes and pay attention to maintaining the natural appearance of the glasses.
Blend and refine: Continuously blend and refine your edits by adjusting the opacity or hardness of the tool as needed. That will ensure seamless integration of the edited area with the rest of the image.
Review and make adjustments: Zoom and review the edited image to ensure the glare has been effectively removed. Make any necessary adjustments or touch-ups to enhance the results further.
Step 5: Applying Frequency Separation
Frequency separation is a powerful technique allowing targeted adjustments and precise glare removal while preserving the overall image quality. Follow these steps to apply frequency separation:
Duplicate the image: Begin by duplicating the original image onto two separate layers – one for the high-frequency details and another for the low-frequency tones.
Apply a Gaussian blur: Apply a Gaussian blur to the low-frequency layer. It blurs the overall tones and textures while preserving the underlying structure.
Edit the high-frequency layer: On the high-frequency layer, use tools like cloning, healing, or the brush tool to remove glare from the glasses. This layer focuses on the fine details.
Blend the layers: Adjust the opacity of the high-frequency layer and use layer masks or blending modes to blend the two layers seamlessly.
Refine and finalize: Zoom out and assess the edited image. Make any necessary refinements or adjustments to achieve the desired glare removal while maintaining a natural appearance.
Step 6: Targeted Adjustments for Glare Removal
In removing glare from glasses in photos, targeted adjustments are crucial in achieving optimal results. Follow these steps for effective targeted adjustments:
Select the affected area: Use selection tools like the lasso or brush to isolate the area with glare on the glasses.
Apply adjustments: Use adjustment layers or tools like curves, levels, or brightness/contrast to modify the selected area. Reduce highlights, increase shadows, or make specific colour corrections to eliminate glare.
Fine-tune the adjustments: Adjust the intensity and blending of the targeted adjustments to ensure flawless integration with the rest of the image.
Review and refine: Step back and review the edited image, comparing it to the original. Make any necessary refinements to achieve a natural and polished appearance.
Step 7: Exploring Dedicated Tools and Plugins
To remove glare from glasses in photos, it’s worth exploring dedicated tools and plugins specifically designed for this purpose. Consider the following steps:
Research available tools: Look for dedicated tools or plugins specializing in glare removal. Explore reputable software and plugins known for their effectiveness in dealing with reflections on glasses.
Install and familiarize yourself: Once you’ve identified suitable tools, install them and take the time to familiarize yourself with their features and functionalities. Understand how they can assist in removing glare and enhance the overall quality of your portraits.
Follow user guides or tutorials: Refer to user guides or online tutorials provided by the tool’s creators. These resources can offer valuable insights and step-by-step instructions on effectively using the tool for glare removal.
Experiment and refine: Apply the dedicated tool or plugin to your photos, experimenting with different settings and options. Refine your approach based on the specific characteristics of the glare and the desired outcome.
Evaluate the results: Carefully review the edited images to assess the effectiveness of the dedicated tool or plugin. Make any necessary adjustments or additional edits to achieve the desired glare-free result.
Step 8: Implementing Prevention Techniques during the Photoshoot
Preventing glare on glasses during the photo shoot can save you time and effort post-processing. Here are key prevention techniques to consider:
Adjust lighting angles: Position the light source at an angle that minimizes glare on the glasses. Try different lighting setups to find the optimal placement.
Use a lens hood: Attach a lens hood to your camera lens to block unwanted stray light that can cause glare on glasses.
Encourage tilting or removing glasses: Request the subject tilt their head slightly downward or remove their glasses, especially if the glare persists despite lighting adjustments.
Clean the glasses: Advise the subject to clean their glasses before the photo shoot to reduce smudges or fingerprints that may cause additional glare.
Conclusion
In conclusion, removing glare from glasses in photos is a multi-step process that combines shooting techniques, post-processing skills, and attention to detail. Following the steps outlined, from adjusting lighting to implementing prevention techniques, you can achieve glare-free images that showcase clear and captivating eyes.
