
How to Develop External Blender Python Scripts for Remote Batch Processing of NeRF & Gaussian Splatting
NeRF and Gaussian Splatting reconstructions are also inefficient to process manually in Blender, especially in cases of large datasets. Considering that it takes time to run every reconstruction separately, opening the UI of Blender and repeating the steps of the setup, it is a waste of time and risks. Long processing times, variable results, and poor usage of the GPU are issues that many users find to be an issue, particularly when they are scaling up their projects to production or research.
These problems are solved by knowing how to write external Blender Python scripts to do remote batch processing of NeRF and Gaussian Splatting solves. External scripting enables you to run Blender in headless mode, automate the creation of a scene, and process a series of datasets without needing to be a human. Getting the control logic out of Blender provides the added benefits of error handling and logging and allows the execution of jobs on remote or cloud-based servers.
This approach streamlines NeRF and Gaussian Splatting workflows by enabling batch execution, efficient GPU usage, and repeatable results. Whether you manage dozens of product scans or large-scale 3D reconstruction pipelines, external Blender Python scripts help you scale processing, reduce manual effort, and deliver consistent 3D outputs faster.
Step 1: Install and Prepare Blender for Background Processing

Get the latest version of Blender LTS on the official site and install it on the system. Once installed, find the executable file Blender (blender.exe on Windows or blender on Linux). Copy the entire location of this executable. On Windows, go to open System Properties, Advanced, and Environment Variables, and edit the Path Variable and paste the Blender executable path such that you can run Blender in the command line.
The new release of Blender LTS can be found on the official website and installed on the system. After installing, locate the executable file (blender.exe on Windows or blender on Linux) of the blender. Copy the whole path of this executable. In Windows, find open System Properties, Advanced, and Environment Variables, and amend the Path Variable and paste in the Blender executable path so that you can run Blender in the command line.
Step 2: Set Up the External Python Environment\

Open a terminal or command prompt and change the working directory to the one that you made in the previous step (blender_batch). Within this folder, you have to make a directory called ‘venv’ where the virtual environment is going to be placed. The command will execute the creation of a virtual environment with the same version of Python that Blender operates on (you can determine the version of Python Blender is already using by running blender -b –python-expr “import sys; print(sys.version)”).
Install the virtual environment. Run venv/scripts/activate on Windows and run source venv/bin/activate on Linux or macOS. After this is done, you can install the necessary libraries using pip install torch torchvision numpy opencv-python tqdm. When using a NeRF repository or Gaussian Splatting, just clone it into the blender_batch folder, which you should then pip install -r requirements.txt to install it. Once installed, you can check that Python can access the GPU by running a simple Python command such as python -c “import torch; print(torch.cuda.is_available())”. This is an installation that enables your external Python code to drive Blender and process NeRF or Gaussian Splatting in a reliable manner.
Step 3: Organize Input Datasets for Batch Processing

Create a new folder inside the Blender_batch directory and name it ‘datasets’. Inside this folder, create a separate subfolder for each object or scene you want to process, for example, datasets/object_01, datasets/object_02, and so on. Place all input images for a single object into its corresponding folder and ensure that each folder contains only one dataset. Rename images in sequential order, such as img_001.jpg, img_002.jpg, and img_003.jpg, to maintain consistent camera ordering.
In case there are camera pose files or metadata provided, then the files have to be put in the same object folder and have the same filenames. Ensure that the pictures of all the images are in the same format and resolution prior to moving on. Open a terminal and go to the datasets folder, and make sure the structure is correct by visual inspection or by using the ls command to see the contents of the directory. This organisation makes it possible to automatically loop datasets with your external Python scripts and execute NeRF or Gaussian Splatting jobs automatically.
Step 4: Create an External Python Script to Control Blender
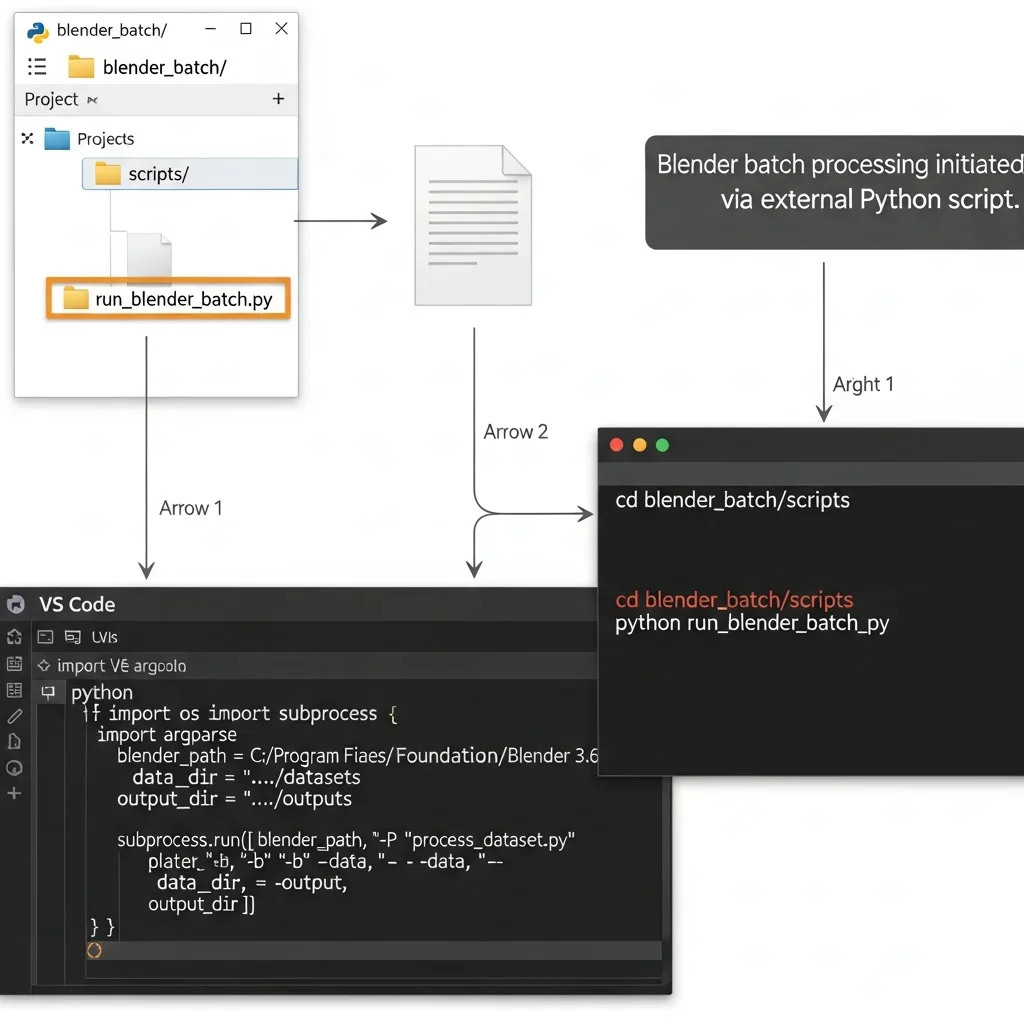
Enter the blender_batch folder, then the scripts directory. Write a new Python programme and call it run_blender_batch.py. Open this file with the help of a code editor such as VS Code or Notepad++. Within the script, one has to import necessary Python modules (os, subprocess, argparse). Specify variables of the Blender executable path, data directory, and output directory. Start up Blender in the background with the -b option and give Blender a Python script with the -python option using the subprocess. run() function. Add command-line parameters to give the dataset path and output path to Blender. Store the file and start a terminal in the scripts folder. Make sure to run the script with python run_blender_batch.py and ensure that Blender is launched without the UI. This is an external script that is the primary controller, and it initiates Blender runs and batch processing of NeRF and Gaussian Splatting.
Step 5: Write the Blender Python Script for Batch Processing

Open Blender in some manner (UI or headless), then create a new text file in the Text Editor panel. Call the file process_nerf_gaussian.py. At the beginning of the script, there are such modules as bpy, os, and sys that were imported. Add a code to get the command-line arguments, i.e., sys. argv, to allow the script to get the dataset path and the output path in the external Python controller. Delete the default cube, light, and camera using:
bpy.data.objects[‘Cube’].select_set(True)
bpy.ops.object.delete()
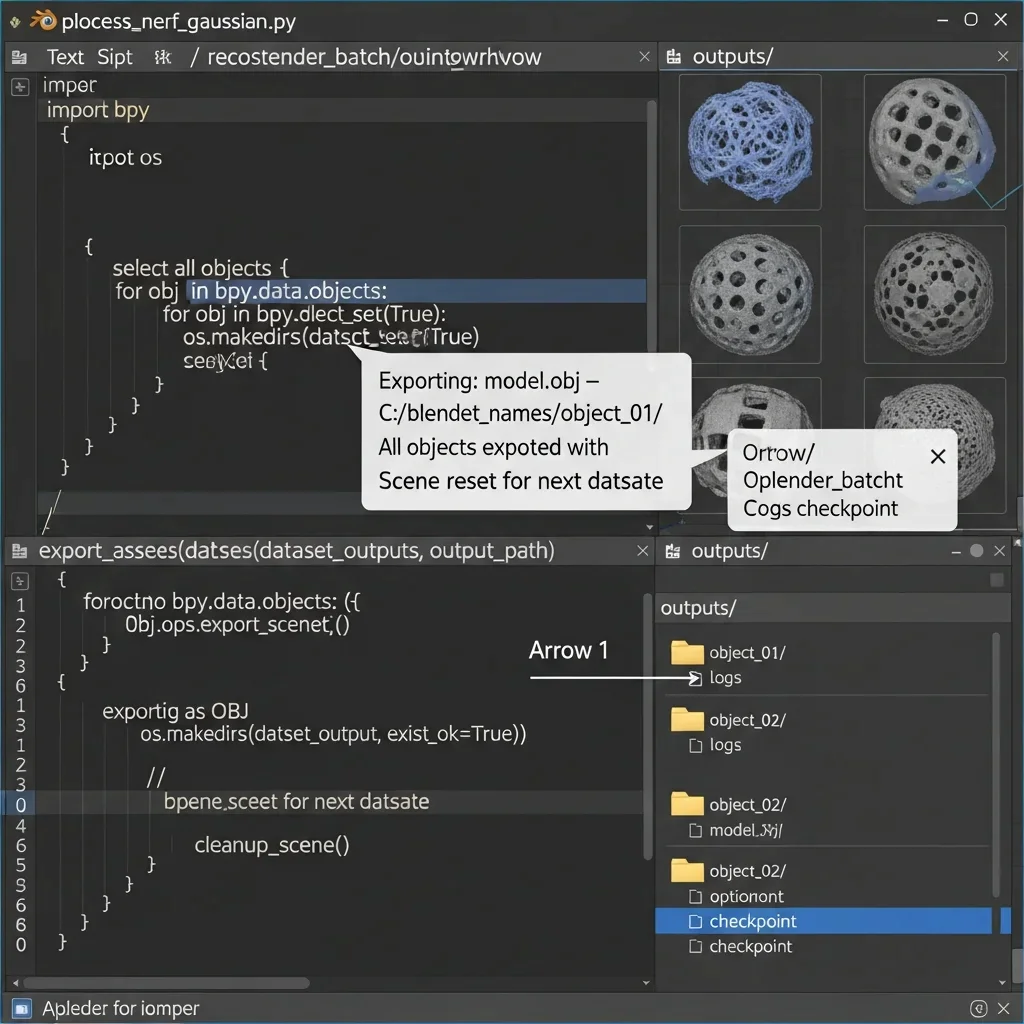
Get the light and camera on the repeat. Next, implement a load function to load the images in the input folder by going through all the files in the dataset path with an index and loading them to a new camera configuration or NeRF/Gaussian Splatting input node. bpy.context. scene.unit settings and bpy.context.scene. Render can be used to set the scene units, frame rate, and scale. Turn off UI-dependent functions such as viewport shading to make sure that the script does not run in foreground mode. Finally, lastly, bpy.ops.export_scene.obj() or your pipeline exporter of choice, to save the output to the output path. Save the script in the scripts folder. This is a Blender-side script that will be run automatically every time a dataset is called by the external controller.
Step 6: Integrate NeRF or Gaussian Splatting into Blender Scripts

Open the Blender Python script (process_nerf_gaussian.py) that you have created in Step 5. Import your NeRF or Gaussian Splatting module (e.g., import nerf_trainer or the library you are using). Code Within, there is a pass of images that are loaded and camera poses to the NeRF/Gaussian Splatting training pipeline. Specify training parameters, which include the number of iterations, learning rate, and output resolution in the script. To make the script gain automatic activation of the reconstruction, add a code such as:
nerf_trainer.train(images=images, poses=poses, output_path=output_path, iterations=1000)
Checkpoints by monitoring. Save your intermediate models or logs by creating an output folder for every dataset within your main output directory. Check the existence of folders with Python, os.makedirs(output_path, exist-ok=True). When the function has finished, export the final mesh or point-cloud output in OBJ, PLY, or GLTF format with the exporter functions (bpy.ops.export_scene.obj() or similar). Ensure that every output is stored in the folder that belongs to the data. By incorporating the reconstruction pipeline into the Blender script, every dataset can be processed automatically and without user interaction, which allows running the batch processing.
Step 7: Automate Scene Cleanup and Initialization

Open your Blender Python script (process_nerf_gaussian.py) and create a cleanup function at the beginning of the script. Select and delete all default objects by running:
for obj in bpy. data.objects:
obj.select_set(True)
bpy.ops.object.delete()
Clear any existing materials by iterating over bpy.data.materials and removing them:
for mat in bpy. data.materials:
bpy.data.materials.remove(mat)
Remove any unused meshes, images, or textures to free memory:
for mesh in bpy. data.meshes:
bpy.data.meshes.remove(mesh)
for img in bpy. data. images:
bpy.data.images.remove(img)
Reset the scene settings by setting units, frame rate, and render resolution using:
scene = bpy.context. scene
scene.unit_settings. system = ‘METRIC’
scene.render.resolution_x = 1024
scene.r ender.resolution_y = 1024
scene .render.fps = 24
Invoking this cleaning-up function when starting to process each dataset. This guarantees that every batch run starts with a clean scene, does not leak memory, and does not leave any old data from other reconstructions that may affect new reconstructions.
Step 8: Export Reconstructed Assets
At the end of your Blender Python script (process_nerf_gaussian.py), create a function to export the reconstructed 3D models. First, select all reconstructed meshes or point clouds:
for obj in bpy.data. objects:
obj.select_set(True)
Then, export the objects using the appropriate format. For meshes, use:
bpy.ops.export_scene.obj(
filepath=os.path.join(output_path, “model.obj”),
use_selection=True,
use_materials=True
)
For point clouds or other formats, replace export_scene.obj with export_scene.ply or export_scene.gltf as needed. Ensure that each dataset has a dedicated output folder:
dataset_output = os.path.join(output_path, dataset_name)
os.makedirs(dataset_output, exist_ok=True)
All intermediate files and logs should be saved in one folder. Once the export has been made, make the scene clear and reset the scene so as not to conflict with the next dataset. Such an arrangement will make sure that all the reconstruction is stored, sorted by dataset, and can be further used by downstream tasks such as rendering, analysis, or AR/VR integration.
Step 9: Implement Batch Processing Loop

Open your external Python controller script (run_blender_batch.py) and write a loop to process all datasets automatically. First, list all dataset folders inside your main datasets directory:
import os
datasets_path = “path/to/blender_batch/datasets”
dataset_folders = [f for f in os.listdir(datasets_path) if os.path.isdir(os.path.join(datasets_path, f))]
Next, iterate over each dataset folder and call Blender in background mode:
import subprocess
blender_exec = “path/to/blender”
script_path = “path/to/scripts/process_nerf_gaussian.py”
output_base = “path/to/blender_batch/output”
for dataset in dataset_folders:
input_path = os.path.join(datasets_path, dataset)output_path = os.path.join(output_base, dataset)
os.makedirs(output_path, exist_ok=True)
subprocess.run([
blender_exec, “-b”, “–python”, script_path, “–“,
“–input”, input_path,
“–output”, output_path
])
Add error handling to skip failed datasets or retry them if Blender crashes:
Try:
subprocess.run([…], check=True)
except subprocess. CalledProcessError:
print(f”Dataset {dataset} failed, retrying…”)
Save the script. To run python run_blender_batch.py, then it will automatically run through all the datasets and start Blender in background mode, run the reconstruction script, and save results on each dataset. This loop removes the need for human intervention and provides a uniform processing of a batch of objects or scenes.
Step 10: Deploy on Remote or Headless Servers
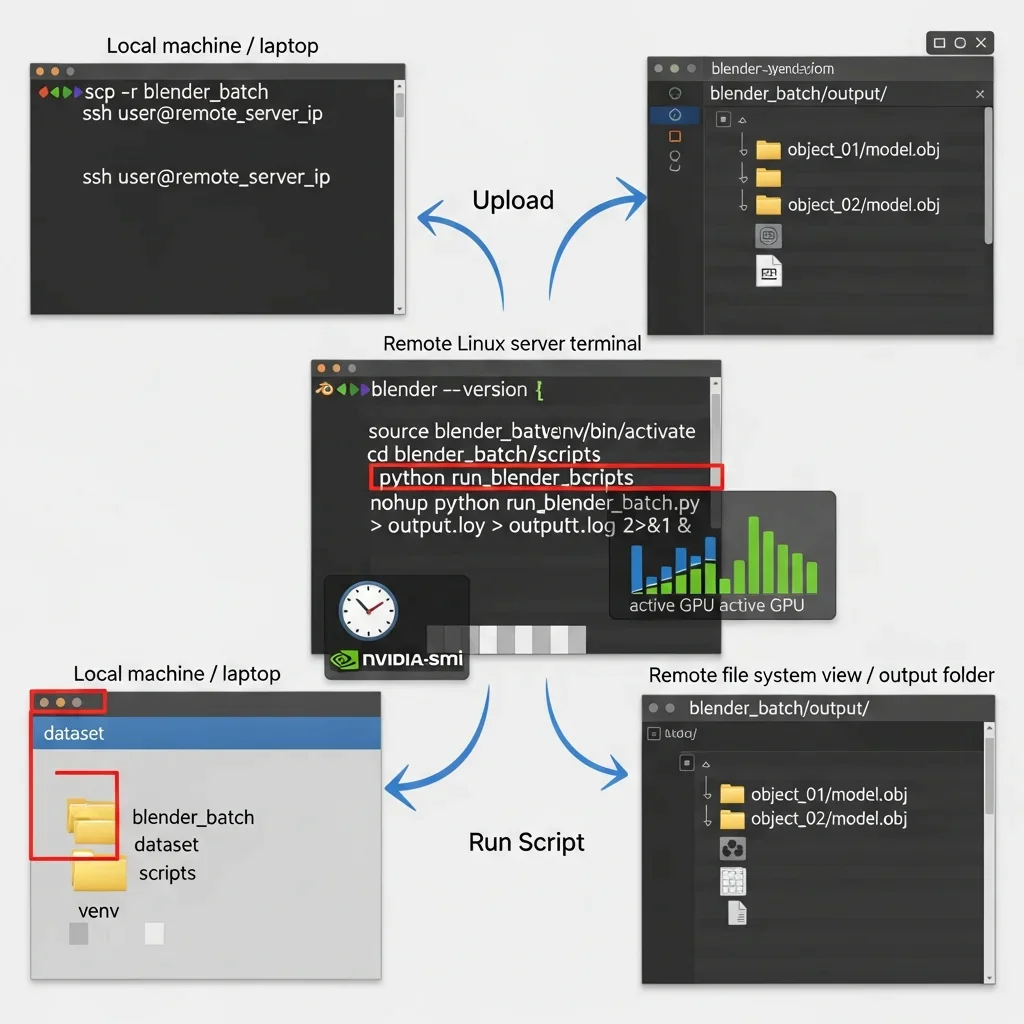
Log in to your remote Linux server or cloud instance with GPU support using SSH:
ssh user@remote_server_ip
Upload your blender_batch folder to the server using scp or rsync:
scp -r blender_batch user@remote_server_ip:/home/user/
Verify that Blender is installed on the server and accessible via command line (blender –version). Install the same Python environment as Step 2 on the server and ensure all required libraries are installed in the virtual environment. Activate the environment:
source blender_batch/venv/bin/activate
Navigate to the scripts folder:
cd blender_batch/scripts
Run your batch processing script remotely:
python run_blender_batch.py
If you want to run jobs in the background without keeping SSH open, use nohup:
nohup python run_blender_batch.py > output.log 2>&1 &
Check the use of the GPUs using nvidia-smi and make sure that the output files are present in the output directory. Do this again with more than one server in case you need to scale massive datasets. This deployment provides the performance of your Blender Python batch processing, which is fully automated and can use the resources of the GPU on remote machines.
Conclusion
Using these steps, it is possible to complete NeRF and Gaussian Splatting automation within Blender. You have installed Blender and Python, pre-processed datasets, and have scripts that automatically remesh, recompose, and recombine several reconstructions. The addition of cleanup, exporting, and batch loops is a sure way of getting repeatable and error-free results. Running on remote servers allows scaling of jobs and maximum utilisation of GPUs.
This workflow will save time, decrease manual effort, and produce 3D assets that are ready to use for visualisation, AR/VR, or marketing. This makes the pipeline reliable, repeatable, and scalable from start to end.
