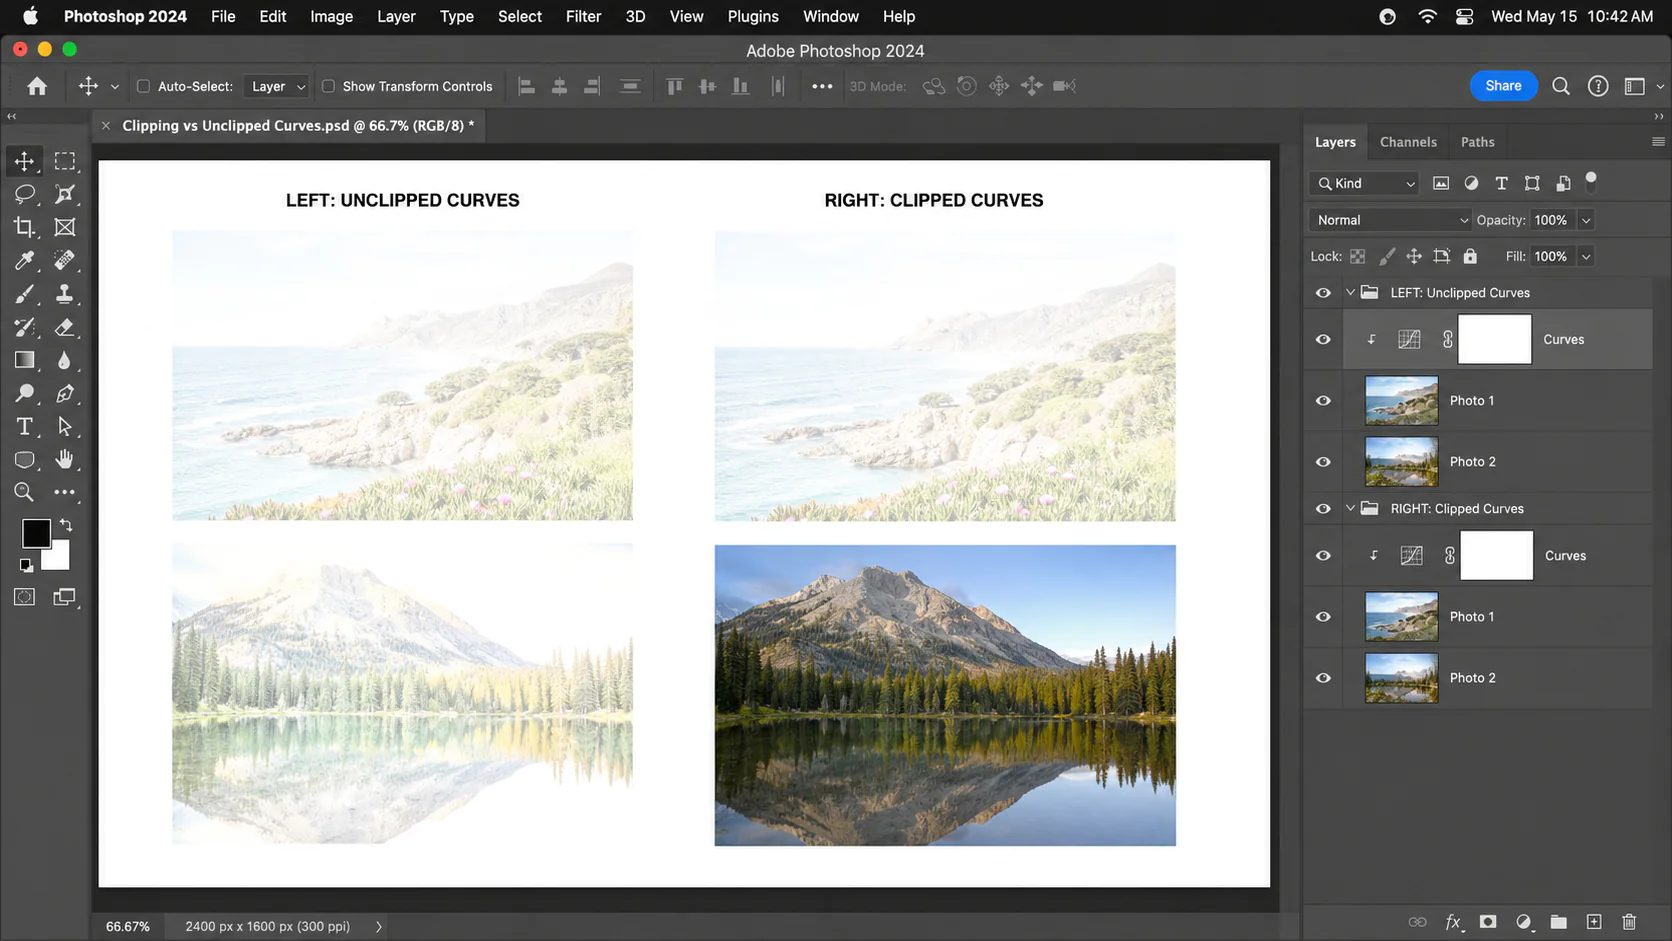
How to Create a Clipping Mask in Photoshop: 4 Easy Ways
Quick Answer:
To create a clipping mask in Photoshop, place your image layer directly above a text or shape layer. Then press Ctrl + Alt + G on Windows or Option + Command + G on Mac. You can also right-click the image layer and select “Create Clipping Mask” to apply it instantly.
If you’ve ever dropped a photo onto a text layer and watched it vanish, you already know how confusing clipping masks can feel. I remember thinking I’d broken something the first time my image disappeared inside a shape. But that confusion disappears fast once you understand the simple logic behind the tool.
A clipping mask forces one layer to take the exact shape of the layer beneath it. The bottom layer acts like a cookie cutter and the top layer fills that cutter. Nothing gets permanently deleted, so you can experiment without fear. In this guide you will learn how to create a clipping mask in Photoshop using different methods. A clipping mask in Photoshop helps you place images inside text or shapes easily.
.
What Is a Clipping Mask?
A clipping mask establishes a parent‑child link between two layers. The bottom layer becomes the base and controls the visibility of the layer stacked directly above it. Photoshop reads the alpha channel of that base layer, which is simply its transparency information. Where the base has opaque pixels, the clipped layer appears fully. Where the base is transparent, the clipped layer stays hidden. When the base contains partially transparent areas, the clipped layer inherits that same partial visibility.
This mechanism works differently from a layer mask. A layer mask uses a separate grayscale channel attached to a single layer. You paint black, white, or grey on that channel to hide or reveal parts of that same layer. A clipping mask does not store any information in a new channel. The mask lives inside the base layer’s existing alpha content. Because of that, you can edit the base shape freely and the clipped content follows without needing any extra adjustments.
Knowing this distinction changes everything. You stop guessing and start making intentional choices. In my own work I turn to a clipping mask whenever something must stay cleanly inside a defined shape, like a photo inside a headline or an adjustment that should only affect one subject. The mask never damages the clipped content, so I can keep experimenting without ever losing the original image.
How a Clipping Mask Works ?
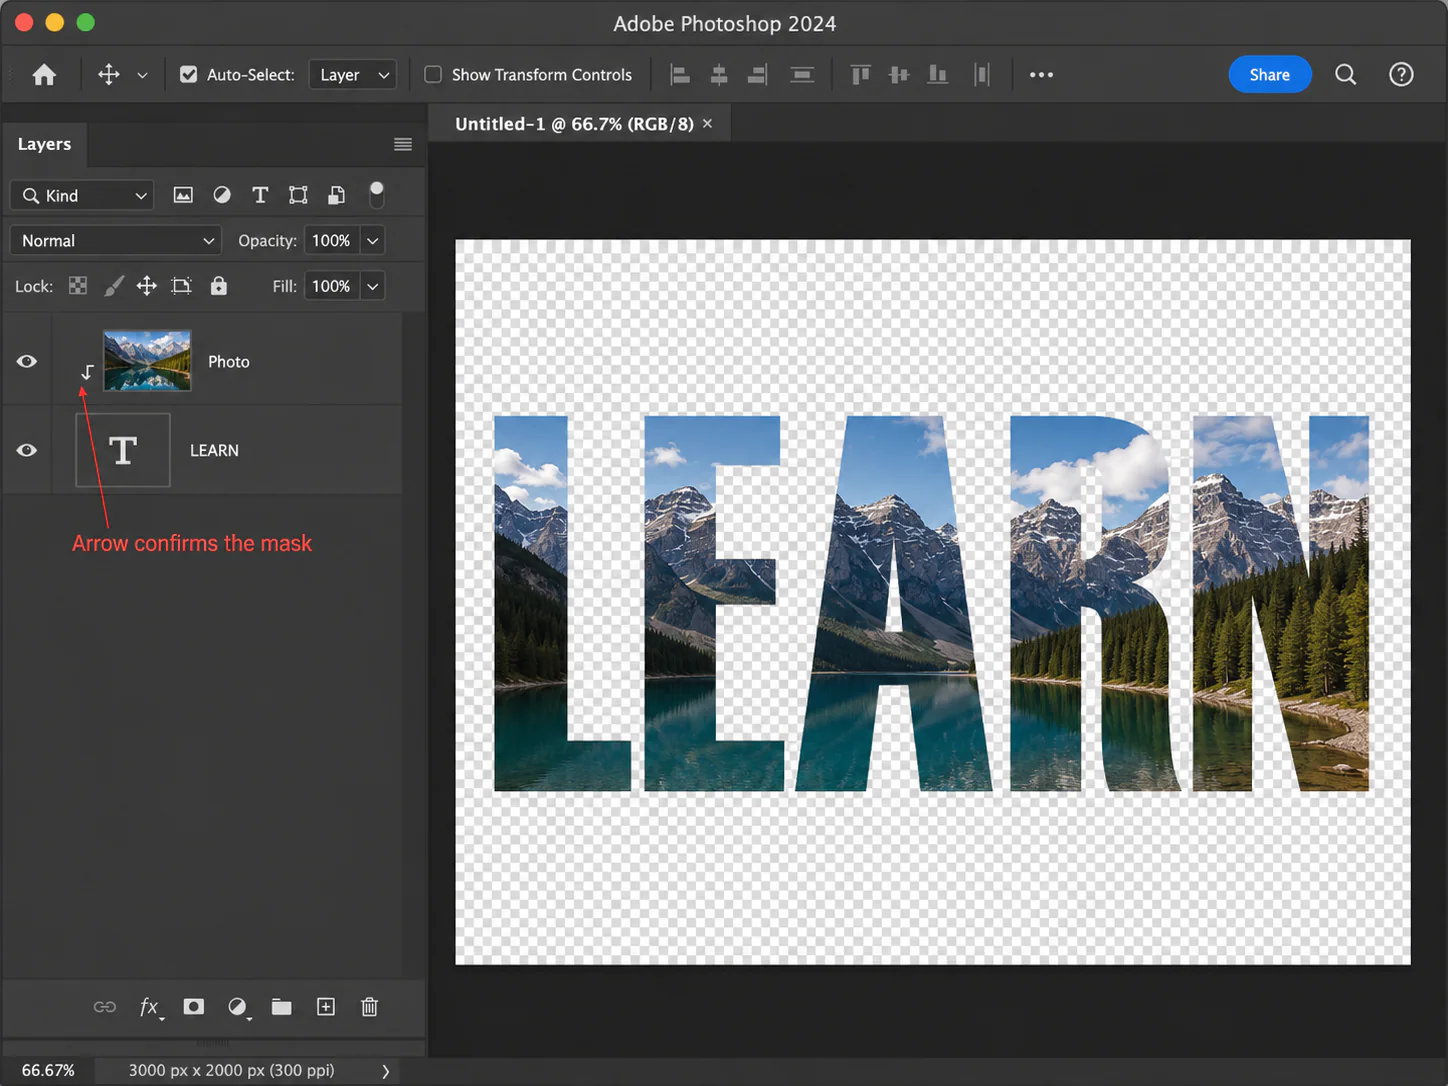
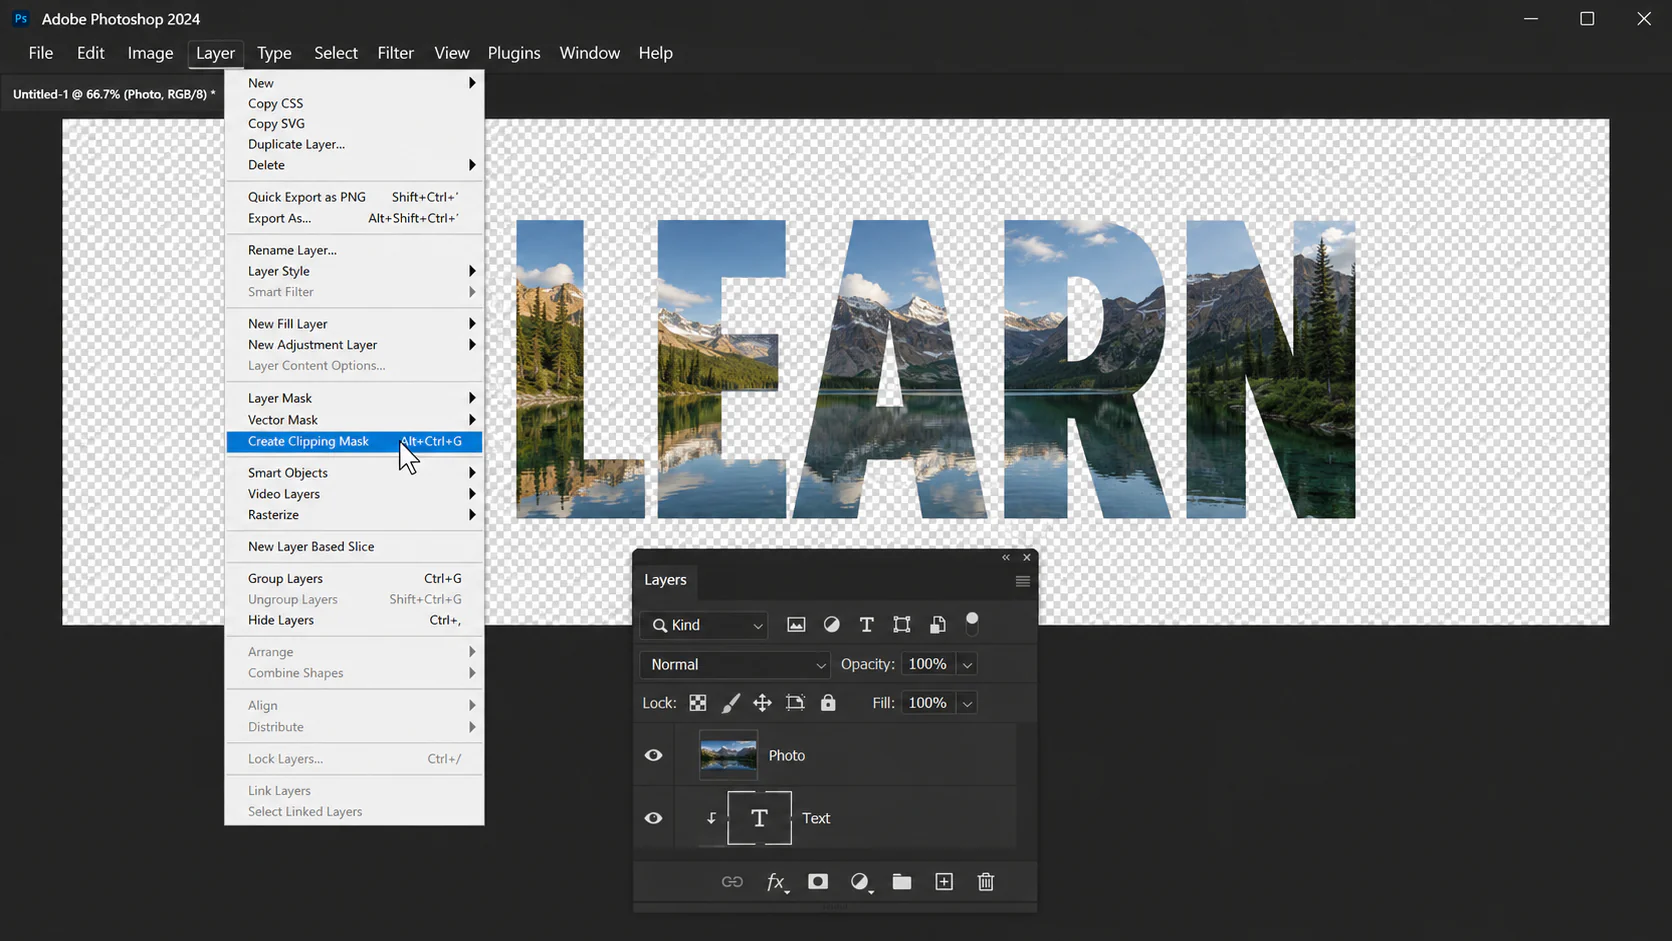
Open a blank document and type a bold word like “LEARN”. Place a photo on the layer just above that text. Select the photo layer in the Layers panel and press Alt+Ctrl+G on Windows, or Option+Cmd+G on Mac. Instantly, the photo sits inside the letters. In the Layers panel, the photo layer shifts slightly to the right and a small downward arrow appears beside its thumbnail. That arrow tells you the mask is active.
Now look closely. The arrow points down at the text layer. That means the text layer decides what stays visible on the photo. Where the text has solid colour, the photo shows. Where the text is transparent, the photo hides. You can test this quickly. Lower the text layer’s opacity and watch the photo fade with it. Drag the text to a new position and the photo follows. The mask lives inside the text itself, so you never need to manage a separate mask.
To turn the mask off, press the same shortcut again or right‑click the photo layer and choose Release Clipping Mask. The photo returns to full canvas, completely untouched. I use this exact flow in live projects because I can experiment without damaging any original file.
How to Create a Clipping Mask in Photoshop
Photoshop gives you more than one way to apply a clipping mask. I will show you four different methods so you can pick the one that feels fastest. Each method comes with an image prompt you can use to generate a realistic screenshot.
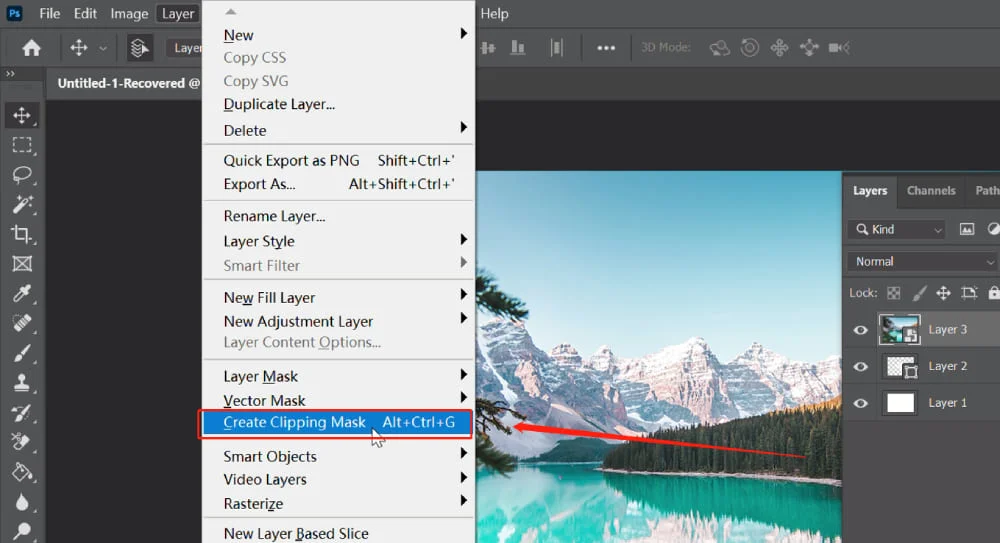
Method 1: Right‑Click Context Menu
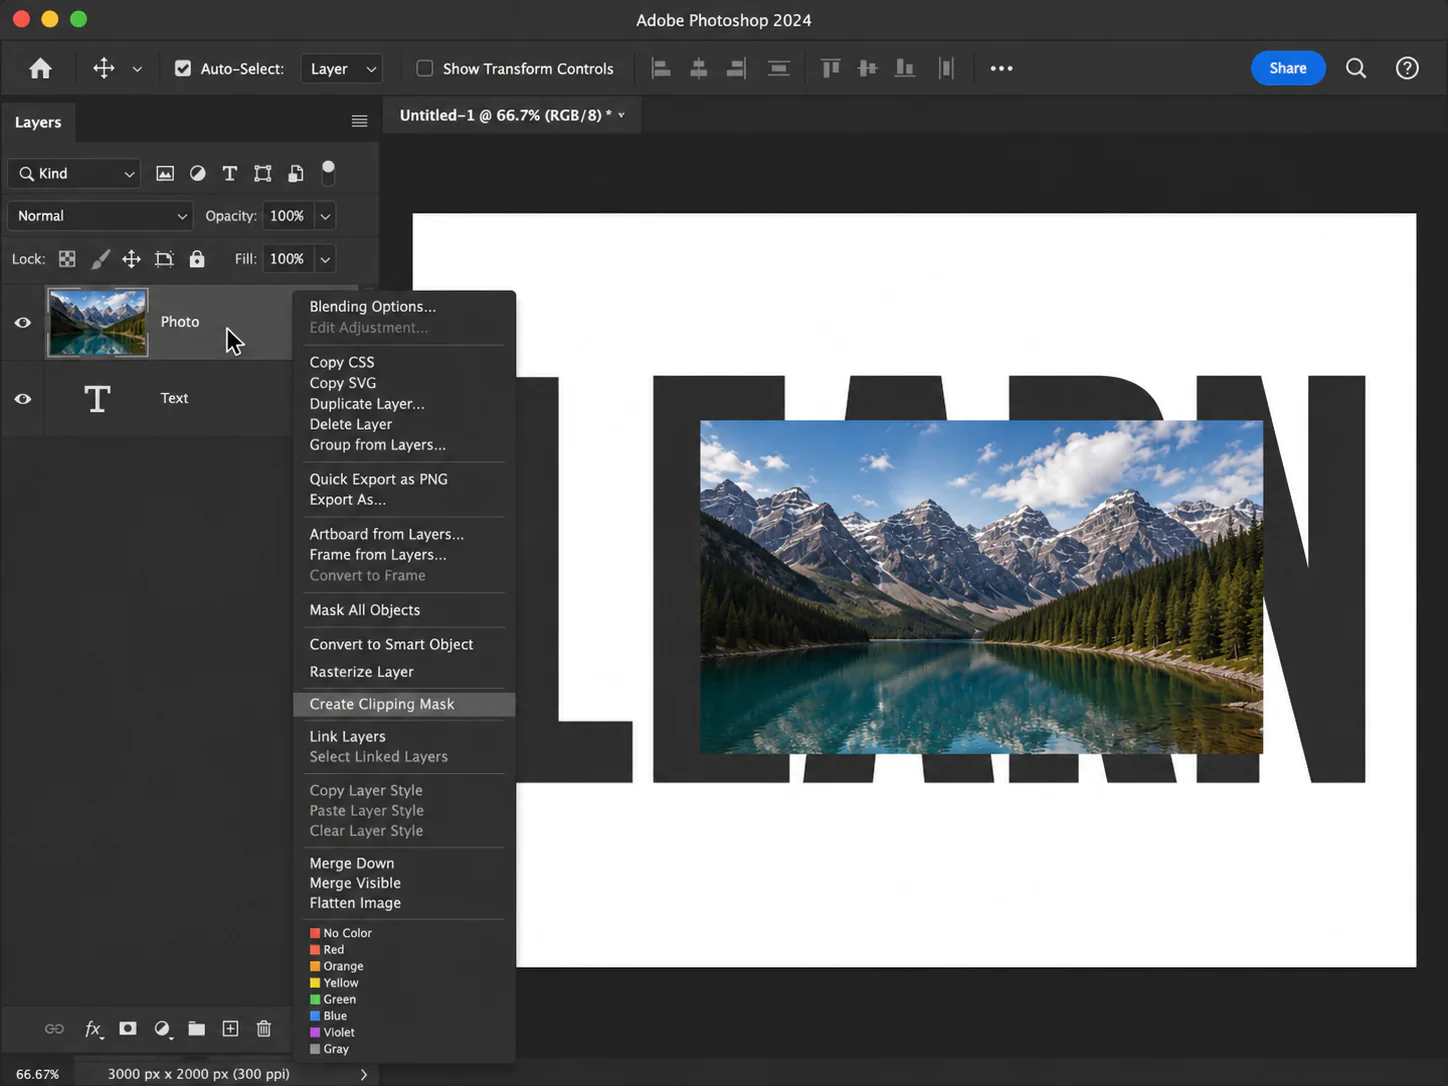
I use this method the most because my hand never leaves the mouse and the whole process takes two seconds.
- Arrange your layers. Put your photo or texture layer directly above the base shape or text layer.
- In the Layers panel, right‑click on the name of the photo layer.
- From the menu that opens, click Create Clipping Mask.
The photo snaps inside the shape immediately. In the Layers panel, the photo layer shifts slightly to the right and a small downward arrow appears beside its thumbnail. That arrow is your confirmation that the mask is active. If you ever need to remove the mask, right‑click the same layer again and choose Release Clipping Mask. Your photo returns to full canvas, completely untouched.
Method 2 : Keyboard Shortcut

This is the method I reach for dozens of times a day. It keeps both hands moving and takes less than a second.
- Select the photo or content layer in the Layers panel.
- Press Alt + Ctrl + G on Windows, or Option + Cmd + G on Mac.
The image snaps inside the base shape immediately. In the Layers panel the photo layer shifts to the right and a downward arrow appears, confirming the mask is active. To release the mask just press the same shortcut again. The photo returns to full canvas without any damage.
Method 3: Alt/Option + Click Between Layers
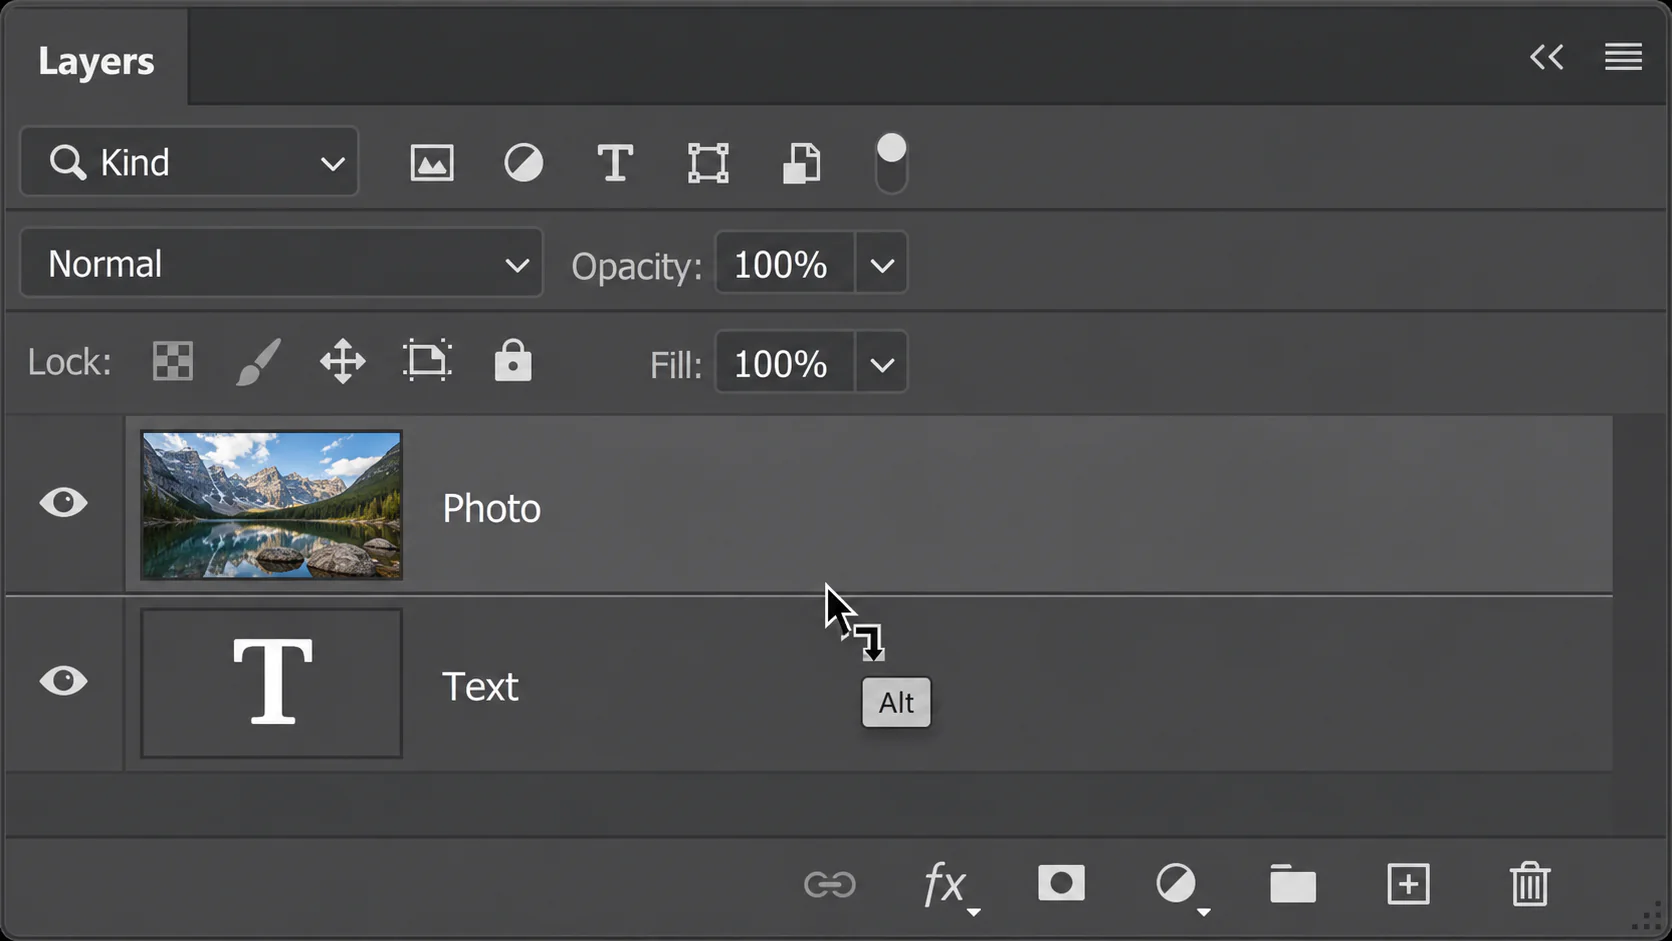
This method hides in plain sight. Most tutorials skip it completely. I use it when my hand is already on the mouse and I want to create a clipping mask faster than right‑clicking.
- Look at your Layers panel. You will see a thin horizontal line separating your photo layer from the base layer below it.
- Hover your cursor directly on that dividing line.
- Hold down the Alt key on Windows, or the Option key on Mac.
- Watch the cursor change into a small square with a bent downward arrow.
- Click once while the cursor looks like that.
The photo snaps inside the base shape instantly. The downward arrow appears next to the photo thumbnail, confirming the mask is active. To release it, repeat the same steps: hold Alt or Option, hover on the line, and click again.
Method 4: Menu Bar Command
Sometimes I work with one hand on the trackpad and the other on my coffee. On those slow mornings, the menu bar feels easiest. Most tutorials ignore this path, but it works just as fast once you know where it lives.
- Select the photo or content layer in the Layers panel.
- Go to the top of your screen and click Layer in the menu bar.
- From the dropdown, choose Create Clipping Mask.
The moment you click, the image slips inside the base shape. The Layers panel shows the familiar indent and downward arrow. If you ever need to remove the mask, return to the same menu and select Release Clipping Mask. The menu bar keeps every mask action neatly tucked under one roof.
How to Remove or Release a Clipping Mask
Releasing a clipping mask works exactly like toggling a switch. You apply the same action that created the mask, and Photoshop returns everything to the way it was. Nothing gets deleted, the photo, the shape, and every adjustment layer stay exactly where you left them, just without the mask relationship.
The simplest way I do this is to select the clipped layer and press Alt + Ctrl + G on Windows or Option + Cmd + G on Mac. The downward arrow vanishes, the layer stops being indented, and the photo expands back to its full canvas. Press the shortcut again to reapply the mask; it’s completely reversible.
Right‑clicking the clipped layer and choosing Release Clipping Mask from the context menu achieves the same result. If you prefer the menu bar, you will find Release Clipping Mask directly under the Layer menu. All three paths lead to the same non‑destructive endpoint.
When you have multiple layers stacked inside a single mask, a texture, an adjustment, and a photo all clipped to one base you can release just the topmost layer without disturbing the others. Select only that layer and toggle the mask off. To free the entire stack at once, select the base layer and apply the shortcut or menu command. The group will unclip cleanly.
This flexibility means you can experiment heavily, unclip, re‑clip, and swap content without ever worrying about losing original work.
How to Fix the White‑Space Bleed
You clip a photo inside a logo or bold text and everything looks perfect. Then you notice the photo bleeding right through the white gaps inside the letters. That happens because Photoshop treats white as a solid pixel, not as empty space. The clipping mask obediently shows your photo wherever the base has any content, and pure white counts as content. Fixing this takes only a minute, and I will show you two reliable ways.
Fix 1: Magic Wand and Layer Mask
This method works best when the white areas are clean and easy to select.
Select the base layer first. Grab the Magic Wand Tool from the toolbar or press W. In the Options bar at the top, set Tolerance to 0 and uncheck Contiguous. Click once on any white area inside your shape. Photoshop selects every white pixel on that layer instantly.
With the selection still active, click the Add Layer Mask icon at the bottom of the Layers panel. It looks like a rectangle with a circle inside. The white areas disappear immediately, replaced by genuine transparency. Your clipping mask now respects that transparency and stops bleeding.
I have used this exact fix on dozens of logo mockups. It never deletes anything, so you can always go back and tweak the mask later.
Fix 2: Blend If Sliders
If you prefer avoiding extra layers, this built-in trick works wonders.Double‑click an empty area on the base layer to open the Layer Style dialog. Look for the Blend If sliders at the bottom. Under This Layer, you will see a white slider on the right. Drag its left half gently toward the left until you reach a value around 254. The pure white pixels become transparent right before your eyes while keeping the rest of the shape intact.
This technique works especially well when the base has clean solid white areas and you want to keep your layer stack minimal.
How to Use Clipping Masks (5 Practical Examples)
Knowing how to create a clipping mask is one thing. Knowing when to use it changes the way you work. I have pulled together five real-world examples that cover most creative tasks I face daily. Each example follows the same pattern: a simple goal, a few straight‑forward steps, and a realistic image prompt you can use to visualise the result.
Example 1 : Image Inside Text
This is the classic move. You want bold typography with a photo peeking through the letters.
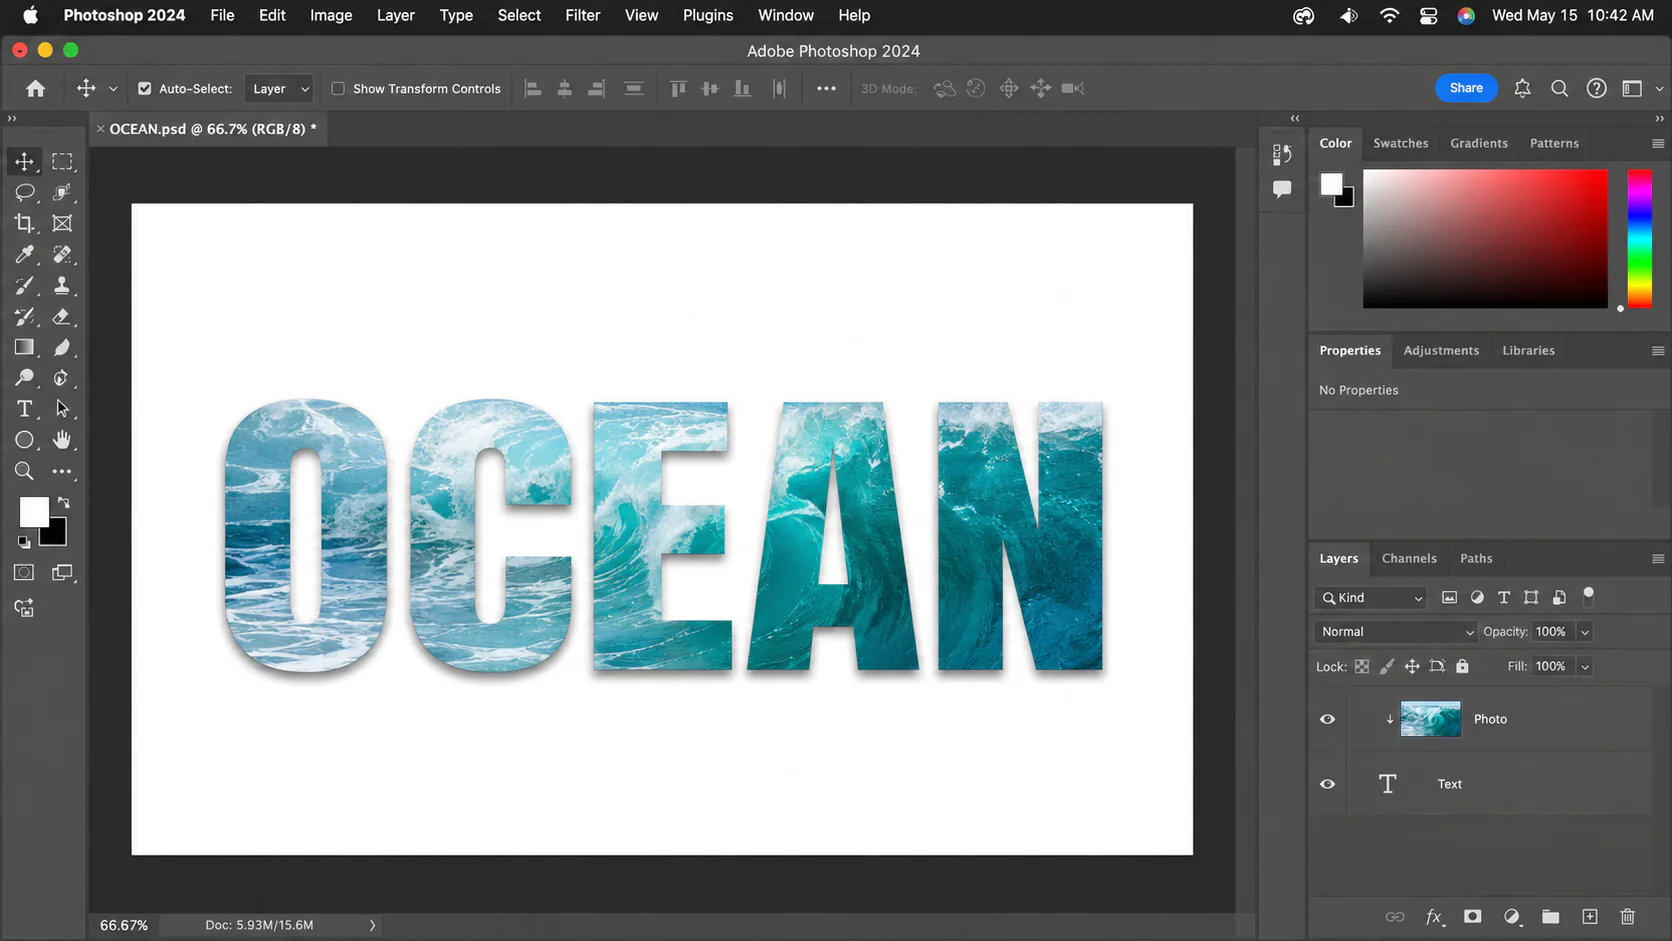
- Open a new document and type a short word like “OCEAN” in a heavy, bold font.
- Place a vibrant photo of a beach, a sunset, or a texture on the layer directly above the text.
- Right‑click the photo layer and choose Create Clipping Mask.
- Use the Move Tool to shift the photo until the best part fills the letters.
- Add a Drop Shadow to the text layer (not the photo) to give the letters depth.
Example 2 : Limit an Adjustment Layer to One Photo
Adjustment layers normally affect every layer below them. By clipping them, you target only one photo.
- Open a photo and add a second image or element on any other layer.
- Create a Curves or Hue/Saturation adjustment layer directly above the photo you want to edit.
- Clip the adjustment layer to the photo by pressing Alt + Ctrl + G (Windows) or Option + Cmd + G (Mac).
- Make your adjustments. Only that single photo changes; everything else stays untouched.
This trick saves me when I need to brighten a product shot without altering the background or other images in the composition.
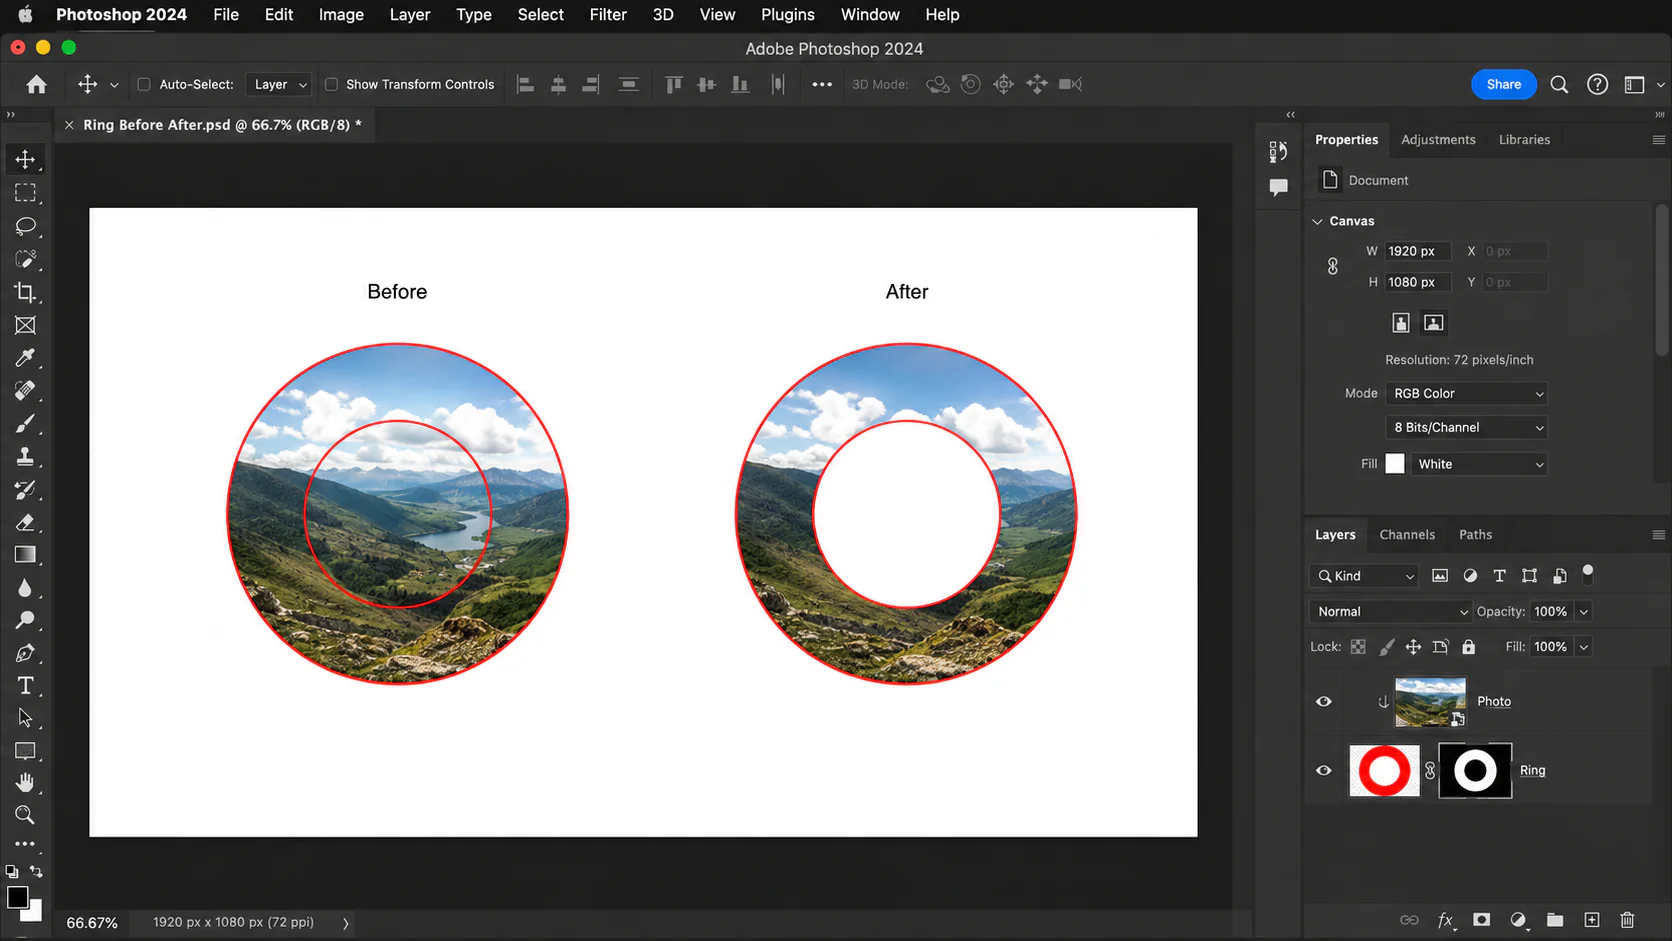
Example 3 : Photo Mockups (Image Inside a Frame)

Quick mockups without Smart Objects. I use this method to drop screenshots into device frames in seconds.
- Draw a rectangle or rounded rectangle with the Shape Tool to represent a phone screen.
- Place your screenshot or design on the layer directly above the rectangle.
- Clip the screenshot to the rectangle shape. It fits perfectly inside.
- To update the screen later, replace the clipped image layer. The mask stays.
This approach works for any container circles, hexagons, or custom vector shapes.
Example 4 : Professional Color Grading Workflow
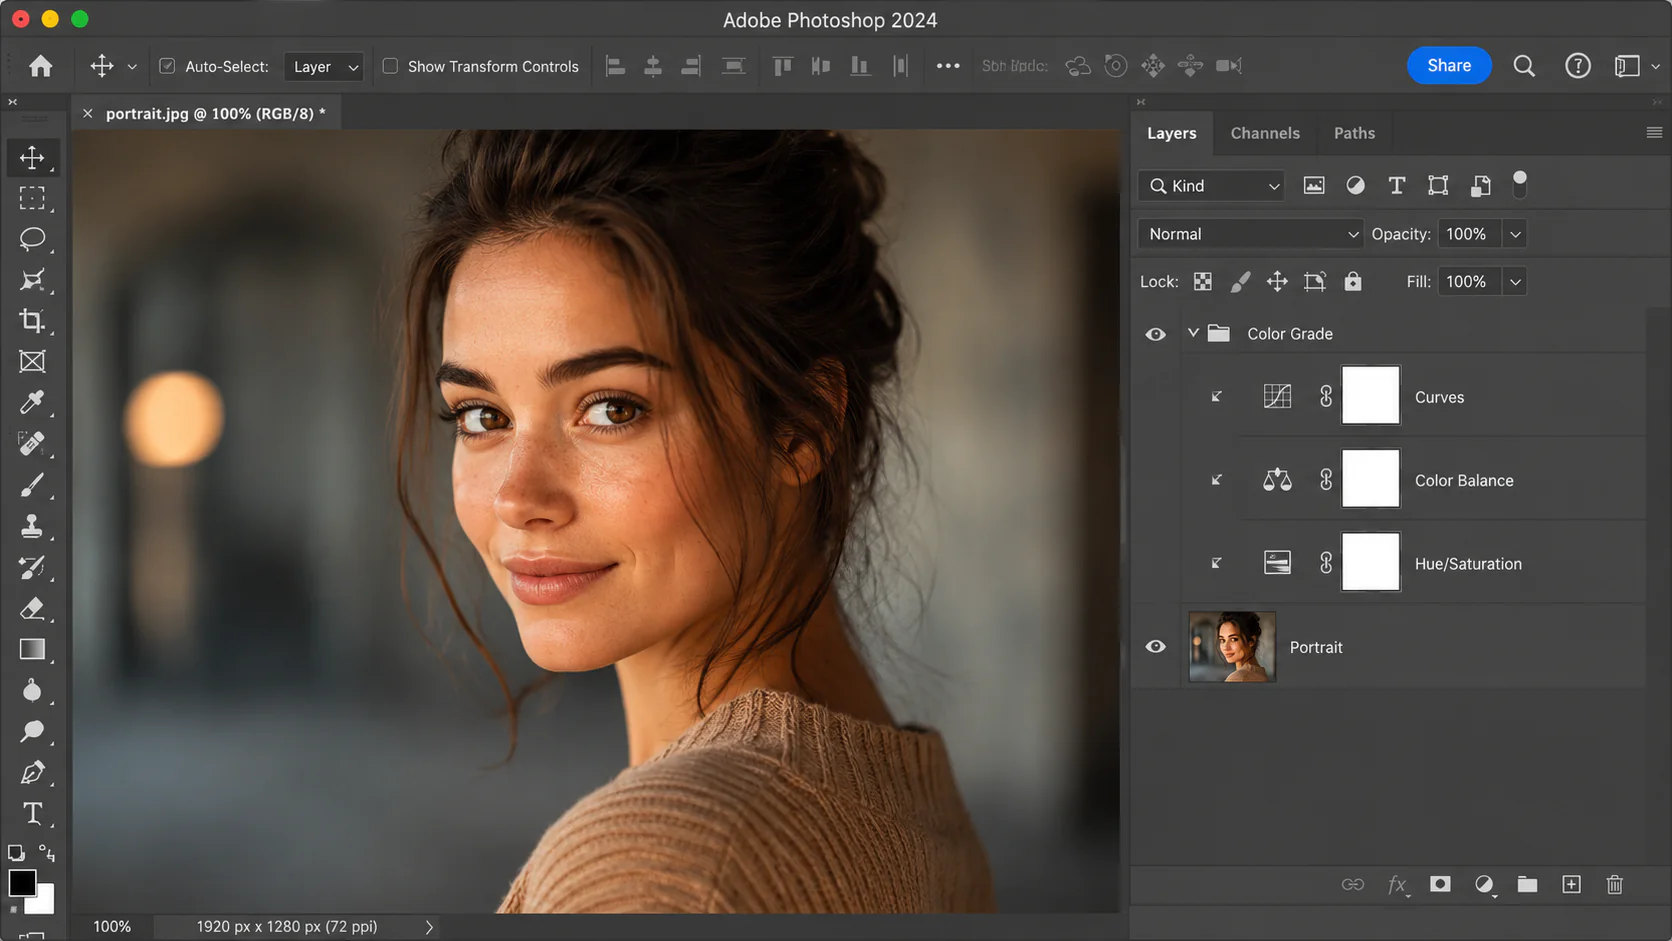
In portrait retouching, you often need several adjustments just for the subject, not the whole frame.
- Open a portrait and stack multiple adjustment layers on top Curves, Color Balance, Hue/Saturation.
- Select all adjustment layers and press Ctrl + G (Windows) or Cmd + G (Mac) to group them.
- Name the group “Color Grade”.
- Clip the group to the portrait layer below by right‑clicking the group and choosing Create Clipping Mask.
- Now every adjustment inside the group affects only the portrait. The background stays as it was
Example 5 :Double Exposure Effect
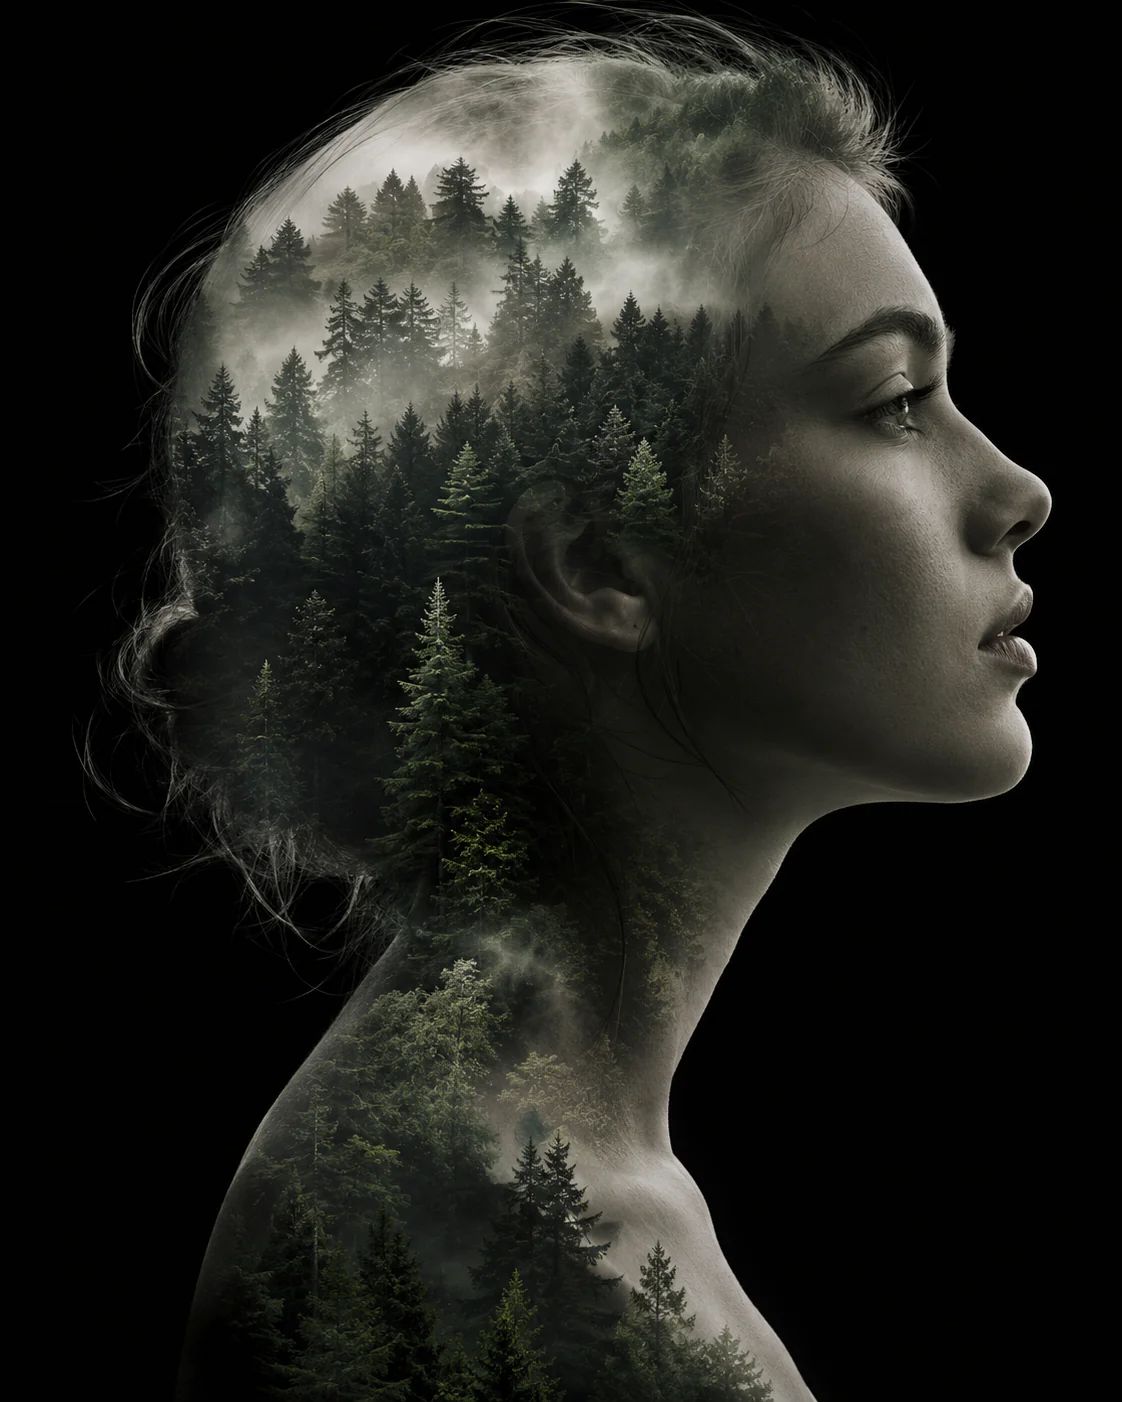
This artistic effect marries a clipping mask with blend modes. I love it for album covers and moody editorial pieces.
- Open a profile portrait with a clean background and a dramatic landscape image.
- Place the landscape layer directly above the portrait and clip it.
- Change the landscape layer’s Blend Mode to Screen or Lighten. The landscape blends with the portrait’s shadows.
- Add a Layer Mask to the landscape and paint with a soft black brush where you don’t want the landscape to show, such as over the eyes or the jawline.
- Optionally, clip a Curves adjustment above the landscape to fine‑tune the contrast.
Advanced Techniques: Stacking and Combining Clipping Masks
I keep this table taped to my monitor because a single shortcut saves me dozens of clicks every week.
| Action | Windows | Mac |
|---|---|---|
| Create or release a clipping mask | Alt + Ctrl + G | Option + Cmd + G |
| Create mask via clicking between layers | Hold Alt and click the line | Hold Option and click the line |
Blend Modes
Set the clipped layer’s blend mode to Multiply, Screen, or Overlay. The effect stays inside the base shape and instantly adds depth or lighting. I use Screen for double exposures and Multiply for adding shadows to mockups.
Opacity Control
Adjust the opacity of the clipped layer independently. This lets you fade a texture or a colour wash inside a shape without affecting the base. It is a small slider that makes a huge difference.
Smart Object Workflow
Convert your photo to a Smart Object before clipping. You can then apply filters, resize, and replace the image without rebuilding the mask. I rely on this for client work where the content changes frequently.
Batch Mockups
Save a base shape template with a clipping mask. Drop a new screenshot or image above the base, clip it, and export. Repeat for multiple screens in seconds.
Soft Edges Combo
Add a Layer Mask to the base and paint with a soft brush. The clipping mask inherits that softness. I combine this with the stacking technique for polished editorial composites.
Troubleshooting Common Clipping Mask Problems
Nothing happened after applying the mask
Check the layer order. The content layer must sit directly above the base layer. If there is even a tiny gap, the mask cannot form.
The screen goes blank or the photo disappears completely
Your base layer has no opaque pixels. Fill the text or shape with a solid colour, then reapply the mask.
The photo still shows everywhere, even outside the shape
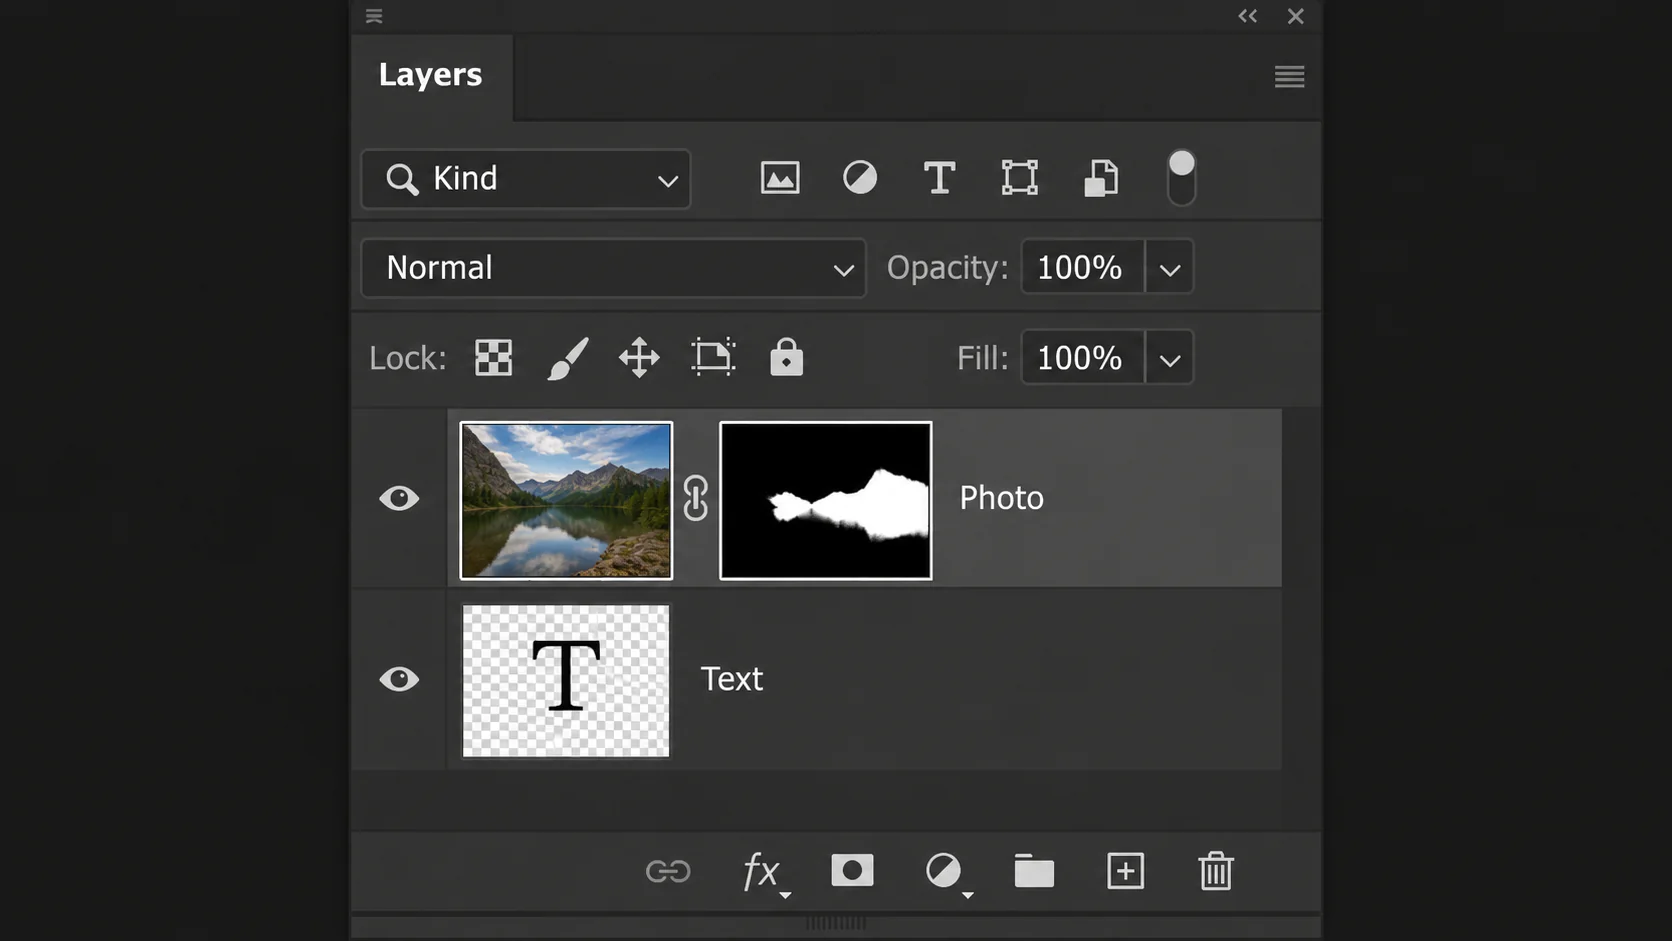
White is not transparent. The base contains a white background instead of actual emptiness. Use the Magic Wand and Layer Mask fix we covered earlier, or apply the Blend If slider trick
I need to clip several images into one shape but it only works for the top layer
Group the content layers first. Select them all, press Ctrl+G (Windows) or Cmd+G (Mac), and then clip the group to the base
The edges look too sharp and artificial
A clipping mask follows the exact outline of the base. To soften things, add a Layer Mask to the base and paint with a soft black brush along the edges. The clipped content will fade naturally.
I released the mask and now the layers look strange
Nothing is broken. The layers simply returned to their original, unclipped state. You can reapply the mask anytime with the same shortcut.
I applied a clipping mask but the adjustment still affects everything
You may have clipped the adjustment layer to the wrong layer or forgotten to clip it altogether. Double‑check that the downward arrow points to the exact photo or group you want to adjust
Need a Professional Hand Instead?
Not every image plays nice with a clipping mask. Fine hair, fur, translucent fabric, or a stack of hundreds of product shots can eat hours of your time. When the deadline is tight and the detail matters, a professional team can take that weight off your desk.
Our image masking service at IT‑S has delivered over 100,000 edited images for photographers, e‑commerce brands, and design studios around the world. More than 2,000 clients rely on us because we combine ISO 27001‑certified security with a trained team that uses the latest Adobe Photoshop software and plug‑ins.
Every specialist on our floor goes through regular workshops to keep their skills current with shifting visual trends. Whether you need a pure white background for an online store, a delicate fur mask, or a complex cut‑out for print, the final file arrives with the fastest possible turnaround.If you ever decide to leave the pixel work to someone else, our image masking service handles the rest
Conclusion
Every clipping mask follows one rule the bottom layer controls the visibility of the layer above it. Once that clicked for me, I stopped guessing and started creating with confidence. You now hold that same clarity. You can right‑click, press a shortcut, or Alt‑click between layers and watch the downward arrow confirm the mask. You know how to fix the white‑space bleed, how to stack textures and adjustments inside a single shape, and how to soften hard edges with a layer mask.
These are the exact techniques I return to on every branding project, every mockup, and every photo composite. Open a blank document, type a bold word, drop in a photo, and clip it. Build the five examples at your own pace. The skill sticks when your hands repeat the steps until the shortcut feels natural. You now have everything you need to make clipping masks a quiet, powerful part of your daily workflow.
