
How To Add Realistic Wear & Edge Details to 3D Products Using Substance Painter
When it comes to 3D modeling, making a product or object look realistic by introducing signs of wear, such as a battle-worn weapon, an aged piece of furniture or a worn-out surface, will entirely change the attractiveness and believability of a model. This effect of aging is significant in visualization of 3D products and so models look that they are real and worn. The aged surfaces and flaws of old age are capable of making your 3D models sterile to lively.
Nevertheless, it can be challenging to reach the appropriate balance of the wear and tear impacts. Excessively so, and your model will appear unnatural; excessively so and it will appear over-slicked, lacking that lived-in quality. Natural wear and edge technique is a skill that needs accuracy particularly when you want to create worn-out surfaces in which you are trying to create depth and reality to your model.
This blog will provide the steps one should follow in order to add realistic wear and edge effect to your 3D models using Substance Painter. We will make sure that your models possess just enough authenticity, without making them too authentic. You will be able to master techniques to generate weathered textures that render your 3D products to look worn out and realistic at the end.
Step 1: Preparing Your 3D Model in Substance Painter
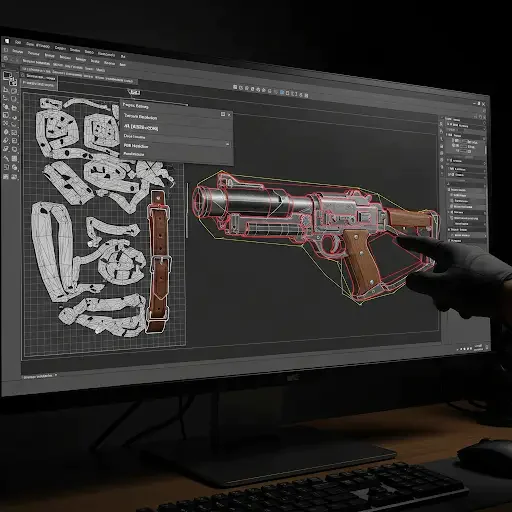
But before you can go along and add all that wear and edge detail, first you need to set up your model for texturing in Substance Painter. This method is needed in order to both apply wear properly and make it look believable.
Importing the Model:
First step, bring your 3D model into Substance Painter. For most 3D modeling software, your model will export as an FBX or OBJ file that is widely used in Substance Painter.
UV Unwrapping:
Make sure your model has decent UVs. UV unwrapping flattens the 3D surface of your model out into 2D space where textures can accurately be applied. If your model is not UV-unwrapped properly, then they will appear stretched or misaligned, and there may be issues with the wear effects.
Setting Up Project Settings:
Once your model is imported, it’s time to set up your project settings. These settings will ensure your textures are optimized for your model and will help you achieve the best possible results when adding wear details.
Texture Resolution:
Pick the right level of texture for your model. For gaming purposes, 2K (2048×2048) textures are usually good enough, but if you do high-quality renders or cinematics, you may consider using 4K (4096×4096) textures. Higher resolution means more detail to wear and edge effects.”
PBR Workflow:
Make sure to be using the PBR workflow, Substance Painter’s way of creating realistic materials. PBR (Physically Based Rendering) workflow: A PBR material includes multiple texture maps, such as base color, roughness, and metallic, that simulate the ways in which light interacts with surface detail on a mesh so that wear effects look more realistic.
Model Preparation for Realistic Wear:
For the natural wear and tear your model will have to undergo, the model should be designed with these areas in mind. These can be the edges, corners, or surfaces with friction and use.
Identify Wear-Prone Areas:
Consider where you are likely to see wear and tear in your model. On metal-based devices (e.g., personal telecommunication devices, mobile phones, and the like), such edges and raised surfaces may be readily scratched or chipped. If it’s a leather piece, you might see wear on things like the seams, handles, and corners.
For the natural wear and tear your model will have to undergo, the model should be designed with these areas in mind. These can be the edges, corners, or surfaces with friction and use.
Material Assignment:
Distribute materials throughout your model according to the way you think they will wear. For example, if it is a wooden item, then the surface may have scratches and splinters; or if it is an iron object, then rust may appear on the surface, or there may be paint chipped off. Substance Painter lets you easily assign different materials to the different parts of your model, and that will come in really handy when adding wear later on.
2. Step 2: Baking the Necessary Maps
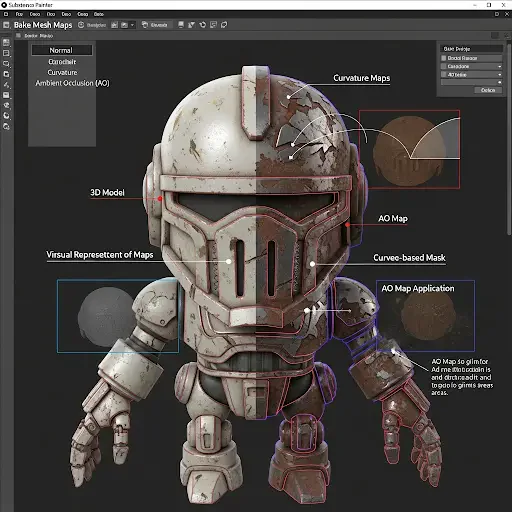
When you have your model imported in Substance Painter, the first thing to do is to bake the maps that will dictate where wear effects will be placed. Normal maps, curvature maps, and ambient occlusion (AO) must be baked in for realistic wear, particularly at edges and surfaces worn over time.
Normal Maps:
The second part of your question is A normal map simulates surface detail by adding depth without actually altering the geometry of your model. It’s particularly good for enhancing subtle scratches, dents, and surface defects to create realistic wear.”
Curvature Maps:
The curvature map can also help you determine where areas of your model have worn surfaces, like edges and high points. It’s necessary for simulating paint chipping, scratches, and scuffing on edges and protruding areas.
AO (Ambient Occlusion) Maps:
The AO map adds shadows where the light may not reach, such as crevices and corners, to bring out depth. It is useful to add dirt deposits and wear where there is friction or the model has been exposed to the elements.
Using Maps for Edge Wear:
Once your mesh is baked, you can bring this curvature map and AO map in to apply realistic wear. These maps let you concentrate the wear effect in places where realistic damage would occur naturally.
Curvature-based Masks:
Use curvature-based masks to show edges and raised portions that would get wear. These are all normal places for key scratches, chipped paint, and wear marks to happen.
AO Map Application:
The AO map can be used to insert dirt and grime into corners or areas where surfaces touch other objects. It increases the depth of your wear effects by showing simulated dirt and grime.
Why Baking Maps Is Important for Realistic Wear:
Baking maps is important because it lets you granularly define where wear occurs to exert much more sense for the geometry of your model’s wear effects.
Optimization:
Baking maps also has the added effect of improving workflow efficiency by minimizing manual paint work required to fade wear across entire models. This allows the process to be performed quicker and more efficiently while maintaining excellent quality.
Step 3: Adding Wear Using Smart Masks and Manual Masking
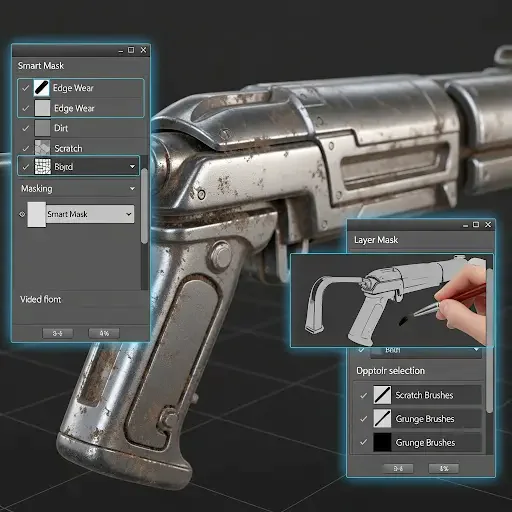
After you’ve baked all your base maps (normal, curvature, and AO), the next step is to start applying some wear effects to your model utilizing smart masks. Smart masks in Substance Painter are predesigned masks that automatically recognize the model’s structure and apply to areas of the mesh that will likely take damage, allowing you to include wear effects anywhere where it would seem realistic.
How to Apply Smart Masks:
Select the smart mask and go to the Masking tab to apply it. Select the smart mask that is fit for your wear effect needs, such as edge wear or dirt. Smart masks will do a good job of selecting likely areas where wear would occur, say edges and raised things.
Manual Masking for Customization:
Although smart masks provide an easy method to apply general wear, you may sometimes desire more control or even limit wear to certain regions. This is where manual masking has its place. You can control where it is applied with layer masks.
Creating Layer Masks:
Just create a layer mask, add a new layer, and click Add Mask. Then, begin painting the damage on specific parts of your model with a range of brushes. Use scratch brushes for edge wear and grunge brushes for dirt buildup.
Refining the Wear Effects:
Style-Based Wear If your wear is a little too heavy-handed, excessive or simply not in the right areas you can easily adjust it by using a soft brush/eraser tool to increase or decrease the level of wear on your mask until it looks perfect for your needs.
Combining Smart Masks and Manual Masking:
For the most natural and personalized usage of your masks combination of smart masking and manual masking is a good practice. Use some smart masks to block in the big areas, and refine it with some manual masking for the more specific touches.
Blending Both Techniques:
Begin with an intelligent mask on the main wear areas, such as edges and high contact areas. Now manually mask to fine-tune the wear, for example, adding scratches on the handle or more dirt near the seams.
Why It’s Important to Cover for Realistic Wear:
Masking is a must if you want to make wear look realistic: it helps paint effects in the right places. Unmasked wear can also become too uniform or random-looking, which isn’t how things generally look in real life.
Precision and Control:
Using masking, apply wear only where you want it. Whether you’re adding scratches on the edge or dirt in crevices, manual masking allows you to achieve exacting, detailed effects.
Step 4: Painting Edge Wear, Scratches, and Dirt
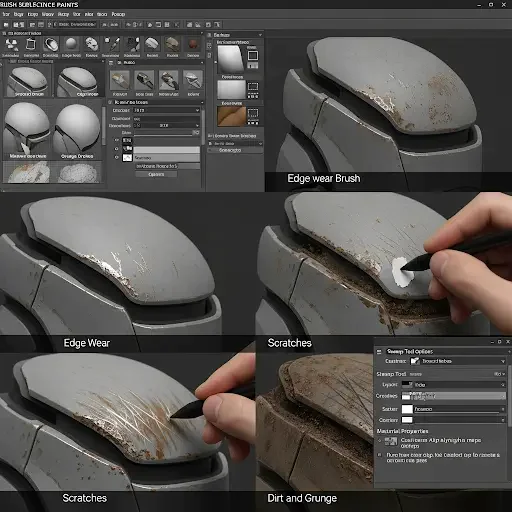
After you have your smart masks and manual masking established, it’s time to begin painting wear and tear onto the model. In Substance Painter, brushes and stamps are the tools at your disposal to apply edge wear, scratches and dirt.
Choosing the Right Brushes:
Substance Painter has a big collection of brush specifically for the different kind of wear effect you want to apply. Well for edge wear use something like a scratch brush or an edge wear brush to simulate some abrasions on the edges of your model. For dirt, grunge brushes can help you look at how accumulated dirt and weathering the model’s surface.
Using Stamps for Detail:
The stamp tool in Substance Painter is another really awesome feature. Stamps are basically textures that you can add onto your model to mimic more complex wear patterns such as cracks, scratches or paint chips. You can load or create new stamps to enjoy the appearance of your model.
Applying Edge Wear and Scratches:
Your model’s edges are the parts of your model that take the most abuse, so you should concentrate on them to give your paint job a natural and convincing look.
Painting Edge Wear:
First off to make some edge wear, let’s choose the right brush (like scratch brush). Next, paint the sides and high points of your miniature where the material would rub off through either contact or scraping. Make sure to keep varying the pressure of your paint strokes for a really natural-looking uneven wear.
Adding Scratches:
For more pronounced scratches, paint with the scratch brush at a variety of settings (such as spacing or opacity). Brush irregularly on the edges, especially near high-contact points like buttons, handles or joints where wear eventually would happen.
Adding Dirt and Grunge Effects:
To make the worn effect more convincing you need to add details like dirt, dust or weathering that occur naturally in those areas.
Using Grunge Brushes:
Apply grunge brushes to the areas of the model exposed to environmental elements or wear to introduce dirt, oil, or other types of grime. For instance, grunge brushes can also be used in corners and seams where dust would build up.
Dirt Accumulation:
For details like seams or creases, where dirt might collect, lower the brush opacity and flow to create layers of subtle dirt streaks. Considering using AO maps in combination with the grunge brushes to sell the dirty areas as more part of the model.
Customising Wear Patterns:
Nothing wears the way that anything else wears. Every model will need some kind of adjustments, depending on the material and how it is being used. For instance, a metal item will exhibit rust and corrosion; and a leather surface may include creases, wear lines or cracks.
Customising with Alpha Maps and Brushes:
To have different wear patterns you can use alpha maps, custom brushes etc.. These can simulate complex effects such as cracks, tears, or rust patterns on your model. Custom brushes permit actually realistic detail based on the actual material type.
Why Painting Wear Is Essential for Realism:
Paint wear and edge highlight One of the biggest contributions to making your model feel real is in the paint. Smart masks on their own will not yield sufficient detail and depth to make the wear feel real. With manual painting, you can address that natural variation and imperfection to get a believable output.
Precise Control:
Smart masks can take care of big, automated areas, but below that, manual painting is what we need to control for intricate wear effects such as scratches, rust and weathering.
Step 5: Fine-Tuning with Roughness and Metalness Maps
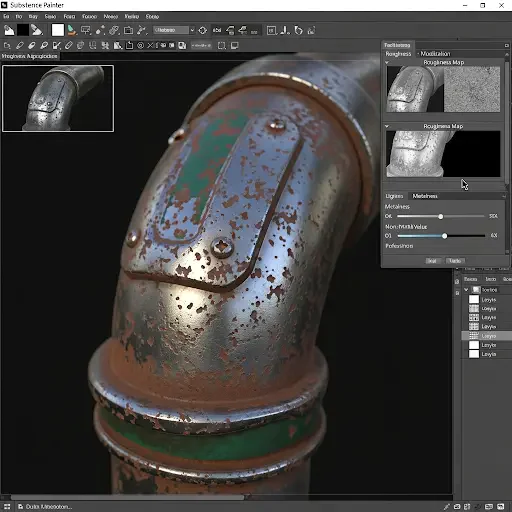
Now they applied the wear to your model so the next step is refining that roughness map. Roughness determines how shiny or matte a surface looks by emulating the way light bounces off it. For realistic looking wear, its shopping is equally important as softer/smoothed areas (those that worn away) are more reflective while fresh is not.
Why Roughness Matters for Wear:
Edges of use, wear surfaces are usually reduced over time by friction. By playing with the roughness map, one can replicate this to get a simulated effect which will make your model look more genuine.
Re-Fitting the Roughness Map:
Choose the roughness map layer in Substance Painter, and begin to tweak the roughness values for worn parts. Minimize the roughness in areas where its effects are most apparent, such as on edges and near contact points. Up the roughness in less worn areas to get some contrast between those and the areas that are untouched.
Enhancing Metalness for Realism:
At this point, we are going to tweak the metalness map which is an important part of simulating how light interacts with a material. Even worn metal surfaces behave differently to light compared to non-metallic surfaces, which is crucial.
Why Metalness Matters for Wear:
when wear occurs on metal surfaces, the exposed metal will have a different ‘metalness’ than (i.e., reflect light differently from) its painted or oxidized surroundings. Scratches or chipped paint on the metal object, for example, expose the metal underneath making it more reflective and shiny.”
Metalness Map Adjustment:
If you want to simulate over time metal surfaces, raise the area wear and tear values where you expect scratches or chipped paint. In areas that are still painted or covered with some other material, keep the metalness lower. You can even use the curvature map or AO map to assist you in targeting edges and certain spots that should be more metal.
Combining Roughness and Metalness for Realism:
The parameters roughness + metalness will control the realism of the material. High metalness and low roughness will give a glossy, reflecting surface and low metalness with high roughness will give you an matte or ill dry look representing old, oxidized or painted surfaces.
Fine-Tuning for Different Materials:
For instance, a rusty chunk of metal would have high roughness and low metalness, but pulled up planked off car hanger edges shiny smooth with high metalness to represent polished wear.
Combining Roughness and Metalness for Realism:
Why Fine-Tuning Roughness and Metalness is Crucial:
Refining those maps is essential to make your wear and tear effects look more like real life. How the light bounces off your model’s surface, this is one of the details that influence how natural or not will look as the wear. By altering these values, you can simulate smooth edges (polished surfaces), rough textures (scratches on that surface) and also dust / dirt accumulation – all of this adds to a more realistic look.
Achieving Realism Through Subtle Adjustments:
Even little tweaks to the roughness and metalness maps can have a great effect. By concentrating paint in certain areas, such as edges, seams and raised surfaces, you can obtain the realistic wear found on everyday items.
Step 6: Adding Grunge and Fine Details
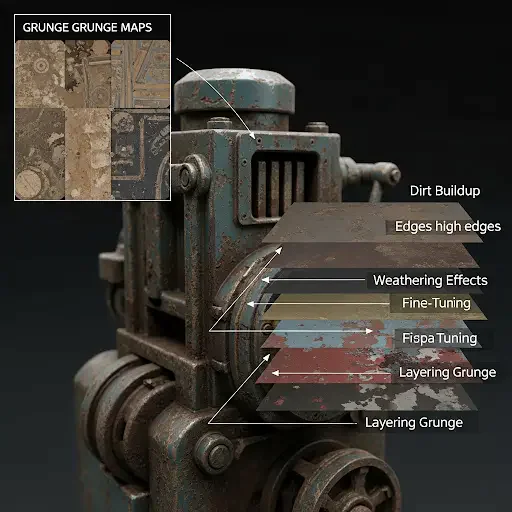
To achieve a more realistic looking wear, you’ll need to include some smaller defects that could be aged with the rest of your mesh. Grunge maps are what you need to work with for this, so you can add dirt, oil, grease, and environmental wear to your model. This is adding a level of detail and realism to your model’s surface.
How to Apply Grunge Maps:
To apply grunge map, select the grunge layer and place in the location you want for it to be in effect. Add volume to the model’s weathered parts with multiply/overlay blending mode. Opacity and contrast can be dialled back to change the strength of the effect.
Adding Dirt and Weathering Effects:
Dirt and weathering are also major factors in the wear and tear of devices. Objects that come into contact with the environment (buildings, cars, tools, etc.), collect grime and dust and develop flaws. Life is Strange Weapon FX and Muzzle FlashesTo create FX which looks natural in game you will not want to ignore these effects in Substance Painter.
Dirt Buildup:
Apply dirty over dirt brushes and grunge maps on high used edges, connections, junctions. If surfaces rub together or are exposed to the elements, dirt will naturally accumulate.
Weathering Effects:
Grunge maps can be applied to models that should be exposed to elemental effects like rusted metals or old wood as a way of simulating this sort of aging pattern, including things like peeling paint, rusting and oxidizing. These elements provide a realistic and weathered look to the model.
Fine-Tuning the Grunge Details:
Grunge type mapping provides a great overall effect, but you’ll have to tailor it to the actual flow of wear on your model. If you excessively apply the dirt or grunge effects, it appears a little bit too much dirty to model, so in this case don’t forget to adjust the intensity and place.
Intensity Control:
Play around with the opacity of those grunge layers for less or more intensity. The dirt and wear can be made more subtle by adjusting the opacity or with soft brushes to barely apply them and slowly increase their affect.
Layering Grunge:
To give a little bit of realism, advise you to accomplish your effect with different grunge maps. For example, use a rust map and then apply a dirt map over it to show where wear would progress such as where the rust might start accumulating or with dirt and grime.
Grunge & Fine Details and the Importance for Realism:
The grunge and fine details comes in as the difference between a perfect 3D render, and something that feels real. Those flaws be it a chip in the paint or dust on the edges are what allow us to feel like it has lived through time, been useful and used.
Natural Variation:
Things in the real world almost never have a uniform appearance. By including those little details such as scratches, dust and dirt it adds natural variation to your model making it more realistic looking and interesting.
Step 7: Finalizing and Exporting Textures
Before exporting your textures, it’s a good idea to make some final tweaks and checks to ensure you wear looks like an organic part of the rest of your model. Now you should have all of the wear on your model – edge wear, scratches, dirt, grunge and fine details.
Adjusting Opacity and Intensity:
Adjust the opacity and flow on your wear layers to dial in how strong. If there are spots on the wear that seem too heavy, lower the opacity a bit so it is not as visible or use a soft brush to blend the effect more seamlessly into your model.”
Blending Layers:
you want to get more finesse between your heavily worn areas and clean sections, try some layer blending modes like soft light or multiply. This enables the wear to blend better into the lower texture and it looks better once you look extremely close not bad P$error! These do a good job blending the wear into that lower texture also.
Final Touches:
Now take the “smudge brush” or “soft eraser” tool and clean up any edges where it looks too rough, like the fabric doesn’t blend into worn edges properly. You can also add more subtle things such as dirt streaks or extra scratches for complexity.
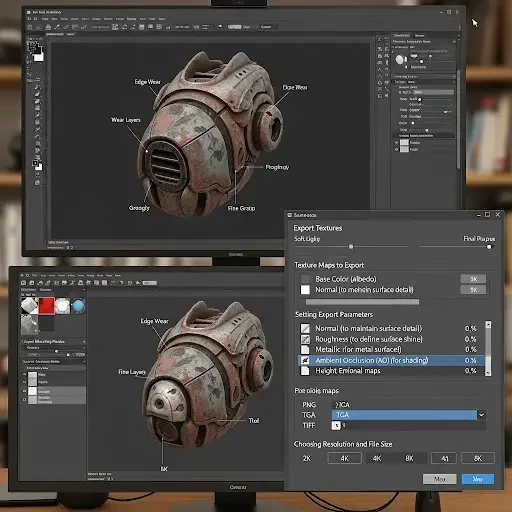
Exporting Textures for Rendering or Game Engines:
So now that you’re pleased with your model and its aging; the next step is to export the textures. Exporting is important, as it prepares the textures for utilization in rendering applications or game engines among others (for example Unity or Unreal Engine). The exporting process in Substance Painter is easy and flexible.
1. Selecting Texture Maps to Export:
Some maps you will have to export:
Base Color (albedo)
Normal (to maintain surface detail)
Roughness (to define surface shine)
Metallic (for metal surfaces)
Ambient Occlusion (AO) (for shading)
Optional maps are Height, to provide additional surface depth and Emissive in case the model should have glowing parts.
2. Setting Export Parameters:
Navigate to File > Export Textures from the menu in Substance Painter. Choose the desired format for your composited project in the export dialog (PNG, TGA, TIFF etc.) If you’re working with game engines, pick the format that is best suited to your engine needs (e.g., Unity uses PNG for PBR textures
3. Choosing Resolution and File Size:
Adjust texture resolution to your project as necessary. Typically you will be able to get away with 2k textures in games, but high end renders might need as high as 4K or even 8K, depending on what quality you are after,says Dixon. Make sure your texture sizes are optimal for performance and don’t export silly resolution assets if they’re destined for a game engine.
Exporting for Different Platforms:
If the product is being exported for other platforms such as game engines or rendering software, export may wish to be set accordingly.
For Game Engines (Unity/Unreal):
For Unity or Unreal Engine, the textures should be exported with the proper settings for PBR workflow. We’re also going to add this roughness and normal maps in the albedo texture as an alpha channel.
For 3D Rendering Software:
If you are exporting for Blender or Maya, you might want to export PBR textures (with the needed channels), like Base Color, Normal and Roughness etc. but tweak maps for specific shaders in your rendering program.
Why Finalising and Exporting Textures Matters:
This final export (and test) is crucial, as all of this wear and tear and detail map work is only as good as how it appears in the final environment. Correct export settings mean that game engines or rendering programs respond efficiently and accurately to the shape maps, both in terms of performance and quality.
Optimization:
When you optimize exporting your textures, you guarantee that the performance of your model won’t be sacrificed, especially when it comes to games and other real-time scenarios.This will cause your wear details to look realistic and run smooth.
Common Mistakes to Avoid:
1. Overdoing Wear Effects:
Too much damaged wear can be unrealistic for your model. Make sure the effects are subtle and concentrated on where wear naturally occurs, at edges or high-contact areas.
2. Incorrect Baking of Maps:
Make sure your normal, curvature and AO maps are baked correctly. If those maps aren’t baked the right way, your wear effects might not match how the surface of the model curves, and you’ll end up with an artificial appearance.
3. Improper Masking:
If you’re not using your smart masks and manual masks in the right spots, you might be getting wear effects where they shouldn’t be. Now is the time to really check out your masks and adjust them for more authentic placement of wear.”
4. Roughness and Metalness Mismanagement:
Be sure the roughness and metalness maps are properly set. Metal should have low roughness, but not be too high on worn edges or it will look like a fake shiny surface and likewise roughness can be overdone so wear does not look natural.
Tips for Realistic Wear:
1. Use Reference Images:
Work from real-life references to see the way in which wear and scratches occur on a variety of materials. This will give you an indication on where to put any realistic wear effects on your model.
2. Work with Layers:
Always approach wear effects in layers, eg – one for edge wear, another for dirt so you can control the intensity and blending of each effect.
3. Gradually Build Grunge Effects:
Begin with soft layers of grunge and add more to taste. Don’t pile on dirt or rust immediately. Let those layers pile on for a believable appearance.
4 . Check Under Different Lighting:
Test your model in various lighting situations, so the wearing effects look good from all directions and in every situation.
Conclusion
Substance Painter can be used to add realistic wear and edge textures as a potent form of making your 3D models look more realistic. Sharp masks, hand-painted details, and subtext maps can be combined to cause natural wear and tear, making surfaces come alive, created by the artists. Texturing an aged game weapon, an aged item or a movie prop, knowing these techniques will enable your assets to become believable and part of the environment.
With the help of the workflow described in this blog, you will be able to use the effect of wearing with great confidence. Your models will not only appear beautiful with the appropriate tools, practice, and experimentation with various materials and aging styles but they will also be up to the standards of professionalism. Keep perfecting such methods and with time, you will also be in a position to incorporate the convincing realistic aging that will make any project you make much better.
