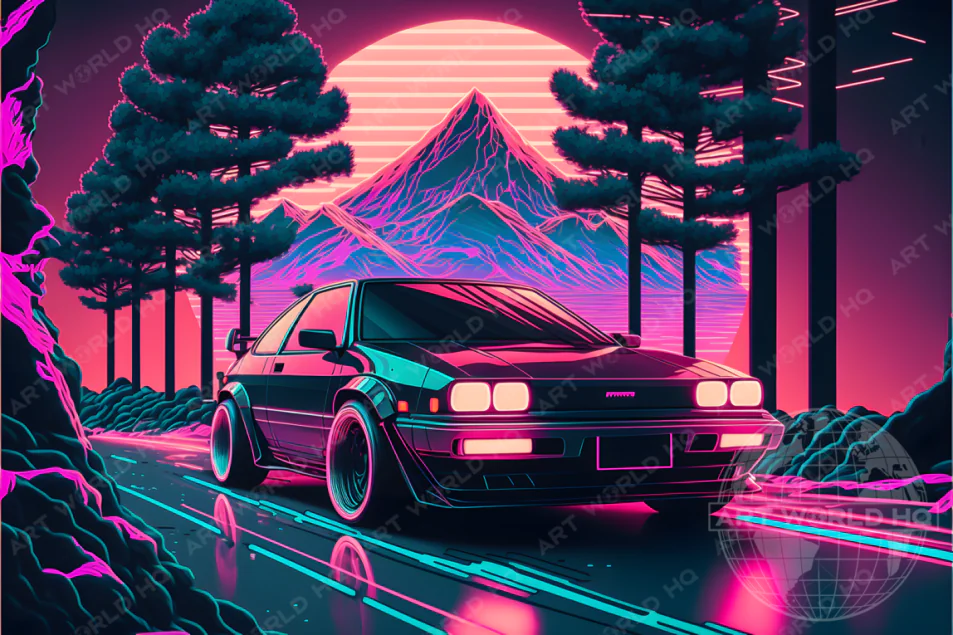
How To Use Vaporwave Aesthetics In Your Images
Vaporwave aesthetics refers to a peculiar art movement about cultural influence that sprang up during the early 2010s. It reflects the reminiscence and appreciation of the past in digital and visual style, fusing retro-futuristic details, surreal imagery, and a unique environment. The term vaporwave emphasizes the rapid development of consumerism, branding, and technology at that time, unstopingly adorned by the masses till now as advancement continued in the modern era. Pastel color palettes, geometric shapes, and fascinating old-fashioned corporate logos and symbols characterize vaporwave artwork images. The technique often includes glitch art through the deliberate insertion of digital errors and the use of classical elements, creating a paradoxical contrast between the traditional and the digital. This blog tutorial can further guide you about the immaculate employment of editing tools and techniques while incorporating vaporware aesthetics into everyday photographs. At the end of this blog, you can smoothly transform your images into modern retro compositions that elevate viewers’ interest in all three dimensions of time, either its golden past, the ever-developing present, or the coming hope for the best-to-be future.
Step 1: Choose your source image
Select your source image as the base for applying vaporwave aesthetics. Picking the right image lays the groundwork for effectively using vaporwave aesthetics in your editing.
Look for an image that can create an atmosphere of nostalgia or a futuristic retro style. It can include aesthetic aspects like urban architecture, vintage technology, neon lights, or old advertisements.
Consider the overall composition of the image. It should be clean and visually appealing. Look for balance, symmetry, and a core focus that can align with vaporwave elements.
Regard high-resolution images that are more flexible and detailed to get the preferred vaporwave aesthetic with perfection.
After selecting the images suitable for vaporwave aesthetic addition, open them in a versatile editing software like Photoshop and start working on it.
Step 2: Customize the colors
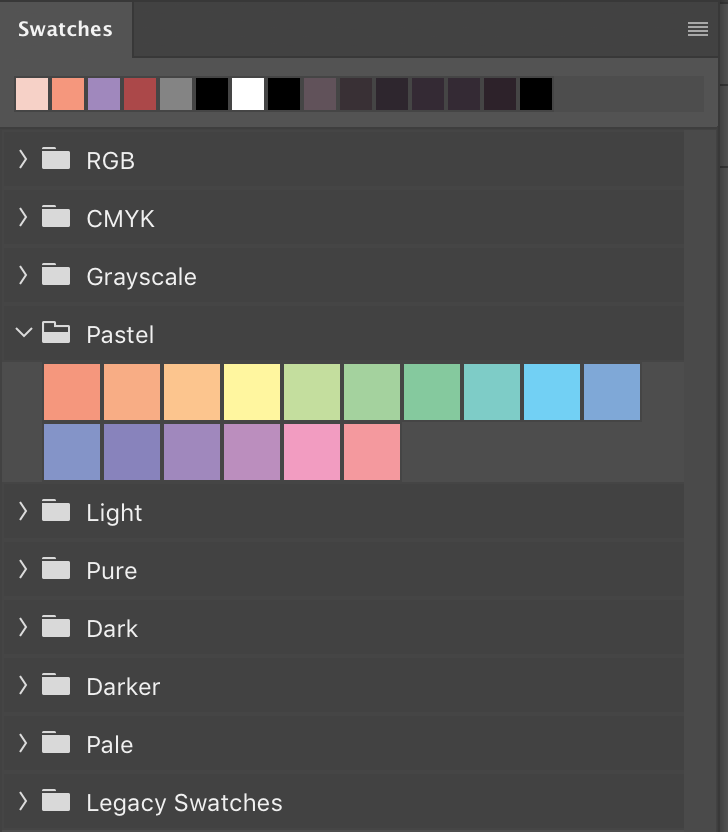
Concentrate on pastel colors, mostly pink, blue, and purple shades. These colors are exemplary for the vaporwave aesthetic, evoking dreamy nostalgia and enhancing the overall retro-futuristic mood.
Choose tools like color balance, hue/saturation, and color grading for an immaculate pastel effect. Desaturate the current colors, set the tones, and increase the vibrancy of pastels.
Other than applying these colors evenly, you should create a pleasing and lucid color scheme that complements the image’s subject matter. Your pastel tones should be in harmony with the rest of your image.
Merging the right color palette is vital to attaining the substance of vaporwave aesthetics. It also determines the other elements you’ll add in later steps.
Step 3: Add geometrical forms
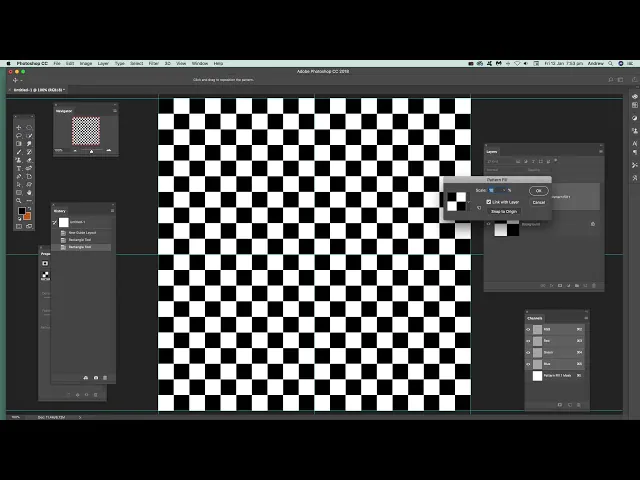
Think about the geometric shapes that line up with the vaporwave aesthetic. You can include grids, checkerboards, or triangles. Use these as overlays or add them to the image itself, depending on the overall look of your images.
To use overlays, create transparent layers with your chosen geometric shapes. Tune their opacity to blend perfectly with your image. Play with different blend modes, like Overlay, Normal, or Screen.
Use a grid pattern for a background or include triangles in architectural elements. Keep up with the symmetry between geometrical forms and your composition.
Fine-tune the size and position of the shapes. They can be the central focus, directing the viewer’s eye through the photograph. Test with diverse variations to discover the most engaging and even settings.
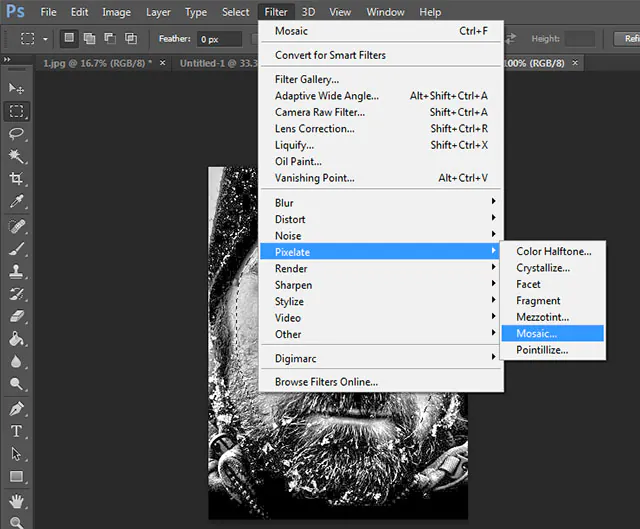
Step 4: Introduce glitch effects
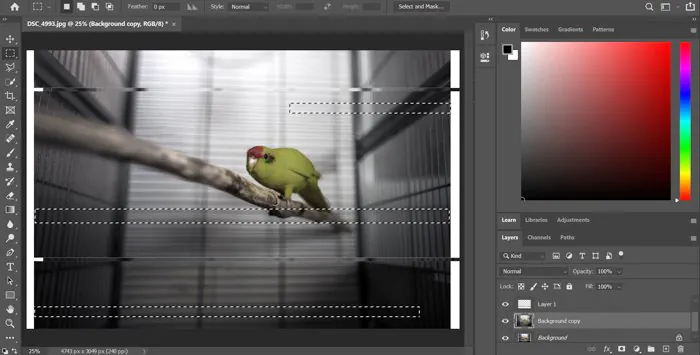
Point out the regions of your image where you want to add a glitch effect, such as certain areas of the image, particular objects, or even the whole image.
Pick the kind of glitch effect you find suitable for your image. Common glitches include pixelation, scan lines, and distortions.
Use the pixelation tool or selectively apply pixelation to bring up a retro-style fragmented appearance.
Add scale lines for an old cathode-ray tube television vibe or a vintage, analog feel. Fine-tune the transparency and measurements of these lines accordingly.
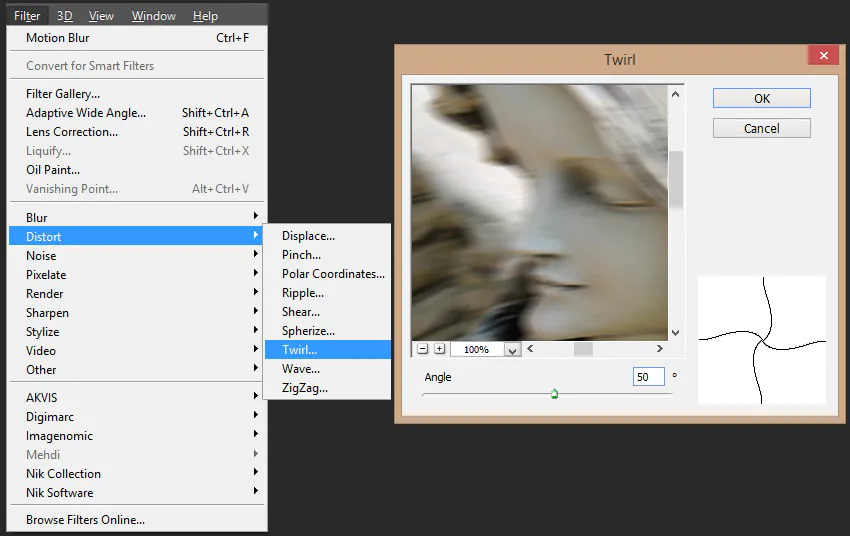
Include warping, stretching, or twisting parts of the image to give surreal dimensions to your vaporwave aesthetics.
Overlay different glitches or use them in combination to attain one-of-a-kind effects.
Regulate the glitches’ intensity, altering the glitch effects’ strength and opacity.
Glitches must enhance the picture without overpowering it. Try with distinctive glitch situations and intensities to get the proper balance for the general elegance of your picture.
Step 5: Add retro vibes
Determine the retro components you need to incorporate into your image, like ancient TVs, arcade recreations, cassette tapes, or other attributes of the 1980s and 1990s.
Preserve the image quality and consistency; choose high-resolution retro images or symbols you overlay onto your existing picture.
Utilize your software blending settings to mix the retro components into your image. Alter the opacity and blending modes to refine their blend with the background.
Consider the composition and arrangement of retro components. Consider approximately how you want them to collaborate in your composition, foreground, or background.
Add vintage textures like an ancient backdrop or retro design to enhance nostalgia. These surfaces can be connected to specific regions or used as overlays for the whole image.
Remember that the retro components are meant to complement the existing composition, not overpower it or divert from the general visual effect.
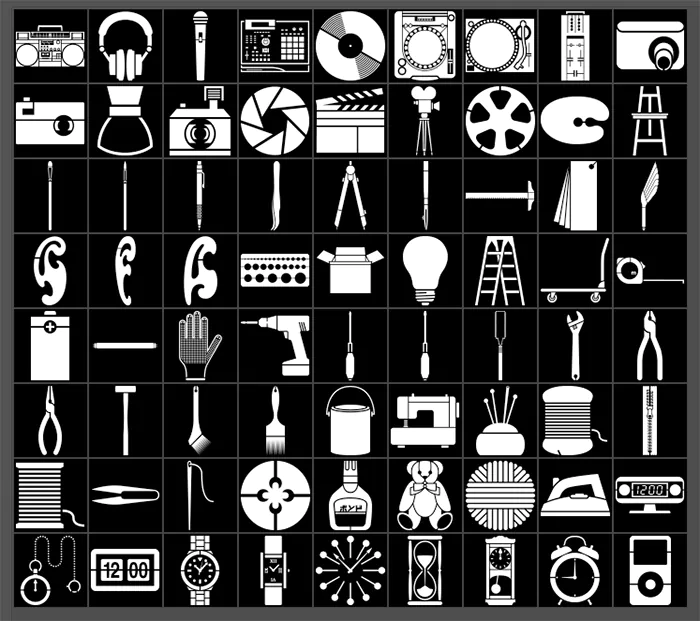
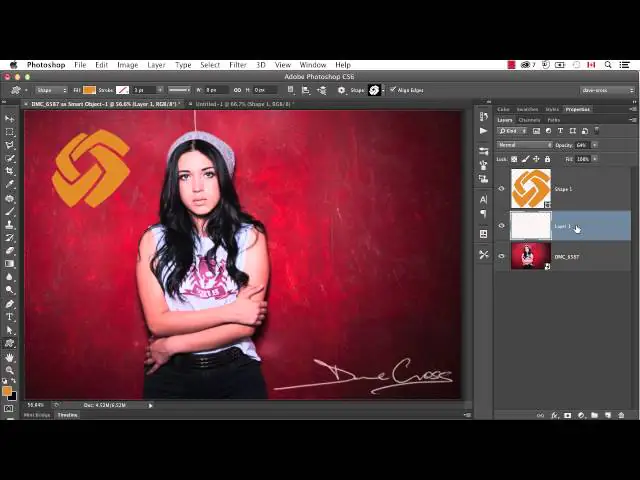
Step 6: Include branding icons
Brand icons from the 1980s and 1990s are vital to boosting your vaporwave aesthetics and intensifying its nostalgic dimension.
Discover famous corporate logos, consumer item branding, or other images from the past that resound with the vaporwave taste.
You can incorporate logos from past technology companies, fast-food chains, or pop brands.
Explore high-resolution forms of these images for good-quality images. You’ll quickly find vector files that are adaptable and versatile.
Combine the chosen vector images into your picture. Carefully consider their arrangement and measure inside the composition.
Alter the opacity and blending modes for image consolidation with the background. You can also test with color adjustments to make them fit the overall color scheme.
Speculate the imagery of the corporate and customer components you’re joining. These images can be utilized to evaluate consumer culture and convey wistfulness.
Hold on to a balanced composition, ensuring old branding icons or images are for general aesthetics without ruling the visual story.
Step 7: Affix surreal imagery
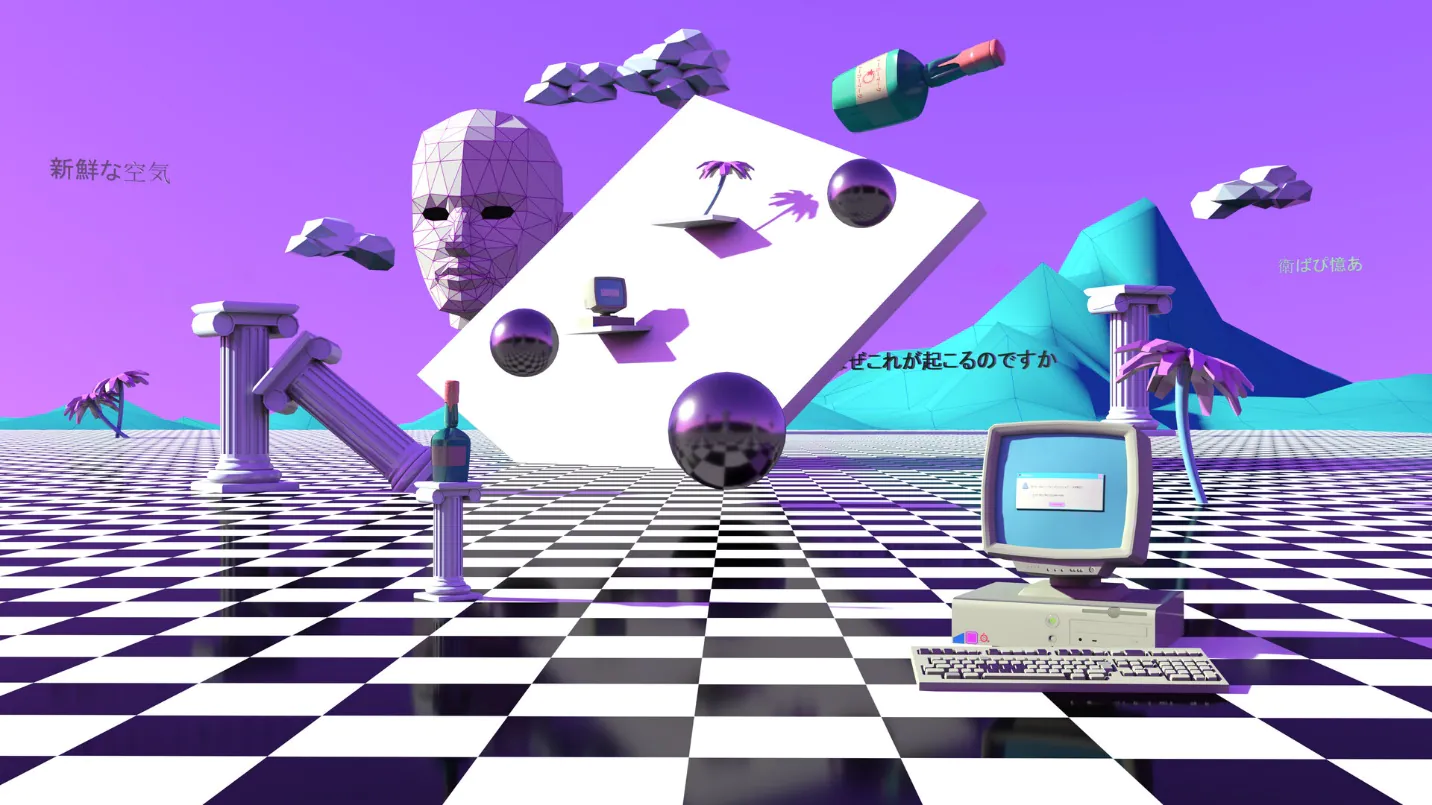
Choose elements that seem unrelated but have an enchanting and visually intriguing aura, like Incorporating classical art with modern or digital objects, juxtaposing elements, or merging retro and futuristic symbols.
Blend these elements accurately, adjusting lighting, shadows, and perspective to make the juxtaposition look as realistic as possible.
Contemplate the tale you want to recount through the surreal juxtaposition. The contrasting elements should reflect the overall temperament of your image.
The surreality should not overshadow the viewers’ perception but rather enchant their curiosity, inspiring them to explore the image further.
Regard the symbolic significance of the composition and freshly added juxtaposed components. Consider the underlying subjects, such as the mingling of past and future, nature and technology, or the real and the surreal.
Feel free to try with variation to blend components in juxtaposition.
Step 8: Apply the VHS vaporwave Filters
Select a VHS filter or overlay that conforms to your image. You can recreate the look of analog VHS tapes using VHS filters with their hallmark imperfections.
Use VHS tape specifications like tracking lines and distortion in your images to echo the look of old VHS tapes.
VHS specifies special background settings named “VHS noise.” Introduce this noise into your photos to enrich the vintage sense.
Use VHS tapes’ faded colors, where the colors seem to blend. Use color adjustments to create an antique, faded effect in your image.
Apply slight distortion and warping to imitate the traits of VHS playback. Start with a slight twisting or stretching of the image.
Include vignetting to frame your picture with a darker border around it and overlay scan lines for a bona fide VHS appearance.
Play with the opacity and blending modes of your VHS effects to attain the correct level of retro analog style.
Take note of the overall vintage look and feel. To create an authentic and retro environment, align the VHS elements.
Take a minute to check your work after applying VHS aesthetics and ensure your image rhymes with the vaporwave design.
Review your image for any aberrations or areas that need to be adjusted.
Once you have revised that, the composition achieves the intended atmosphere and message. Save your image in your destination folder or consider it for sharing or publication.
Conclusion
In summary, the vaporwave aesthetic can make them thought-provoking and appealing entities when introduced into your photographs. Such images are dominated by symbols and objects representing technology and modernism’s continuously enhancing influence on our lives. It is an open invitation for viewers to look further into the complexities of consumer society and contemplate the very nature of nostalgia. Vaporwave motifs imbue the visuals with an intensive cultural enchantment that remodels pixels and symbols into stories. These aesthetics bid us to reconsider our existence, creating a cyclic link between the past, present, and future.
