How To Scrape Real-Time Data From Websites Using WebSockets
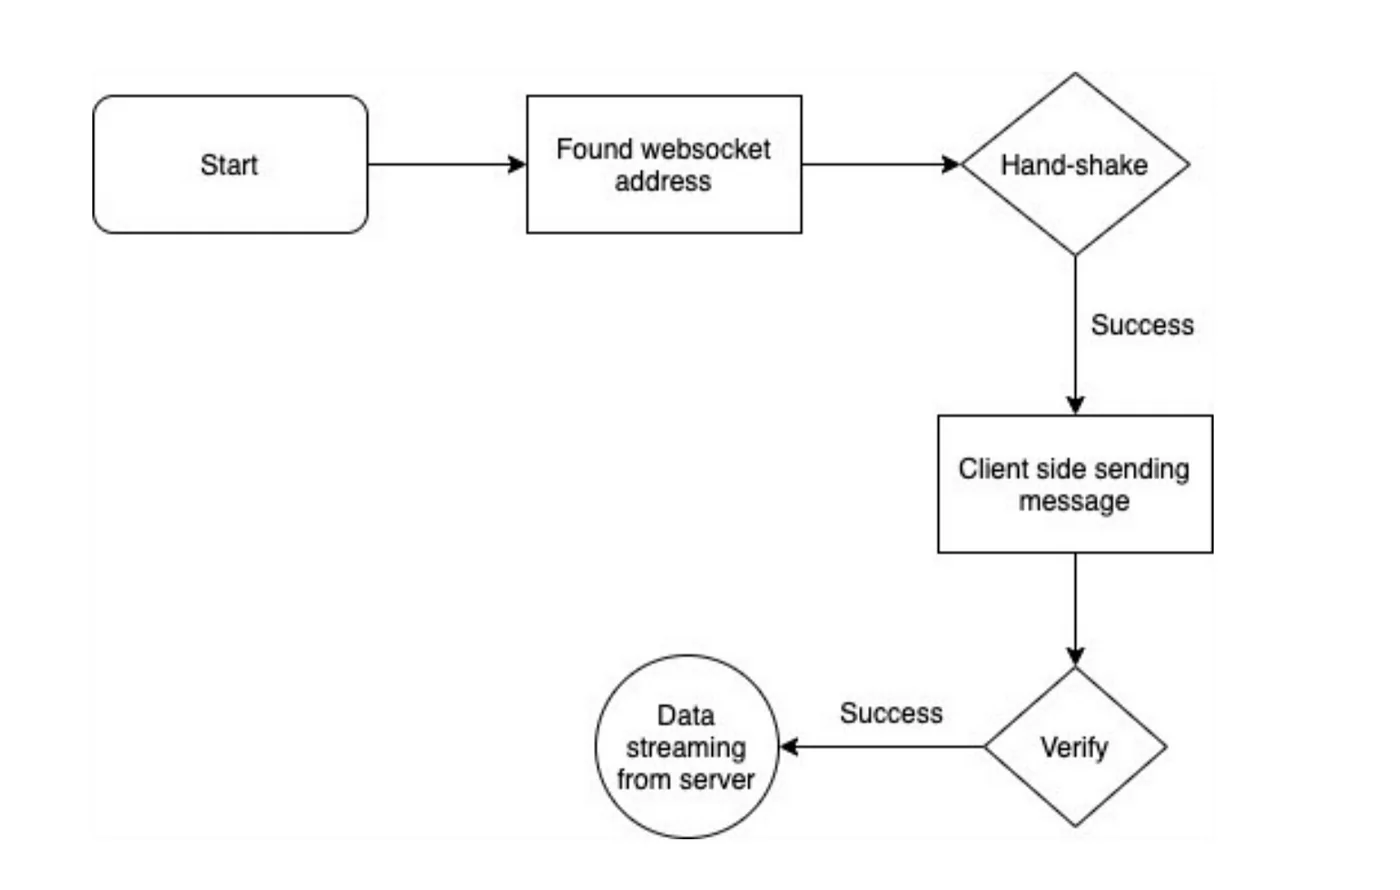
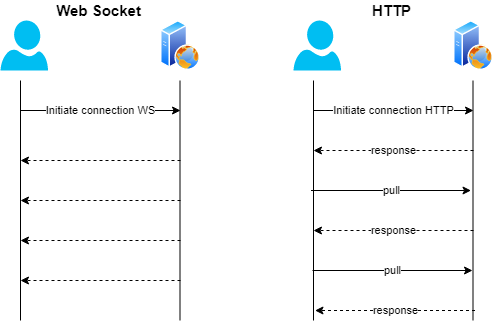
For the majority of businesses, scraping real-time online data from websites is crucial. Generally speaking, you have more options if you have access to more recent information. Compared to HTTP alone, WebSockets, a communication protocol, enables quicker and more comprehensive data retrieval. Every piece of data that is required requires a different request when using HTTP alone. Fortunately, WebSockets allow all necessary data to be retrieved via a single connection. As a result, more time can be spent processing the data rather than waiting for it to be returned from the server. Using WebSockets for web scraping also has the benefit of potentially offering a more effective method of managing massive volumes of data. Because each HTTP request needs its own connection to the server, if too many requests are being made at once, the server may soon become overwhelmed. WebSockets, on the other hand, allow multiple requests to share a single connection, lessen the strain on the server and improve its ability to handle high traffic levels. The step-by-step process of using WebSockets to scrape real-time data from websites is as follows.
Step 1: Specify The WebSocket URL
At the initial phase of scraping real-time data utilizing WebSockets, it is important to identify the WebSocket URL and understand how that data is exchanged. Far from conventional HTTP requests, WebSockets preserves maintains a diligent connection for persistent data transfer. Numerous sites utilize WebSockets for live upgrades, like stock costs, sports scores, and chats.
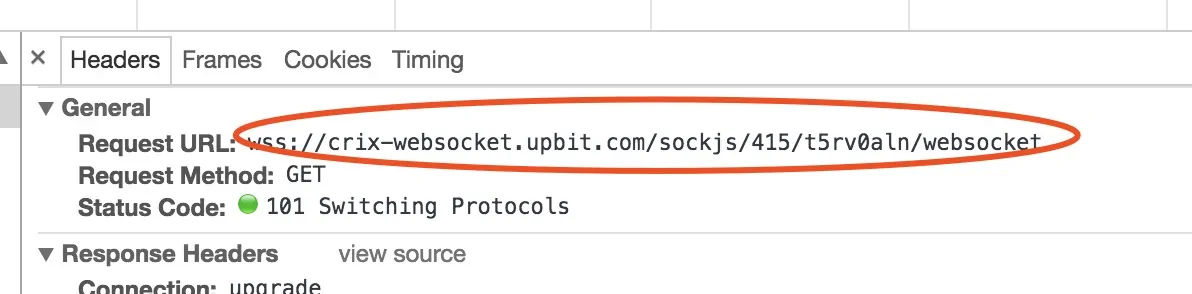
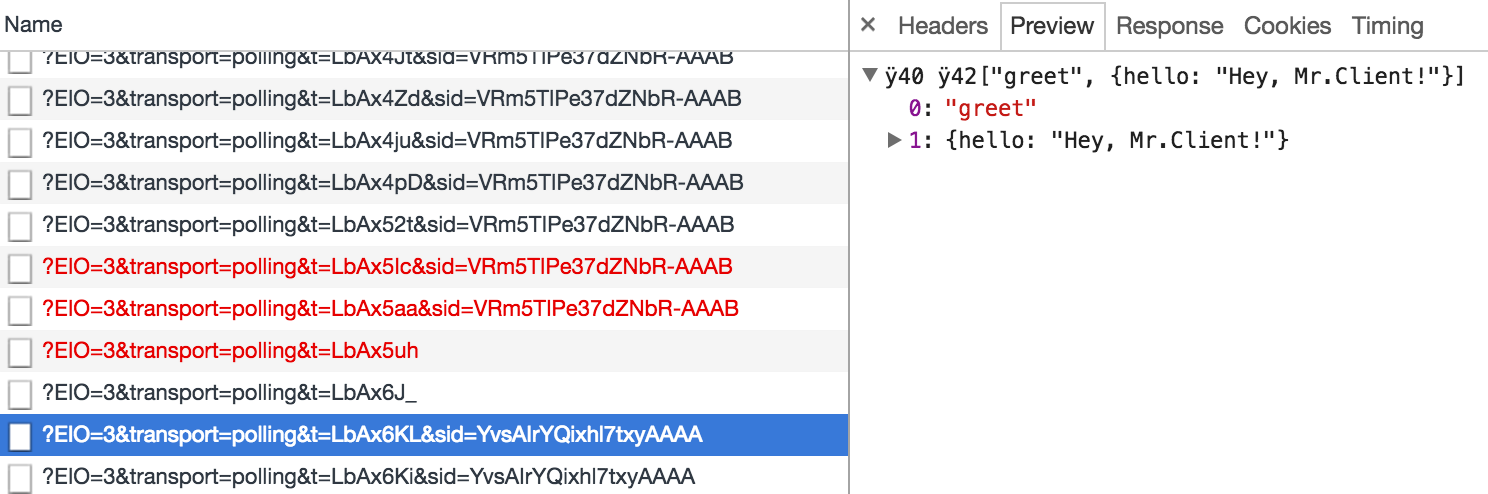
To discover the WebSocket connection, open Developer Tools in your browser using F12 or Ctrl+Shift+I in Chrome. Go to the Network tab and filter by WebSockets. Load the page again and search for WebSocket connections or URLs that begin with wss://). Tap on the dynamic WebSocket and swap to the Messages tab to catch real-time data exchanges. Oversee the format of approaching and outgoing messages. Those messages are usually in JSON format but may likewise be in binary data.
Comprehending the way WebSocket communication functions is pivotal for appropriate data extraction. Some WebSockets demand verification, custom headers, or introductory subscription messages. As essential, review the Headers and Frames segments in Developer Tools to catch needed request parameters.
After you have identified the WebSocket URL and message format, you’ll utilize the WebSocket-client library of Python to set up a connection and begin getting real-time data. That phase makes sure that you accurately capture and handle live information from the source.
Step 2: Set Up A Connection
After identifying the WebSocket URL, you need to set up a connection to get real-time information. In contrast to traditional HTTP requests that need rehashed polling, WebSockets offer a diligent, bidirectional connection between the client and the server.
Utilize Python’s WebSocket-client library to connect, which allows simple interlinkage with WebSocket servers. To begin with, install the library if you have not as of now, utilizing the following command:
pip install websocket-client
After that, make a WebSocket connection in Python:
import websocket
ws = websocket.WebSocket()
ws.connect(“wss://example.com/socket”)
print(“Connected to WebSocket”)
After you have connected, the WebSocket stays open, empowering real-time data retrieval without the requirement for rehashed requests. Some WebSockets demand extra headers or verification tokens. You’ll incorporate these while building up the connection. Look at the following command:
headers = {“Authorization”: “Bearer YOUR_ACCESS_TOKEN”}
ws.connect(“wss://example.com/socket”, header=headers)
Once you acquire an effective connection, you can begin sending and getting messages. That diligent connection permits effective data scraping with negligible delay, making WebSockets perfect for live market information, social media streams, and other real-time applications.
Step 3: Send The Subscription Request
Once you are done setting up a WebSocket connection, it’s time to subscribe to particular data streams. Numerous WebSocket APIs demand an introductory request to begin collecting data. That can be a straightforward handshake, authentication, or indicating the sort of information you require.
To begin with, see the Messages tab in Developer Tools to catch what subscription messages are sent when the webpage links to the WebSocket. Such messages are generally in JSON format. Here is an example of how they may seem like:
{“action”: “subscribe”, “channel”: “live_updates”}
After identifying the proper format, send the subscription request in Python after connecting, just like the following way:
import websocket
import json
def on_open(ws):
subscribe_message = json.dumps({“action”: “subscribe”, “channel”: “live_updates”})
ws.send(subscribe_message)
print(“Subscription request sent”)
ws = websocket.WebSocketApp(“wss://example.com/socket”, on_open=on_open)
ws.run_forever()
If any kind of verification is required, you ought to send an access token along with the subscription request. Some APIs also need occasional keep-alive messages to preserve the connection. Continuously look at the WebSocket API documentation or browser logs for the proper format.
Step 4: Process The Information

After setting up the WebSocket connection and sending the subscription request, you can receive and process the approaching real-time data. WebSockets provide messages persistently, generally in JSON format, but some might utilize binary or plain content.
To deal with approaching messages, define an on_message function that forms and extracts pertinent data from the response.
import websocket
import json
def on_message(ws, message):
data = json.loads(message) # Convert JSON string to Python dictionary
print(f”Timestamp: {data.get(‘timestamp’)}, Value: {data.get(‘value’)}”)
ws = websocket.WebSocketApp(“wss://example.com/socket”, on_message=on_message)
ws.run_forever()
In case the WebSocket sends data in a distinctive format, you can alter the parsing strategy in like manner. Moreover, A few APIs may wrap data in numerous layers, necessitating extra parsing logic.
For proficient data handling, look into storing the extracted data in a database, adding it to a CSV file, or utilizing it for real-time analytics. If messages arrive too often, execute a buffer or processing queue to oversee approaching data without overpowering system assets.
By persistently listening for and processing messages, you’ll extract significant perspicuity from real-time WebSocket streams.
Step 5: Examine The Data
After real-time data reception, you can store or examine that data for further utilization. Relying on your application, you might have to save the information in a database, write it to a file, or handle it in real-time for analysis.
If you would like to log the data for afterwards investigation, you’ll store it in a CSV file via the following command:
import csv
def save_to_csv(data):
with open(“data.csv”, “a”, newline=””) as file:
writer = csv.writer(file)
writer.writerow([data[“timestamp”], data[“value”]])
# Example usage inside on_message function
def on_message(ws, message):
data = json.loads(message)
save_to_csv(data)
If you want to store larger datasets, consider employing a database such as PostgreSQL or MongoDB like this:
from pymongo import MongoClient
client = MongoClient(“mongodb://localhost:27017/”)
db = client.websocket_data
collection = db.live_updates
def save_to_db(data):
collection.insert_one(data)
If the data you are working on is some kind of financial market data or live metrics, you will apply analytics functions instantly. You can look into the following command:
if data[“value”] > threshold:
print(“Alert! Unusual activity detected.”)
On effective storing and analyzing WebSocket data, you will guarantee that real-time bits of knowledge are accessible for significant decision-making.
Step 6: Address Network Errors
It often happens that WebSocket connections get hindered because of network errors, server timeouts, or unexpected detachments. To guarantee ceaseless data scraping, execute an automatic reconnection process.
To address disconnections, a simple strategy is to wrap the connection logic in a loop with an exception handler:
import websocket
import time
def connect():
while True:
try:
ws = websocket.WebSocket()
ws.connect(“wss://example.com/socket”)
print(“Connected to WebSocket”)
return ws
except Exception as e:
print(f”Connection failed: {e}. Retrying in 5 seconds…”)
time.sleep(5)
ws = connect()
A much better practice is to utilize the WebSocketApp class, which allows depicting callback functions to deal with blunders and reconnection:
def on_error(ws, error):
print(f”WebSocket error: {error}”)
ws.close()
time.sleep(5)
run_websocket() # Restart connection
def run_websocket():
ws = websocket.WebSocketApp(“wss://example.com/socket”,
on_error=on_error)
ws.run_forever()
run_websocket()
That strategy guarantees that in case the connection is lost, the scraper can automatically try to reconnect, reducing downtime. With appropriate error handling, you can keep up a steady WebSocket data scraping pipeline.
Conclusion
In conclusion, the necessity for rapid data extraction from websites grows along with technological advancements. Real-time web scraping is essential for competitive analysis, market research, and decision-making since it enables both individuals and corporations to obtain current information. Data can be pushed from the server to the client without the need for continuous polling with the help of WebSockets, which offer a full-duplex communication channel over a single TCP connection. The WebSockets’ ability to deliver updates instantly makes them an ideal choice, perfect for real-time data extraction.
