How to use Sketchup for 3D Printing?
These days, viewers can easily engage with the surroundings and see how the product will actually look, thanks to 3D modelling and 3D printing. Today, 3D is used in many different industries. This technology is being used by engineers, designers, building owners, constructors, and many others to advertise their products and services. In general, 3D modelling has advantages that make it beneficial for all types of businesses and organizations. But, here one question arises? How one can polish their 3D printing and modelling skills? The answer is simple; 3D software. Many softwares are available that can help one in this manner. However, the simplest to use software is Sketchup. Well, in this post, we will tell you about Sketchup and how to use Sketchup for 3D printing.
What is Sketchup?
SketchUp is a popular 3D software i.e. suitable for both new and experienced users. Its fundamental objective has always been to make 3D modelling as familiar as possible to users, which explains why it’s so easy to use. Moreover, the platform is widely used in a variety of fields which include product design, interior design, and architecture. Since it can handle both large drawings and little objects, it’s also a useful tool for the creative community.
SketchUp is also excellent for individuals who are new to 3D modelling but want to start designing their products for 3D printing. With its simple toolset and clean user interface, it enables newbies to start creating in a relatively short time.
We’ll go over every step you need to take to make your first SketchUp 3D model for 3D printing. However, let’s first understand more about this software and how to get it.
Licensing of Sketchup
Different types of users can choose from a variety of licensing options with SketchUp. These are:
1 SketchUp Free
It is free software for non-commercial applications that runs in a browser. It provides simple tools, 10 GB of cloud storage, and limited file export and import functionality. All that is necessary to access this edition of the software is an account and a good connection to the internet.
2 SketchUp Go
It requires a $119 yearly fee for a subscription. This license is practically the same as the Free license, but it also includes unlimited cloud storage and access to SketchUp for iPad, which is also available offline.
3 SketchUp Pro
It charges $299 annually. This license tier also includes access to the “Extension Warehouse plugin repository” and the complete desktop version in addition to the web-based and iPad versions. Additionally, it features special VR and AR viewing tools.
4 SketchUp Studio
It needs the most expensive annual subscription, which costs $699. It also has all the features and capabilities of all the other versions, as well as point cloud visualization for 3D scans and the potent V-Ray rendering engine. Remember that this license is only valid for Windows.
How to use Sketchup for 3D printing?
As we discussed above, SketchUp is one of the most widely used 3D modelling & design software for 3D printing. But getting a SketchUp model ready for 3D printing can be a little challenging. To help you in making your SketchUp design 3D printable, we’ve put together a list of quick yet useful tricks and tips.
1 Your Template should be set to Millimeters or Inches
Your life can become easier with a few quick clicks before you begin. You may need to adjust your SketchUp model to metric or imperial units. This will prevent you from having to later rescale your model’s printing size. The template can be modified by choosing “3D Printing – Millimeters” or “3D Printing – Inches” under Window > Preferences > Template.

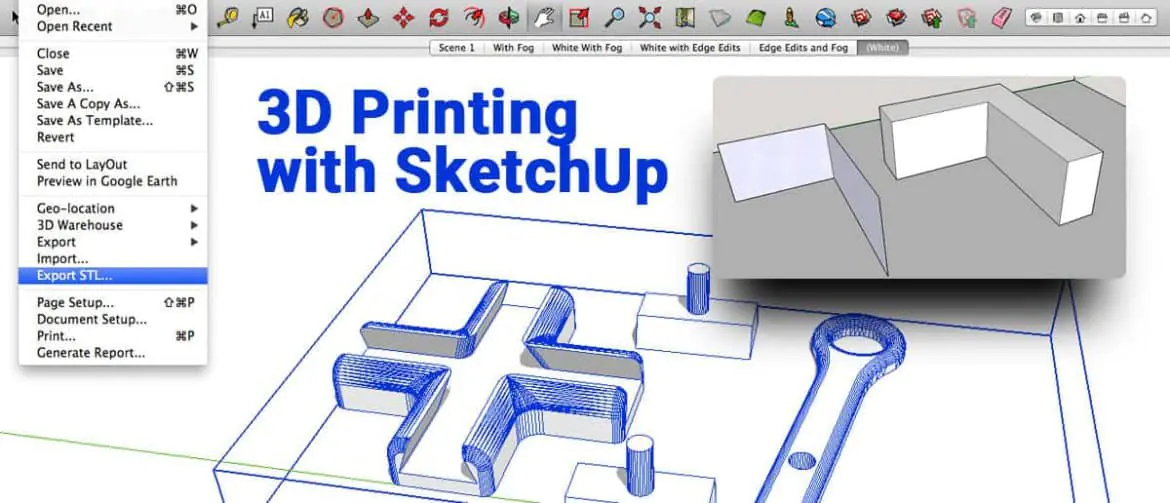
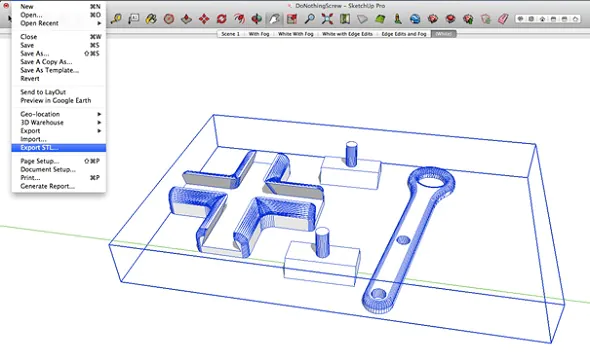
2 The SketchUp STL Extension installation
Normally, your 3D model can be saved as a SketchUp file (SKP). Even though these files are compatible with our online 3D printing service, you may wish to download SketchUp’s free STL Extension. The most popular file format for 3D printing is STL, which will make it simpler to print, share and update your design in other programs.
Moreover, you can export your model as an STL file if you have the SketchUp STL extension installed. When exporting, be sure to specify the millimeters or inches unit type that you selected in your template, and select the binary file format to minimize the size of your file.
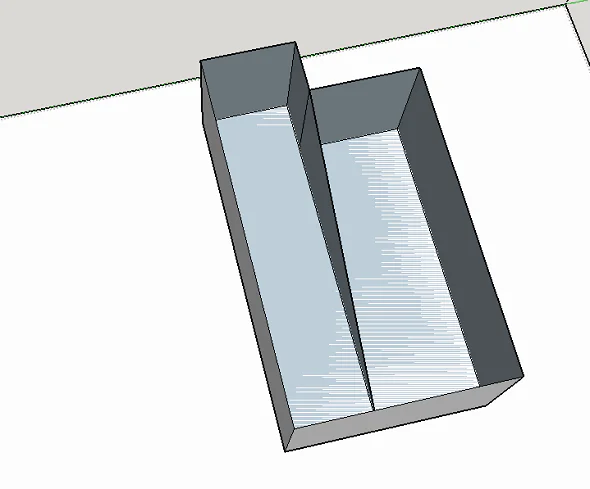
3 Set wall thicknesses and stay away from paper-thin surfaces
You must make sure that every surface has a wall thickness to make your SketchUp model printable. A 3D printer lacks information about how thick or thin it should print your object without a wall thickness option.
The image below illustrates a substantial object with thick walls with a model with paper-thin surfaces (not printable, left) (printable, right).
4 Create a watertight model (Manifold)
A printable model must not have any surface holes. Consider this: Would water flow out of my model if I put water inside of it? In that scenario, you must locate and seal these openings. One of the most challenging aspects of making 3D printable models with SketchUp is this.
An illustration of a non-watertight model is shown in the design below. On its surface, one sizable hole is easily noticeable.

When this gap is sealed (for instance, by adding additional lines), SketchUp knows that the object is internally solid and prepared for printing. Below is an example of a watertight object (also known as a manifold object).
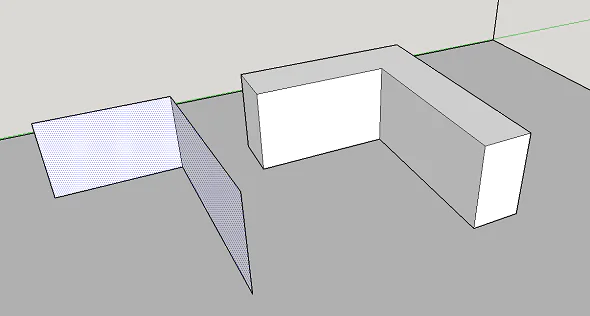
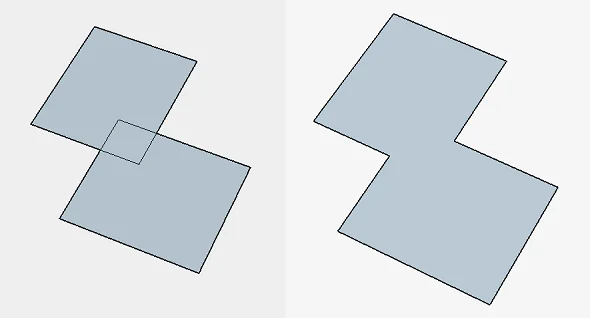
5 Try to eliminate Internal Overlap
Since your model must have a consistent “outer shell,” crossings and walls within your design can be challenging. Because of this, it makes it logical to first consider your model in a 2-dimensional space.
In the example below, the left form will not be printed after being pulled into a three-dimensional object because the item will have paper-thin walls. However, because the shape on the right will only have one “shell,” printing it will not be a challenge once it is turned into a 3D object. On the inside, it doesn’t have paper-thin walls. Later, we’ll look at how to make one outer shell automatically.
6 Make sure your model is sound
It can be challenging to build watertight models with a continuous outside. Fortunately, SketchUp allows you to check for errors.
This is how it goes:
Use the select tool to make three clicks on your model (this will select everything).
Make a group by clicking with the right mouse button on your object.
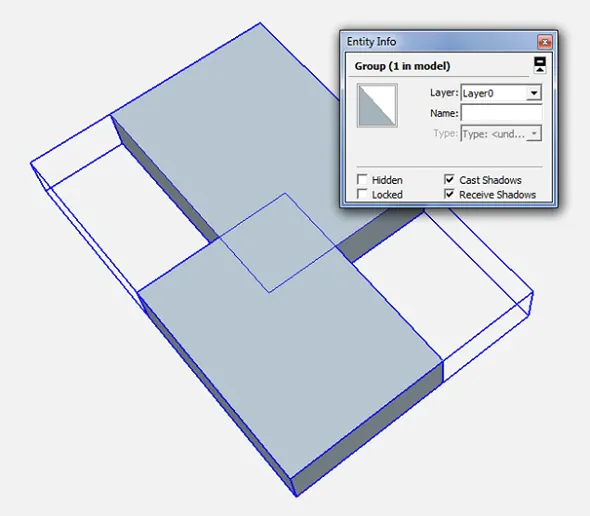
Once more, right-click your object and choose “Entity Info.”
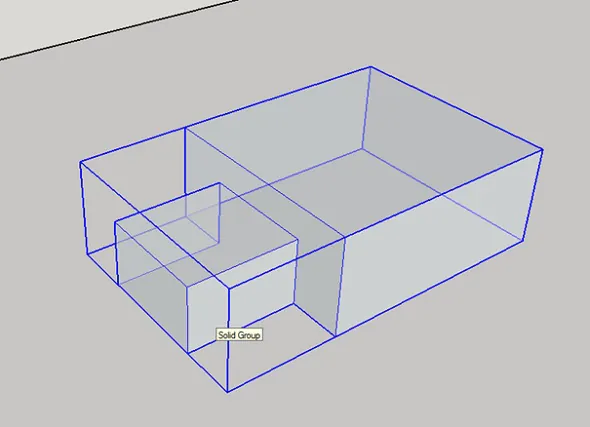
The Entity Info box will display “Group” if you designed an object with holes (not watertight) and internal intersection (not in one shell). This indicates that you need to recheck your model because it is not printable. To alter the components again, right-click on it and choose “Explode.”
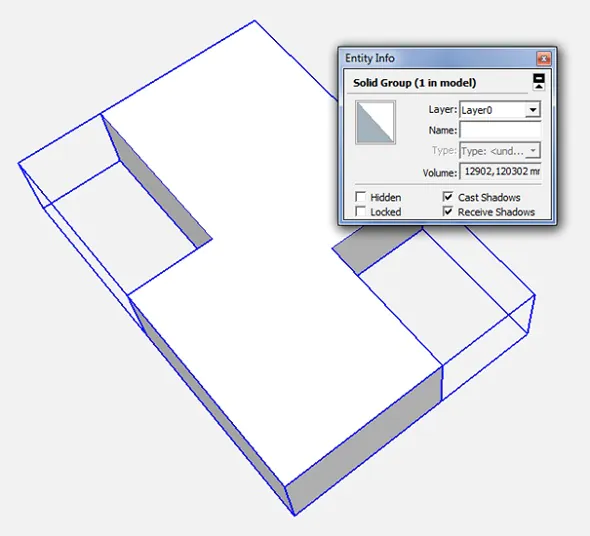
The Entity Info window will display “Solid Group” if you created a watertight model in a single shell, indicating that your model is ready for 3D printing.
7 Utilize the “Hide Tool” and “X-Ray-Mode” to see inside your model
When you view your model from the outside, the interior is a “black box” to you. However, even the interior of your model could have numerous modelling errors that would prevent the printing of your product. The ‘Entity Info’ window in the example below indicates the non-solid object.
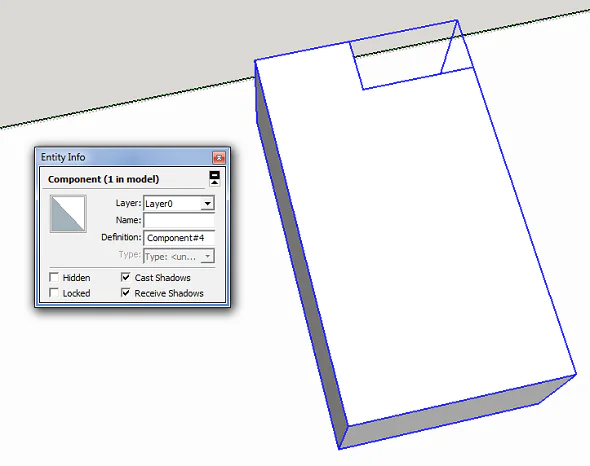
It makes sense to check inside as it appears to be sturdy from the outside. To hide a surface (face), click it and then choose “Edit” > “Hide.” You can now easily locate the problematic error. You can also enter x-ray mode by selecting “View” > “Face Style” > “X-ray”.
8 Form an “Outer Shell”
As we’ve already mentioned, 3D printers have trouble with designs that have overlapping objects. The good news is that there is an automatic method for eliminating all overlapping internal portions and forming an “outer shell” around the overlapping objects.
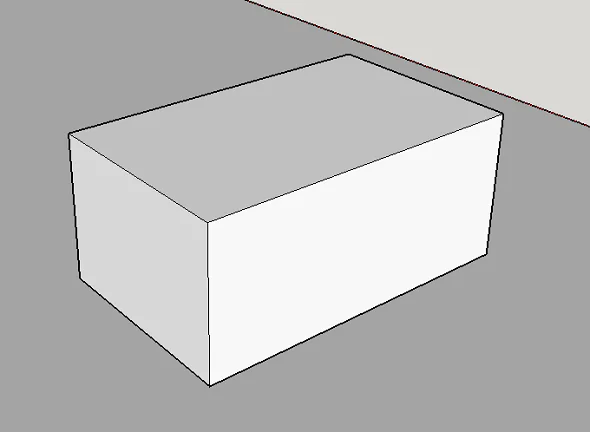
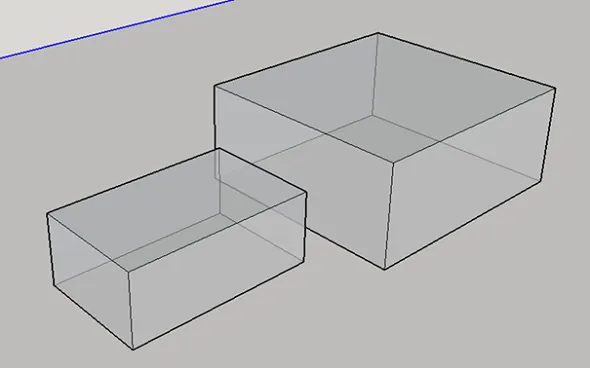
We have these two solid blocks, to begin with. These blocks were individually “grouped” (Select > Right-click > Make Group). To make things simpler, we also chose the x-ray perspective.
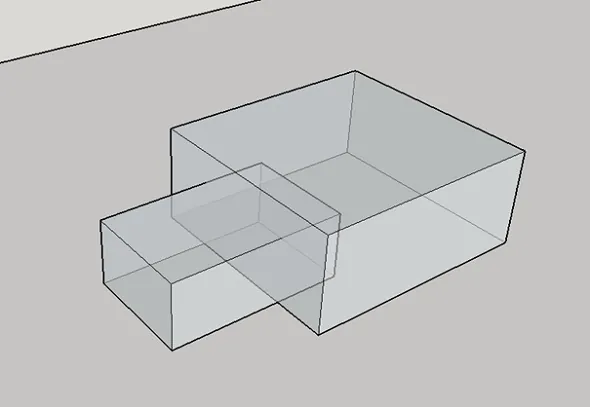
Next, we stack one block on top of another. There are now regions within this item that overlap.
We choose one of these blocks, click “Tools,” and then select “Outer Shell” to remove it.
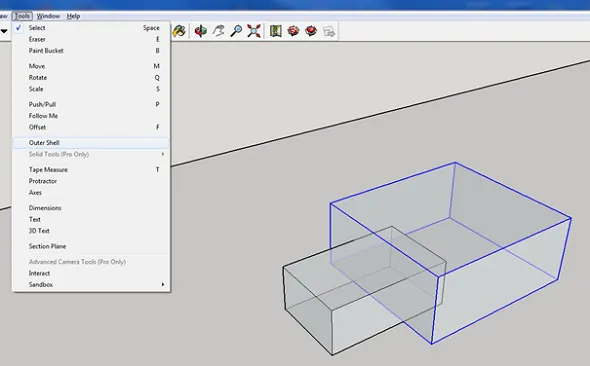
Clicking on the second block is the final step. Out of these blocks, SketchUp automatically formed one solid group. As you can see, there are no longer any internal overlapped portions. The outcome is a brand-new, solid object that is prepared for 3D printing!
9 Fix reversed faces (Inverted Normals)
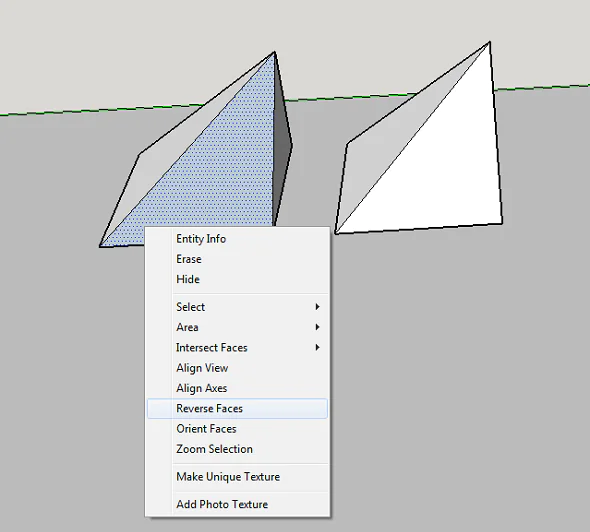
So-called inward-facing or reversed faces can also be a concern. This indicates that your model’s surface is facing the wrong way (usually this means that it is facing the object’s inside rather than the outside). These surfaces are highlighted with blue color.
Right-click the inward-facing surface (face) and choose “Reverse Faces” to correct this. This is demonstrated in the illustration below (left). On the right, you can see the thing as it should be, with all faces pointing outward once more.
10 To obtain smooth curves, increase the number of circle/arc segments
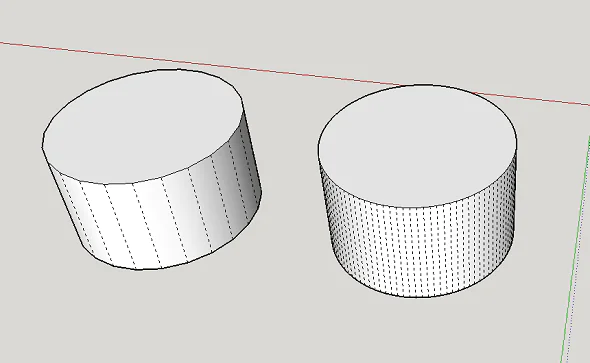
Arcs and circles are “smoothens” in SketchUp’s visual presentation. Even though circles in SketchUp may appear to be totally spherical, they actually only have 24 sides. To view these sides, select “View” > “Hidden Geometry.” This circle may print with some noticeable edges.
The default sides of the arc or curve tools are displayed in the bottom right corner of SketchUp when you pick them. The number of sides can then be increased by entering a greater value. Create your arc or circle after validating your entry by pressing the “Enter” key.
The graphic below contrasts 150 sides (right) with the normal 24 sides (left) (right).
Indeed, Sketchup is a widely used software that is helpful for both newcomers and experienced in the 3D modeling and printing field. We hope, this post was helpful for you to become proficient with Sketchup. Get up and go now to create your first 3D model!
