How To Use Presets In Lightroom
Professional and amateur photographers alike frequently employ the well-liked photo editing program Lightroom. Using presets is a fundamental characteristic that separates Lightroom from other editing programs. Presets are pre-made adjustments that can be applied to your photographs with a single click, saving you time and effort while editing. Presets can create a consistent look across a series of photos or apply standard adjustments such as exposure, contrast, and colour correction. Presets may seem intimidating, but they are easy to use and can save a lot of time in the editing process. In this blog article, we’ll glance at the advantages of using Lightroom presets, how to set them up, and how to utilize them to better your images. Whether you are a beginner or a veteran pro, using presets in Lightroom can boost your photos.
Benefits of Using Lightroom Presets:
Using presets in Lightroom offers photographers a range of amateur and professional benefits. Here we highlight some of the main advantages of using Lightroom presets:
Consistency:
One of the key benefits of using presets is that they allow you to apply a consistent look and feel to your images. That can be particularly helpful if you’re working on a large batch of photos from the same shoot or event, as it ensures that all of your images have a cohesive look. Using the same preset across all your pictures, you can create a uniform style that ties your photos together.
Time-saving:
Presets can save you much time and effort in the editing process. Using a preset, you can apply a range of adjustments to your image with just one click rather than making each adjustment individually. That can be especially helpful for busy photographers who need to quickly edit large volumes of photos. Using presets can help speed up your workflow and get more work done in less time.
Creativity:
Presets can also be an excellent tool for developing your editing style. By experimenting with different presets and adjusting them, you can create custom presets that reflect your style and preferences. It can be the best way to express your creativity and develop a unique look that sets your photos apart from others.
Learning:
Finally, presets can be a great way to learn about photo editing. By studying the adjustments made by different presets you can better understand how other editing techniques work and how you can apply them to your images. That can be a helpful learning tool for photographers new to editing or looking to improve their skills.
In summary, using presets in Lightroom can offer a range of benefits, including consistency, time-saving, creativity, and learning opportunities. By incorporating presets into your editing workflow, you can streamline your editing process, develop your editing style, and improve your overall photography skills.
Installing Lightroom Presets:
Installing Lightroom presets is a straightforward, feasible process in just a few simple steps. Here’s how to install presets in Lightroom:
Step 1: Download your presets:
First, you’ll need to download your presets from your chosen source. That might be a third-party provider or presets that you have created yourself.
Step 2: Locate your presets folder:
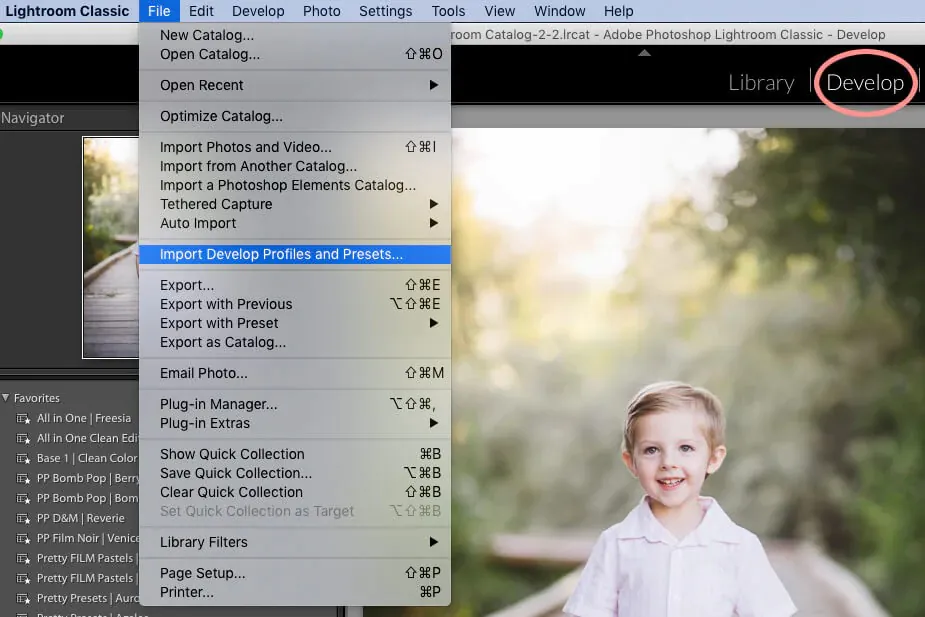
Next, you’ll need to find you presets folder in Lightroom. To do this, go to the ‘Develop’ module and scroll down to the ‘Presets’ panel on the left-hand side of the screen. Right-click on any preset and select ‘Show in Finder’ (on a Mac) or ‘Show in Explorer’ (on Windows). That will take you to the location of your presets folder.
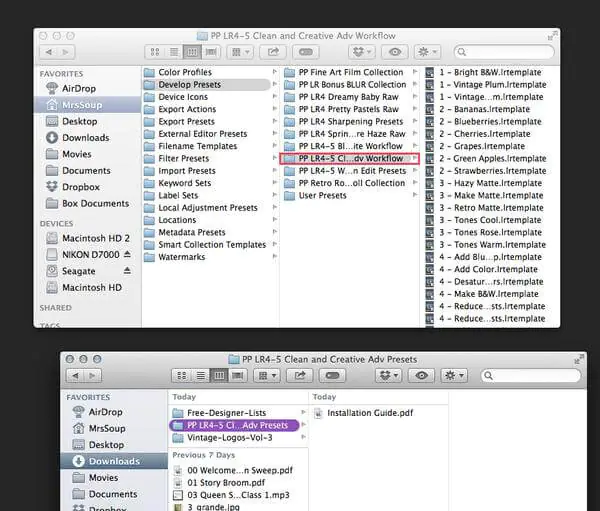
Step 3: Copy your presets:
Once you’ve located your presets folder, copy and paste the presets you downloaded or created into this folder.
Step 4: Restart Lightroom:
After copying your presets into the presets folder, you’ll need to restart Lightroom. Once you’ve done this, your presets should be available in Lightroom.
It’s worth noting that you can install different presets in Lightroom, including develop presets, export presets, and import presets. The process for installing each preset is similar, but you’ll need to ensure you’re putting the presets in the correct folder. For example, if you want to install an export preset, you’ll need to go to the export dialogue box and click on the preset dropdown menu. From here, you can select ‘Manage Presets’ and then click ‘Show Lightroom Presets Folder’ to find the folder where your export presets should be.
Using Lightroom Presets
Once you’ve installed your Lightroom presets, it’s time to start using them to edit your photos. Here’s a step-by-step guide to using Lightroom presets:
Step 1: Open Lightroom and select an image to edit
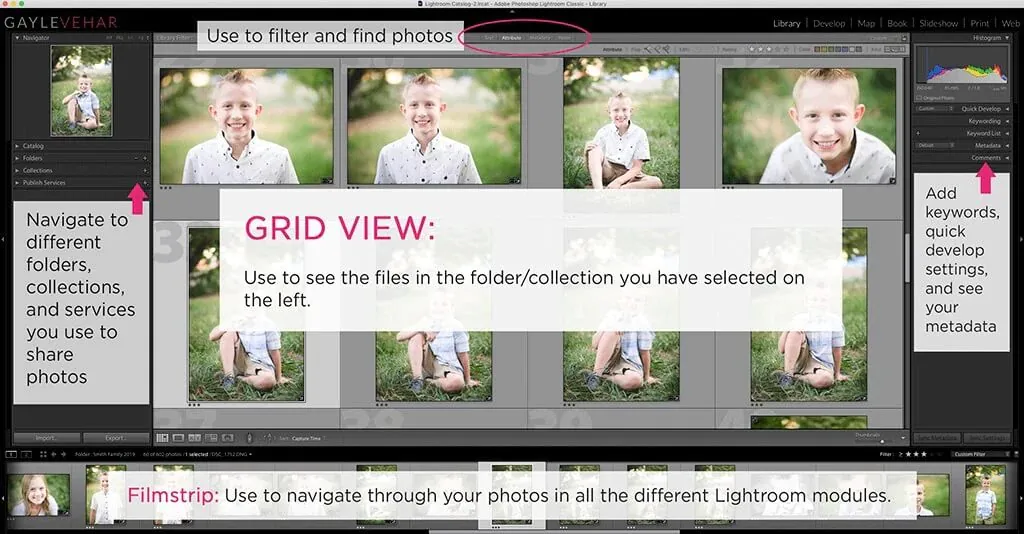
To get started, open Lightroom and navigate to the Library module. Your photos are organized by date, folder, or collection here.
To select a photo to edit, click on it in the Library module. That will bring up a preview of the picture and some basic information about the image, such as its file type, resolution, and camera settings.
Alternatively, you can import a new photo into Lightroom by clicking on the Import button in the bottom left-hand corner of the screen. From here, you can choose the location of your image and import it into Lightroom.
Once you have a photo selected, it’s time to start using presets to edit it.
Step 2: Navigate to the Develop module
Next, navigate to the Develop module by clicking the Develop button in the top right-hand corner of the screen. That will bring up various editing options and tools to edit your photo.
Step 3: Browse through your presets
Once you’re in the Develop module, you can browse your presets. To access your presets, scroll down to the Presets panel on the left-hand side of the screen. Here, you can see a list of all your installed presets.
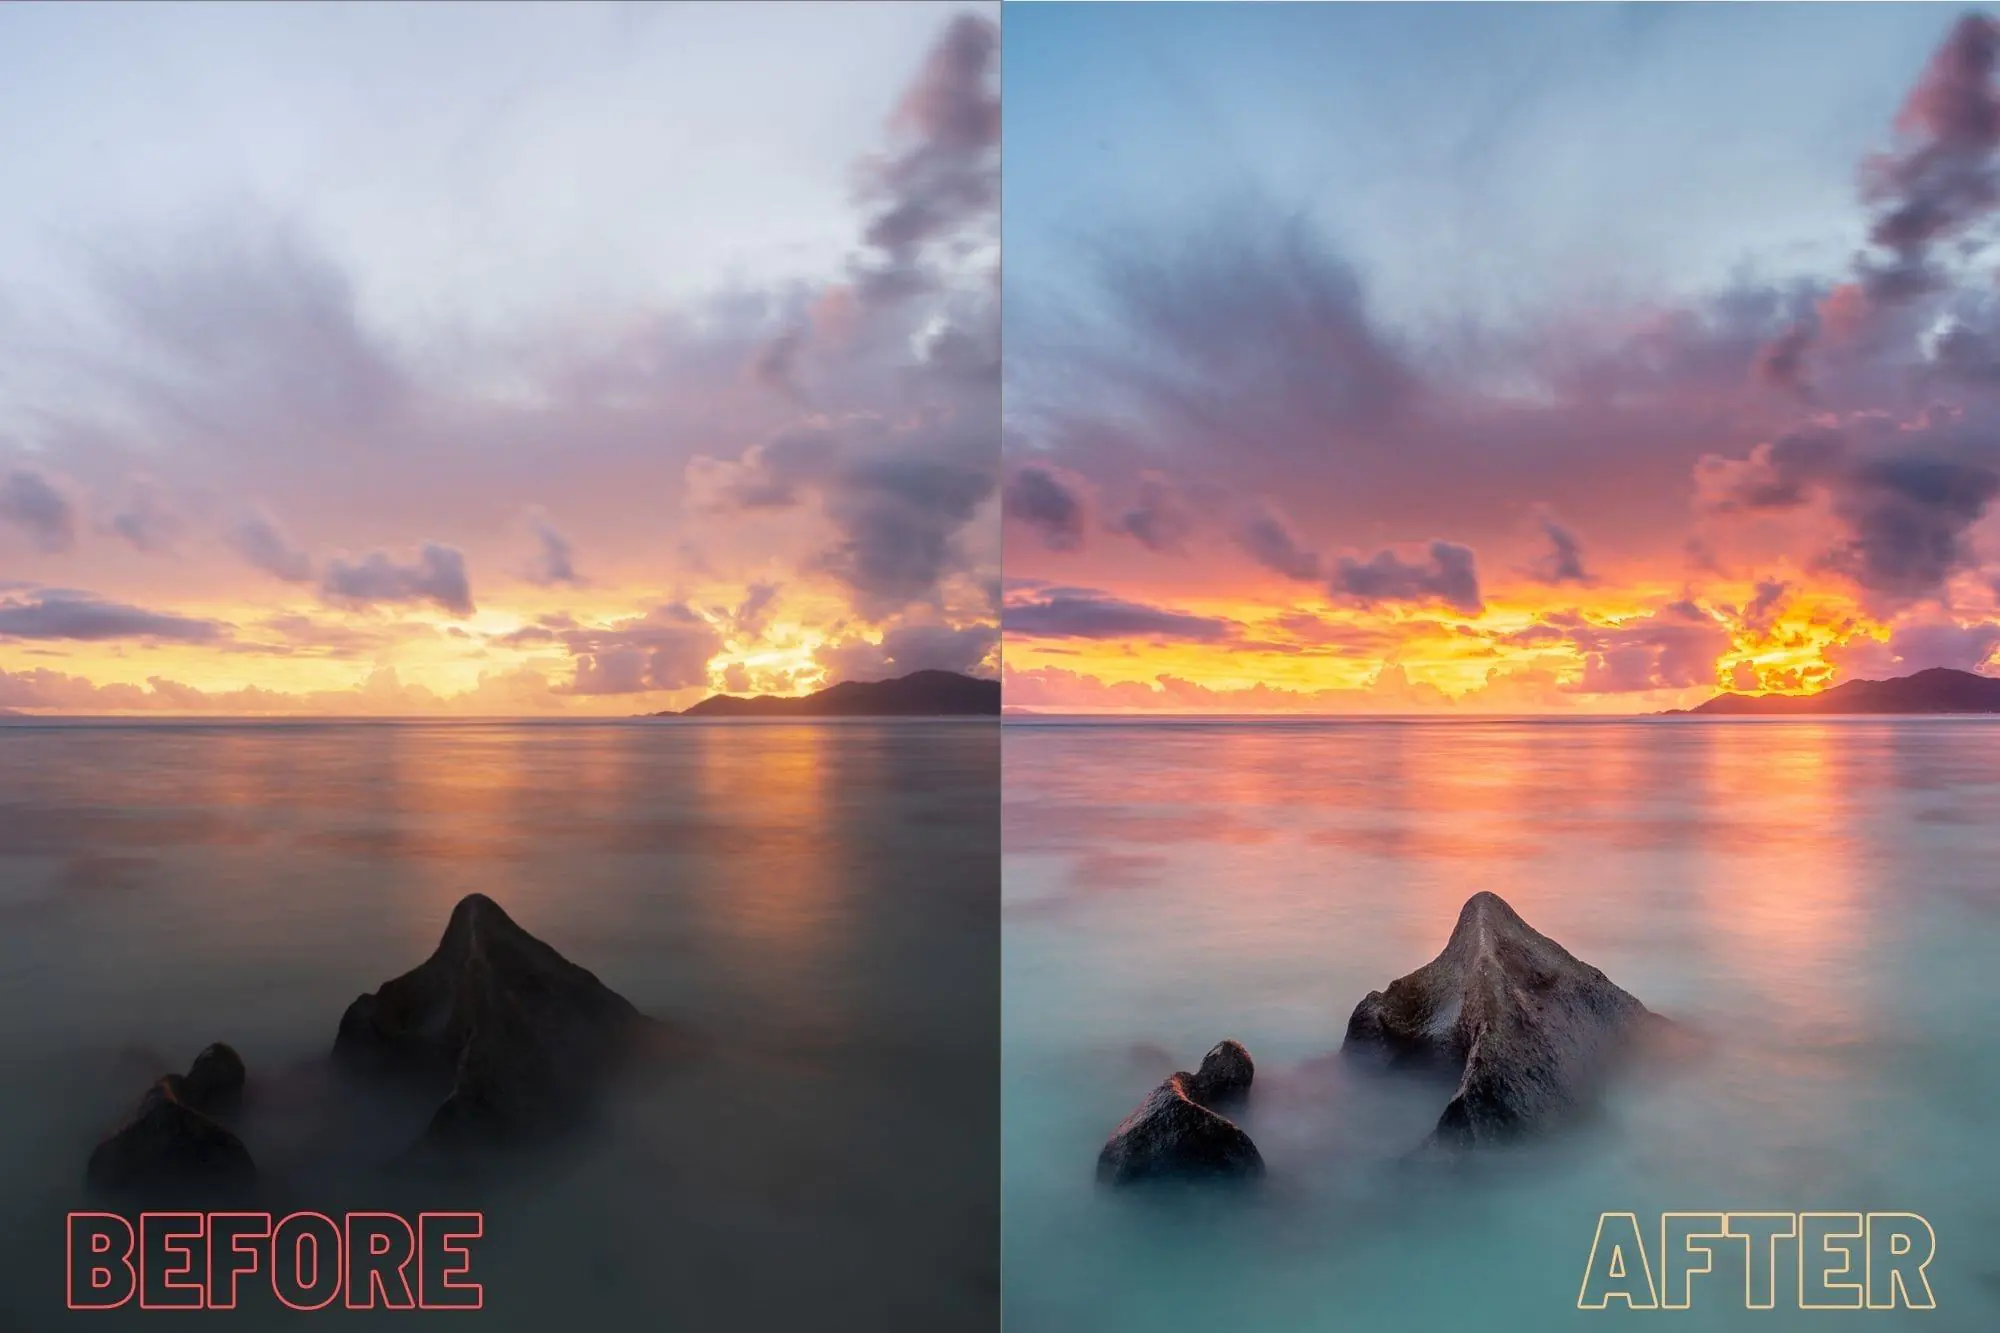
To preview a preset, click on it. Lightroom will then apply the preset to your photo, giving you an instant preview of the final image.
Step 4: Choose the preset that you want to use
Once you’ve previewed your presets, it’s time to choose the one that you want to use. To apply a preset, click on it in the Presets panel. Lightroom will then apply the preset to your photo, making the necessary adjustments to things like exposure, contrast, and colour.
Step 5: Make any necessary adjustments
After applying a preset, you may need to make additional adjustments to your photo. That is normal and a crucial part of the editing process. To make adjustments, use the editing tools in the right-hand panel.
For example, if you’ve applied a preset that has made your photo too bright, you can use the Exposure slider to dial it back. Similarly, if you want to add a bit of warmth to your image, you can adjust the White Balance slider.
The goal is to use the preset as a starting point and make any necessary tweaks to create the perfect photo.
Step 6: Save your photo
Once you’re happy with your edits, it’s time to save your photo. To do this, navigate to the “Develop” module and make any additional adjustments to your desired image. Next, click the “Export” button in the screen’s left panel. Choose your desired file settings, such as file type and resolution, and select the destination folder where you want to save the exported file. Finally, click the “Export” button to save the edited photo with the preset applied.
Step 7: Create your own presets
Finally, if you’re a Lightroom power user, you should create presets. Creating presets is a great way to streamline your editing workflow and ensure consistency in your work.
To create a preset, start by editing a photo as usual. Once you’ve made your adjustments, navigate to the Presets panel on the left-hand side of the screen. From here, click on the plus sign to create a new preset.
You can then name your preset and choose which settings to include. For example, if you’ve adjusted the Exposure, Contrast, and White Balance, you can include these in your preset.
Once you’ve created your preset, it will be added to the Presets panel, and you can use it to edit future photos.
After learning the steps for using presets in Lightroom, there are some important considerations to keep in mind:
Experiment with different presets to find the styles that work best for your photos
Make adjustments as needed to fine-tune the edit for each photo
Use presets selectively, choosing those that work well with the specific image and making adjustments as needed
Learn how to create your own presets to customize your editing process further
Avoid relying solely on presets and instead use them as a starting point for your edits
Remember to backup and organize your presets to avoid losing them or creating clutter
Note which presets work well for different photos, such as landscapes, portraits, or black-and-white shots.
Consider sharing your presets with others or using presets created by other photographers to expand your editing options.
Continuously learn and experiment with new presets and editing techniques to develop your unique style.
Conclusion
Presets are a valuable feature in Lightroom that can help photographers save time and achieve consistent results. Importing and applying presets lets you quickly and easily edit your photos with pre-set adjustments. The ability to save your edited images with presets applied you to share your work with others or use them for your projects. By incorporating presets into your workflow, you can take your photo editing skills to new heights and easily create stunning images.
