How to Turn Your Ordinary Photos into Shutter Speed Shots
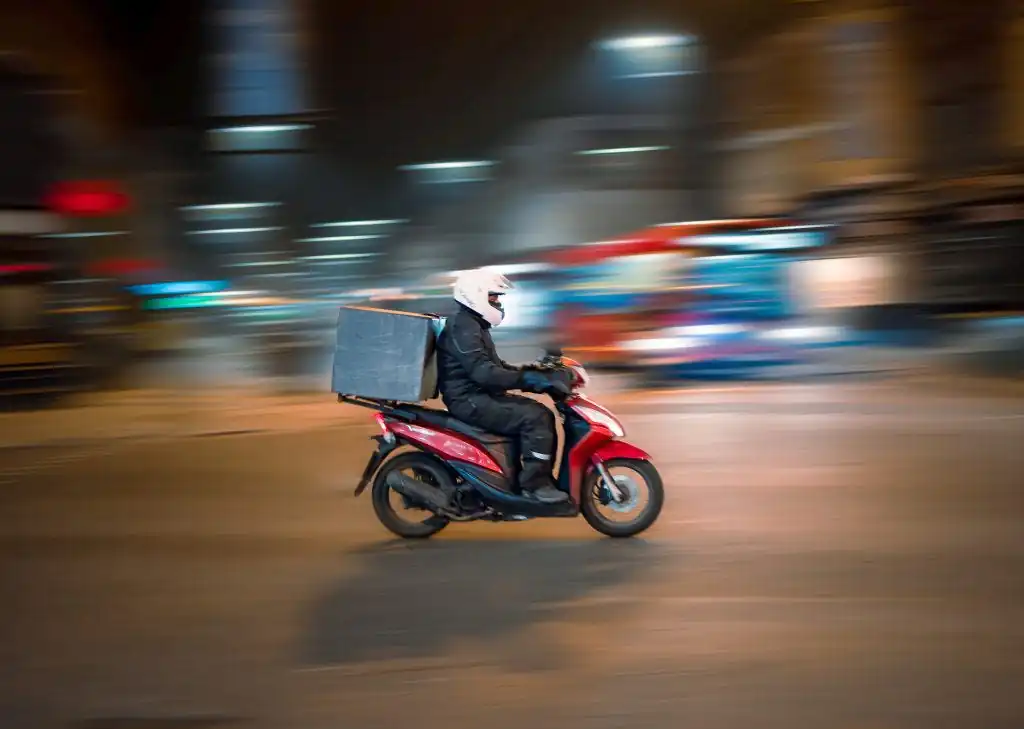
Photographing lightning-fast moving objects necessitates specific strategies, like speed shuttering the moving scenes for distinctive, unusual visual results. With this strategy, a moving scene is frozen in less than a second by adjusting the camera’s shutter to a rapid opening and closing. The approach acknowledges the beauty of fleeting moments with outstanding lucidity and sharpness. Speed shutter photography is also ideal for capturing candid shots with momentary glimpses and expressions of spontaneity. The typical shutter speed effect is attained by a deliberate modification of camera shutter movement in fractions of a second. Yet, if you want to modify your normal shutter image into an exclusive speed shutter scene, it is still accessible with the help of advanced editing tools and techniques. This article will highlight those post-processing techniques in steps that can escalate the energy of your common visuals and make them speed shutter effect compositions.
Step 1: Image Loading and Initial Examination
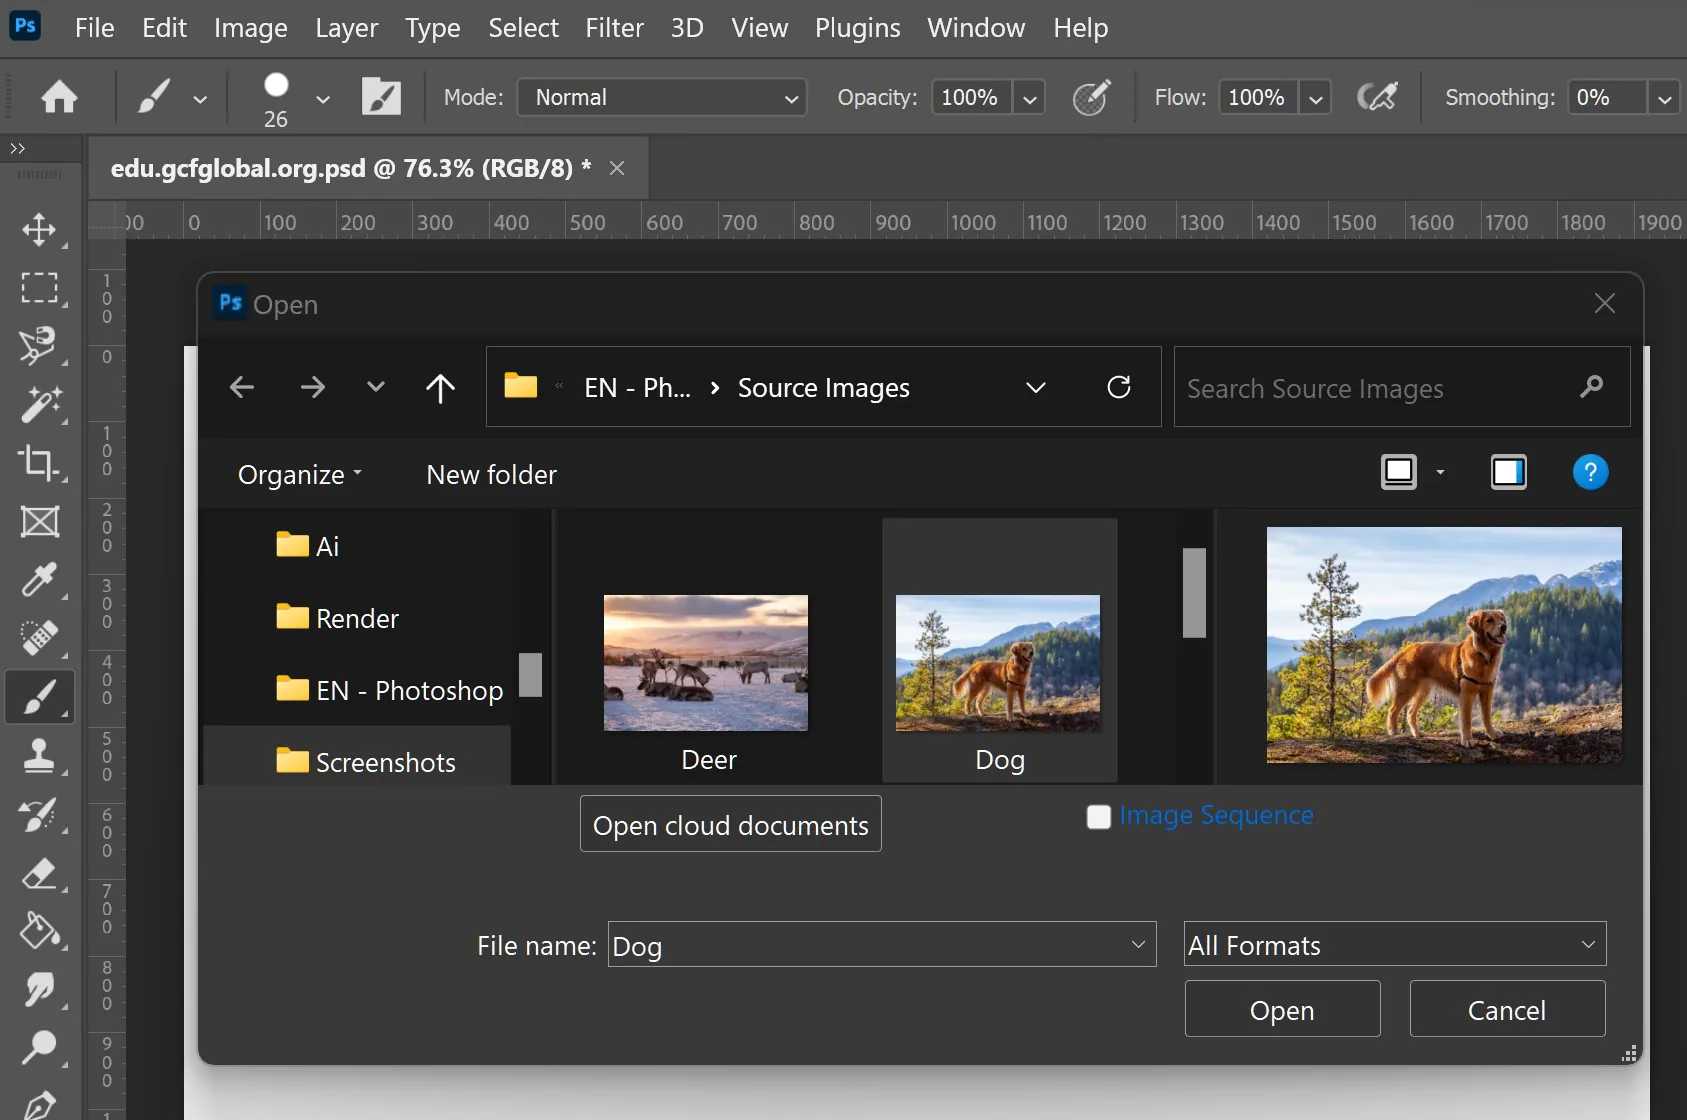
Initiate the editing task by launching your choice of software, or choose any of the versatile options for photo editing app and look for the File menu.
In most software, you can find the “File” option at the top of the workspace. This menu displays all the basic functions related to your image manipulations.
In the “File” menu, select the option to open a new file or image. Clicking on that option will prompt a dialogue box to help explore the file you propose to alter.
Once the dialog box is open, go to the directory where your image is located. Select the image and press the “Open” button, stacking the chosen image into the editing software.
After your photograph is loaded, it is set up for your innovative actions, but before jumping to the detailed phases, consider using the zoom and navigation functions to have a closer look at specific areas of the image to assess the influence of later-introduced effects.
Step 2: Creating the Original Layer Copy
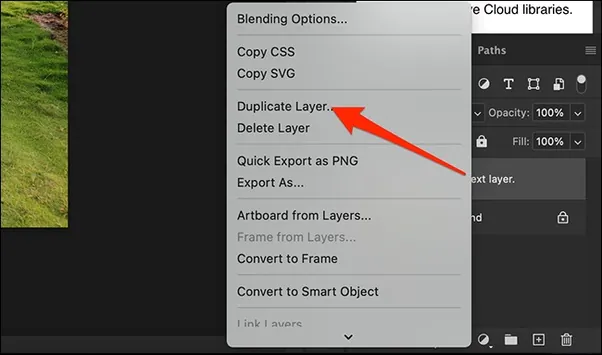
Pay attention to the layer panel inside your editing program. This fundamental tool shows the different layers that comprise your picture.
Recognize and select the background layer, which is often titled as the Original image. This base layer is the canvas upon which your visual narrative takes shape.
Click on the chosen layer to display an option like Duplicate or Copy Layer. Use this option to make a copy of your original image.
Consider allotting a particular title to the copied layer for the organization as you browse through different layers amid the editing process.
The duplication process preserves the integrity of your original file, giving you a canvas where inventive experimentation can take place without influencing the initial data.
Find the option to set the visibility of the copied layer on and off. This action allows you to compare changes made to the copied layer with the untouched main image, encouraging a thoughtful approach to your altering attempts.
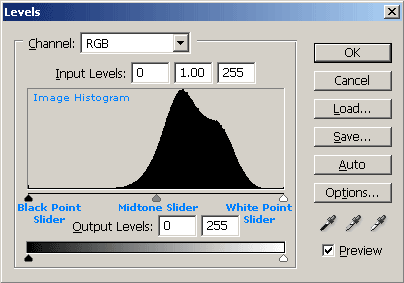
Step 3: Altering the Levels
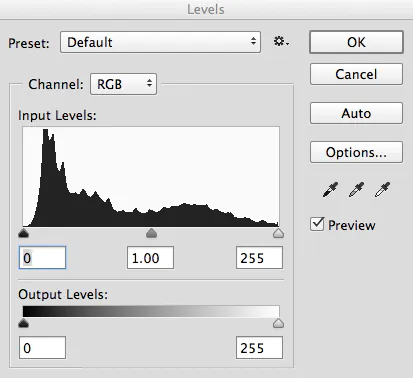
Move to the “Adjustments” menu or any related panel present within your software. Search for the “Levels” option to start the alteration process.
Play with the settings within the histogram shown in the Levels adjustment tool. This visual representation outlines the conveyance of tones in your image, directing your modifications.
Locate the black point slider in the Levels adjustment. Steadily move it to the proper position until it adjusts with the start of the histogram, extending the shadows and improving contrast.
Find the white point slider and move it to the left, adjusting it with the histogram’s end. This activity heightens highlights and helps improve the dynamic range of your image.
For a blend of shadows and highlights, play with the midtones slider and make subtle tweaks to refine the overall tonal harmony.
Frequently observe the image as you make alterations. This real-time assessment lets you determine the advancing effect on contrast and tonal dispersion.
Once you are happy with the alterations, apply the changes. This sets the improved levels, bringing a refreshed lavishness to the contrast inside your picture.
Step 4: The Sharpness Manipulations
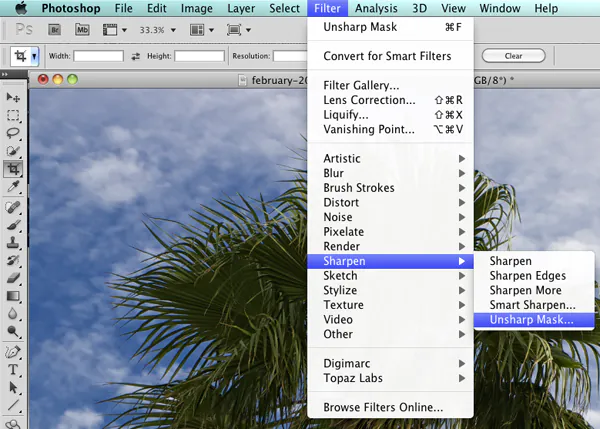
Find the sharpening tools inside your editing program. These tools are to enhance the clarity and freshness of your image.
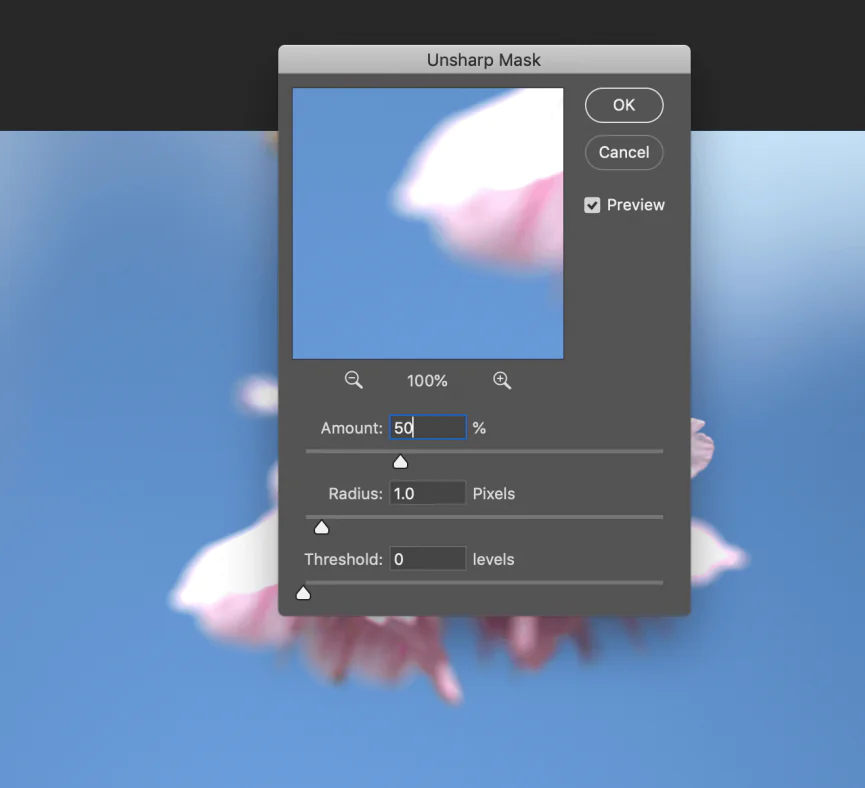
Select a particular sharpening option, like “Unsharp Mask,” or any sharpening filters.
Find the strength control slider inside the sharpening tool. Slowly increment this parameter to heighten the sharpening impact. Remember to maintain a tactical balance to avoid triggering artificiality.
Locate the radius settings to control the size of the sharpening effect. Alter this parameter to maintain a balance between upgrading points of interest and protecting a natural appearance.
If accessible, utilize the threshold setting to control which zones get sharpening. This prevents the sharpening tool from influencing ranges with negligible points of interest, resulting in a more natural result.
During editing, regularly preview your composition to assess the effect of sharpening over clarity.
After you are content with the sharpening settings, apply the changes to set the improved sharpness.
Step 5: Eliminating Motion Blur
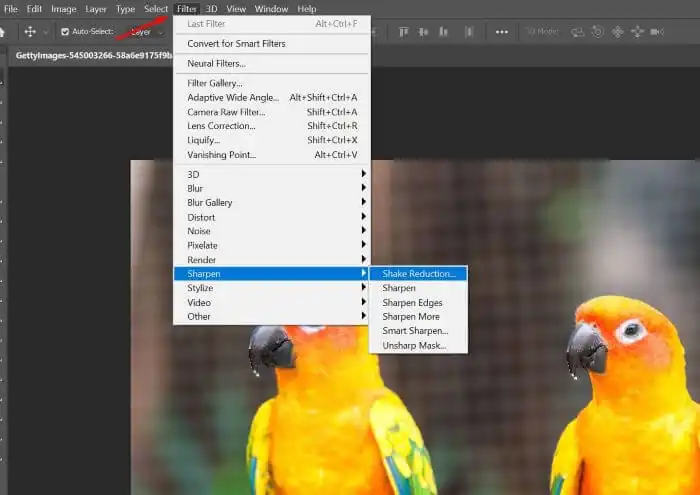
Survey your image to look for any regions with motion blur phenomena. That is relatable to components in movement, such as moving subjects or objects.
Get to the deblurring or shake reduction options in your software. Some programs may have particular filters outlined to tackle motion blur.
Take advantage of the tool’s parameters to control the intensity or strength of the deblurring. Be cautious to avoid overcorrection, which can lead to unnatural outcomes.
Apply the deblurring effect specifically to the distinguished zones with a motion blur appearance. Guarantee that the correction corresponds with your innovative expectations and improves the overall clarity of the image.
If accessible, explore extra settings such as directional blur adjustment or angle alterations. These alternatives can provide a more focused approach to addressing particular sorts of movement blur.
Frequently preview the picture as you make deblurring alterations. This permits you to survey the effect on motion blur reduction and overall picture quality. After you have a preview of your images, apply the changes to implement the correction.
Step 6: Regulating the Saturation
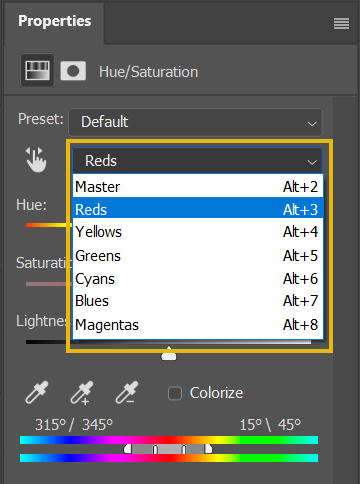
Locate the “Saturation” or “Hue/Saturation” setting tool to specifically improve or tone down the concentration of colors.
Distinguish the key colors in your image that relate to its visual story. Think about components such as dynamic skies, rich greenery, or the energetic tones inside a bustling scene.
Slowly increment the saturation parameter to heighten the energy of selected colors. Practice caution to preserve a normal appearance and dodge oversaturation.
Find the options to regulate individual hues if your software contains this feature. That lets you alter the particular color ranges within the picture.
Alternately, on the off chance that certain colors appear excessively strong, you can select to desaturate them slightly. This modification results in an adjusted and visually satisfying color palette.
Once done with the saturation tweaks, apply the changes to solidify the improved color warmth. This stage includes a layer of visual excitement to your mimicked shutter speed impact.
Step 7: Cropping the Necessary Details
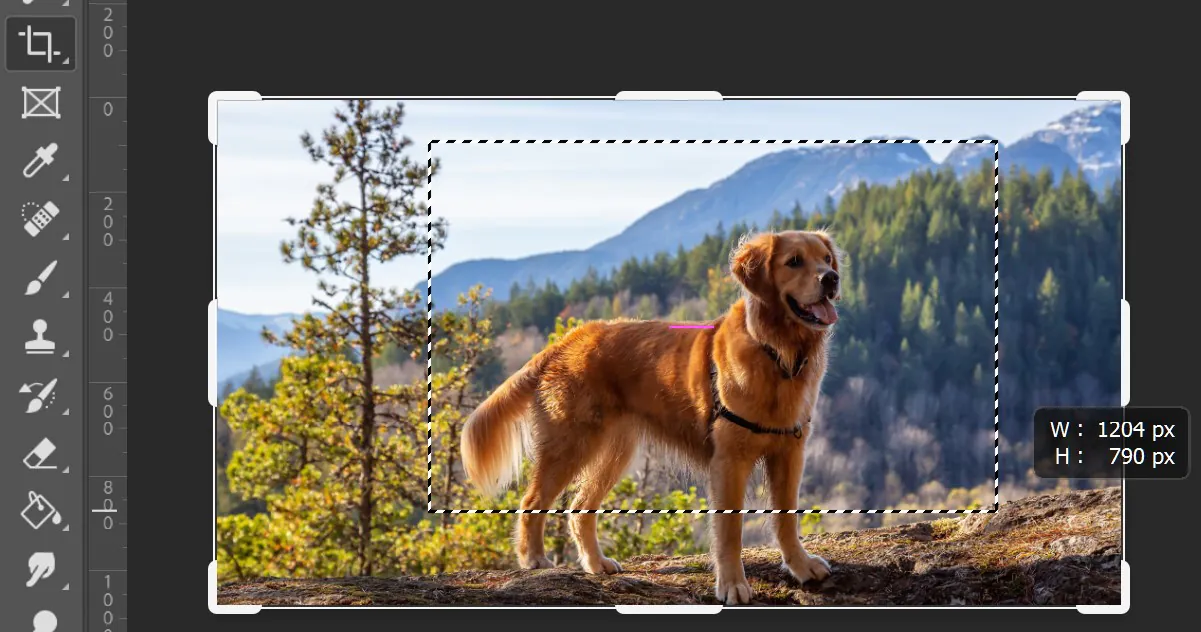
Head to the “Crop” tool to define a new outline for your composition, specifically including or excluding particular regions.
Decide the required angle proportion for your final composition. This phase can be significant if you are considering a particular output or format.
Move the cursor to drag and resize the crop box, shaping the new composition. Pay consideration to the arrangement of key components and employ the rule of thirds for a visually adjusted result.
If the image requires a little rotation for symmetry or inventive impact, some altering program give you the choice to rotate the crop box.
Take a zoom view to refine the composition, ensuring that the chosen outline emphasizes the energetic components inside the scene. Remove pointless components, which will diminish the expected effect.
During editing, try to preserve the resolution and overall quality of the picture for an engaging ultimate result.
Once agreed upon with the crop, apply the changes to solidify the refined composition. and expanding the visual narrative viewpoint of your effect.
Step 8: The Final Examination
Take a detailed survey of the image’s presentation. confirm that the overall brightness and contrast match your imaginative notion. Alter exposure settings if required to improve the tonal range.
Polish the brightness and contrast settings to attain a satisfactory and aesthetically compelling result. Think about subtle elements and shadow highlights for a tidy wrap-up.
Assess the color harmony and introduce small tweaks to the color temperature or tint to get a consistent and organic color palette.
Reexamine the sharpness of the image. perform any extra adjustments to sharpening settings to improve subtle elements without presenting relics.
If you observe any noise in your composition, apply noise reduction strategies. achieve a proper equilibrium to diminish noise without compromising picture clarity.
Take a break and assess the general composition of the picture. Make sure that each component is compatible with the visual concept you aim to communicate.
Once completed with the ultimate alterations, save your final image as a high-quality adaptation. Select a suitable file format and resolution to protect the validity of your work.
Conclusion
In conclusion, shutter speed images represent exciting frozen motion effects that often go unnoticed by the eyes. These images give viewers a realization of the beauty found in rapid-life moments. The organic appearance and rawness of the speed shutter effect bring naturalism and energy that are too eye-catching. Since the adjustments highlighted in this blog can emulate some characteristics of the shutter speed effect in your standard shutter photographs, it’s necessary to consider the conditions of shutter speed before snapping the shot for a more accurate shutter speed effect.
