How To Turn An Image Into Photographic Portraits
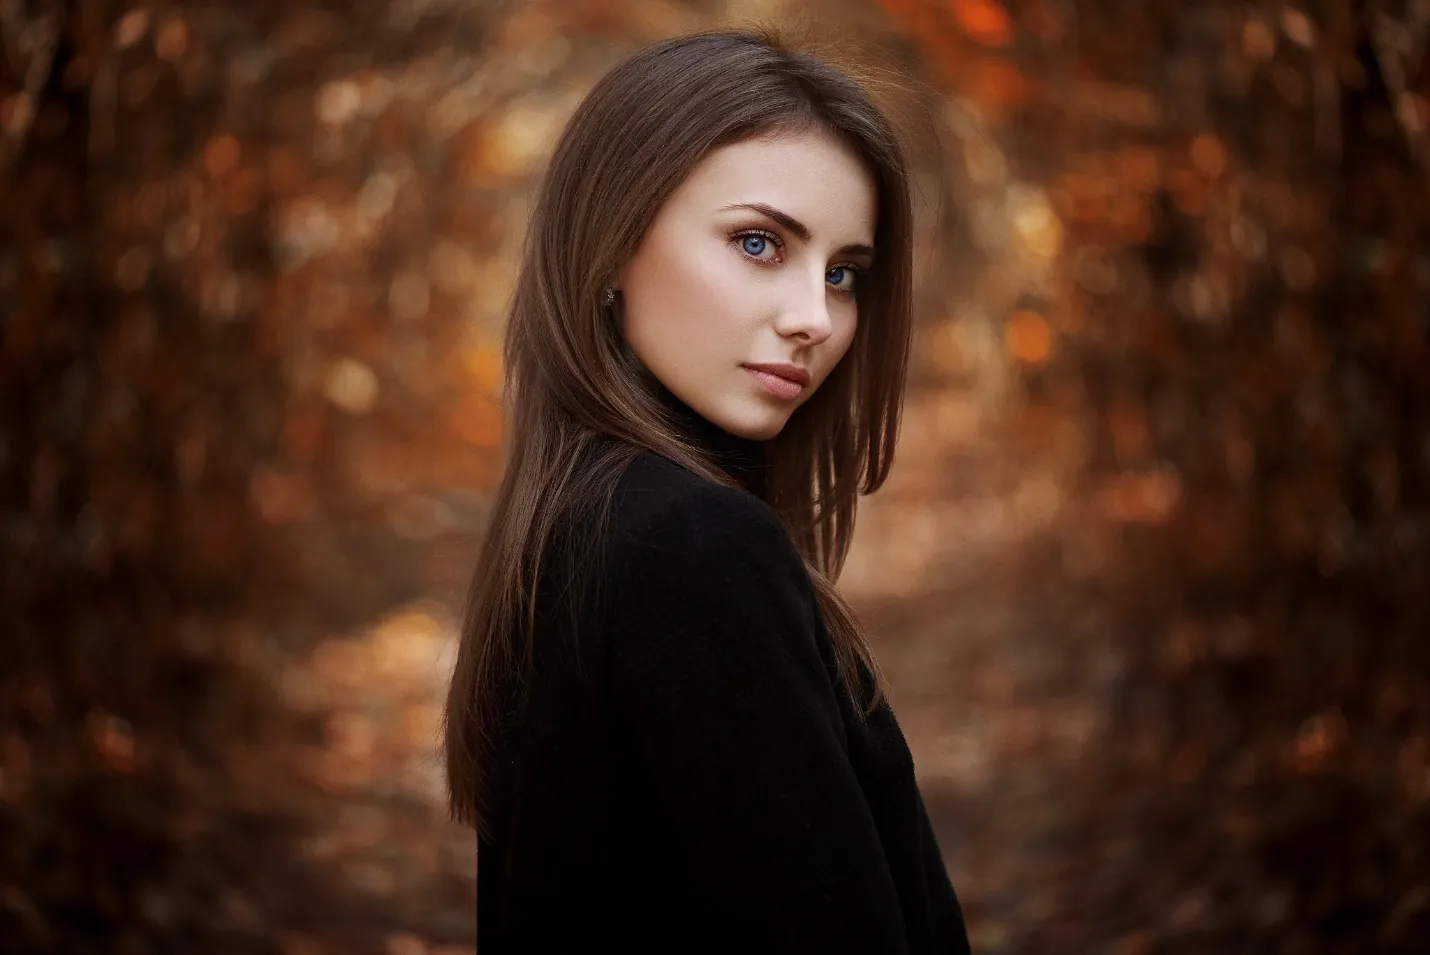
Photographic portraits are characterized by their sharpness, clarity, and well-defined details, essential to capture the subject’s features. A well-exposed portrait ensures proper lighting, a balanced distribution of light and shadows, and a realistic appearance. The subject’s skin tones, clothing, and surrounding environment should appear genuine. Many portraits rely on a short depth of field to keep the subject in focus. Simultaneously, the backdrop is purposefully blurred, producing a nice optical distinction between the subject and its surroundings. The positioning and arrangement of the subject within the frame of a photographic portrait incorporate aspects such as the person’s stance, facial expression, and overall balance and rhythm. The choice of background is also crucial in the composition of a photographic portrait. It should complement the subject and enhance the overall mood or story. After you comprehend what distinguishes photographic portraits, you can probe into the step-by-step process of transforming a picture into an exquisite photographic portrait. To turn your chosen photograph into a magnificent portrait that highlights the subject’s distinctive traits follow the procedures outlined in this blog.
Step 1: Select a Suitable Image
Choose an image you want to transform into a photographic portrait. Look for a photo with good resolution and clarity; these qualities will make it easier to work with and achieve desired results.
Consider the subject of the image—whether it’s a person, pet, or object—and ensure that it has distinct features or characteristics that can be highlighted in the portrait.
If you’re capturing a new image specifically for this purpose, focus on lighting and composition during the photoshoot. Ensure the subject is well-lit and positioned to suit the desired portrait style.
If you’re working with an existing image, ensure it meets the basic requirements and aligns with your vision for the final portrait.
Step 2: Assess and Plan
Start by carefully analyzing the selected image’s composition, lighting, and overall mood. Consider the subject’s pose, facial expression, and any elements in the background that may impact the final result.
Next, determine the style and desired outcome for the photographic portrait. Do you want a traditional, fine art, or lifestyle portrait? This decision will guide your editing choices.
Consider any necessary adjustments to the image. Are there areas that need cropping or straightening? Would altering the exposure, contrast, or color balance enhance the aesthetic?
Take note of any specific retouching needs, such as blemish removal or skin smoothing, to ensure a polished appearance.
Step 3: Cropping and Composition
Start by assessing the existing composition of the image. Look for any distracting elements, unnecessary background clutter, or off-center subjects. Determine if cropping can improve the overall balance and visual appeal.
Consider using the rule of thirds as a guide. Align critical elements or the subject’s eyes along the intersecting lines to create a visually pleasing composition.
Experiment with different cropping ratios, such as square or rectangular formats, to achieve the desired artistic effect.
Remember to maintain a balance between the subject and the surrounding space. Allow enough breathing room around the subject to draw attention and create visual interest.
Pay attention to the image’s resolution and ensure that the final cropped area retains sufficient detail and clarity.
Step 4: Adjust Exposure and Contrast
Begin by evaluating the image’s exposure. Is it too dark or too bright? Adjust the exposure settings to ensure that essential details are visible and the image has a balanced tonal range.
Next, work on fine-tuning the contrast. Increase or decrease the contrast to achieve a pleasing balance between highlights and shadows. That adds depth and dimension to the portrait.
Use the available tools in your chosen photo editing software to make these adjustments. These tools may include exposure sliders, curve adjustments, or tone mapping features.
Keep in mind the desired mood or style of the portrait. Adjusting exposure and contrast can significantly impact the image’s aesthetic and emotional impact.
Regularly evaluate the changes made, keeping the original image as a reference. Aim for a result that maintains natural-looking tones while enhancing the image’s visual impact.
Step 5: Color Correction and White Balance
Use color correction tools in your photo editing software to fine-tune the colors. Adjust the saturation, hue, and vibrancy to achieve a natural and appealing color palette.
Pay special attention to skin tones if the portrait includes people. Ensure that the skin appears realistic and healthy, without any unnatural undertones.
Address white balance issues to eliminate any color shifts caused by incorrect lighting during the photoshoot. Use the white balance adjustment tools to neutralize unwanted color casts and achieve a proper white balance.
Regularly compare your edits to the original image and make adjustments accordingly, striving for a result that looks visually pleasing and true to life.
Step 6: Retouching and Blemish Removal
Use the retouching tools in your photo editing software, such as the healing brush or clone stamp, to remove or reduce these imperfections. Take care to blend the edits perfectly with the surrounding skin for a natural result.
Pay attention to other areas that may benefit from retouching, such as flyaway hairs, stray threads on clothing, or wrinkles that may need softening.
Be cautious about retouching sparingly, as excessive smoothing or alterations can result in an unnatural appearance. Keep a balance between maintaining the subject’s unique features and achieving a polished look.
Step 7: Sharpening and Detail Enhancement
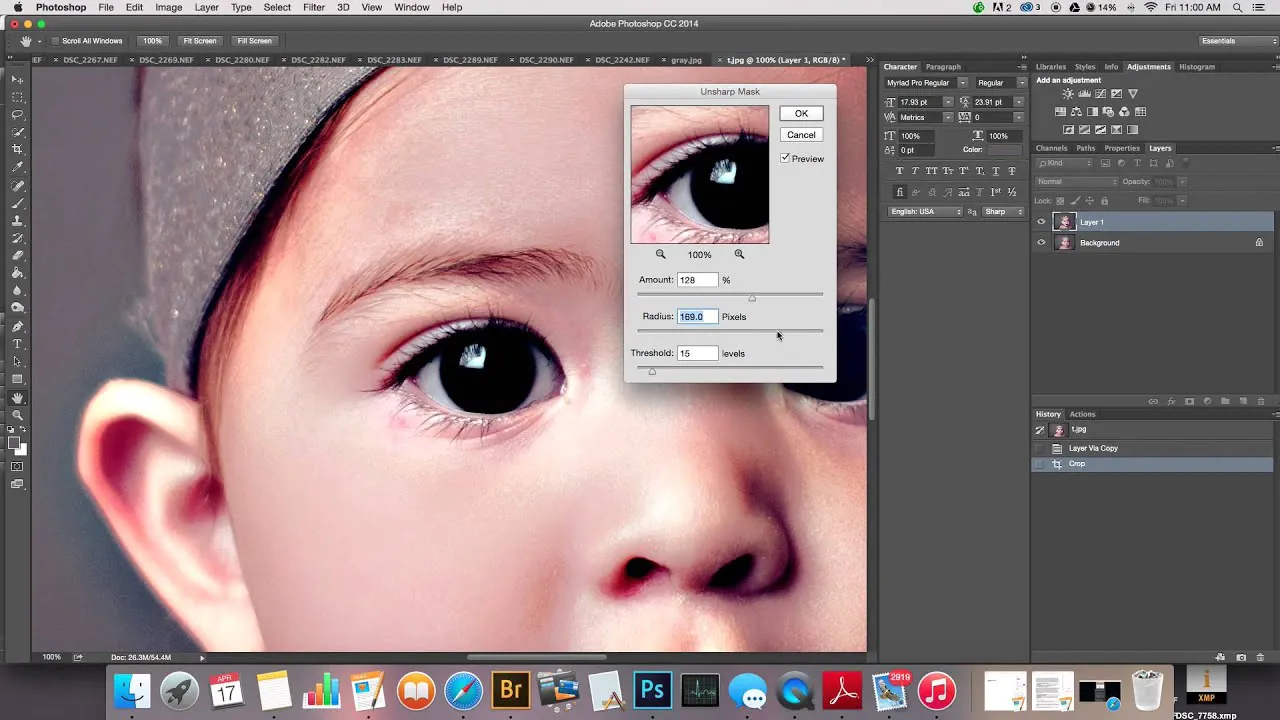
Assess the image’s overall sharpness. Apply sharpening techniques to enhance clarity and bring out important details if necessary.
Use the sharpening tools available in your photo editing software, such as sharpening filters or unsharp masks, to selectively enhance the image’s sharpness. Adjust the settings carefully to avoid introducing excessive artifacts or noise.
Pay attention to critical areas like the subject’s eyes, hair, and facial features. These areas often benefit from targeted sharpening to make them stand out and create a focal point.
Consider using techniques like dodging and burning to selectively enhance or darken specific areas of the image, further emphasizing the details and adding depth.
Regularly zoom in and out to assess the impact of your sharpening adjustments. Aim for a result that maintains a natural appearance while ensuring the image’s details are well-defined.
Step 8: Selective Editing
Identify areas of the image that could benefit from additional adjustments or enhancements. These areas could include the subject’s eyes, skin, hair, or other details.
Use the selection tools available in your photo editing software to isolate the desired areas for editing. That can be done through layer masks or adjustment brushes.
Experiment with different editing techniques and adjustments for example, you may brighten the eyes, enhance the color or smoothness of the skin, or add a definition to the hair.
Take a subtle and nuanced approach to maintain a natural appearance. It’s essential to balance enhancing the selected areas and ensuring they blend seamlessly with the rest of the image.
Regularly compare your edits to the original image to ensure that the enhancements contribute positively to the photographic portrait’s overall visual appeal.
Step 9: Background Enhancements
Evaluate the existing background and determine if any adjustments are needed. Look for elements that may distract or detract from the focus on the subject.
Consider blurring the background to create a shallow depth of field effect, which can help isolate the subject and create a more visually pleasing separation between the foreground and background.
Use tools like blur or selective focus features in your photo editing software to achieve the desired background effect. Adjust the strength and extent of the blur to find the right balance for your portrait.
If necessary, make color or tonal adjustments to the background to ensure it harmonizes with the subject and the overall mood of the portrait. That involves adjusting saturation and brightness or applying color grading techniques.
Be mindful of maintaining a natural appearance and ensuring the background enhancements enhance rather than overpower the subject.
Regularly evaluate the changes made to the background and how they contribute to the photographic portrait’s overall composition and visual impact.
Step 10: Final Touches
Review the entire image and make any necessary global adjustments to fine-tune the overall appearance. That includes tweaking exposure, contrast, or color balance to achieve a cohesive and balanced look.
Consider applying artistic effects or filters to add a touch of creativity or enhance the portrait’s mood. However, exercise caution to ensure that the effects complement the subject.
Evaluate the image and make any last-minute refinements to ensure a polished and professional result. Pay attention to small details like stray hairs, distracting elements, or minor imperfections that may have been overlooked.
Inspect the image closely to ensure all edits and enhancements are seamlessly blended with no visible artifacts or inconsistencies.
Take breaks and revisit the image with fresh eyes to gain a new perspective and make any final adjustments with a critical look.
Save the final portrait in an appropriate file format and resolution for its intended use, whether for printing, online display, or sharing on social media.
Conclusion
In conclusion, photography portraits, as opposed to merely snapping photos of a person, are a solid and effective approach to conveying the essence of a persona, acting as a window into the soul. They represent people’s emotions, personalities, and stories in one shot. They are a narrative medium that invokes moods and highlights brief stretches of time. Creating an intriguing photographic portrait takes a thoughtful and competent process. With adequate preparation and deep commitment, you can articulate your idiosyncratic style and make images that leave an imprint that endures.
