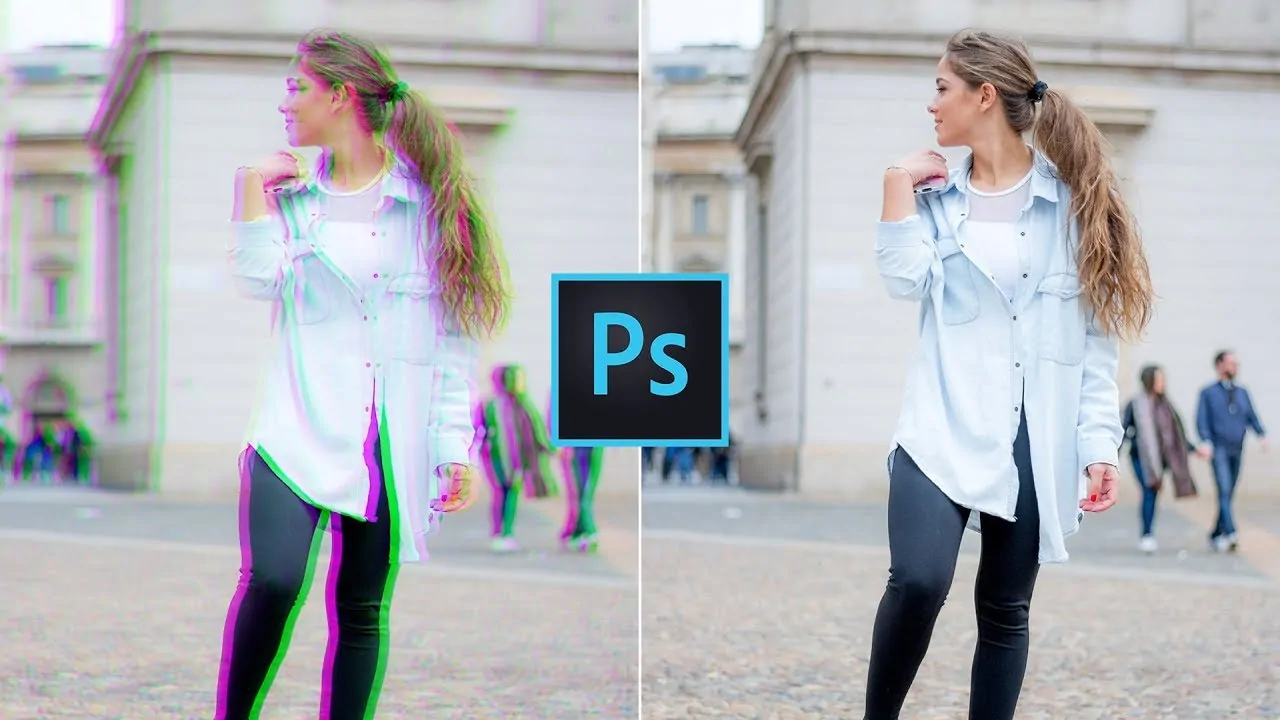
How To Remove Fringing From Images
Fringing is a kind of colour distortion which creates a distortive border-like the appearance of colours around objects in images. It frequently occurs near metallic surfaces or in areas with strong contrasts between light and dark elements, such as a black wall against a vivid blue sky. The outlines around the edges of objects bear varying colours due to various types of fringing. For instance, blue-yellow, red-green, or magenta-purple fringing can occur when a camera lens is unable to focus all of the wavelengths of white light into a single focal point. The best option to avoid fringing into photographs is when you start capturing images. Begin with using a high-quality lens, staying clear of wide-angle lenses, and shooting at a smaller aperture. Nevertheless, for the images that have already produced fringing or colour distortions, different digital tools like Adobe Photoshop and editing techniques can help you make them clear. The following are the steps to follow to remove fringing from your images and heighten the image clarity.
Step 1: Importing The Base Image
Initiate the Photoshop application from your PC’s desktop or application menu.
Tap on the File option, which is located at the top of the screen, to open the drop-down menu.
From the drop-down menu, select Open to start the file selection dialog.
Within the file dialog, scan through your folders to discover the photo you want to alter. You can likewise utilize the search function to find the image rapidly.
Press on the photo to select it. After that, tap the Open button within the dialog box to load the photo into Photoshop.
Your photo will presently show up within the main Photoshop workspace, prepared for editing.
As you continue with edits, intermittently save your work to prevent data loss.
Step 2: RGB Mode Conversion
Within your Photoshop screen, recheck that your picture is within the correct colour mode by checking the top menu.
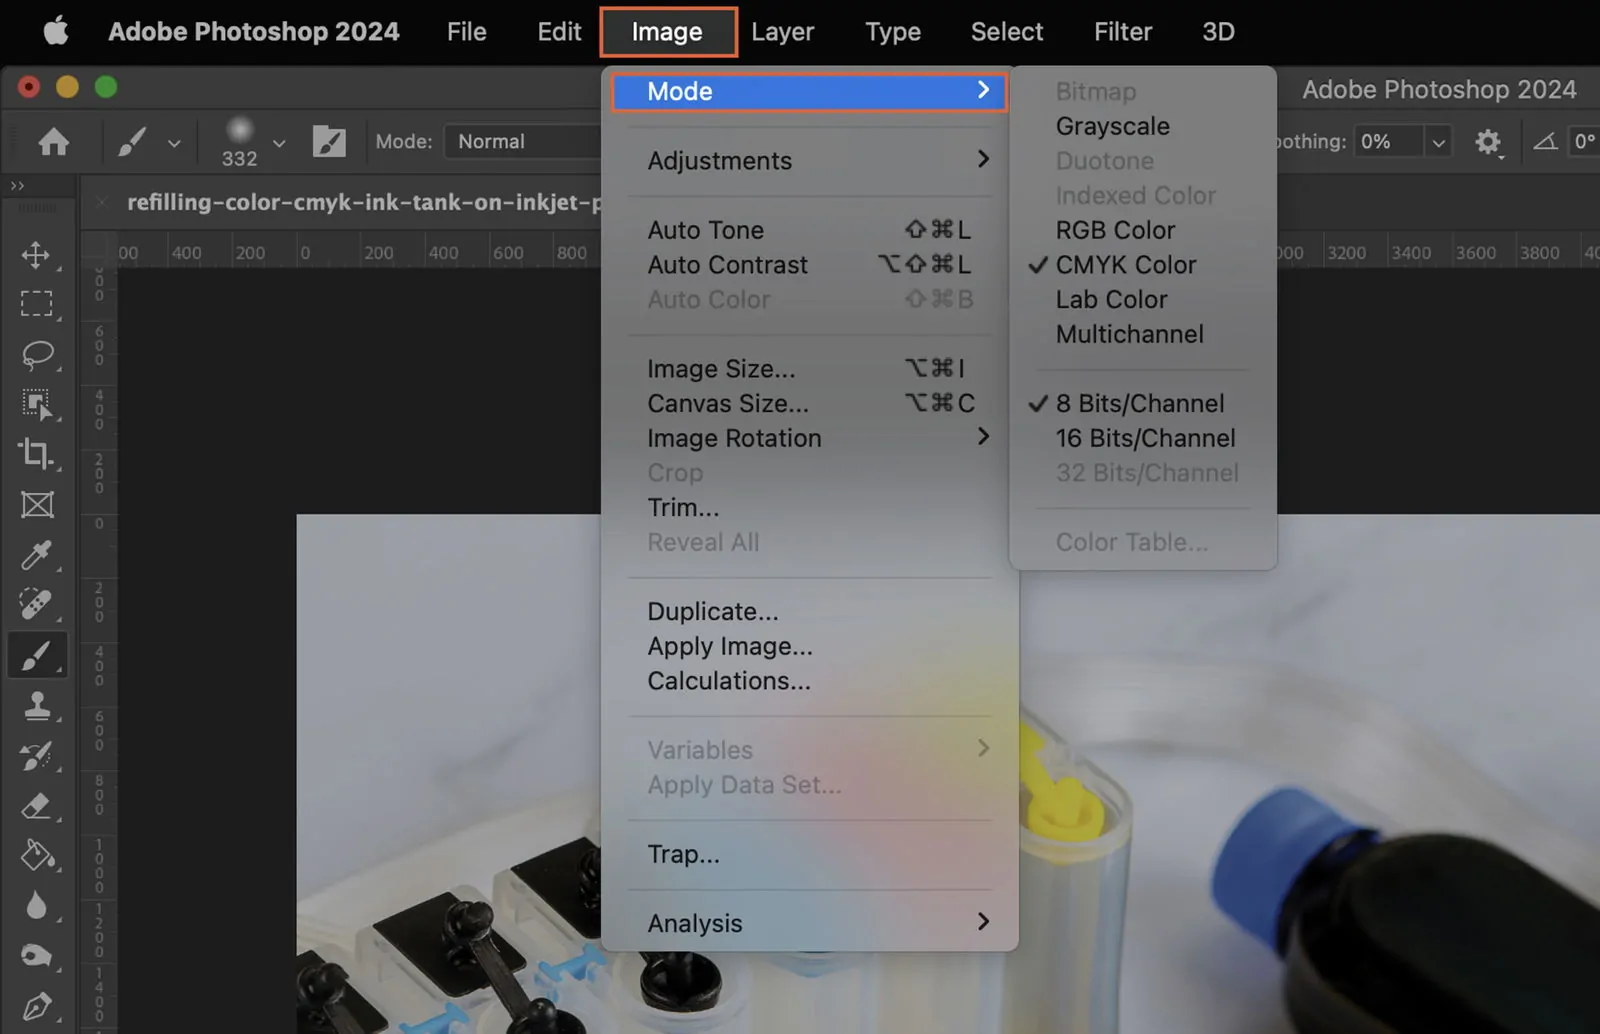
Tap on Image at the top of the screen to unlock the drop-down menu.
Get over the Mode option within the drop-down menu to uncover additional alternatives.
Check if RGB Color is chosen. RGB mode is fundamental for elementary colour corrections and image modifying errands in Photoshop.
If your photograph is in a different mode, like in CMYK or Grayscale, you can tap on RGB Color to change the image.
If you see some further options for confirmation, then you need to affirm the mode change. It will guarantee your photo is within the correct colour space for fringing disposal.
Along with your photo presently in RGB mode, you’re all set to proceed with the editing steps.
Step 3: Applying Lens Corrections
Within the top menu, tap on Filter to spread the drop-down menu.
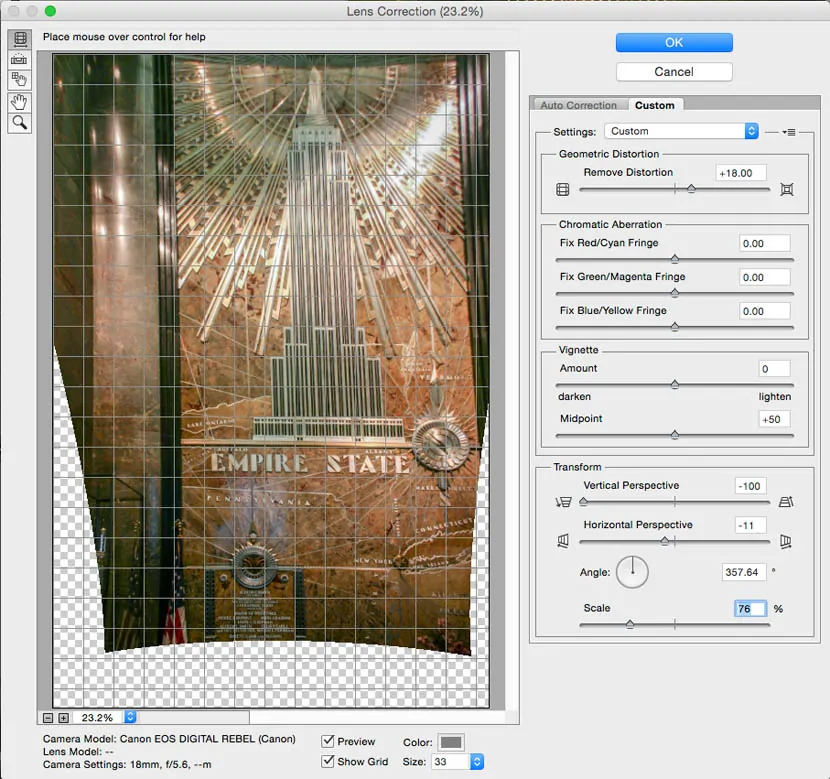
Inside the drop-down options, find and choose Lens Correction to open the Lens Adjustment dialog box. This feature is outlined to repair common lens twists, including chromatic distortion that causes fringing.
Inside the Lens Correction dialog, tap on the Custom tab. This tab gives manual control over different correction settings.
Watch the box tagged as Remove Chromatic Aberration. This alternative automatically applies an essential correction for fringing by tending to colour shifts caused by lens flaws.
Alter the Amount and Radius sliders if needed to polish the correction. The Amount slider holds the intensity, whereas the Radius slider influences the region around the edges.
Utilize the preview window to see the impact of the alterations on your image.
Once done, press Ok to apply the lens correction to your image.
Step 4: Removing Color Aberrations
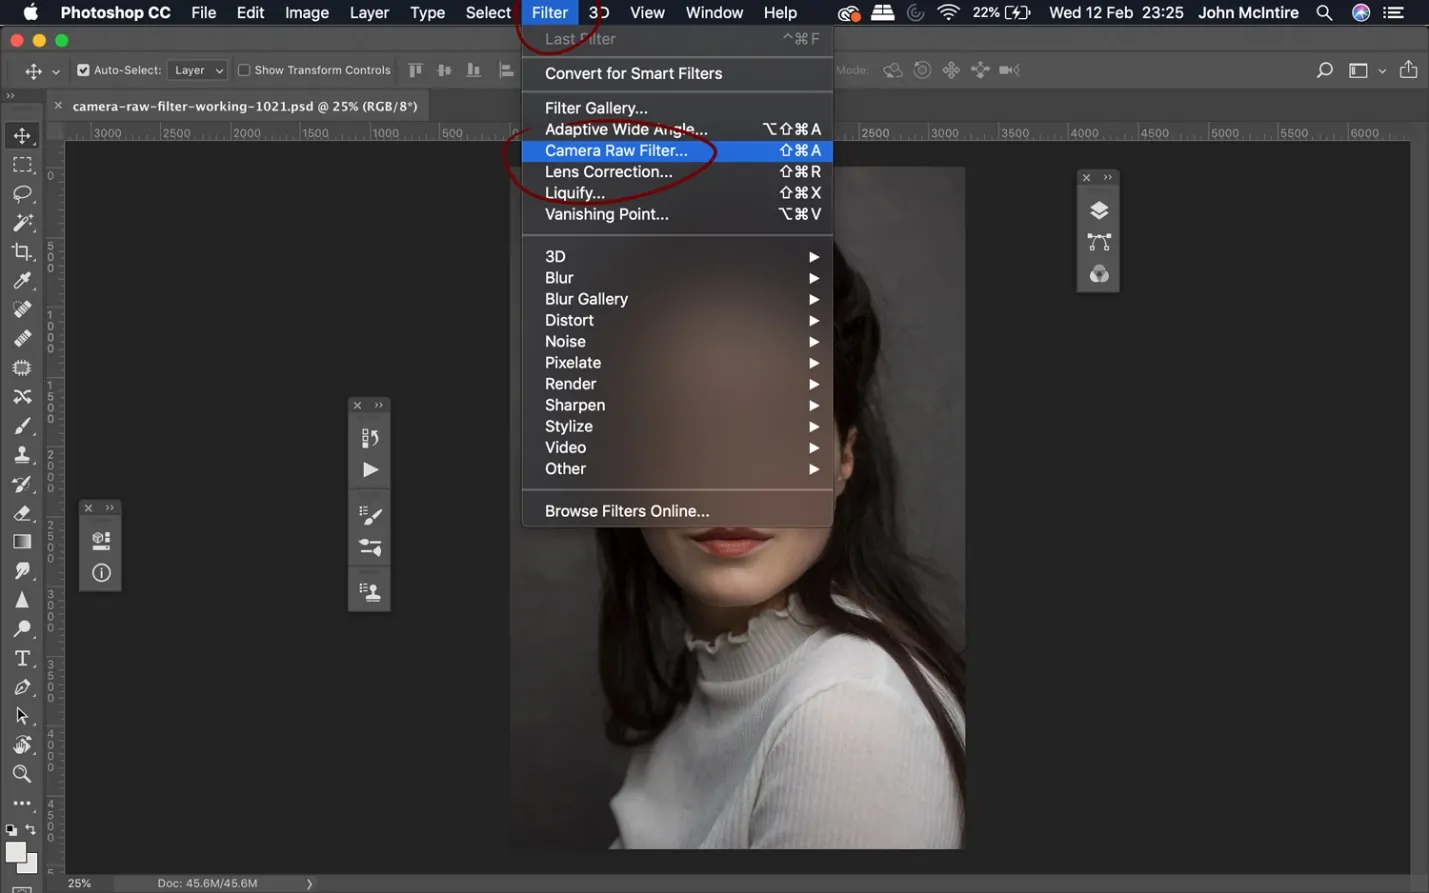
Within the top menu, click on Filter, and after that, select Camera Raw Filter from the drop-down menu choices. It will open your photograph within the Camera Raw interface, which presents effective tools for altering and correcting images.
Within the Camera Raw interface, find the panel on the right side. Tap on the Lens Corrections tab, depicted by a lens symbol, to get to options for lessening fringing and other distortions.
Look at the box labelled as Remove Chromatic Aberration. It can automatically apply a correction to diminish colour fringing caused by lens defects.
Head to the Color tab inside Lens Corrections. Utilize the Defringe sliders to adapt the correction:
Revise the intensity of de-fringing for purple or green fringes.
Regulate the range of colours involved.
Employ the preview highlight to catch the impact of your alterations.
Tap Ok to apply the corrections and get back to the primary Photoshop workspace.
Step 5: Manually Correcting Fringing
Within the toolbar on the left side of Photoshop, press on the Clone Stamp Apparatus. That feature permits you to manually paint over fringing by sampling clean zones of your picture.
From the options present at the top of the screen, set the brush size and hardness according to the range you’re operating on. Employing a smaller, softer brush can be a perfect choice for exact, mild corrections along the edges.
Press the Alt key and click on an adjacent zone that’s free of fringing to specify your source point.
Deliberately paint over the fringed ranges, utilizing the sampled pixels to mix and hide the unwanted colour fringes.
For more intricate regions, change to the Healing Brush Tool. This device automatically integrates the sampled region with the encompassing pixels for a more consistent correction.
Use the Zoom in on the affected zones to guarantee you’re precisely removing all imprints of fringing.
Routinely save your progress to avoid losing any detailed settings.
Step 6: Performing Levels Adjustment
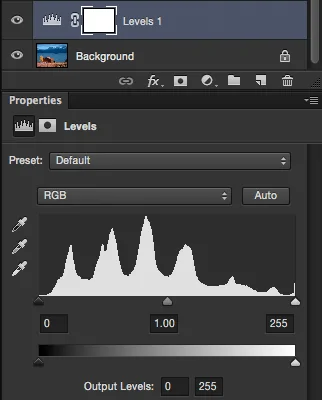
Proceed to the Image button to select Adjustments, and from the drop-down menu, select Levels to unlock the Levels adjustment dialog box. This highlight permits you to alter the brightness and contrast of your picture by adjusting the tonal range.
The Levels dialog shows a histogram, speaking to the distribution of tones in your picture. The left side speaks to shadows, the centre defines midtones, and the right side is for highlights.
Move the Shadow Slider slider to the right to darken shadows and decrease any remaining purple or green borders in darker zones.
Alter Midtone Slider to direct the overall brightness, guaranteeing a balanced contrast.
Pull the Highlight Slider to the left to illume the highlights and bring out subtle elements.
Make sure that your adjustments viably reduce any leftover fringing without over-altering the image.
Press Ok to execute the Levels alteration to your picture.
Save the modifications by getting to File > Save As to protect your edited picture.
Step 7: Final Assessment And Export
Utilize the zoom tool to closely look at your picture, focusing on ranges where fringing was most unmistakable. Look for any remaining colour fringes or imperfections that might require further correction.
Thoroughly inspect the image to guarantee that the corrections added in previous steps have kept up a consistent look over the whole photo. Give specific consideration to high-contrast edges where fringing is normally more discernible.
If you spot any remaining issues, reconsider the significant tools like the Clone Stamp Tool or Healing Brush Tool for zone-wise touch-ups. You can also return to the Levels Adjustment or Camera Raw Filter for more expansive corrections.
If you’ve utilized numerous layers for corrections, consider flattening them to streamline the picture file via Layer > Flatten Image.
Move to File > Save As to preserve your final, revamped image. Select a file format that serves your needs, considering JPEG for web usage or TIFF for high-quality prints.
Conclusion
In closing, the appearance of fringing into images overly affects images’ clarity and colour distribution, making them look blurry and causing unwanted colour distortions. Especially in professional shooting, it is a considerable issue which adversely affects image quality and gives a poor impression to clients. Though efficient photographic skills can help you avoid getting this into images, still, in case of misfortune or you couldn’t pay attention to any conventional guidelines, the advanced image enhancement alternatives can be quite helpful to regain your image’s clarity and retain the overall quality.


