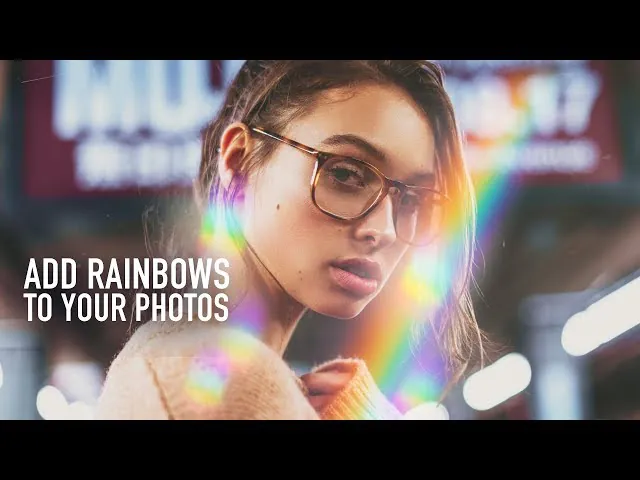
How To Produce A Rainbow Effect Picture
The rainbow effect adds ravishing color fringes to images and glorifies them, inculcating a natural touch and a sensation of enchantment and majesty. It creates a link between the actual and the fantasy, as if the photograph has recorded a wonderful moment that surpasses the confines of daily existence, imparting peace and harmony. In addition, the rainbow effect images highlight the beauty of variety and oneness as they reflect the richness of distinct fragments working together for a coherent and compelling whole, much like the colors of a rainbow coexisting happily. Besides providing visual excitement, your images, after adding the rainbow effect, also start acting as an emblem of the beauty found in diversity and the strength of unification in producing something exceptional.
Interested in learning how to produce this impressive effect and add an enticing atmosphere to your photographs? Follow these step-by-step instructions to turn your selected image into a work of art with a harmonious color palette and a sense of fun.
Step 1: Select the Right Image
Choose a high-resolution photograph with clear elements and good lighting.
Look for images with contrasting colors or well-defined subjects to emphasize the rainbow effect.
Consider landscape photos with visible horizons, portraits with distinct subjects, or images with ample open space.
Ensure the image has a composition that complements the addition of vibrant rainbow colors.
The selected image should have enough space to accommodate the rainbow effect without overwhelming the main elements.
High-quality images will yield better results when applying the rainbow effect.
A suitable image will be a strong foundation for creating a captivating rainbow effect picture.
Step 2: Open the Image in Editing Software
Launch your preferred image editing software, such as Adobe Photoshop or GIMP.
The software’s “Open” or “Import” function loads the selected image into the workspace.
Ensure you have the necessary tools and features, like layers and gradient tools, to apply the rainbow effect effectively.
Familiarize yourself with the software’s user interface to navigate the editing process smoothly.
Working with layers is crucial to maintain the original image while making edits on a separate layer for the rainbow effect.
Familiarize yourself with the tools necessary to create a gradient, which will be used to apply the rainbow colors seamlessly.
Saving the original image and creating a new project file ensures you can revert to the unaltered version.
Opening the image in the editing software marks the beginning of the creative journey to transform it into a visually enchanting masterpiece enriched by the captivating rainbow effect.
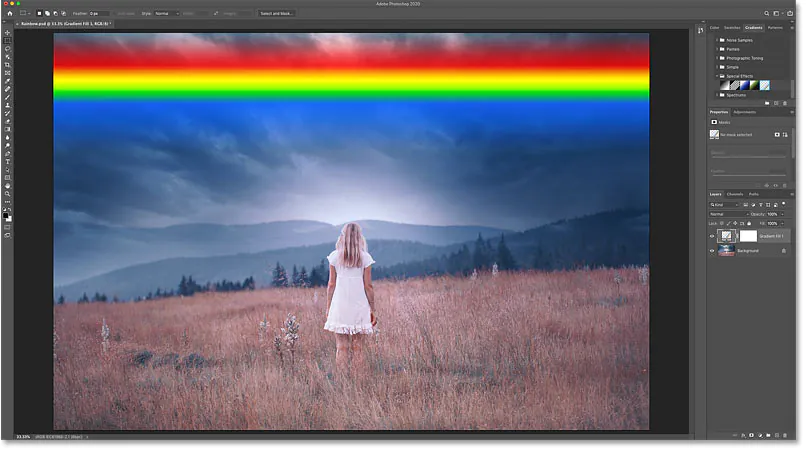
Step 3: Create a New Layer
In your chosen image editing software, locate the “Layers” panel or menu, and click on the option to create a new layer.
Creating a new layer ensures that the original image remains untouched while you work on the rainbow effect separately.
Name the new layer appropriately to distinguish it from the background layer, such as “Rainbow Gradient” or “Color Overlay.”
Ensure the new layer is positioned above the original image layer to apply the rainbow effect.
Utilizing layers allows you to experiment and adjust without permanently altering the base image.
Remember that you can control the opacity, blending modes, and other effects to fine-tune the rainbow’s appearance when working with layers.
Understanding how to manage layers enables you to add other effects or elements to the image while maintaining flexibility in your editing process.
Creating a new layer marks a crucial step in crafting a visually captivating rainbow effect picture, combining creativity and technical expertise to achieve an enchanting and harmonious result.
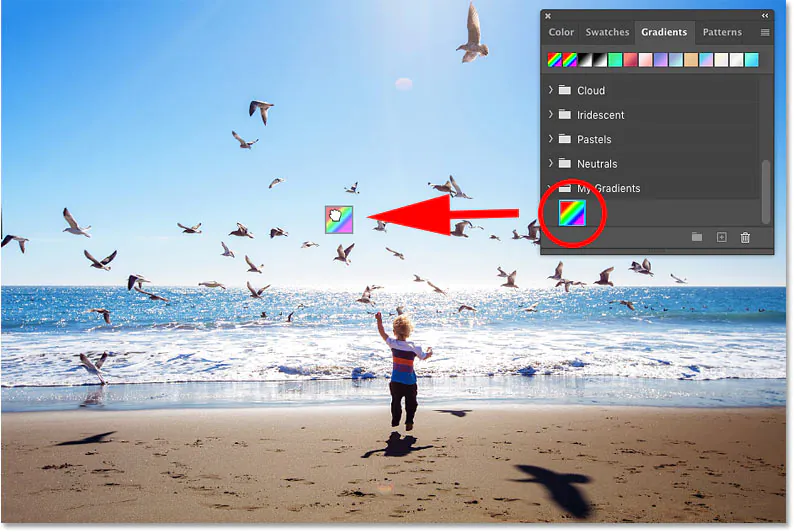
Step 4: Add a Gradient
Access the gradient tool in your image editing software with the new layer selected.
Choose a linear gradient style to apply the rainbow effect horizontally or vertically, depending on your image’s composition.
Select the colors representing the rainbow spectrum, typically starting with red and smoothly transitioning through orange, yellow, green, blue, indigo, and ending with violet.
Apply the gradient on the new layer, ensuring it covers the entire image or specific areas where you want the rainbow effect to appear.
Experiment with the gradient’s positioning and length to achieve the desired placement and intensity of the rainbow colors.
Some image editing software allows you to customize the gradient by adjusting color stops and opacity, providing more creative control over the rainbow effect.
Pay attention to how the gradient interacts with the underlying image, aiming for a seamless blend that enhances the photo’s visual appeal.
Adding the rainbow gradient sets the stage for a vibrant transformation, breathing life into the image and setting the tone for the enchanting effect.
Step 5: Set the Blend Mode
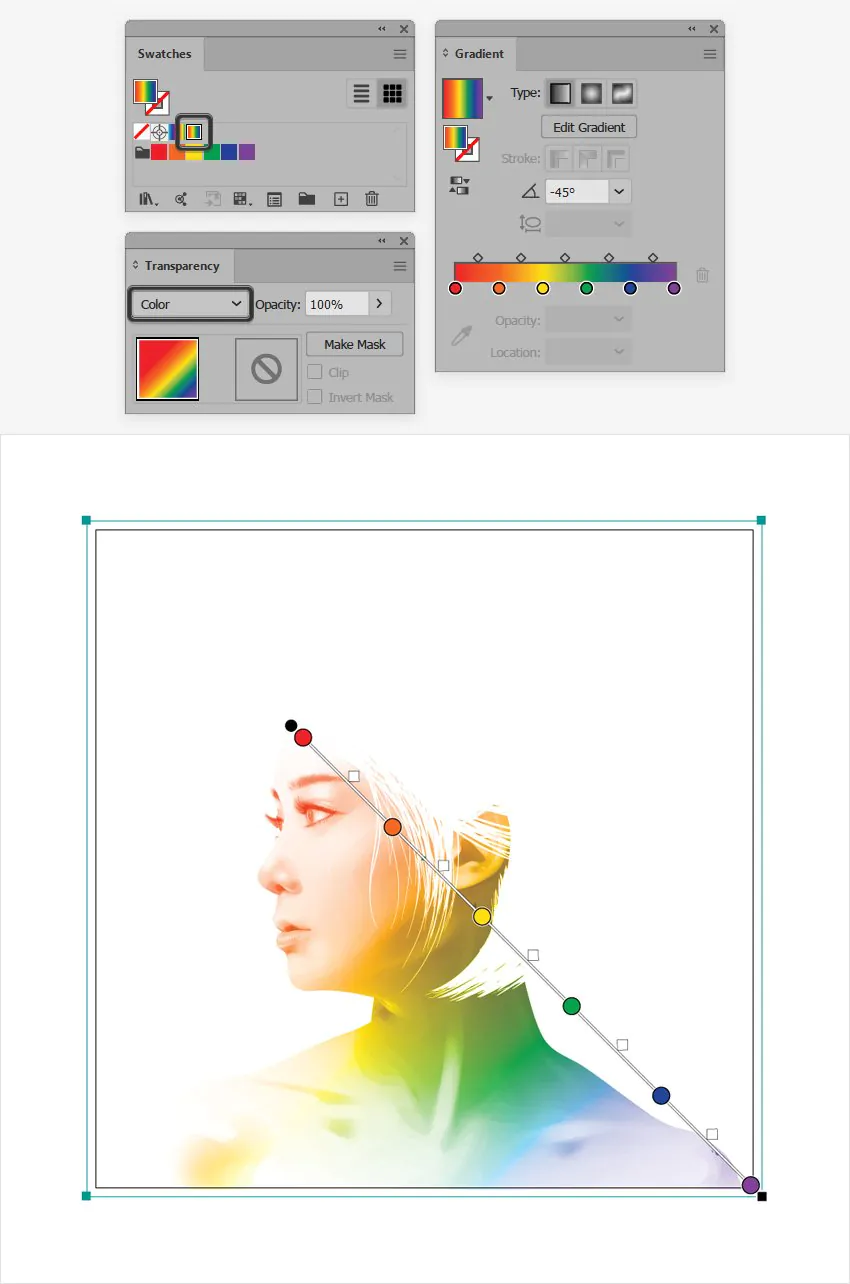
With the rainbow gradient layer still selected, navigate to the “Blend Mode” settings in the layers panel or menu.
Experiment with different blend modes such as “Screen,” “Overlay,” or “Soft Light” to achieve the desired blending effect.
The chosen blend mode will determine how the rainbow colors interact with the underlying image.
“Screen” mode brightens the colors, while “Overlay” and “Soft Light” add depth and contrast, enhancing the vibrancy of the rainbow effect.
Observe how each blend mode impacts the image’s overall appearance and choose the one that best complements your creative vision.
Adjust the opacity of the rainbow gradient layer if needed to fine-tune the intensity of the effect.
Balancing the blend mode and opacity ensures a natural integration of the rainbow colors with the original image, avoiding an overpowering or artificial look.
Setting the blend mode is a pivotal step that brings the rainbow effect to life, imbuing the picture with enchanting hues and weaving together the elements of magic and artistry.
Step 6: Adjust Opacity and Fine-Tune
With the rainbow gradient layer still selected, access the opacity slider or text box in the layers panel.
Gradually adjust the opacity of the rainbow layer to achieve the desired level of subtlety or prominence for the effect.
A lower opacity value makes the rainbow colors more transparent, blending gently with the original image, while a higher value intensifies the effect.
Pay attention to the image’s overall look and feel, ensuring the rainbow effect enhances rather than overwhelms the composition.
Consider the mood and theme of the image; a softer rainbow effect may suit a peaceful landscape, while a more vibrant effect may suit a celebratory or fantastical scene.
Fine-tune any other adjustments, such as color balance or saturation, to maintain cohesion between the rainbow colors and the existing elements in the image.
Step back occasionally to assess the progress and make any necessary tweaks to achieve the desired outcome.
By carefully adjusting the opacity and fine-tuning the effect, you ensure the rainbow enhances the image’s visual allure, complementing the natural touch and enchantment it brings to life.
Step 7: Review, Save, and Share
Take a moment to review the final result of your rainbow effect picture. Zoom in and inspect the details to ensure everything looks seamless and visually appealing.
Compare the edited image with the original to evaluate the impact of the rainbow effect and how it has transformed the overall composition.
If you’re satisfied with the result, save the edited image in a high-quality format such as JPEG or PNG. Consider creating a copy to preserve the original unedited version.
Give your artwork a descriptive and creative title that reflects the mood and theme of the image, along with the magical rainbow effect.
Share your masterpiece with others to spread joy and enchantment. Post it on social media platforms, photography forums, or personal portfolios to showcase your creativity and receive feedback.
Embrace the learning process and consider experimenting with different images, colors, and compositions to refine your skills and create more captivating rainbow effect pictures.
Enjoy the voyage of artistic creation and let your imagination fly as you discover the limitless possibilities of the rainbow effect in adding visual enchantment and grandeur to your images.
Tips for Creating Mesmerizing Rainbow Effect Pictures:
Under this heading, you can list the points in bullet form as we’ve done previously:
Experiment with colors, saturation, and opacity for captivating results.
Mind the composition to ensure the rainbow effect complements the image.
Consider the mood you want to convey – subtle for serenity, bold for drama.
Practice and refine your technique with different images.
Use gradual transitions for a natural effect.
Get inspired by other artists’ work and adapt their techniques.
Believe in your intuition and enjoy the freedom of artistic expression.
Finally, confidently create visually enchanting and harmonious rainbow effect pictures. Happy editing!
Conclusion:
In summary, producing a rainbow-effect picture gives you a feeling of possessing some mysterious supernatural powers that can develop vigor and glamour for your image transformation. Though waiting for the natural occurrence of the rainbow to capture a shot has its acute charm, a rainbow effect image manipulation facilitates adding those natural effects at any time, place, and on any image. As you strive to illustrate the beauty of rainbows in your images, you must be conscious of minute details throughout the process so that your final composition inspires amazement and renders delight for all who encounter them.
