How To Edit High-Contrast Images
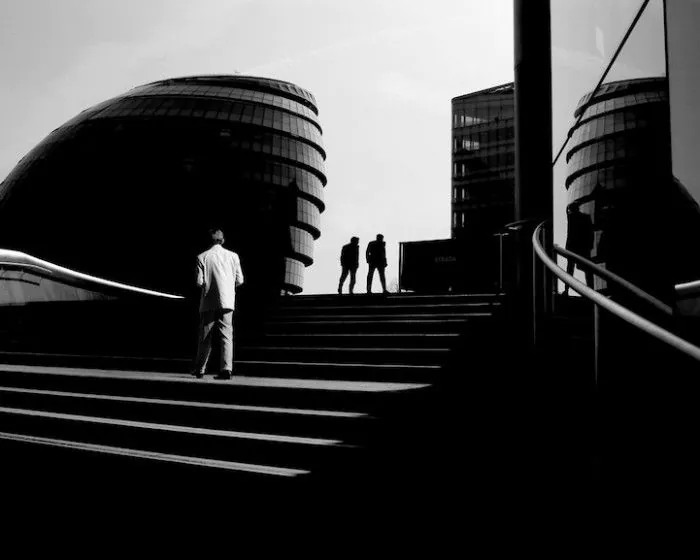
High-contrast images display a sharp difference between the brightest and darkest areas, following diverse tonal ranges of black, white, and sometimes gray shades. The strong contrast aspect of these images intensifies the subject matter and other elements, thus flashing an impactful temperament. Plus, high-contrast photographs have better visual clarity. The high contrast between the brightest whites and deepest blacks breeds great defining qualities, inviting the subject to overhang with extraordinary clarity. This trait is very effective in portrait photography since it can accentuate facial gestures, emotions, and specifics, leading to engaging and unforgettable images. High-contrast images also possess graphic dimensions by plainly distinguishing between dark and light parts and producing bold lines, graphic shapes, and patterns. To edit high-contrast images, you need to carefully balance the intensity of both main shades and avoid overdoing them so that you do not fully diminish the essential details of the image. Using post-processing steps, as mentioned in this blog, you can adjust levels, contrast, exposure, and tonal values and deepen the high-contrast effects of your images.
Step 1: Adjust Exposure
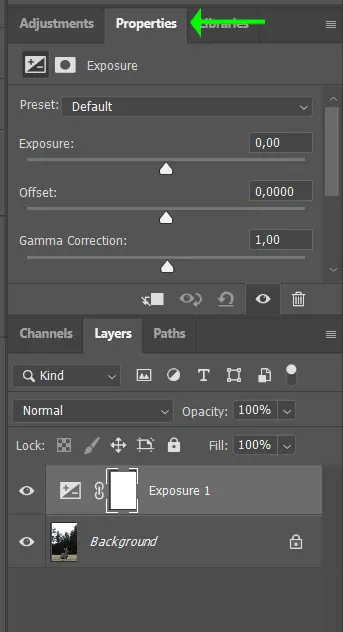
In this initial step, the focus is on adjusting the overall exposure of the high-contrast image to establish a balanced foundation. The goal is to ensure that the image is neither too bright nor too dark, providing a proper starting point for subsequent editing.
Assess the Histogram: Examine the image’s histogram, which displays the distribution of tonal values. Identify any peaks on the far left (indicating underexposed areas) or far right (indicating overexposed areas).
Basic Exposure Adjustment: Use exposure controls to brighten or darken the image globally. Increase exposure to bring out details in dark areas or decrease it to retain highlights.
Preserve Essential Details: Ensure vital details, especially in highlight and shadow regions, are preserved during exposure adjustment. Be cautious not to cause clipping in these areas.
Evaluate Visual Impact: Continuously review the image’s visual impact during exposure adjustment, aiming for an optimal balance between brightness and darkness to support the high contrast effect.
Step 2: Enhance Contrast
Building upon the balanced exposure from the previous step, the next focus is on intensifying the contrast to create a visually striking high-contrast effect. By increasing the differentiation between the brightest whites and deepest blacks, this step accentuates the drama and impact of the image.
Contrast Adjustment: Use the contrast slider or controls in photo editing software to increase the differentiation between highlights and shadows. That will make the bright areas appear brighter and the dark areas darker.
Gradual Changes: Avoid extreme contrast adjustments that may result in loss of details or overly harsh transitions. Instead, make gradual changes to achieve a more natural yet impactful contrast.
Preserve Texture and Detail: While increasing contrast, ensure that essential textures and details in the image are retained. Avoid excessive contrast that could lead to loss of texture in highlight or shadow regions.
Consider the Subject: Be mindful of the subject matter and the intended mood of the image. The level of contrast applied should complement and enhance the subject’s characteristics and the overall story of the image.
Review Impact: Regularly review the image’s visual impact during contrast enhancement, aiming for a balance that intensifies the drama without overwhelming the composition.
Step 3: Manage Highlights and Shadows
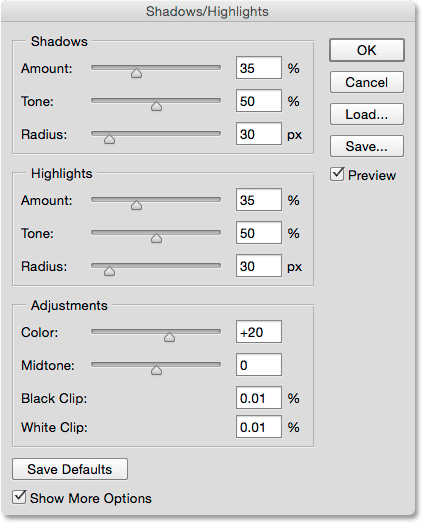
With the contrast-enhanced, the next crucial step is carefully managing the highlights and shadows in the high-contrast image. That ensures that details in the brightest and darkest areas are preserved, creating a balanced composition that retains visual clarity and depth.
Highlight Recovery: Use highlight recovery tools or adjustments to reclaim details in overexposed or blown-out areas. Gradually bring back information in these regions to restore essential highlights.
Shadow Lifting: Employ shadow lifting techniques to brighten underexposed areas and reveal hidden details. Gradually lighten shadow regions to enhance the overall visibility without compromising the high contrast effect.
Avoid Clipping: While adjusting highlights and shadows, keep a close eye on the histogram to prevent clipping. Ensure that no tonal values reach the extreme ends of the histogram, which may result in a loss of details.
Retain Contrast Balance: Maintain the overall contrast balance while managing highlights and shadows. Ensure the high contrast effect remains intact even as you recover details in both extremes.
Fine-Tune with Local Adjustments: Use brushes or masks to apply selective adjustments to specific image areas. That allows for targeted adjustments in highlight and shadow regions, ensuring precise control over the image’s tonal range.
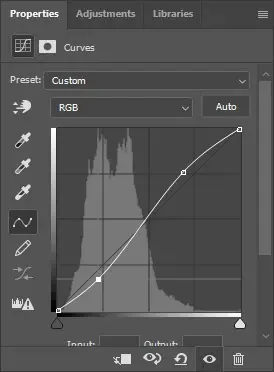
Step 4: Utilize Curves Adjustment
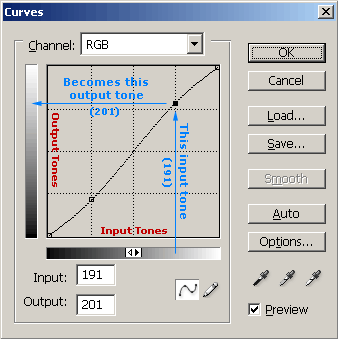
In this step, the focus shifts to using curve adjustment to fine-tune the tonal range of the high-contrast image. Curves provide a more nuanced control over highlights, mid-tones, and shadows, allowing for targeted adjustments that enhance the image’s visual impact and overall composition.
Access Curves Panel: Open the curves adjustment panel in your photo editing software. This panel typically displays a graph representing the image’s tonal distribution.
Adjust Highlights: On the curves graph, slightly lift the top right corner to brighten the highlights. That increases the brightness of the lightest areas without affecting the mid-tones or shadows.
Enhance Shadows: Lower the bottom left corner of the graph slightly to darken shadows. That intensifies the contrast in darker areas while keeping the highlights and mid-tones unchanged.
S-Curve Adjustment: Create an S-shaped curve for a classic high-contrast look by gently raising the top-right corner and lowering the bottom-left corner. That adds more contrast to the mid-tones, creating a visually striking effect.
Preserving Midtone Balance: Be mindful not to overdo the adjustments, which could lead to unnatural or harsh contrast. Aim to balance highlights, mid-tones, and shadows for a cohesive and visually appealing image.
Evaluate and Refine: Regularly review the image’s tonal balance during the curves adjustment process. Make subtle tweaks to achieve high contrast while preserving essential details.
Step 5: Saturation and Hue
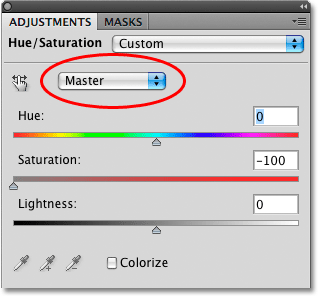
For high-contrast color images, the focus shifts to adjusting the saturation and hue to complement the intensified contrast effect. Carefully manage color vibrancy and tones to enhance the overall visual appeal without introducing unnatural color shifts.
Saturation Adjustment: The saturation slider or controls adjust the color intensity. Increase saturation slightly to make colors more vibrant and lively, adding visual interest to the image.
Hue Fine-Tuning: Consider fine-tuning the hue of specific colors to match the mood and subject matter. Make subtle adjustments to create harmonious color combinations that complement the high contrast effect.
Avoid Oversaturation: Be cautious not to oversaturate the image, as it may distract from the high contrast impact. Maintain a natural and balanced color representation while enhancing the visual appeal.
Step 6: Selective Local Adjustments
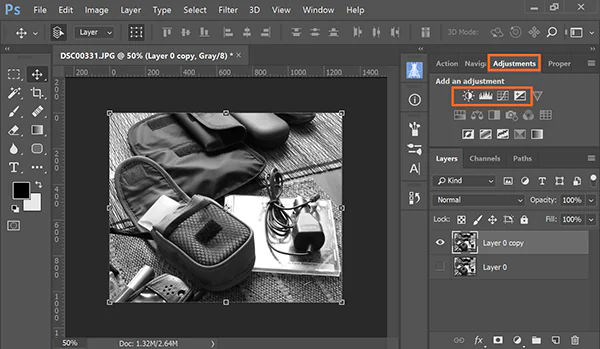
In this step, apply selective local adjustments using brushes or masks to enhance specific areas of the high-contrast image further. This technique allows for targeted modifications, drawing attention to essential elements within the composition.
Darkening Specific Areas: Use brushes or masks to darken specific regions to add depth and drama. This technique can draw the viewer’s eye towards the subject or lead them along a visual path within the image.
Lightening Focal Points: Selectively lighten areas of interest to create emphasis and visual balance. This technique can guide the viewer to significant details or create a focal point within the composition.
Step 7: Check for Clipping
Continuously monitor the high-contrast image for any highlight or shadow clipping, which can lead to losing essential details. Clipping occurs when certain tonal values reach the extreme ends of the histogram, resulting in areas without any texture or information. Make subtle adjustments to ensure the tonal values remain within the visible range, preserving critical information in bright and dark areas. The image retains its visual appeal by avoiding clipping and ensuring no vital elements are lost.
Step 8: Revisit with Fresh Eyes
After editing, take breaks and revisit the high-contrast image with fresh eyes. Stepping away from the image allows you to gain a more objective perspective and reevaluate the composition. This step ensures that the high contrast effect and overall visual impact align with the desired creative objectives. By revisiting the image with a fresh perspective, you can make final adjustments to achieve the intended mood and visual intensity.
Step 9: Experiment with Styles
This final step encourages exploring different editing styles and techniques to achieve a unique and artistic interpretation of the high-contrast image. Playful experimentation can produce unexpected and visually stunning results, uniquely expressing the subject. Try different adjustments, filters, or creative effects to see how they affect the image’s mood and visual impact. Experimenting with various styles allows for discovering new artistic possibilities and contributes to developing a personal editing style.
By following these steps, photographers and artists can achieve powerful, impactful high-contrast images that captivate viewers and convey a compelling visual narrative. The careful balance of exposure, contrast, tonal adjustments, and color management results in a visually striking composition that leaves a lasting impression on audiences.
Conclusion
High-contrast images hold great importance in featuring the main photo subject and its immediate visual impact. They can effectively intercommunicate with the audience by conveying to them a sense of both thrilling drama and serene tranquility together in a single frame. This duality of impressions further exceeds when high-contrast images go through skillful post-processing and become more accomplished in story-telling and visual terms. Thus, your images aim for advertising, or personal graphics get more geared up to contact viewers more intimately.
