How to pixelate your images
Pixelating an image is an authentic, practical tool for sheltering information while still conveying a general visual context. It involves the manipulation of visual clarity and detail by replacing smaller portions, known as pixels, with larger and more compact elements. This technique is often used to obscure sensitive or private information in images while retaining a basic representation of the original content. The pixelation effect essentially blurs or distorts the image’s finer details, making it challenging to discern specific information. When an image is pixelated, individual pixels lose their distinct characteristics and merge with adjacent ones, forming larger, less detailed blocks. This can be likened to looking at an image through a grid or mosaic, where the original features become less recognizable. The technique is useful in situations where privacy or anonymity are critical. A popular use case is blurring faces or licence plates in images to safeguard people’s identities or sensitive data. Additionally, pixelation is occasionally used as an aesthetic effect in photos to generate a feeling of abstraction or fun.
Step 1: Open the Image
Commence your pixelation by launching your preferred image editing software. The pivotal objective at this juncture is to secure access to the specific image you have earmarked for pixelation. This foundational step carries considerable weight, as it effectively lays the groundwork upon which the entire pixelation endeavor will be constructed.
Within the interface of your chosen software, anticipate encountering a range of avenues to facilitate the opening of your image file. These pathways may manifest in the form of accessible menu options, prominently positioned toolbar buttons, or even the convenience of keyboard shortcuts at your fingertips. As you deftly navigate this initial phase, your selected image will swiftly grace the editing workspace, poised and ready for the forthcoming stages that will unfold in your pixelation voyage.
Precision is paramount during the execution of this opening step, as its flawless accomplishment serves as the cornerstone for an efficient, seamless, and ultimately successful pixelation process. In essence, this process assumes the role of sculpting the bedrock upon which your pixelation endeavor thrives and flourishes.
Step 2: Precise Area Selection for Pixelation

Pixelating an image involves strategic area selection to ensure the pixelation effect is applied exactly where intended. Follow these steps for accurate selection:
Locate Selection Tools: Identify and acquaint yourself with the available selection tools in your image editing software.
Choose the Right Tool: Depending on the area’s shape, opt for tools like rectangular marquee, lasso, or magic wand.
Start Selection: Begin the selection process by clicking or dragging, based on the chosen tool.
Refine the Selection: Use the tool’s options to adjust and fine-tune the selection for precision.
Smooth Edges: Utilize the “feather” or “smooth” option to soften selection edges for seamless blending.
Confirm Accuracy: Double-check the selection to ensure it covers the intended area precisely.
Step 3: Applying the Pixelation Effect
![]()
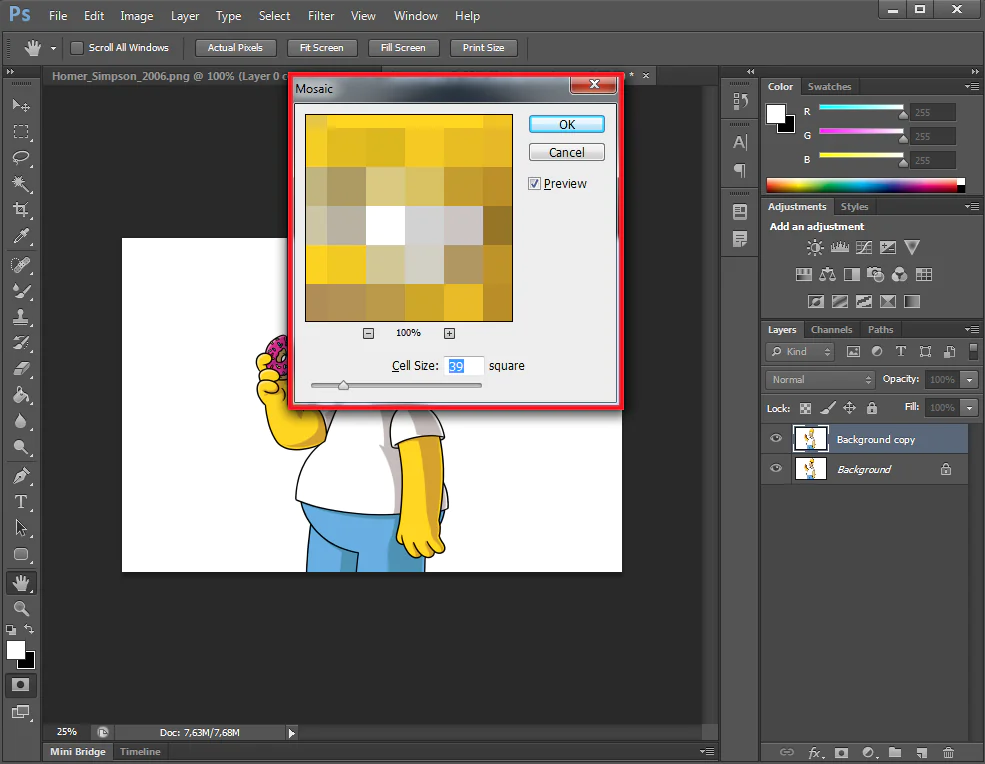
After precisely selecting the area for pixelation, the next stage involves applying the pixelation effect. This effect will transform the selected area into a mosaic of larger blocks, reducing its detail while maintaining its basic visual representation. Here’s how to proceed:
Locate Pixelation Tool: Within your image editing software, navigate to the pixelation or mosaic tool. This tool might be labeled as “Pixelate” or “Mosaic.”
Apply the Effect: Once you’ve accessed the pixelation tool, apply it to the area you’ve previously selected.
Adjust Block Size: Depending on the software, you may have the option to adjust the size of the pixel blocks. Larger blocks result in a more pronounced pixelation effect.
Preview the Effect: Before finalizing the pixelation, preview the effect to ensure it meets your expectations. This allows you to make any necessary adjustments.
Confirm and Apply: Once satisfied with the preview, go ahead and apply the pixelation effect to the selected area.
Save Your Work: Remember to save the edited image as a new file to preserve the original. This ensures you can always revert to the unaltered version if needed.
Step 4: Preview and Adjust the Pixelation Effect
After applying the pixelation effect to the selected area, it’s essential to preview the result and make any necessary adjustments for optimal outcomes. Here’s how you can effectively manage this stage:
Inspect the Pixelation: Take a close look at the pixelated area to gauge the level of detail reduction and how well it aligns with your intended outcome.
Zoom In and Out: Utilize the zoom function in your image editing software to inspect the pixelation at different levels of magnification. This helps ensure the effect looks balanced across various viewing scales.
Check for Clarity: Confirm that the pixelation achieves the desired level of obscuration while maintaining basic visual representation. The balance between pixel size and clarity is crucial.
Make Adjustments: If the pixelation effect doesn’t align with your expectations, revisit the pixelation tool’s settings. You can experiment with block size and other parameters to achieve the desired result.
Compare Previews: If your software allows, compare multiple previews with varying settings. This can help you decide on the most effective pixelation configuration.
Refine as Needed: Continuously refine the pixelation settings until you achieve the desired outcome. Be patient and iterate as necessary to strike the right balance.
Evaluate Overall Image: Consider how the pixelated area fits within the context of the overall image. Ensure it blends harmoniously with the surrounding elements.
Final Preview: Before proceeding further, perform a final preview to confirm that the adjusted pixelation effect meets your criteria.
Step 5: Apply the Pixelation Effect and Save
With the pixelation effect optimized and previewed to your satisfaction, it’s time to apply the effect permanently and ensure your work is preserved. Follow these steps to finalize the pixelation process:
Commit to the Effect: Once you’re content with the previewed pixelation, proceed to apply the effect to the selected area. This step makes the pixelation effect a permanent part of the image.
Check Final Appearance: After applying the effect, take a final look at the pixelated area. Confirm that the appearance aligns with your vision and serves its intended purpose.
Save the Edited Image: To preserve your work, save the pixelated image as a new file. This safeguards the original image while allowing you to showcase the pixelated version.
Choose File Format: When saving, choose an appropriate file format that maintains image quality. Common formats include JPEG, PNG, and GIF.
Select Compression Level: Depending on the format, you might have the option to adjust compression. Opt for a balance between image quality and file size.
Name the File: Give your pixelated image a descriptive and relevant name. This aids in organizing and identifying your files.
Select Destination: Determine where you want to save the file on your computer or cloud storage. Choose a location that suits your workflow.
Confirm and Save: After configuring the settings, confirm your choices and save the pixelated image.
Step 6: Review and Share
![]()
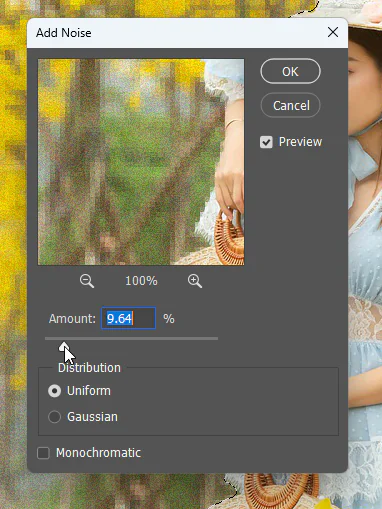
As you’ve successfully applied the pixelation effect and saved the edited image, it’s crucial to review your work and consider how you’ll share it. Here’s how to wrap up the pixelation process with a polished outcome:
Review the Edited Image: Open the saved pixelated image and review it one final time. Ensure the pixelation effect is consistent, balanced, and achieves the intended purpose of obscuring sensitive information.
Check Overall Composition: Examine how the pixelated area fits within the context of the entire image. Confirm that the pixelated region doesn’t distract from the overall visual composition.
Consider Viewer Perspective: Put yourself in the shoes of your audience. Imagine how they would perceive the pixelated image and whether it effectively conveys the intended message.
Proofread and Edit: While you’re reviewing, take a moment to proofread any accompanying text or captions. Ensuring accuracy in your written content enhances the overall quality of your work.
Plan Sharing Strategy: Determine how and where you’ll share the pixelated image. Whether it’s on a blog post, social media, or other platforms, having a clear plan enhances your outreach.
Write a Description: Craft a concise and informative description for the pixelated image. Clearly explain the purpose of pixelation and any relevant details about the image.
Engage Your Audience: If sharing on social media or a blog, engage with your audience by inviting comments and feedback. Responding to comments can enrich the experience for your readers.
Share Responsibly: If the pixelated image contains sensitive information, ensure that your sharing strategy aligns with privacy considerations and ethical guidelines.
Archive Your Work: Store the pixelated image and related content in an organized manner for future reference. This ensures you can easily locate and share your work when needed.
By including these final steps in your process, you finalize the pixelation process with a well-rounded approach that aligns with your choices effectively.
Conclusion
To sum up, the art of pixelating an image adeptly finds equilibrium between safeguarding and comprehending visuals. Through strategically replacing intricate elements with larger pixel blocks, pixelation acts as a shield for sensitive content, ensuring privacy without forsaking the image’s core essence. This technique transforms the image into a visual puzzle, upholding confidentiality while maintaining context. Either for privacy considerations, creative expression, or a touch of innovation, pixelation proves to be a versatile asset in image editing as it adds protection and curiosity to visual communication, adjusting well to its changing landscape.
