How to Modify Images with Duotone in Photoshop
Duotone images contain two shades of the same hue or sometimes two different colors of different hues; both types of duotones complement each other making images more fanciful and reassuring looks. Both hues in one form of duotone are generated from the same hue, creating a monochromatic effect with differing degrees of brightness and darkness. In the second case of duotones, two distinct colors are employed, usually chosen to complement each other on the color wheel. That gives a more lively and pleasing appearance, calling attention to the opposing colors and instilling energy and vitality. Duotone images share an illusion of simplicity and refinement while communicating a potent point by restricting the color pallet to just two tones. If you want to give your images a satisfactory duotone modification, you can use Photoshop and excellently modify your images with duotone in Photoshop. Adobe Photoshop has a collection of powerful tools and features to apply different color combinations, curves, and adjustments, transforming your images into compelling duotone compositions.
Step 1: Prepare Your Image
To begin modifying your image with a duotone effect in Adobe Photoshop, follow these steps:
Open Adobe Photoshop: Launch the Photoshop application on your computer and ensure you have the image you want to work with ready to import.
Duplicate the Layer: If you’re concerned about making irreversible changes to your original file, consider duplicating the layer before proceeding. Right-click on the layer in the Layers panel and choose.
“Duplicate Layer.” That creates a backup copy that you can refer back to if needed.
Convert to Grayscale: If your image is in color, it is essential to convert it to grayscale first. The duotone effect relies on the image’s tonal values rather than its color information. To convert to grayscale, go to the “Image” menu at the top of the screen, then choose “Mode” and select “Grayscale.”
Step 2: Convert the Image to Grayscale
Converting your image to grayscale is crucial in the duotone modification process. It removes all color information, leaving only shades of gray based on the original colors’ luminance values. This process sets the foundation for subsequent duotone adjustments. To convert your image to grayscale in Adobe Photoshop, follow these simple steps:
Open the Image: Launch Adobe Photoshop and open the image you want to modify by going to “File” > “Open” and choosing the file from your computer.
Access Grayscale Mode: With the image open, navigate to the “Image” menu at the top of the screen.
Choose Grayscale: From the “Image” menu, select “Mode,” and then click on “Grayscale” in the submenu.
Confirmation: A pop-up dialog box will appear, asking you to confirm the conversion to grayscale. Click “Discard” to proceed with the conversion.
Step 3: Accessing the Duotone Mode
Now that your image is in grayscale mode, you can access the Duotone mode in Adobe Photoshop.
Ensure Grayscale Mode: To confirm, look at the top of the Photoshop window where the document title is displayed. If it shows the word “Grayscale,” you’re all set to proceed.
Navigate to Image Mode: In the top menu, click “Image.” A drop-down menu will pop up with various options.
Select Duotone: From the “Image” menu, move your cursor down to “Mode.” Another submenu will appear, showing different color mode options.
Choose Duotone: Click on “Duotone” in the submenu. That will activate the Duotone dialog box, which provides options for applying the two-color effect.
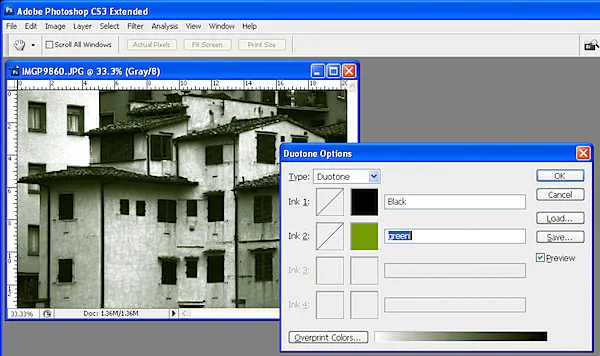
Step 4: Choose Your Colors
With the Duotone mode activated and the dialog box open, you can choose the two colors that will define the Duotone effect in your image and replace the grayscale tones. Follow these steps to select your preferred colors:
Access the Duotone Dialog Box: Ensure the image is in Duotone mode, as mentioned in Step 3. If not, select “Duotone” from the “Image” menu.
Color Picker: In the Duotone dialog box, you’ll find two color swatches: “Ink 1” and “Ink 2.” Click on each swatch to access the Color Picker window.
Selecting the Colors: You can choose the colors for your duotone effect in the Color Picker. You can manually input specific color values, use the sliders to adjust RGB or CMYK values or pick colors from the color spectrum.
Harmonious Colors: Consider the mood and tone you want to convey in your image when selecting colors. Aim for colors that complement each other and harmonize with the overall aesthetics of the image.
Experiment and Preview: Don’t hesitate to try different color combinations. As you adjust the colors, observe the real-time preview in the image window to see how they affect the overall appearance.
Black & Pantone Colors: If you prefer the classic duotone look, you can opt for black as one of the colors and choose a Pantone color for the second ink. This combination can be both elegant and impactful.
Save Color Swatches: If you like a color combination, consider saving it as a swatch. You can easily reuse the same duotone effect for other images or projects.
Keep it Subtle or Bold: Remember that subtle color variation can create a more sophisticated effect, while bold and contrasting colors can produce a dramatic impact.
After choosing your preferred colors, click “OK” in the Color Picker window to apply the duotone effect to your image.
Step 5: Adjusting Curves for Each Color
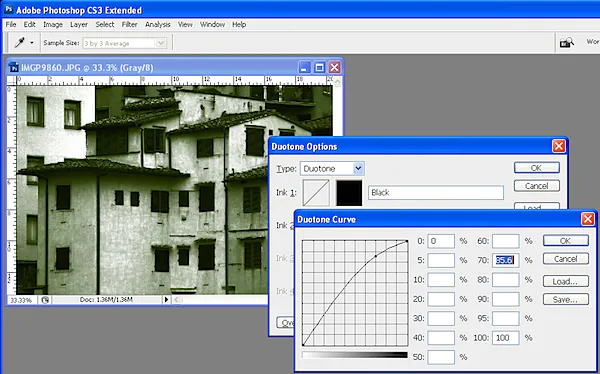
Fine-tuning each color’s tonal range and contrast is essential to achieve the perfect balance. Follow these steps:
Access the Duotone Curves Dialog Box: Ensure your image is in Duotone mode (Step 3). You’ll find two curve graphs in the Duotone dialog box, one for each color.
Modify Shadows and Highlights: Click on the curve for “Ink 1” to adjust the tonal range of that color. Drag the curve points to control brightness and contrast. Moving the curve up increases brightness while moving it down darkens the tone.
Adjust the “Ink 2” Curve: Click on the curve for “Ink 2” to modify the tonal range of the second color. Manipulate the curve points to achieve the desired effect.
Balance the Tones: Aim for a harmonious balance between the two colors, ensuring they complement each other.
Preview and Refine: Observe the real-time preview as you adjust the curves. Fine-tune until your duotone look aligns with your creative vision.
Preserve Highlights and Shadows: Avoid compressing the curve too much to maintain highlight and shadow details, adding depth to your duotone image.
Save Custom Curves: Save your unique duotone effect as a preset for future use.
Click “OK” in the Duotone Curves dialog box to apply the adjustments to your image.
Step 6: Preview and Fine-Tune
To preview the duotone effect and fine-tune any aspects that require further adjustments, follow these steps:
Zoom In and Out: Examine how the duotone effect impacts different areas by zooming in and out of the image. Look for pixelation or artifacts that may result from the adjustments.
Toggle Visibility: Temporarily hide each ink color layer in the Layers panel to compare the image with one color at a time. Analyze the impact of each color on the mood and tone.
Balance the Colors: Aim for a harmonious blend of the two colors. Ensure they work together to create a cohesive and striking duotone effect.
Evaluate Highlights and Shadows: Consider how the duotone affects highlights and shadows. Preserve essential details to maintain depth and dimension.
Make Subtle Adjustments: Fine-tune the curves slightly to achieve the perfect balance and enhance the overall aesthetics.
Seek Feedback: Gather feedback from colleagues or friends with a keen eye for design. Fresh perspectives can offer valuable insights.
Save Incrementally: Save progress incrementally with different filenames to have options to go back if needed.
Experiment with Blending Modes: Explore blending modes for the duotone layers to add depth and creativity.
Step 7: Save and Export
To preserve your composition, follow these steps:
Save as a New File: To protect the original image, save the Duotone version as a new file. Use “File” > “Save As” and choose a new filename for your duotone image.
File Format: Consider your purpose when selecting the file format. For online sharing or emailing, JPEG is a widely supported option. For lossless quality and transparency, opt for PNG.
Resolution and Size: Determine your duotone image’s appropriate resolution and size. Use 72 pixels per inch (ppi) for web use and higher resolutions like 300 ppi for print projects.
Color Profile: Check the settings for consistent colors across devices. For web use, sRGB is a standard profile.
Save Presets: Save your custom duotone settings as a preset for future use and efficiency.
Export for Web: Optimize the image size and quality for faster loading on websites using “File” > “Export” > “Save for Web (Legacy).”
Metadata: Decide whether to include copyright information in the image file to protect your work.
Backup Your Work: Create backups of the original Photoshop file and the exported Duotone version to safeguard your hard work.
Share your duotone image on social media, your portfolio, or any platform to showcase your creativity and attract an appreciative audience.
Conclusion
In conclusion, the duotone effect can indeed magnetize your images’ attractiveness by efficaciously steering their mood and tones. Apart from their general attributes, duotone images can yield additional benefits like monochromatic duotone, contrasting duotone, vintage duotone, vibrant duotone, and much more. These mood-specific duotone effects can further advance the visual impressiveness and shape the emotional aspect of the photographs. Ultimately, your images, modified using duotone in Photoshop, a prevailing software, become sensate and exclusive artwork that emits graceful vibes.
