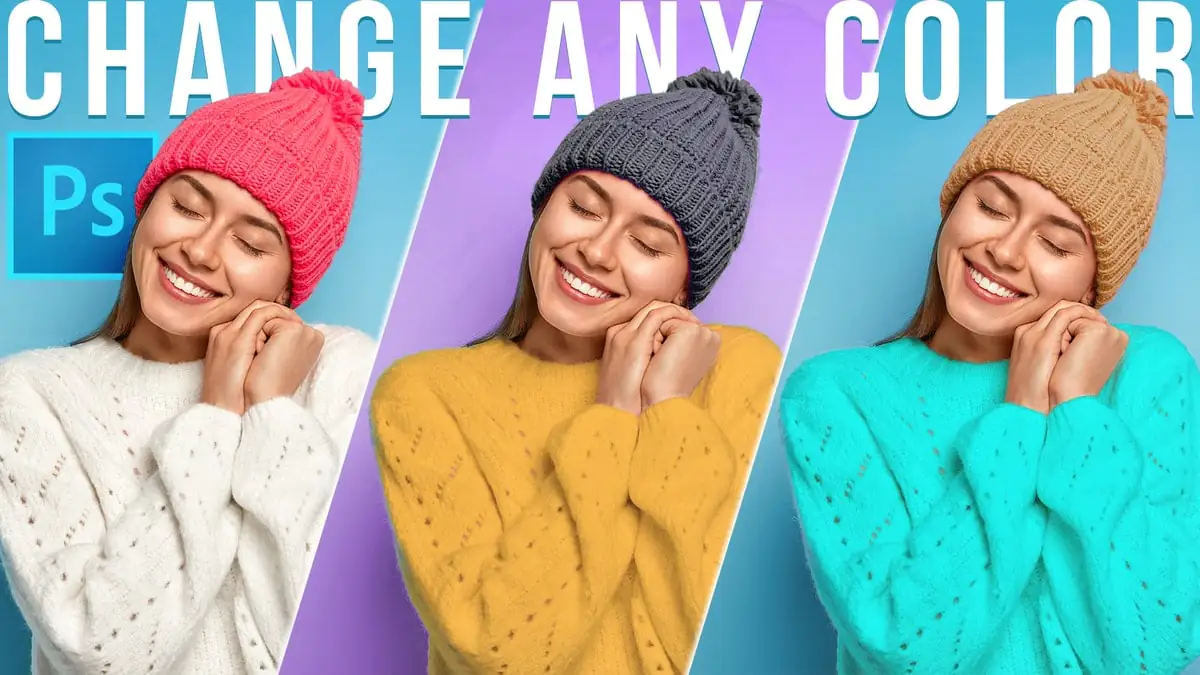
How To Do Colour Swapping Using Photoshop
Colour swapping is a worthy colour replacement technique that alters the colour of objects or the whole image using image editing programs like Photoshop that give you the creative autonomy to apply random adjustments and colour settings. Colour swapping’s primary intent is to shift the look of a picture by adjusting particular colours while maintaining the overall composition and structure. It pinpoints certain colours inside a picture and replaces them with new ones. Such colour replacements are accomplished by manual selection or through the use of algorithms that identify and modify certain colour ranges automatically.
You can use colour swapping to produce pleasing-to-the-eye and emotionally strong images. The technique is also about having fun with different colour combinations, creating unique attitudes and scenes, and communicating thoughts more optimally. Furthermore, colour swapping is accessible to professionals and hobbyists, and users can become skilled in applying colour swapping using Photoshop and following the basic steps.
Step 1: Open the image in Photoshop
Launch the application and open the image you want to work with to begin colour swapping in Photoshop. Go to the “File” menu at the top left corner, click on “Open,” and navigate to the location where your image is stored. Select the image file and click “Open.” The image will now appear on the Photoshop workspace.
Working on a duplicate layer to preserve the original image is a good practice. If the “Layers” panel is not visible, move to the “Window” menu and choose “Layers” to bring it up. Then, right-click on the background layer and select “Duplicate Layer.” This way, you can work on the duplicate layer while keeping the original image untouched for reference or future adjustments.
Step 2: Create a new adjustment layer
In the next step, we will create a new adjustment layer to apply the color-swapping effect. Adjustment layers in Photoshop allow non-destructive editing, meaning you can make modifications without altering the original image data.
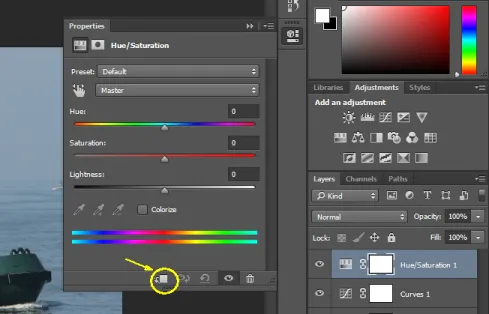
To create an adjustment layer, move to the bottom of the “Layers” panel, then click the “Create new fill or adjustment layer” icon. It looks like a half-filled circle. A menu will appear; choose “Hue/Saturation” from the list. That will create a new adjustment layer above your image layer.
The adjustment layer comes with its properties panel, where you can control the color and other adjustments. The properties panel lets you modify the hue, saturation, and lightness of the selected color range, which is crucial for achieving the desired color-swapping effect.
Step 3: Select the color range
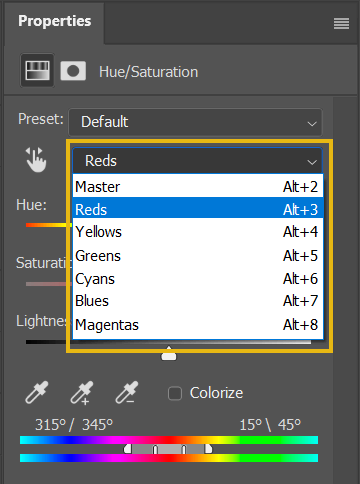
In the third step, select the colour range you want to swap. In the “Hue/Saturation” adjustment layer properties panel, you’ll find a drop-down menu labelled “Master” by default. Click on it to reveal a list of colour channels like “Reds,” “Yellows,” “Greens,” and so on.
Choose the colour range that corresponds to the colours you want to replace. For instance, select “Blues” from the drop-down menu if you want to swap blue with green.
After selecting the colour range, you’ll notice that the adjustment sliders will affect only that specific range of colours. That allows you to target and modify the chosen colours while leaving the rest of the image unaffected.
Once you have selected the colour range, you can proceed to the next step to adjust and apply the colour-swapping effect.
Step 4: Adjust the colour
In step four, you will adjust the colour of the selected range to achieve the colour-swapping effect. In the “Hue/Saturation” adjustment layer properties panel, you’ll find three sliders: “Hue,” “Saturation,” and “Lightness.”
The “Hue” slider lets you shift the colours within the selected range. For example, move the “Hue” slider towards the blue side if you want to swap red with blue.
The “Saturation” slider steers the intensity of the colours within the selected range. Increase the saturation to make the colours more vibrant or decrease it to desaturate them.
The “Lightness” slider adjusts the brightness of the selected colours. Move it to the left to make the colours darker or to the right to make them brighter.
Experiment with these sliders until you achieve the desired colour-swapping effect. Remember, the changes are non-destructive, so you can always fine-tune them later.
Step 5: Fine-tune the selection
In step five, you can fine-tune the colour selection to ensure a more accurate and precise colour-swapping effect. The goal is to isolate the specific areas or objects you want to swap in the image.
To do this, first, make sure the adjustment layer’s mask thumbnail in the “Layers” panel is selected. That indicates you are working on the mask, not the adjustment itself.
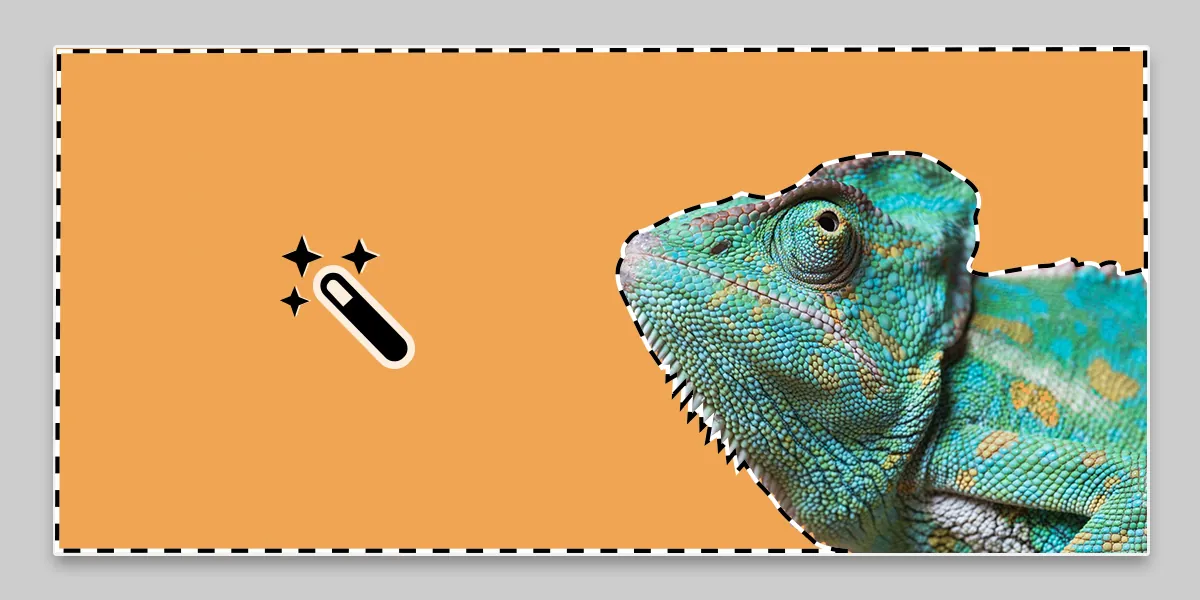
Next, use the “Eyedropper” tool in the properties panel to sample the colours you want to replace. Click on the “Eyedropper” icon, then click on the areas of the image that contain the colours you want to swap. Photoshop will adjust the selection based on the colour samples you choose.
You can also use selection tools like the “Magic Wand” or “Quick Selection” tool to make precise selections, especially if the colour ranges are distinct and well-defined.
By fine-tuning the colour selection, you can ensure that the colour-swapping effect is applied only to the intended areas, leading to a more polished and accurate result.
Step 6: Apply the colour swap

In step six, you will apply the colour swap effect to the selected areas. Once you have fine-tuned the colour selection using the adjustment layer’s mask, it’s time to reveal the colour-swapping effect.
To do this, click the adjustment layer’s mask thumbnail in the “Layers” panel to ensure you are working on the mask. Then, press “Ctrl + I” (or “Cmd + I” on Mac) to invert the mask. This action hides the adjustment effect, making the image appear as originally.
Find the brush tool from the toolbar, and specify the foreground colour to white. With the mask still active, paint over the areas of the image where you want the colour swap to be visible. As you paint white on the mask, the colour-swapping effect will be revealed, effectively changing the colours in the selected areas.
Remember to use a soft brush for smooth transitions between the original and swapped colours, and adjust the brush opacity if needed for more subtle effects.
Following this step, the colour swap effect will be applied to your image in the targeted areas, creating the desired visual impact.
Step 7: Paint on the mask
In step seven, you will paint on the adjustment layer’s mask to further refine the colour swap effect. This step allows you to control precisely where the colour swap is applied and where it is not.
With the brush tool still selected and the adjustment layer’s mask active, you can use a soft brush with white as the foreground colour to reveal the colour swap effect. As you paint over the image, the new colours will start replacing the original colours in the areas you paint.
If you make a mistake or want to revert part of the colour swap, you can switch the foreground colour to black and paint with black on the mask. That will hide the colour swap effect in those areas, restoring the original colours.
Adjust the brush size, opacity, and hardness to achieve smooth and accurate transitions between the original and swapped colours.
By painting on the mask, you have full control over the colour swap effect, allowing you to apply it precisely where you want and create a seamless and visually appealing result.
Step 8: Save your work
In the final step, after you are satisfied with the colour-swapping effect, it’s time to save your work. Saving your edited image ensures that your changes are preserved and can be shared or used for various purposes.
To save your work in Photoshop, go to the “File” menu at the top left corner and select “Save As.” Choose the required file format for your image, such as JPEG, PNG, or PSD (Photoshop’s native format that retains layers and editing capabilities).
Select the location on your PC to save the file after giving it a name, and click “Save.” If you save it as a JPEG or PNG, you may be prompted to adjust the image quality or other settings, depending on the file format.
After saving, you will have a copy of your colour-swapped image that you can use as needed. It’s always a good idea to keep the original image and save your colour-swapped version separately to maintain the flexibility of further edits if required.
Conclusion
Colour swapping is a paramount aspect of image editing to introduce arresting attitudes of creativity and amusement. It serves both purposes: beautifying the visual aesthetic and evoking certain frames of mind, like nostalgia or playfulness. Using widely acclaimed software like Photoshop for terrific colour swapping is the best choice if you want your compositions to be extraordinary and discernibly exceeding. It provides precise colour adjustments and easy selection and replacement of specific colours in a non-destructive way, reassuring the original image remains unaltered and allowing users to experiment freely without fearing losing valuable graphics.
