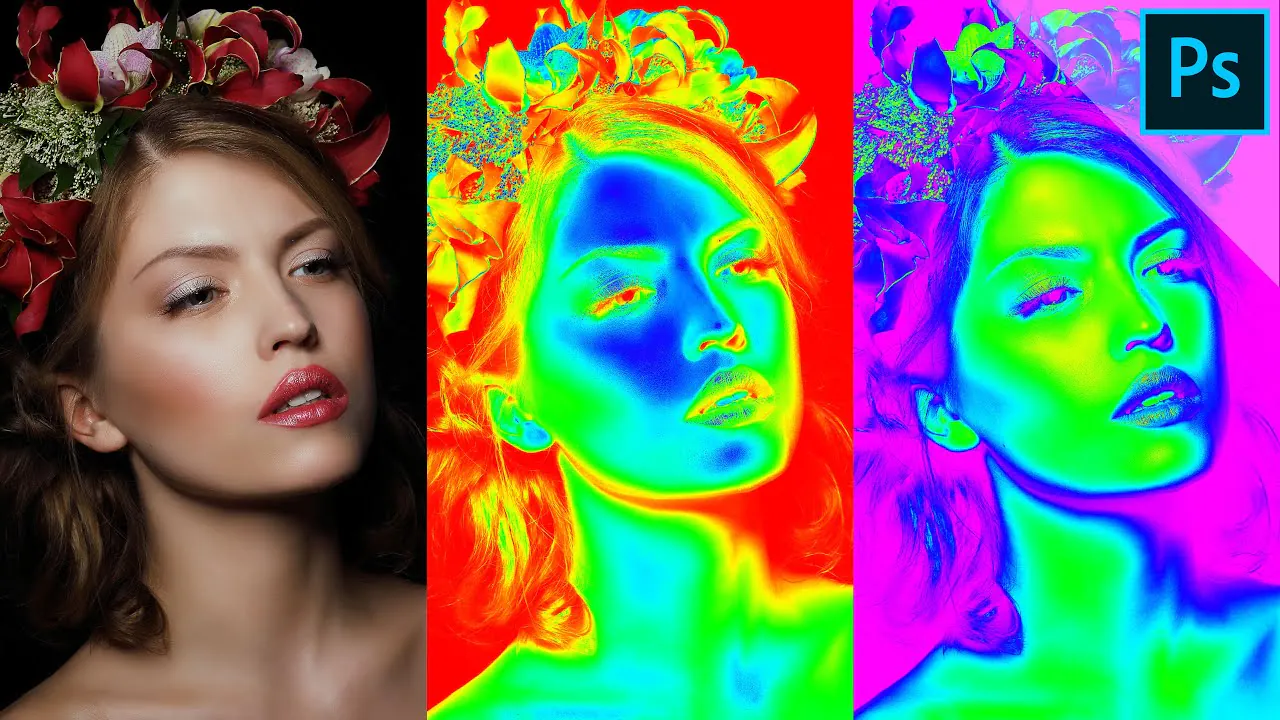
How To Get A Thermal Imaging Effect
Thermal imaging, typically exerted for domains like military, law enforcement, medical, industrial, and research settings, has now ranked the status of an interesting and distinctive tool in digital art and creativity, particularly when combined with creative filters. Digital artists are always looking for untouched and novel methods to voice themselves, and the thermal imaging effect is a well-deserved idea that provides unique and compelling results for making visuals attention-grabbing in a peculiar way. Using thermal imaging in images adds a bizarre, futuristic, or even alien perception to the work. Thermal imaging can also create intriguing graphics that generate an attitude of brainteasing and bemuse by incorporating thermal data or synthetic heat signatures into the compositions. The resultant photos aptly establish brilliant colors that depict temperature changes, dramatically contrasting the normal grayscale tones observed in traditional thermal scans. Using thermal imaging as a creative tool, you can bring up novel avenues and enchant viewers with bizarre and influencing visual stimulation. For an applicable step-by-step approach to getting thermal imaging effects in your images, the following blog can be a productive guide for you.
Step 1: Select the Image Editing Software
The first step in applying thermal imaging effects to images is to choose the right image editing software. Consider your editing needs, skill level, and budget when deciding. Several popular options are available, catering to both beginners and professionals.
Adobe Photoshop is a top choice for those seeking a comprehensive, feature-rich solution. It offers various tools and capabilities, including the ability to apply thermal filters and create custom effects.
If you prefer a free and open-source alternative, GIMP is a powerful option, providing similar functionalities to Photoshop. It’s a great option for users on a budget or those who prefer open-source software.
Other software like Affinity Photo, Corel PaintShop Pro, and Pixlr offers thermal imaging capabilities and unique features to explore in your creative journey. Select the software that best suits your editing needs and provides the tools to achieve your desired thermal imaging effects.
Step 2: Open the Image
After selecting your preferred image editing software, the next step is to open the image to which you want to apply the thermal imaging effect. Launch the chosen software and navigate to the “File” menu, then select “Open” or use the appropriate keyboard shortcut.
Browse through your computer files and locate the image you wish to edit. Most image editing software supports various file formats, such as JPEG, PNG, TIFF, and RAW.
Once you select the image, it will appear in the software’s workspace, ready for editing. At this stage, you can perform additional steps, such as creating a duplicate or a new layer to work non-destructively, before applying the thermal imaging filter or effect to the image.
Step 3: Create a New Layer (if desired)
Before applying the thermal imaging effect to the image, consider creating a new layer to work non-destructively. That allows you to make adjustments without permanently altering the original image, providing more flexibility in your editing process.
To create a new layer, navigate to your image editing software’s “Layers” menu and select “New Layer.” Name the layer appropriately, and ensure it is positioned above the original image layer.
By working on a new layer, you can apply the thermal imaging effect to this layer while preserving the original image below. This way, you can easily make changes, fine-tune the effect, or remove it without affecting the original image data.
Step 4: Apply a Thermal Filter
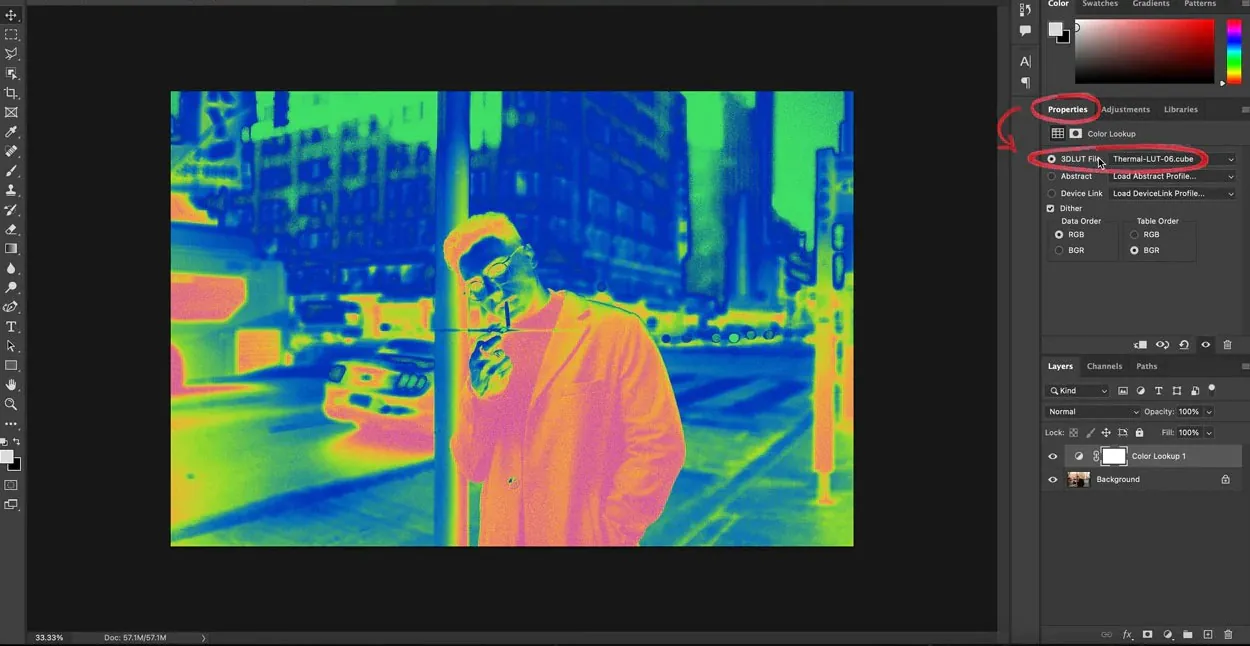
With the new layer created (if applicable), it’s time to apply the thermal imaging effect to the image. The process may vary depending on the image editing software you are using.
Look for a “Filter” menu or a specific option related to thermal imaging, infrared, or heat maps. Some software may have pre-built thermal filters that you can directly apply to the image. Alternatively, you might need to create a custom effect using adjustments like “Gradient Map” or “Color Balance” to achieve the thermal look.
Click on the desired filter or effect, and the software will apply the thermal imaging effect to the image, overlaying it on the selected layer or the entire composition.
Step 5: Fine-Tuning the Thermal Effect

After applying the thermal imaging filter, it’s essential to fine-tune the effect to achieve the desired result. Fine-tuning adjusts the intensity, color balance, and overall appearance of the thermal effect.
To fine-tune the thermal effect, use various adjustment tools provided by your image editing software. You can experiment with tools like “Brightness/Contrast,” “Curves,” “Levels,” or “Hue/Saturation” to modify the thermal effect’s attributes. These adjustments enhance the visual impact and cohesiveness of the thermal imaging effect within the image.
Keep refining the settings until you achieve the desired artistic vision for your image.
Step 6: Add Depth and Texture
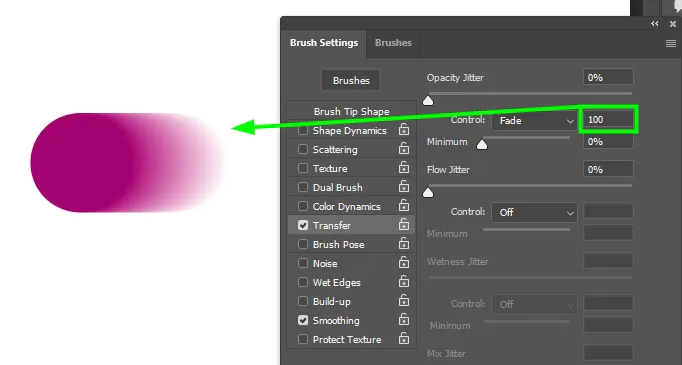
To further enhance the realism and impact of the thermal imaging effect, consider adding depth and texture to the image. Utilize the “Brush” tool with low opacity and various warm and cool colors to paint over specific areas, creating the illusion of temperature variations.
By strategically applying brush strokes, you can simulate the interplay of heat across the image, giving it a more organic and tactile feel. This technique enhances the immersive thermal effect, making the heat signatures appear intricately woven into the image.
Try different brush sizes, colors, and opacities to achieve the desired level of depth and texture for an engaging and visually compelling thermal imaging effect.
Step 7: Blend Modes
Try different blending modes to achieve captivating visuals that seamlessly merge the thermal effect with the original image.
Common blend modes to consider include “Overlay,” “Soft Light,” “Color Dodge,” and “Screen.” Each blend mode alters the thermal layer’s interaction with the underlying image, resulting in various color interactions and luminosity changes.
You can create eye-catching and unexpected visuals by exploring different blend modes, giving your thermal imaging effect a distinct and artistic flair. Fine-tune the blend mode and layer opacity until you achieve the desired look that complements your creative vision.
Step 8: Add Additional Elements
To further enhance the impact of your thermal imaging effect, consider adding additional elements to the image. These elements can include light sources, particles, atmospheric effects, or other visual elements complementing the thermal scene.
For example, you can incorporate glowing elements to simulate heat sources or use particle effects to represent steam or smoke in a thermal environment. Such additions add depth and realism to the image, making the thermal effect more convincing and captivating.
Carefully select and position these elements to ensure they integrate seamlessly with the thermal imaging effect and contribute to your artwork’s overall narrative and aesthetic.
Step 9: Multiple Layers and Opacity
To create complex and dynamic thermal imaging effects, utilize multiple layers and adjust their opacity. You can create a multi-dimensional and visually captivating composition by combining various thermal filters, adjustments, and additional elements on separate layers.
Experiment with different opacity levels for each layer to control the intensity of specific thermal features within the image. Adjusting the opacity allows you to blend the thermal effect with the underlying layers, achieving a more subtle and integrated appearance.
This technique provides greater control over the different temperature zones and visual elements, enabling you to craft a compelling and intricate thermal imaging effect.
Step 10: Review and Make Further Adjustments
Take a moment to review the image and the applied thermal imaging effect. Analyze the composition, color balance, and storytelling to ensure the thermal effect aligns with your creative vision. Look for any areas that may require further adjustments or refinement.
If you find any aspects that need improvement, go back to the image editing software and make the necessary adjustments. Fine-tune the settings, layer opacity, or add/subtract elements to enhance the impact and cohesiveness of the thermal imaging effect.
By carefully reviewing and making further adjustments, you can ensure that your final artwork reflects your artistic vision and effectively conveys the desired narrative through thermal imaging.
Step 11: Save Your Work
Once satisfied with the applied thermal imaging effect and all the adjustments, you must save your work to preserve the edited image. Saving the image ensures that you can access and share the final artwork in the future.
Before saving, consider the intended use of the image and the desired level of image quality. For non-destructive editing, save the image in a format like TIFF or PSD, which preserves all the editing layers and information. Alternatively, save the image in a widely supported format like JPEG or PNG for sharing or web use while considering the appropriate resolution and compression settings.
Save Versions (Optional)
As an optional step, you may want to save multiple versions of your edited image to explore different creative choices or to have backups for future reference. Save different iterations of the image, each representing various stages of your editing process and the final version.
Conclusion:
Thermal imaging has unfolded as a conspicuous and meaningful instrument in digital art and imaginativeness, delivering hypnotic effects that have reinvented photography. Artists promote their compositions with a mysterious charm, a futuristic sense, and an extraterrestrial look through thermal data and creative filters. Thermal imaging’s glamour stems from its unique capability to construct visual stimulants that evoke profound riddles, rapacious curiosity, and a palpable feeling of surprise in observers. Continuously play with its possibilities and discover a treasure trove of uncharted routes for erecting fascinating narratives and taking viewers on immersive visual odysseys beyond the everyday. Keep getting measureless prospects from the pairing of thermal imaging and cutting-edge technology.
