How To Make A 3D Model in Fusion 360?
Are you ever intimated by the exciting learning curve of Fusion 360? This blog especially aims to cater to all your modeling needs with Fusion 360 in a better way. The guide is kept simple followed by a series of basic steps for even beginners to feel confident in creating 3D models with Fusion 360 at the end of the blog. Fusion 360 is a free tool and holds about 3 years old educational license for students as well as educators to create enticing and creative models with the Fusion 360 program. Make sure to get benefit from the tool if you fall under the eligibility criteria preset by the creators. If let us suppose you do not qualify for eligibility, you can always activate your account for a free 2-week trial basis or pay to get the official license for long-term use of the program.
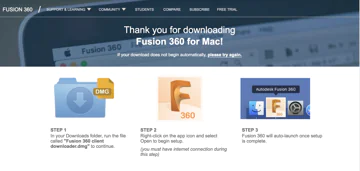
The basic step is to sign you up for an account on Autodesk’s Website. From there you can easily activate your account, profile and download the Fusion 360 program successfully. No matter if you use macOS or Windows, the program is compatible with both versions. Following steps on the installation wizard need to be followed to install the version on your PC within a few minutes. After successful installation of the program is complete, just double right-click to launch the program Fusion 360 on your computer. Now login into your created Autodesk Account and you are ready to go!
The Interface
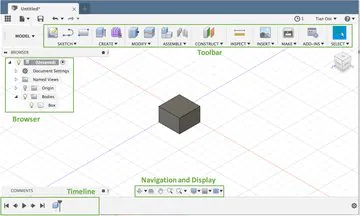
After launching Fusion 360, the screen visible to you must look something the image shown above. Many areas need to be pointed out in the user interface. These include:
Toolbar
Located on the straight top portion of the screen, the menu bar displays a closely selected option of main functions which can be used to create or manipulate the 3D models. Just click on the drop-down arrow and you will see the possible commands which can be used for every category separately. Such shortcuts prove fruitful while customizing complex product models.
Browser
The browser is present on the very left corner of the screen, this shows all the components, planes, and bodies of the file structure while storing it. Here we have at the moment only one component (unsaved), with one body (Box). You can always rename all the items according to your preferred file names. Just click on the triangles icon to the left of the folder and you can toggle the visibility of planes with the help of the light bulb.
Timeline
The timeline is located at the bottom and is regarded as the key part of the Fusion 360 program which makes it stand out from CAD software. It consists of a list of commands. Such commands are executed while creating the model. This enables the user to experience exactly how the model is being made. You can roll the timeline back and can fix any point you feel needs revision.
Navigation and Display
These boxes help toggle the setting of the display and offer manual integration of the view. All the below-mentioned shortcuts prove useful while creating a model:
Pan: A mouse button (middle)
Zoom: scroll (upward and downward)
Orbit: hold (shift) + mouse button (middle)
Tutorial: Make a Popsicle
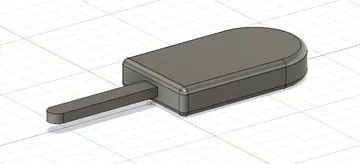
To demonstrate the basic type of Fusion 360 modeling principle, we shall create a Popsicle on a stick as a reference. General, the flow begins with a basic sketch-up step. This step demands demand close consideration to the concept design outline. The sketch is then extruded and is modified to confirm everything is in the correct order or sequence.
Create a Sketch
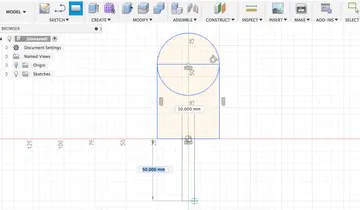
Sketches are just like what they happen to sound like, by saying this we mean that the curves and lines drawn in 2D can be created into a versatile model in the end. To create a sketch you just need to click on the ‘Create Sketch Option’ from the toolbar and also the plane on which the sketch is going to be based. The view can also be shifted from 3D to 2D.
To draw the popsicle, you need to line up two triangles and a full circle. You can also visit the sketch dropdown by using ‘C’ and ‘R’ hotkeys. Now for dimensions select ‘Sketch Dimensions’ by simply pressing ‘D’ hotkey. Once you are fully satisfied with the resulting sketch, you can click ‘Stop Sketch’ and exit the sketch mode.
Extrude Your 2D Shapes
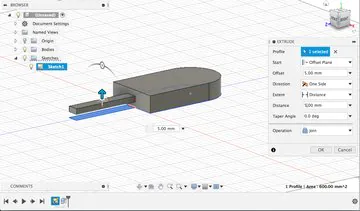
Now let us learn how to turn our 2D sketches into a 3D realistic Object by cleverly expanding the sketch from the plane. The operation starts with a selection of the ‘Extrude Button’ in the menu toolbar. This will result in a menu on the very right of the screen. The very first thing you need now to do is to observe and select which profile needs to be extruded.
In this popsicle part, we are going to extrude the stick. To extrude one or more profiles, just keep on hold the shift key while selecting the portion to be extruded. In this popsicle, we selected 15 mm to extrude. Remember to make sure that the ‘Operation’ is preset to the ‘New Body’. Further, we need to inflate the popsicle and during this step, you again need to extrude on the stick part of the popsicle to make it stick out from the center of the popsicle and not the profile plane.
Adding Finishing Touches
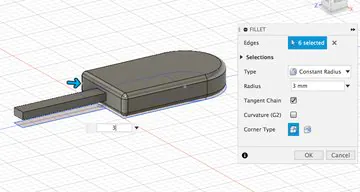
All we need to do is to add some final finishing touches before saving our work. Now after the previous step you can see, a 3D model of the popsicle is achieved but it still looks a bit blocky around its edges. To make them look more natural you can use ‘Fillet Command’ present under the drop-down menu bar. This will result in a curve of a specific radius around the corners of the popsicle. You can add 5mm ‘Fillets’ on each corner of the popsicle to make it look more natural.
Save and Export Your Popsicle
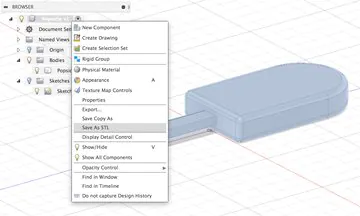
Perhaps, this step is the most satisfying of them all for everyone. Make sure that you save all the work done on your modeling project with Ctrl/Cmd+s or through the ‘Save button’ on the very top left. Fusion 360 stores all the models and files within the cloud such that you can easily get access to them whenever needed in any case.
How ITS Can Help You With 3D Modeling Service?
Information Transformation Service (ITS) has been providing 3D Modeling Services for over a time now. Information Transformation Services knows all about the modern-day industry and its trends in the Online Marketing Business. ITS is light on the budget and heavy in terms of quality and stature. Our highly responsive and interactive team specializes in 3D Product and Asset Modeling Services and will note down every essential detail provided by you and in return turn your dream into a real-life realistic or virtual reality. Information Transformation Service (ITS) also caters to a wide variety of services relating to efficient 3D Modeling and Designing services. If you are interested in ITS 3D Modeling Services, you can ask for a free quote!
