How to Equip Your Images With A Polaroid Frame
A polaroid frame highlights photos more than other digital photographs because of its prominent white border that distinguishes them from the par for the course. These frames lend authenticity and rawness to the image, making it feel more intimate and honest. You can use these frames to create stories, develop information or provide a soothing mood to photographs. It promotes feelings of connectedness while also making a distinct appearance. Including handwritten remarks or notes in the frame increases the value of the photograph and allows viewers to understand its context better. Furthermore, it emphasizes composition by focusing on the main subject and framing it inside the image, so increasing visual impact. Equipping your images with a polaroid frame can guide the viewer’s eyes toward the focal point by giving images a recognizable visual identity. By vigilantly following the step-by-step guidelines plus augmenting your customized style, adding polaroid frames should no longer be challenging.
Step 1: Choose a photo editing software
To add a Polaroid frame to your images, the first step is to choose a photo editing software that suits your needs and skill level. Various options are available, from professional software like Adobe Photoshop to more user-friendly alternatives such as Canva or Pixlr. Consider factors such as your familiarity with the software, the features you require, and your budget.
Once you have selected the software, launch it on your computer or access it online. Look for the “File” menu or a similar option and click “Open” to select the image you want to edit. Alternatively, some software allows you to drag and drop the image onto the workspace.
Step 2: Open Your Image in the Chosen Software
After selecting the photo editing software that suits your needs, the next step is to open your image within the software’s interface. This process allows you to access and manipulate your photo using the software’s editing tools and features.
Locate the “File” menu or a similar option in the software’s toolbar to open your image. Click “Open” or “Import” to browse your computer’s files and select the image you want to work on. Alternatively, drag and drop the image directly into the software’s workspace.
Once the image is opened, it will be displayed within the software’s editing environment, ready for you to apply various modifications, including adding a Polaroid frame.
Step 3: Create a New Layer for the Polaroid Frame
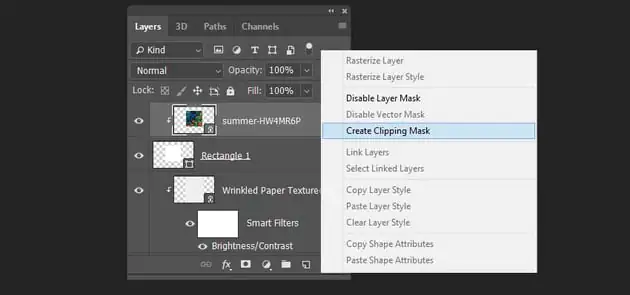
Creating a new layer dedicated to the frame is essential to add a Polaroid frame to your image. That can help you work non-destructively and maintain the original image while making adjustments and additions.
Look for your photo editing software’s “Layers” panel or menu. It is usually located in the workspace or accessed through a dedicated tab or window.
Once you’ve located the Layers panel, find the option to create a new layer. It can be represented by a “New Layer” button, a plus symbol (+), or a similar icon. Click on this option to generate a blank layer above your original image.
After creating the new layer, ensure it is selected or active for further modifications. Click on the newly created layer in the Layers panel to activate it.
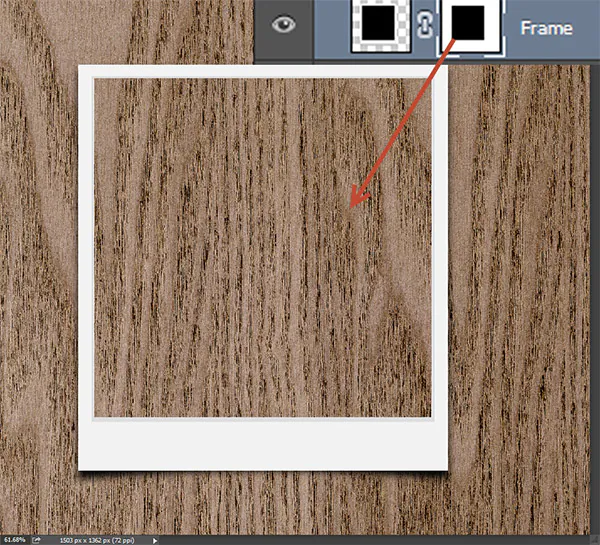
Now, you can add the Polaroid frame to the new layer. Select the drawing or shape tool from the software’s toolbar. It is typically represented by an icon resembling a rectangle or square.
Use the drawing tool to create a rectangle or square shape that surrounds your image, mimicking the appearance of a Polaroid frame. Adjust the size and position of the shape according to your preferences. Remember to leave a section below the image to represent the white space typically in Polaroid prints.
With the shape created, you can customize it to resemble an authentic Polaroid frame. Explore the software’s options to apply effects such as a white border, drop shadow, or simulate imperfections like light leaks or faded colors. These enhancements contribute to the vintage aesthetic and character of the Polaroid frame.
Step 4: Customize the Polaroid Frame
This step involves adding effects, adjusting colors, and simulating imperfections commonly associated with Polaroid prints.
Select the layer containing the Polaroid frame in the Layers panel. Ensure that you have it active for further modifications.
Explore the editing options provided by your chosen software to customize the frame. Look for opportunities related to colors, effects, and filters. The specific tools and menus may vary depending on the software you’re using.
Apply a white border: Polaroid frames typically feature a white border surrounding the image. Use the software’s tools to add a white border to the frame layer. Adjust the thickness and size of the border to match your preference.
Simulate imperfections: To achieve a more authentic vintage look, consider simulating flaws commonly found in Polaroid prints. These can include light leaks, faded colors, or vignetting. Your software may have specific filters or effects that can help recreate these imperfections. Try different settings until you achieve the desired result.
Add a drop shadow: Another way to enhance the realism of the Polaroid frame is to apply a subtle drop shadow effect. This effect can create a sense of depth and make the frame appear slightly raised from the image. Adjust the settings of the drop shadow, such as opacity and distance, to achieve the desired result.
Fine-tune colors and saturation: Depending on the look you want to achieve, you can adjust the overall colors and saturation of the frame. You can slightly desaturate the colors or add a vintage tone to create a more nostalgic feel. Use the software’s color adjustment tools to refine the colors within the frame.
Step 5: Add Text or Captions
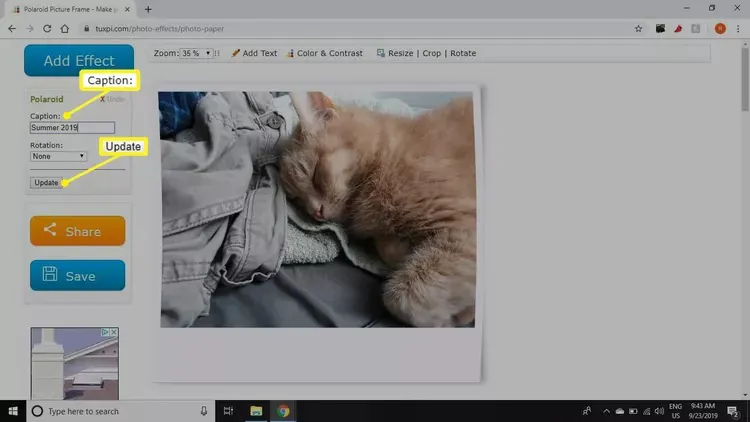
Adding text or captions to the white space below the image in the Polaroid frame can further enhance the storytelling aspect and personalize your photo. This optional step allows you to include relevant information, dates, or anecdotes associated with the captured moment. Here’s how you can add text or captions to your Polaroid frame:
Ensure that the layer containing the Polaroid frame is still selected and active for editing.
Locate the text tool in your photo editing software. It is usually represented by an icon resembling a capital “T” or a text bubble.
Click on the area below the image within the Polaroid frame where you want to add the text. This action will create a text box or cursor where you can type your desired text.
Enter the text you want to include, such as a caption, date, or other relevant information. Adjust the font, size, color, and alignment of the text to match the overall style and aesthetic of the Polaroid frame.
Experiment with different font options to find the one that best complements the vintage vibe of the Polaroid frame. Consider using fonts that mimic typewriter or handwriting styles to enhance the nostalgic feel.
Fine-tune the position and size of the text within the white space of the Polaroid frame. Ensure it doesn’t overlap with the image and maintains a visually pleasing composition.
Step 6: Finalize and Save the Image
After you have added the Polaroid frame and any desired text or captions, it’s time to finalize your image and save it in your preferred format. Follow these steps to complete the process:
Review the overall composition: Take a moment to review the image with the Polaroid frame and text. Ensure everything is positioned correctly and the visual elements are balanced and visually appealing. Make any necessary adjustments to the frame, text, or image.
Check for any errors or inconsistencies: Double-check the text for spelling mistakes, typos, or formatting issues. Ensure the Polaroid frame looks cohesive and realistic, with the desired vintage effects and imperfections. That is your opportunity to make any final edits or refinements.
Save a copy of the edited image: Once you are satisfied with the final result, saving a copy is essential. Look for the “Save” or “Export” option in your photo editing software. Go for a file format that best suits your needs, such as JPEG or PNG. Select a destination on your computer or device where you want to save the image.
Choose the desired quality and settings: Depending on your software, you may have options to adjust the quality, compression, or other settings before saving the image. When selecting these settings, consider file size, intended usage, and platform compatibility.
Rename the file: If desired, you can provide a new name for the edited image to differentiate it from the original.
Save the image: Click the “Save” or “Export” button to save the edited image with the Polaroid frame and any added text or captions. The software will process and save the file according to your settings and location.
Conclusion
To summarize, the Polaroid frame is a durable and aesthetic choice that brings out your photographs and produces a highly appealing experience. You can tailor the frame to your creative notion by introducing options for emulating imperfections or changing the colors. The white area beneath the snapshot encourages you to share the backstory of the event by expressing your feelings about it. Integrating pictures and text within the Polaroid frame gives your photos substance and worth, offering you to observe as your images morph into unique tales that grab hearts and minds.
