
How to Enter Data in EpiData? (Complete Tutorial)
If you face difficulty in carrying out simple data analysis and data entry projects on your own then the 10 minutes reading can eliminate all your business data problems for good. In this blog, the center of attention is the EpiData software tool and how can you enter data into a questionnaire using EpiData for easy and accurate data analysis. Let us begin by understanding what EpiData is and how can it prove a turning point in handling your company data.
What is EpiData?
Jens M.Lauritsen took the initiative to make EpiData in 1999 in Pascal. The idea began from epidemiological research as a result of accident prevention. It is a group of applications, a combination to create qualitative data analysis structures in HTML. EpiData is commonly used by individuals and organizations for bigger data analysis projects. For example, World Health Organization (WHO) makes use of EpiData and STEPS method to gather epidemiological, public health, biostatistics, and medical quantitative data for effective project analysis. EpiData consists of two main kinds, namely, EpiData Entry & EpiData Analysis.
EpiData Entry is used to enter simple or programmed data for efficient documentation purposes. It comes in handy to handle simple related forms or systems.
EpiData Analysis proves best to perform basic graph and statistical analysis of data for deriving comprehensive record-based results in the form of variables. It proves helpful to create control charts like p-charts or Pareto charts to visualize statistical data more precisely.
What is Special in EpiData?
There are various programs to enter data and do the statistical analysis like EpiInfo. Such programs do not function for simple data documentation or validation. The concept behind the creation of EpiData was to develop something simpler and user-friendly. EpiData is, by all means, excellent data entry software that comes free of charge. You can enter data in a simple HTML form and the program will perform data conversion into the required data form.
We can define EpiData into brief 5 useful points;
It is a research-oriented tool developed for better data management processing such as data entry and data documentation within less time than manual data processes.
It is designed to support a user-friendly interface. Although there might exist some technical options it remains an easy option for beginners!
EpiData is free of charge.
The software is compatible with any sort of computer, Microsoft Windows, Macintosh, or Macintosh’s version.
Data can be exported to a variety of statistical database files or formats.
How to Start Data Entry?
The foremost basic step is to download EpiData Manager to perform official documentation. It is available in EpiData Entry. There you will also, come across sample practice files for learning at the official documentation page. Furthermore, you can explore the software via Epi Tour.
EpiData is created essentially to assist researchers in carrying out smooth epidemiological investigations. It carries out the following mentioned tasks:
Text Editor’s function is to develop and create questionnaires, it also enables direct editing of data files, data inclusion, data checking, and data coding, etc.
Data Entry function to make data files from the questionnaire and query data files.
Data Checking function is to allow add coding rules, patterns, complex legal values for performing interactive checking and validation.
The coding and Calculation function allows new data variables or to manipulate existing variables to estimate grouping ages, latency periods, etc.
Import function supports data importation from dBase, text, and STATA files.
The export function is quite the opposite of import. It allows exporting of data to SPSS, SAS, Excel, STATA, dBase, or text for subsequent quantitative analysis.
Data Management function to join end-to-end and merge side-to-side data files or to restructure them.
Documentation function to describe data checking rules and file structures to produce descriptive statistics for creating frequency tables in a file. It also allows the counting of records or other variables within a data file.
Utility function to remove deleted records, compress data files to form backup copies of associated questionnaires. The files can also be renamed with the help of this function. Although EpiData does not contain complex data analysis features and functions the data can be converted into a variety of standard data file formats.
Basic Settings of EpiData
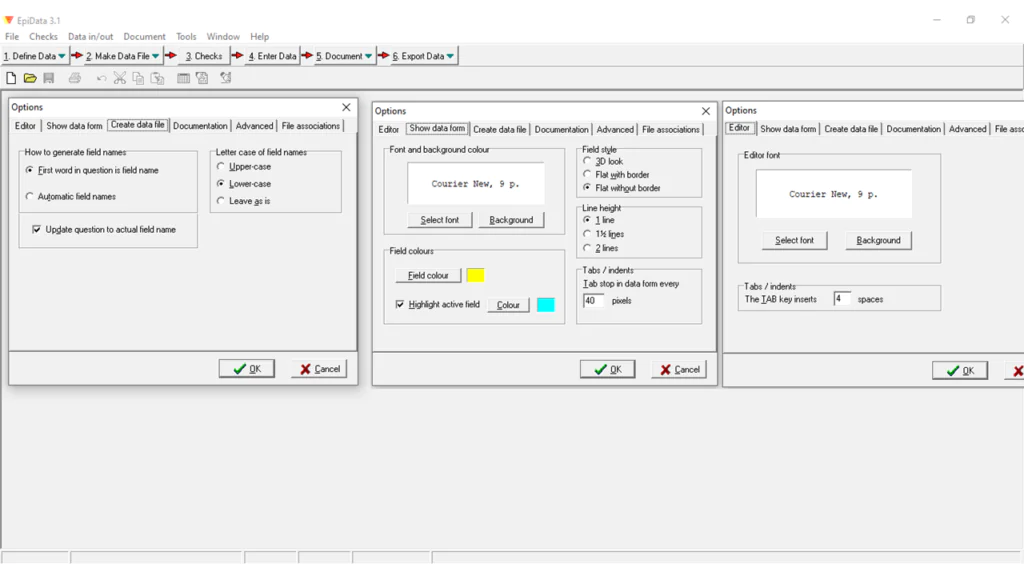
You can navigate your way to the data file in the menu bar and click-open certain options on the screen as shown in the image attached below for your reference. You can set display options like color scheme and font according to your liking alongside variable field name setting options.
Creating Entry Forms
Step no 01: File name>New (Ctrl + N) save it to create a QES file.
Step No 02: Now all you need to do is to set data questionnaire in the format as shown below;
|VariableName| |Question or Description or Statement| |Data Entry Field|
Note: |VariableName| by default the first word is considered as a variable name. The variable name is to be written without underscore or space between the letters. You can also use up to 10 characters as a suitable variable name by default (setting option). In the same instance, you can type the questions and put the main word inside brackets “{}” in the sentence.
For example;
Name Enter your name <Aaaaaaaaaaaaaaaaaaaaaaaaaaaaaaaa>
Name Enter your name __________________________________________
Enter your {name} _________________________________________
The entry field for the numeric variable (weight, age, household numbers, etc.): #####
Entry field for the String: _____ (underscore)
Entry field for the Date: <dd/mm/yyyy>
It is interesting to note that the length of the character determines the capacity of the field. You can simply type ‘Yes’ or ‘No’ for the question. Moreover, make use of a numeric variable type in categorical type questions with # entry field and make separate categories for multiple choice questions for better data analysis output. Repeat the process to enter all questions one by one.
Step no: 03: Now you need to click on the “Make Data File” option in the progress bar. By doing so, a new record file (.REC) will be created.
Step no: 04: This phase is crucial and non-negotiable. It requires the addition of validation measures that include allowable values, labeling of options/ choices, jumps/ skips, and other auto calculations equations. This will result in the creation of a check file (.CHK).
Step no: 05: The most waited part of the entire process arrives now. You may enter data in the designated form right now for an effective data analysis outcome.
How ITS Can Help You With Data Entry Service?
Information Transformation Service (ITS) provides convenient Data Entry Solutions regardless of any additional investment of staff, resources, or infrastructure. By outsourcing your Data Entry Projects to us your company will be blessed with high-quality and diverse data entry-related options. Such quality service enables your data to be entered in various desirable formats with repetitive, inaccurate, incomplete, grammatically nonsensical words replaced to form better semantic clarity and understanding. Irrespective of the size and complexity ITS Team defines customized packages to directly answer specifically your business big data projects. If you are interested in getting ITS Data Entry Services you can ask for a free quote!
