How To Do Image Morphing In Adobe After Effect
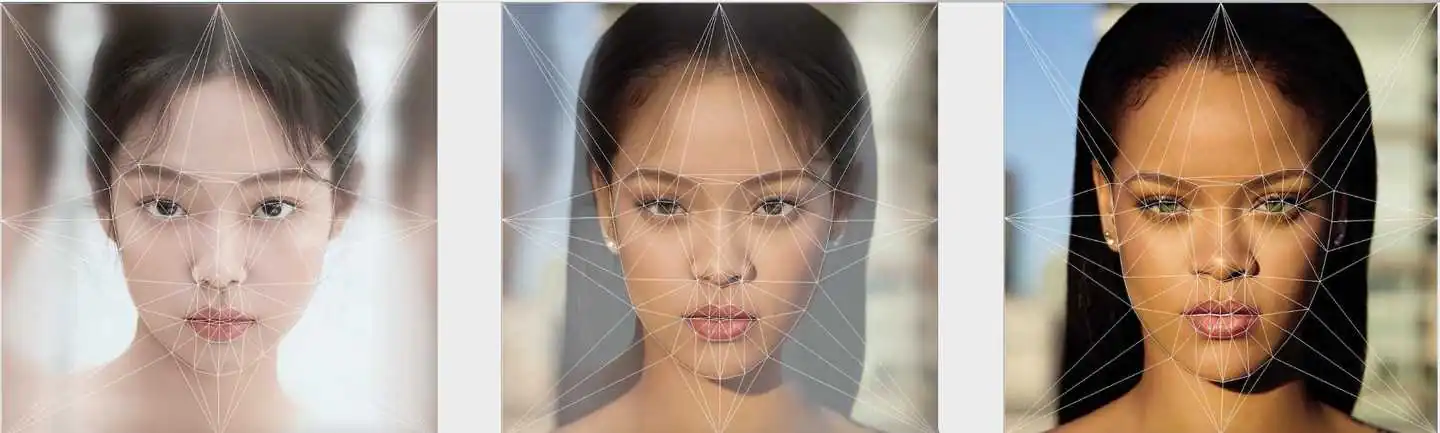
Image morphing has various applications in creating artistic expressions in computer graphics, animations, and movie visual effects. It develops image smoothness through a gradual transformation while generating a sequence of intermediate frames bit by bit, altering the source image into the target image. The notion behind multiple intermediate frames is an ongoing, graceful transition of the source picture, indicating progressive phases in the metamorphosis process. Conversely, using fewer intermediate frames can spawn a jerkier transition, where the changes between frames are more flagrant and less cultivated. When the two images are presented sequentially at the same tempo, a superlative demeanor of transition between them is generated. Though the number of frames generation is in your control, the more intermediate frames you create, the more smoothness your image attains. The chosen software program and the visual quality sought to determine the ideal count of frames for image morphing. Even though many software programs are available to perform image morphing by relying on tool adjustments such as the Warp Transformation, Adobe After Effects provides more at-the-ready features for morphing and animation, conferring you better control over the process and creating appealing morphing effects.
Step 1: Import Images
Launch Adobe After Effects and open a new project.
Access the “File” menu and select “Import” > “File.”
Browse your computer to find the source image and target image files.
Select both images and click “Open” to import them into the project.
Ensure the images have similar dimensions and proportions for a smooth morphing process.
The imported images will appear in the Project panel as separate assets.
Drag the images into the composition area, creating individual layers for each image.
Position the source image at the beginning and the target image at the end of the timeline.
Arranging the images in this order sets the starting and ending points for the morphing animation.
Now you are ready to proceed to the subsequent steps, where you will apply transformations and create intermediate frames for the morphing effect.
Step 2: Create a New Composition
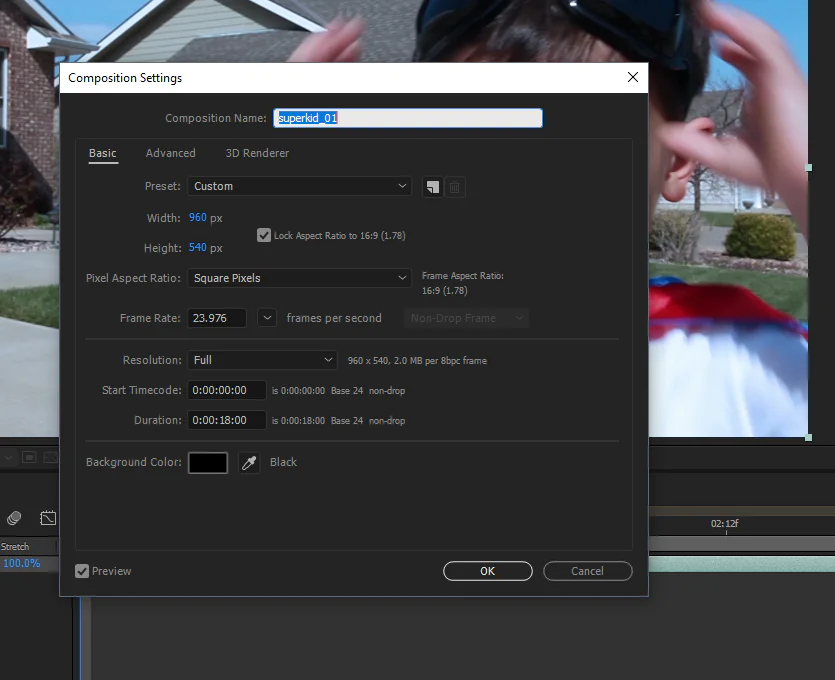
Right-click on one of the imported images in the Project panel.
From the context menu, choose “New Composition from Selection.”
This action generates a new composition in the Timeline panel.
The composition serves as the workspace for your image morphing project.
This composition will organize the source and target images as separate layers.
The new composition provides a structured environment for applying transformations and effects.
It allows you to control the morphing animation’s timing and sequence of transformations.
In the composition, you can easily set keyframes to define the starting and ending states of the images.
The composition’s timeline facilitates precise control over the morphing process, enabling smooth transitions.
Step 3: Organize Images in the Composition
In the composition timeline, position the source image layer at the beginning and the target image layer at the end.
Properly align the images for a smooth progression of the morphing effect.
Ensure both images have similar dimensions and proportions for accurate transformations.
Placing the source image first and the target image last sets the starting and ending points of the morphing animation.
The timeline represents the temporal sequence of the morphing process, allowing you to control the timing and pace.
Organizing the images within the composition ensures a logical flow from the source to the target image.
This step prepares the project for applying keyframes and intermediate frames in subsequent steps.
The composition’s timeline simplifies managing transformations and blending between the images.
By positioning the images appropriately, you establish the chronological order of the morphing effect.
Step 4: Enable Time-Remapping
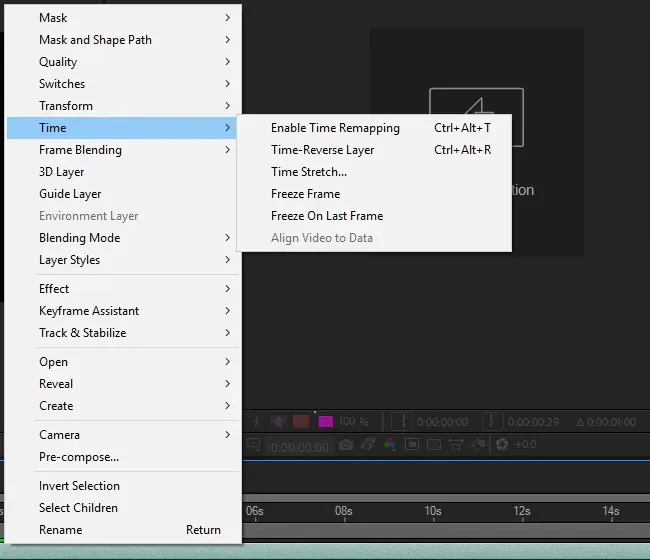
If you desire smoother transitions and intermediate frames, enable time-remapping on the composition layer.
Right-click on the composition layer in the timeline or the pre-composition layer if you created one.
Choose “Time” > “Enable Time Remapping” from the context menu.
Enabling time-remapping allows you to adjust the timing and duration of the morphing animation.
Add and manipulate keyframes on the time-remap property to control the speed and position of the intermediate frames.
This feature allows for gradual transformations between the source and target images.
If intermediate frames are unnecessary, skip this step and proceed with setting direct transformations using keyframes.
Time-remapping allows precise control over the morphing animation’s timing and ensures smoother transitions.
Utilize this feature when creating more complex morphing effects or animations with varying speeds.
Step 5: Set Keyframes
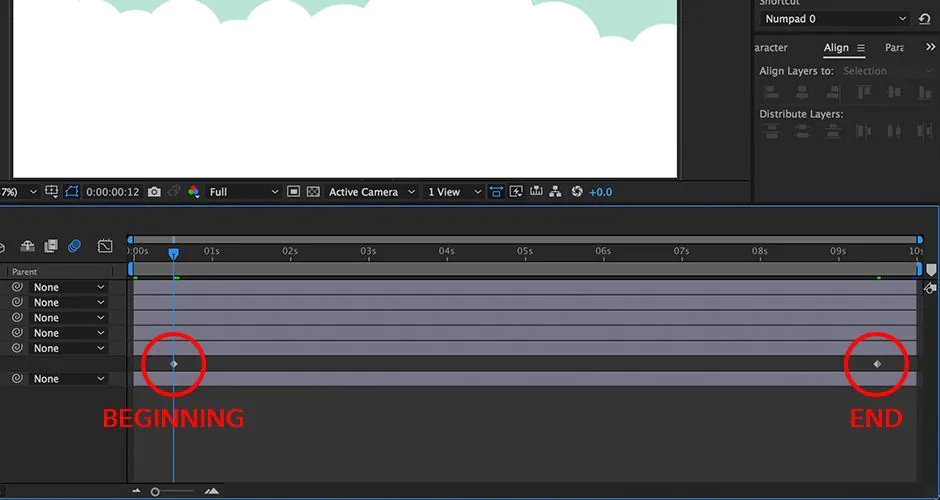
Move the timeline indicator to the starting point of the morphing animation.
Select the source image layer in the composition.
Apply keyframes for position, scale, opacity, and other transformation properties you want to change over time.
Keyframes mark the initial state of the morphing effect, capturing the original position and appearance of the source image.
For smoother morphing, move the timeline indicator to the ending point of the transition.
Adjust the transformation properties of the source image layer to match the target image.
Apply keyframes to represent the final state of the morphing effect.
After Effects will automatically interpolate values between keyframes, creating a gradual transformation from source to target image.
Step 6: Morphing Function
Move the timeline indicator to the ending point of the morphing animation.
With the target image layer selected, adjust the position, scale, opacity, and other transformation properties to match the desired final appearance.
Apply keyframes to represent the target image’s state at this point in the animation.
The changes made to the target image properties define the final state of the morphing effect.
After Effects will automatically interpolate values between the keyframes, smoothly transitioning the source image to resemble the target image.
This morphing function calculates the in-between frames, progressively transforming the source image.
Properly adjusting the transformations ensures a visually cohesive morphing animation.
Fine-tuning the morphing function results in a seamless and natural transition between the two images.
Continuously preview the animation to assess and refine the morphing effect.
Step 7: Intermediate Frames
If time-remapping was enabled in Step 4 and you desire smoother morphing, proceed with this step.
Return to the keyframes of the source and target images on the timeline.
Add intermediate keyframes at regular intervals between the starting and ending points of the animation.
Adjust the source image’s transformation properties for each intermediate keyframe.
Intermediate frames represent incremental changes between the source and target images, creating a gradual transformation.
After Effects automatically interpolates values as you add and adjust intermediate keyframes, generating in-between images.
The number of intermediate frames determines the smoothness and realism of the morphing effect.
Fine-tuning intermediate frames enhances the fluidity and visual appeal of the morphing animation.
Experiment with keyframe placement to achieve a visually pleasing and dynamic transition.
Step 8: Blending
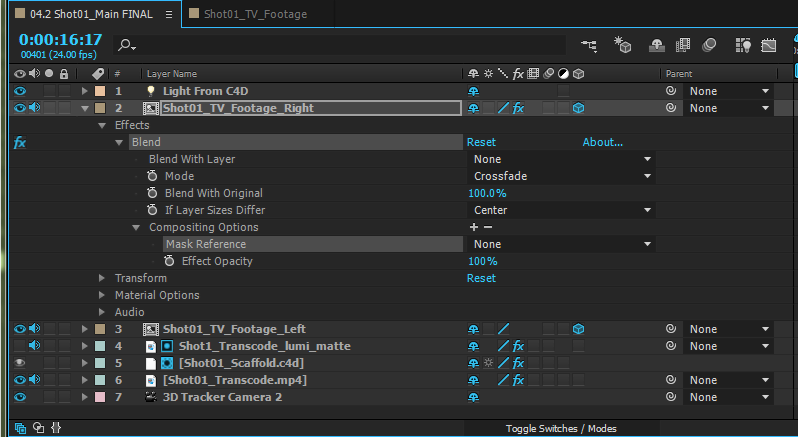
Ensure seamless blending between the source and target images creates a smooth transition.
Use opacity adjustments, masks, and blending modes to achieve the desired effect.
Review and refine the blending between each frame, ensuring no abrupt changes or visual discrepancies.
Pay attention to edges and contours to avoid artifacts during blending.
Experiment with different blending options for creative transitions, like dissolving or crossfading.
Smooth blending enhances the overall quality and cohesiveness of the morphing animation.
Regularly preview the animation to assess the blending and make necessary adjustments.
Appropriate blending techniques create a visually engaging and polished morphing effect.
A balanced approach to blending enhances the realism and impact of the transition.
The final result should be a seamless and visually appealing morphing animation with smooth transitions between the images.
Step 9: Preview and Refine
Play the timeline to preview the morphing animation and assess its visual quality and smoothness.
Check for glitches, artifacts, or inconsistencies in intermediate frames and blending.
Refine keyframes and transformations if needed to improve the animation’s flow.
Fine-tune the timing to ensure the morphing effect aligns with the desired pace.
Utilize After Effects’ preview options to assess the animation at different speeds and resolutions.
Regularly review and refine the animation iteratively to achieve a polished result.
Seek feedback from peers or clients to gather input for further improvements.
Previewing and refining ensure a captivating and seamless morphing animation.
Adjust any elements that may disrupt the overall visual experience.
Continue refining until the animation meets your creative vision and expectations.
Step 10: Render
To render the final output go to the “Composition” menu and select “Add to Render Queue.”
Choose the desired output format, resolution, and other settings for the animation.
Double-check render settings to match your intended requirements.
Specify the destination folder and filename for the rendered file.
Click “Render” to start processing the composition into the final animation.
The rendering time varies based on the animation’s complexity and duration.
After rendering is complete, review the output to ensure it meets expectations.
Save the final rendered animation in a secure location.
Depending on your project’s requirements, use the animation creatively.
You can also share it on social media platforms, websites, or presentations to captivate your audience.
Conclusion
Image morphing is a capable image-manipulating approach that you can employ in plenty of visual effects. Progressively changing a source picture into a destination image via a series of intermediate frames results in a smoother transition. Adobe After Effects is a superior software option with mighty morphing and animation tools. Its blending modes merge pixels from the source and target images icing a beckoning final morphed photograph. Eventually, you can display your vision and creativity well-founded and imaginatively.
