How to do 3D modeling in AutoCAD?
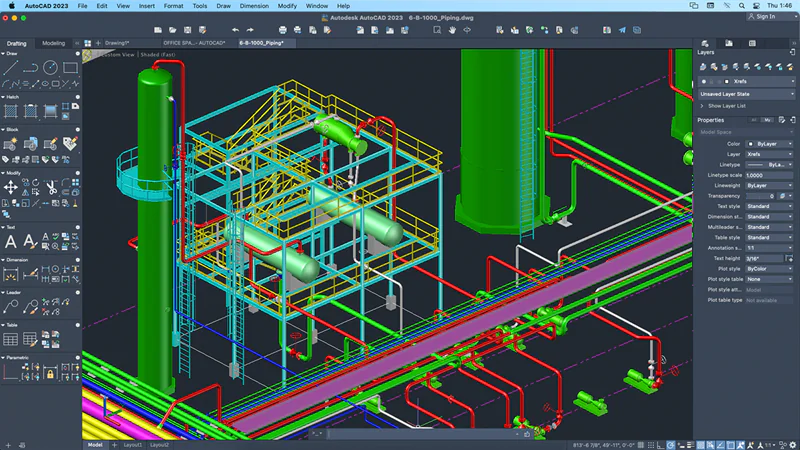
AutoCAD is a well-known tool in the design sector for 2D drawing. However, a totally different world of possibilities—3D—is concealed behind a tiny gear-shaped icon that is secretly hiding in the lower corner of your AutoCAD screen. Well, if you are new to AutoCAD 3D modeling and looking for some guidance, don’t worry, we are here for you. In this post, we will share all the necessary information one should know before starting the 3D designs on AutoCAD.
What is AutoCAD?
If we had to sum it up in a few words, AutoCAD is a form of CAD software dedicated to drawing and modeling in 2D and 3D. It enables the development of all kinds of buildings and objects by enabling the design and alteration of geometric models with practically endless potential. Because of its versatility, AutoCAD has expanded beyond its typical use in the domains of engineering and architecture to include graphic and interior design. At the moment, AutoCAD offers a wide range of specialized auxiliary tools that cover all industrial disciplines linked to 2D design and 3D modeling.
Why should we use AutoCAD for 3D modeling?
When there are numerous software available for 3D modeling, so why we should AutoCAD? The answer is here:
Compatibility
One benefit of using AutoCAD is standardization. It serves as the industry standard for computer-aided design, allowing alternative CAD software to mimic AutoCAD’s functionality and guarantee file compatibility across different industries.
2D and 3D
It has the capability to switch between 2D and 3D. Depending on the version, print documentation can be generated automatically and is frequently based on virtual 3D models. Although 3D modeling is known to be easy to complex, with the help of 3d software, it becomes very simple to build and modify.
Complementary to CAM
CAD and Computer Aided Manufacturing (CAM) go hand in hand. AutoCAD works with the appropriate CAM software automatically to produce machine tool drawings for tasks like drilling, turning, and grinding.
Virtualization
Virtualization is utilized in large-scale production, such as a bridge or building design, etc. Through virtualization, a project may be viewed and explored in 3D before the production process begins.
Saves time
It takes a lot of effort to create any required drawing, however since the invention of AutoCAD, creating drawings take very little time. Additionally, we can make as many copies of the same drawing. Time can be saved by using the same drawing in multiple drawings.
Simulation
Additionally, it is used to build simulations and wire-frame models, which allow users to test a model’s functionality before investing in a prototype.
Database
It also helps in the building of databases like PDM/PLM, which can then be accessible by WAN
once they are developed with the aid of CAD files.
Accuracy
Large files can be produced with the same efficiency and accuracy. For drawing precision, commands like Grid Snap, Zoom, and attach are employed.
How to do 3D modeling in AutoCAD?
Here are the steps which will lead you to draw your first 3D model on AutoCAD.
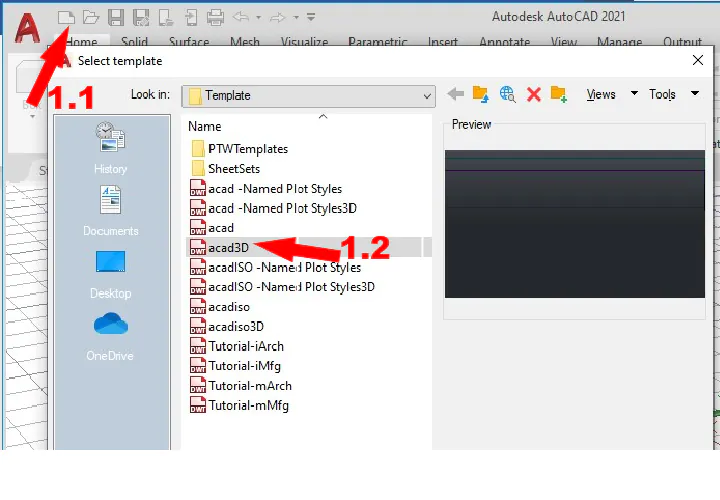
Step 1: Opening a new file
We’ll set up our file first to start.
Select “New.”
Choose “acad3d.dwt.”
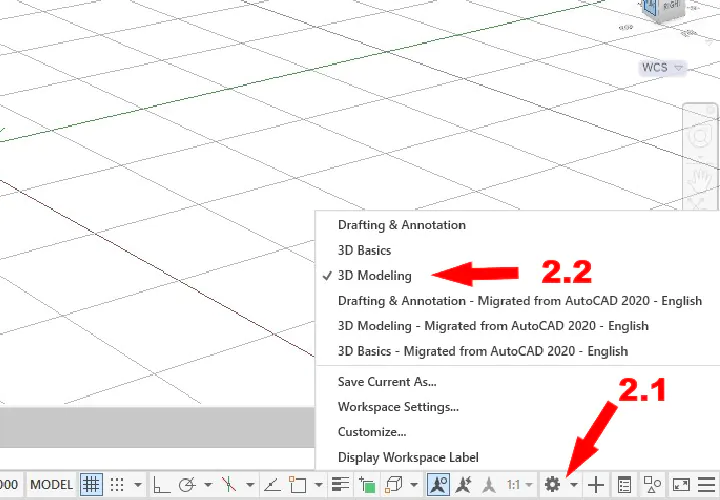
Step 2: Now select the workspace
In the lower right corner of your screen, click the gear symbol.
Choose “3D Modeling” to access the 3D Modeling workspace.
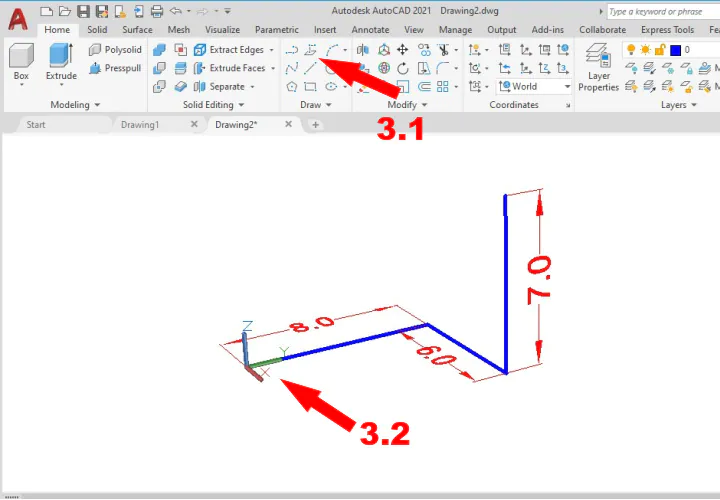
Step 3: Creating the shape
In this stage, we’ll start using 3D drawing to make our shape. To accomplish this, we’ll work with polylines and determine our sizes using direct distance entry (DDE).
- Choose “3D Polyline.”
- From the starting position of “0,0,0,” draw the blue polyline.
- Enter “8” by dragging your mouse along the Y-axis. Type “6” while dragging your mouse along the X-axis. Enter “7” by moving your mouse up the Z-axis.
You’ve just created your first 3D shape—congrats!
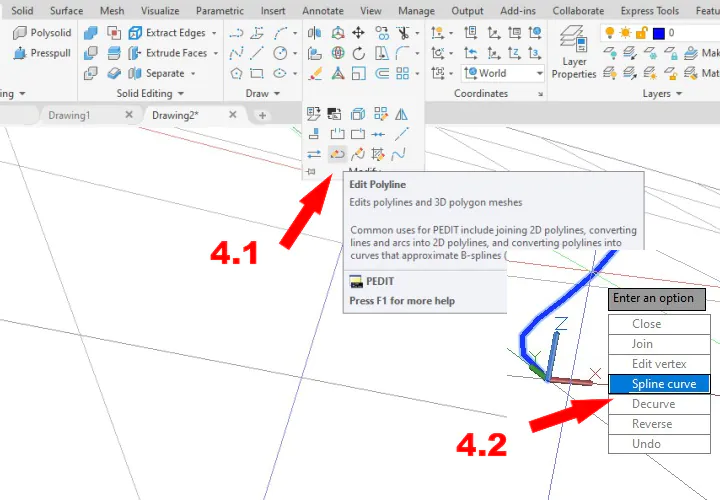
Step 4: Now edit the shape
Now we’ll add some curves to our polyline. This is necessary in order for the Sweep command to function in subsequent actions. We would just receive an error message if we attempted to sweep our profile along the polyline while the angles were still 90 degrees.
- Select the “Edit Polyline” tool.
- Click on your polyline and select “Spline curve”.
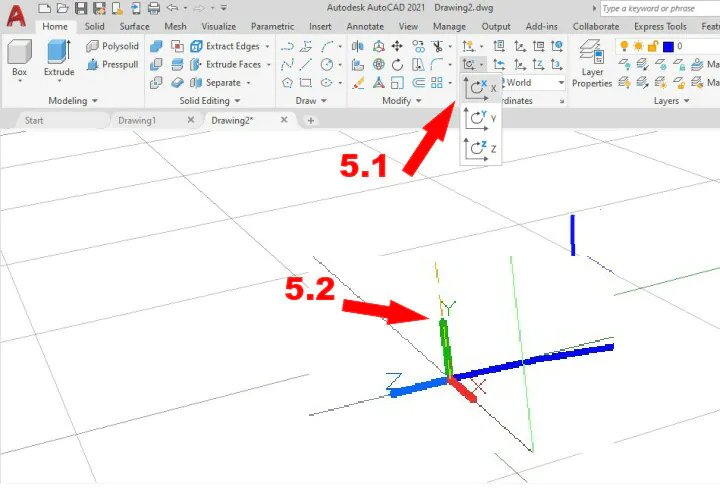
Step 5: Now change the drawing orientation
You can next build a profile perpendicular to the polyline by adjusting the surface that you’re drawing on.
- Select the X-axis first, then the “Rotate Axis” icon.
- Change your UCS icon so that “Y” is pointing upward rather than “Z.” (You always sketch on your X/Y work surface.)
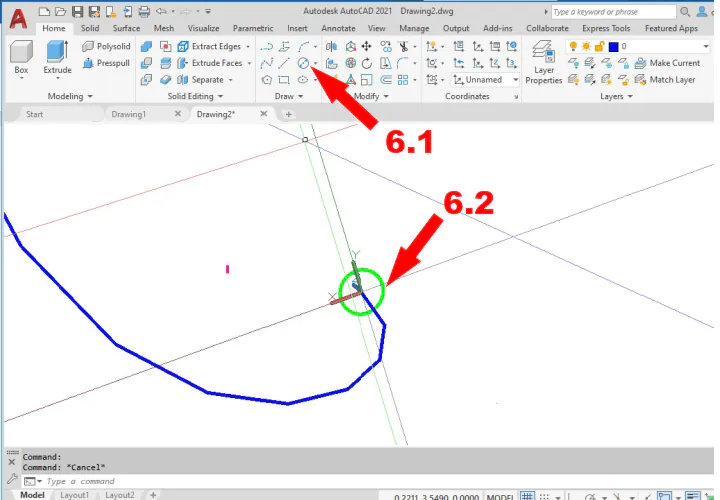
Step 6: Turn it into a model
We need to put up the 3D drawing design you’ll use for the sweep before obtaining a model.
- Choose the “Center, Diameter” icon for the circle.
- On your new drawing surface, center your circle at “0,0,0,” then enter “1” for the diameter.
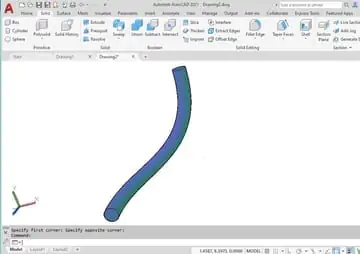
Step 7: Sweeping
We are now prepared to use the 3D modeling tool “Sweep” to produce a solid since we have our 3D drawing shape.
- Select the Solid tab.
- Choose the Sweep instrument.
- After selecting your circle, hit Enter.
- Click on your polyline.
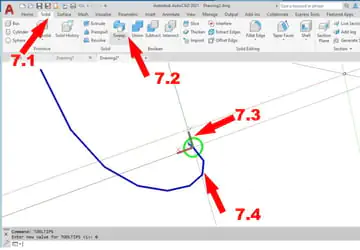
And there you have it—a model you just created using 3D drawing!
How to Convert a 2D Model to 3D Using AutoCAD?
The “Extrude” and “Revolve” commands in AutoCAD can be used to convert 2-D designs into 3-D models. 3-D modelers use the term “extrude” to describe the process of expanding a 2-D shape into 3-D space. To carry out this extension, AutoCAD first adds a new axis that is perpendicular to the 2-D axes that support your 2-D design. The 2-D shapes you are extending are then copied and placed higher on the axis while the original shapes are kept at the foot of the axis. Using the “Render” command on the Render tab, present your 2-D design in 3-D with accurate lighting and shadows.
Step 1: By clicking the “File” menu, choose the “Open” option from the context menu. Double-click on an AutoCAD file that contains a 2-D model that you want to make 3-D. The file will be loaded by AutoCAD for conversion.
Step 2: If you want to view your design with perspective, type “Perspective 1,”. After this, parallel lines will appear to converge as they do in the real world. Compared to parallel projection, this choice is more practical.
Step 3: Drag the mouse until the top, right, and front sides of the cube are visible, then click the “cube” icon in the upper right corner of the canvas. By switching the viewpoint from two dimensions to three, you can now see the three-dimensionality of the 3-D form you’ll make from the two dimensions.
Step 4: To switch the workspace to one that shows tools for creating and modifying 3-D objects, select the drop-down list at the top of the program window, then pick the “3-D modeling” item. To reach the “Modeling” panel, click the “Home” option. From there, you may use the “Extrude” tool to transform rectangular 2-D shapes into 3-D forms that are block-like.
Step 5: Select a shape from your 2-D model that you want to convert into a block form rather than a cylindrical or spherical form by clicking the “Extrude” button. Click “Enter.” The shape you chose will enlarge into three dimensions and the top of the box it creates will attach to your cursor. To stop the extrusion, click the mouse after dragging the pointer until the box reaches the desired height. To expand the remaining 2-D model components into blocks, use the “Extrude” command.
Step 6: The “Revolve” command, which creates cylindrical, spherical, and other round forms from 2-D shapes, can be found by selecting the “Surface” tab and going to the “Create” panel. To change a shape in your 2-D model into a cylinder or another rounded form, click this command and then click the shape you want to change. You can enter “x,” “y,” or “z” to indicate the axis around which you want the shape to spin. To complete the transformation of your 2-D design into a 3-D model, press “Enter” to conduct the rotation and then rotate the remaining components of your design that you want to have round 3-D forms.
Final Thoughts
Without a doubt, AutoCAD has long been regarded as the pioneer of computer-aided design (CAD), and its standing in the market is still as strong as it was. AutoCAD makes it possible to create and edit 3D models using solids, surfaces, and objects as well as 2D geometry in a professional manner. Because of the many different editing options it provides, it is one of the most widely used Cad tools. For these reasons, it is software that is frequently utilized by professionals including designers, architects, and design engineers. Furthermore, commands like extrusion and revolve make it more user-friendly and more proficient for 3D modeling.
