
How to Deal with Chromatic Aberration in Your Images
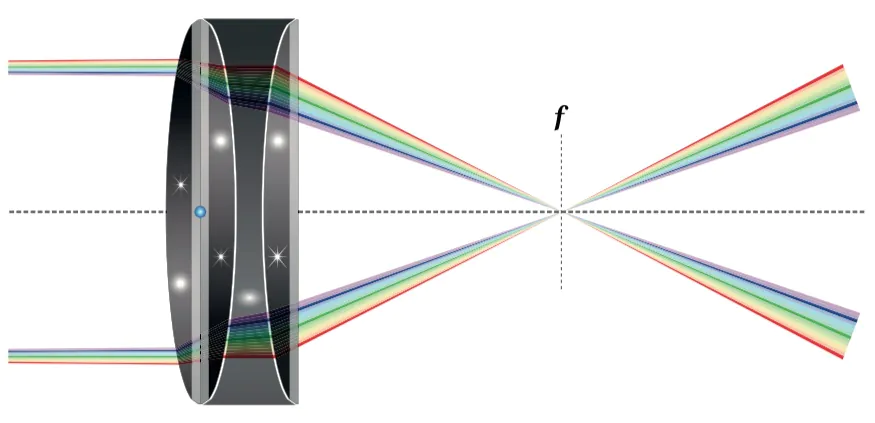
Chromatic aberration is caused by the unusual convergence of various light colors after passing through any optical instrument, resulting in noticeable color distortion and loss of picture clarity. While it is challenging to eliminate chromatic aberration, there are various techniques that have a substantial influence on reducing this issue, resulting in sharper, more color-accurate images. To avoid color fringing, consider the lens quality and various shooting approaches and use chromatic aberration filters. Several post-processing techniques can also help with chromatic aberration correction. This blog focuses on the essential strategies and steps you can adopt to avoid chromatic aberration in your photographs, and if it does occur anyways, you can minimize its impact.
Choose the Right Lens
Choosing the right lens is essential for reducing chromatic aberration. There are some primary factors to consider when choosing a lens that offers an extensive overview to help you make an informed decision. As a result, you can choose a well-suited lens to minimize chromatic aberration and improve the overall image quality of your photography.
Understand lens characteristics: When selecting a lens, it’s essential to understand how different lens characteristics can impact chromatic aberration. Factors such as lens quality, glass elements, and coatings play a crucial role. High-quality lenses with advanced optical designs are often better equipped to minimize chromatic aberration.
Look for low-dispersion glass elements: Lenses that incorporate low-dispersion glass elements, such as Extra-low Dispersion (ED) or Fluorite elements, are designed to reduce chromatic aberration. These specialized glass elements help to correct the dispersion of different wavelengths of light, resulting in sharper and more color-accurate images.
Research lens reviews and recommendations: Before making a lens purchase, it’s helpful to research lens reviews and seek recommendations from trusted sources or photographers who have experience dealing with chromatic aberration. Look for lenses known for their superior optical performance and ability to minimize chromatic aberration.
Test lenses whenever possible: Try out lenses before making a final decision. This hands-on approach allows you to assess the lens’s performance, including its ability to handle chromatic aberration, in real-world shooting conditions.
Apply Proper Shooting Techniques
Applying proper shooting techniques can significantly reduce chromatic aberration in your images. You can implement various techniques while capturing photographs to minimize chromatic aberration and achieve sharper, more accurate results.
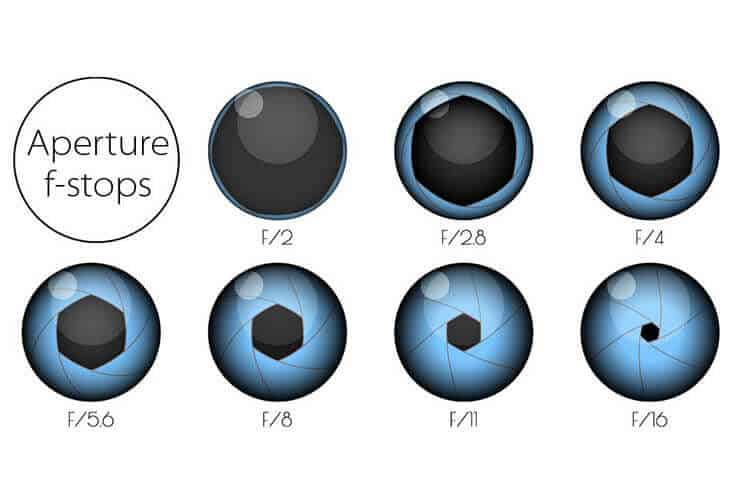
Understand the impact of aperture: The choice of aperture can affect chromatic aberration. Smaller apertures (higher f-numbers) tend to reduce chromatic aberration compared to wider apertures. Experiment with different aperture settings and observe their impact on chromatic aberration in your images.
Consider the focal length: Different focal lengths can contribute to varying degrees of chromatic aberration. Telephoto lenses generally exhibit less chromatic aberration compared to wide-angle lenses. Understanding the characteristics of your lens and adjusting the focal length accordingly can help minimize chromatic aberration.
Use lens hoods: Lens hoods are essential accessories that prevent unwanted light from entering the lens and causing flare, which can exacerbate chromatic aberration. Always use a lens hood appropriate for your lens to shield it from stray light and reduce the chances of chromatic aberration.
Experiment with filters: Certain filters, such as UV filters or specialized chromatic aberration filters, can help reduce the impact of chromatic aberration in your images. Test different filters and assess their effectiveness in minimizing chromatic aberration for specific shooting conditions.
Utilize Post-Processing Solutions
Post-processing is essential for fixing chromatic aberration, especially when camera settings or shooting techniques fail to eliminate it. The steps below will lead you through the process of using post-processing software to effectively address chromatic aberration in your images, from importing and organizing your files to using automatic and manual correction techniques that result in corrected images with visually improved results.
Step 1: Choose suitable post-processing software
Select post-processing software that offers chromatic aberration correction tools. Popular options include Adobe Lightroom, Capture One, DxO PhotoLab, and Photoshop. Research and evaluate the features and capabilities of different software to find the one that suits your needs.
Step 2: Import and organize your images
Start by importing your images into the chosen post-processing software. Organize them into folders or collections for easy access and management during editing.
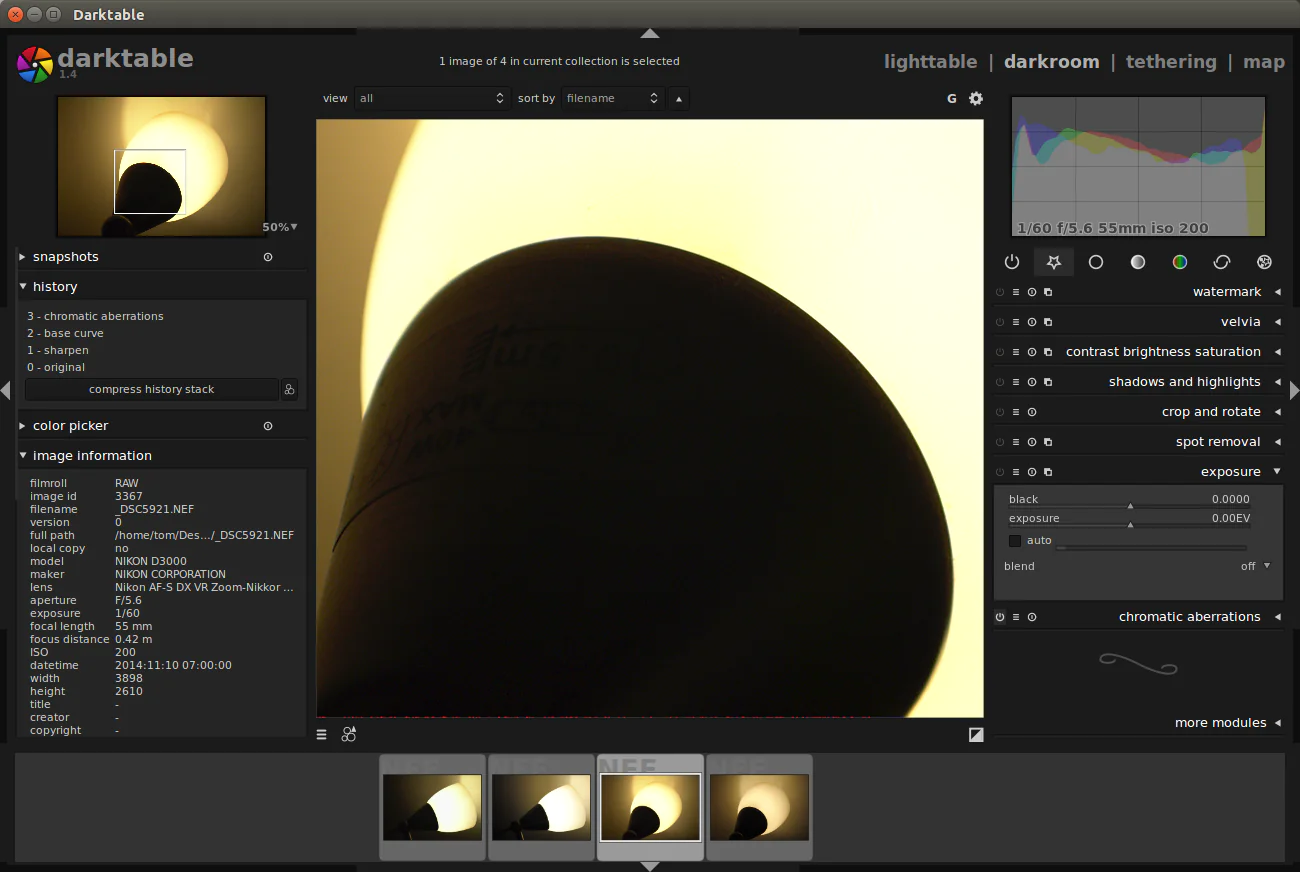
Step 3: Apply automatic chromatic aberration correction
Most post-processing software provides an automatic correction feature for chromatic aberration. Locate and activate this option to let the software analyze and apply corrections based on the detected aberrations in your images.
Step 4: Fine-tune corrections manually
Automatic corrections may not always be perfect or suitable for every image. Look closely at your images and inspect them for any remaining chromatic aberration. Use the software’s manual adjustment tools to fine-tune the corrections and achieve more precise results.
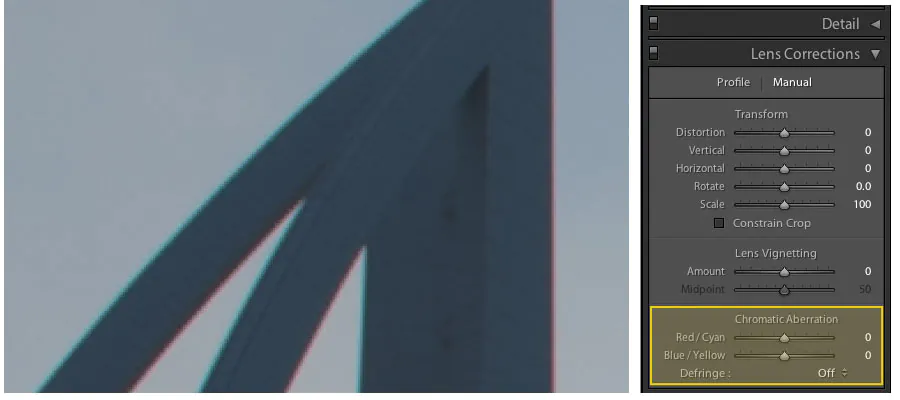
Step 5: Adjust sliders for chromatic aberration correction
Look for sliders or adjustment options for chromatic aberration correction in your chosen post-processing software. These sliders usually allow you to control the amount of correction applied to the red, green, and blue color channels individually. Experiment with these sliders to find the optimal balance and minimize chromatic aberration.
Step 6: Target specific areas for correction
Some software allows you to selectively apply chromatic aberration correction to specific areas of an image. Use tools such as brush or gradient masks to target and correct areas exhibiting significant chromatic aberration, such as high-contrast edges or areas with solid color fringing.
Step 7: Use advanced correction features
Depending on the software, you can access advanced features designed explicitly for chromatic aberration correction. These features could include tools for correcting lateral or longitudinal chromatic aberration, color fringe reduction, or chromatic aberration profiling. Explore these advanced options to refine your corrections further.
Step 8: Utilize batch processing
Use batch processing in your software if you have a series of images with similar chromatic aberration issues. That lets you apply the same chromatic aberration correction settings to multiple images simultaneously, saving time and ensuring consistency across your image set.
Step 9: Review and compare before-and-after results
After applying chromatic aberration corrections, review your images alongside the original versions. Compare the results and assess the effectiveness of the corrections. Make any necessary adjustments to achieve the desired outcome.
Step 10: Save and export your corrected images
Once satisfied with the chromatic aberration corrections, save and export your images in the desired file format and resolution. Remember to maintain a backup of your original images to preserve their integrity.
Employ Advanced Techniques for Complex Cases
Some cases of chromatic aberration may require advanced techniques for optimal correction. You can go for specialized plugins, third-party software, and a combination of different techniques to tackle complex instances of chromatic aberration and achieve the best possible results.
Explore specialized plugins: Besides your post-processing software’s built-in chromatic aberration correction tools, consider exploring specialized plugins or extensions dedicated to chromatic aberration correction. These plugins often offer advanced algorithms and additional controls for precisely correcting complex cases. Research and experiment with reputable plugins compatible with your chosen software.
Consider third-party software: If the native chromatic aberration correction tools in your current software are not providing satisfactory results, consider investing in dedicated third-party software that specializes in chromatic aberration correction. These standalone applications offer advanced algorithms and comprehensive controls specifically designed to address complex cases of chromatic aberration. Evaluate different software options and choose one that aligns with your requirements and budget.
Combine multiple correction techniques: In some situations, combining different techniques may be necessary to effectively deal with complex chromatic aberration. For example, you could apply automatic corrections using your post-processing software and then fine-tune the results using specialized plugins or third-party software. Experiment with various combinations to find the most effective approach for each image.
Refine corrections manually: Complex cases of chromatic aberration may require more precise manual adjustments beyond what automatic tools can offer. Take the time to carefully analyze the image and identify areas with persistent chromatic aberration. Utilize manual adjustment tools available in your software or plugins to refine the corrections on a pixel level. This approach allows for targeted correction, ensuring optimal results.
Utilize advanced color correction techniques: Advanced color correction techniques, such as channel masking or selective color adjustments, can be valuable for addressing complex chromatic aberration. You can minimize color fringing and restore accurate colors by targeting specific color channels or using advanced blending modes. Experiment with these techniques in your software or explore tutorials and resources to learn more about their application.
Seek expert guidance or consultation: If you encounter particularly challenging cases of chromatic aberration or struggle to achieve satisfactory results, consider seeking expert guidance or consultation. Online photography communities, forums, or professional photographers specializing in post-processing may provide insights and advice tailored to your situation.
Advanced techniques for chromatic aberration in complex cases can effectively tackle persistent issues and achieve optimal image quality. Consider specialized plugins and third-party software, and combine multiple correction techniques. You should also seek expert guidance for valuable insights and assistance.
Conclusion
To sum up, chromatic aberration is a prevalent issue that causes frustration through reduced image quality and sharpness. To minimize its influence, anyone dealing with optical instruments must first understand its causes and consequences. You can efficiently handle this phenomenon using high-quality lenses, suitable shooting techniques, and post-processing software with chromatic aberration correction features. At last, with focus and dedication, you can produce accurate and visually arresting photos with brilliant colors and precise details. By constantly learning and trying, you can conquer chromatic aberration issues and make compelling images.
