
How To Achieve Watercolor Effect In Photoshop
Adding a watercolor effect to your photographs could benefit an assortment of artworks, such as illustrations, digital paintings, photo manipulations, and graphic designs. This effect is accomplished by making digital brushstrokes that mix colors fluidly and are transparent, similar to the marks formed by a watercolor brush. The watercolor effect digitally recreates the distinct aesthetic of classic watercolor paintings, allowing for experimentation, freedom, and expressive artwork, improving creativity and flexibility. Regarding adding watercolor effects to your photographs or artwork, Photoshop outperforms the competition by allowing you to play with different colors, brushes, opacity, and blending modes, allowing quick edits and experimentation. Photoshop layers and masking techniques allow you to polish particular sections of your image or design, make modifications, and experiment with variants without causing damage to the original. Using the techniques and following the steps provided in this tutorial blog, you can efficiently achieve a watercolor effect in your design as well as images using Photoshop.
Step 1: Setting up the Workspace
When beginning to achieve a watercolor effect in Photoshop, it is crucial to establish an optimal workspace that will facilitate your creative workflow and set the stage for successful artwork creation.
Launch Adobe Photoshop: Open the Photoshop application on your computer to access the program and its array of powerful digital art tools.
Create a new document: Select “File” from the menu bar and choose “New” to open the New Document dialog box. Specify the dimensions, resolution, and color mode for your canvas. Consider the intended output, whether it be for digital display or printing, and choose appropriate settings accordingly.
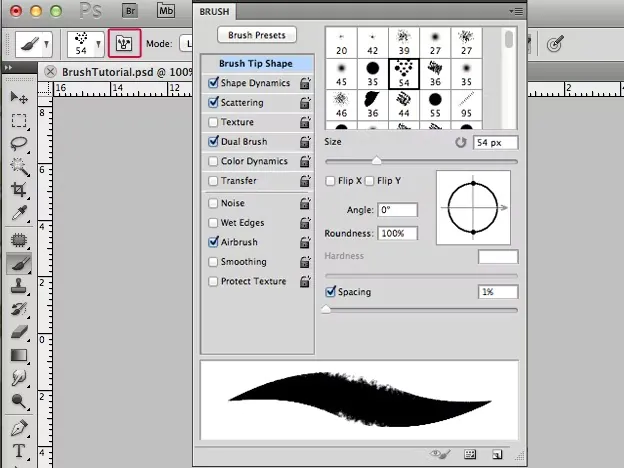
Adjust the brush settings: Select the Brush Tool from the toolbar with your new document open. Explore the Brush Settings panel to modify the brush properties to replicate the characteristics of a watercolor brush. Experiment with different brush shapes, sizes, hardness, opacity, and flow settings to achieve the desired effect. Take advantage of the Shape Dynamics, Scattering, and Transfer options to simulate the organic nature of watercolor brushstrokes.
Properly setting up your workspace in Photoshop lays the foundation for seamless creativity. Adjusting the brush settings enables you to mimic the textures, flow, and transparency of traditional watercolor painting. This step ensures that you have the necessary tools at your disposal to achieve a convincing watercolor effect.
Step 2: Preparing the Base Layers
Once your workspace is set up, the next step is to establish a solid base for your watercolor effect by preparing the base layers in Photoshop.
Create a new layer: To maintain flexibility and non-destructive editing, start by creating a new layer above the background layer. That will allow you to add and adjust elements without affecting the original background.
Choose a suitable background: Select a color or texture for your background layer that complements the subject and sets the desired mood for your artwork. Consider using soft pastel colors or light washes to evoke the translucent quality of watercolor paintings.
Sketch or trace your subject: Use the brush tool or a graphics tablet to sketch or trace your subject on a new layer above the background. Keep the lines loose and simple, focusing on capturing the basic shapes and forms. This initial sketch will serve as a guide for your watercolor painting.
Refine and clean up the sketch: Using the eraser tool or layer masks, refine and clean up your sketch. Remove any unnecessary lines or details that may distract from the watercolor effect. Pay attention to maintaining a delicate and organic feel to the lines.
Preparing the base layers establishes a foundation for your watercolor effect. Creating a separate layer for the background allows you to experiment with different colors and textures without affecting the original artwork. Sketching or tracing the subject provides a roadmap for your painting, ensuring a coherent composition. Cleaning up the sketch helps refine the overall appearance and sets the stage for the subsequent watercolor techniques in Photoshop.
Step 3: Applying Watercolor Techniques
Now that you have prepared the base layers, it’s time to delve into the techniques that will help you achieve a realistic watercolor effect in Photoshop.
Wet-on-wet technique: Begin by creating a new layer above your base layers. Select a soft brush with low opacity and flow settings. Choose a color from your palette and start painting with wet strokes over the base layer. Allow the colors to blend organically, simulating watercolors’ characteristic blending and bleeding. Experiment with different colors and brush sizes to achieve the desired effect. Adjust the opacity and flow settings as needed.
Glazing technique: Add a new layer above your previous layers and set its blending mode to “Multiply” or “Overlay.” Applying transparent washes of color over your existing layers using a large soft brush. Gradually build up layers to achieve the desired richness and depth. This technique mimics the translucent quality of watercolors.TRY different colors and blending modes to create interesting effects and variations.
Dry brush technique: Use a low-opacity brush with a harder edge to add texture and detail to your watercolor painting. This technique emulates the look of dry brush strokes. Choose a lighter or darker color in contrast to the base layer and apply quick, light strokes over specific areas. This technique works well for adding texture to subjects like foliage, hair, or rough surfaces.
Splattering and spattering: Create a new layer above your previous layers. Load a brush with a speckled pattern, or use a custom brush with a scatter effect. Adjust the brush size and opacity according to your preference. Rapidly click or drag the brush on the canvas to create splatters and spatters. This technique adds an element of randomness and spontaneity to your artwork, capturing the organic nature of watercolor paintings. Experiment with different brush patterns, sizes, and opacities to achieve the desired effect.
As you apply these watercolor techniques, remember to observe and study real watercolor artworks to understand how colors blend, flow, and interact with each other. Experimentation and practice will help you develop your style and mastery of these techniques.
Step 4: Fine-tuning and Detailing
After applying the initial watercolor techniques, it’s time to fine-tune your artwork and add intricate details that enhance the realism of the watercolor effect in Photoshop.
Refining edges: To create a smoother transition between different areas of color, use the eraser tool or layer masks to refine or soften the edges of your watercolor washes. This step adds a polished and professional touch to your artwork.
Adding highlights and shadows: Use a combination of layer blending modes, layer masks, and brushes to add highlights and shadows to your artwork. This step adds depth and dimension, making your subjects come to life. Experiment with different brush sizes and opacities to achieve the desired effect.
Incorporating textures: Experiment with incorporating various textures to give your watercolor painting a tactile feel. Import scanned watercolor papers or textures, or create your own custom textures using brushes or filters. Apply these textures selectively to different areas of your artwork, such as the background or specific elements, to add an authentic touch.
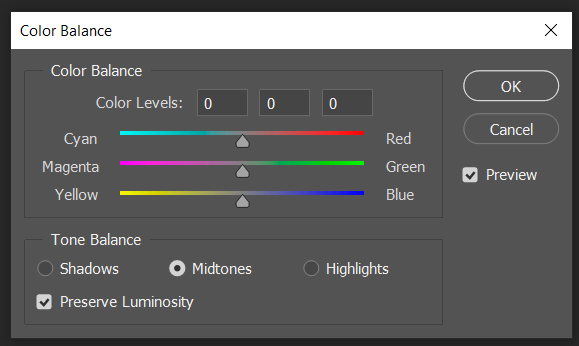
Adjusting levels and colors: Fine-tune your artwork’s overall brightness, contrast, and color balance using adjustment layers or the image adjustment tools in Photoshop. This step ensures that the colors appear harmonious and well-balanced, enhancing the overall impact of your watercolor effect.
By paying attention to these fine-tuning and detailing steps, you can refine and enhance the watercolor effect in your digital artwork. Take your time to carefully evaluate and adjust different elements to achieve the desired realism and artistic expression level in your watercolor painting. Practice and experimentation are key to developing your style and achieving stunning results.
Step 5: Finalizing and Exporting
As you near the completion of your watercolor effect in Photoshop, it’s important to finalize your artwork and prepare it for sharing or printing.
Adjusting levels and colors: Fine-tune your artwork’s overall brightness, contrast, and color balance using adjustment layers or the image adjustment tools in Photoshop. This step ensures the colors are vibrant and the tonal range is well-balanced.
Adding finishing touches: Consider adding final touches to your artwork, such as borders, vignettes, or signature marks. These elements add a personal touch and can further enhance the overall presentation of your watercolor painting.
Saving and exporting: Save your artwork in a high-resolution format such as TIFF or PSD to preserve the layers and flexibility for future editing. When sharing or printing, export your artwork to a suitable format, such as JPEG or PNG, considering the intended use and resolution requirements.
By finalizing your artwork with adjustments, adding finishing touches, and selecting the appropriate file format, you can ensure that your watercolor effect in Photoshop is ready for display or publication. Take the time to review and make any necessary refinements before sharing or printing your masterpiece.
Conclusion
In conclusion, while you strive to achieve a watercolor effect in your images or any artwork, Photoshop is the best option to go for. Exercising with a blend of technical skills plus your creative experimentation, you can take total advantage of this digital medium and easily transform your images into a watercolor masterpiece. However, be considerate of some basic considerations and save your final edit in a high-resolution format to present each subtlety and detail of your artwork.
