
How To Create Sunburst Images
Sunburst images are visually catchy and tempting due to dispersing light and rays extending outward from a central point. This dynamic effect introduces thrill, animation, and spriteliness to the image, upgrading its general impact. The central point of origin acts as a focus point, steering the viewer’s sight to the main subject. Sunburst colours, such as bright yellows, oranges, and reds, pitch into a feeling of warmth and infatuation. Sunburst effects are often cannibalized in nature and landscape photography, enriching the beauty of natural light sources, notably during sunrises and sunsets. Sunbursts hold symbolic value beyond their visual appeal, communicating positivity, vitality, hope, and even metaphysical factors. To apply a sunburst effect to your images, you can prefer photo editing software options like Photoshop, Corel Draw, or any online editing tool like Canva or Fotor. These tools have distinctive features and adjustments like brush settings, filters, and blending modes that help you create miraculously astounding sunburst images. For exact ways and guidelines to use these tools and related adjustments and techniques, you can approach the steps below:
Step 1: Launch Adobe Photoshop and Load the Image
To initiate the process of adding a sunburst effect to your photograph, open Adobe Photoshop software on your computer. Click on the “File” menu at the top left corner of the screen, and from the drop-down menu, select “Open.” Browse through your computer’s files to locate and select the image you want to enhance with the sunburst effect. Once you’ve chosen the image, click the “Open” button, and the image will load into the Photoshop workspace. Ensure that your image is of sufficient quality and resolution to achieve the best results. By completing this first step, you are ready to proceed to the subsequent stages of creating a captivating sunburst effect that will breathe new life into your photograph.
Step 2: Generate a New Layer for the Sunburst Effect
Now that your image is loaded into Adobe Photoshop, the next step is to create a new layer to apply the sunburst effect separately. Look for the “Layers” panel on the screen’s right side. If you can’t find it, go to the top menu and click “Window” > “Layers” to display it. Click on the “New Layer” icon in the Layers window, which appears to be a square with a folded corner. This action generates a blank layer above your original image layer, where you will create the sunburst effect. Utilizing a separate layer ensures that the sunburst won’t alter your original image, providing more flexibility and control over the editing process. It also permits easy adjustments, such as changing the opacity or blending mode, without affecting the underlying image. By creating a new layer, you are now set to craft a visually captivating sunburst effect that will elevate your photograph’s appeal.
Step 3: Select the Brush Tool and Choose a Color

To initiate the process of adding the sunburst effect to your photograph using Adobe Photoshop, start by choosing the Brush Tool in the toolbar on the screen’s left side. Alternatively, you can use the “B” key as a shortcut to access the Brush Tool swiftly. With the Brush Tool activated, navigate to the options bar positioned at the top of the screen.
In the options bar, fine-tune the brush size and hardness settings to cater to your desired effect. If you wish to achieve a more natural and softer sunburst, opt for a lower hardness setting, whereas a higher hardness setting will produce more sharply defined rays.
Now comes the crucial step of selecting the colour that will bring life to your sunburst effect. Click on the coloured square adjacent to the “Foreground Color” in the toolbar to unveil the Color Picker. Here, delve into a wide array of shades and hues to find the perfect bright and vibrant colour that evokes the essence of the sun. Shades of luminous yellow, radiant orange, or glowing gold are popular choices for a sunburst effect. Once you have made your colour selection, click “OK” to confirm your choice.
Step 4: Add the Sunburst Effect
With the brush tool and vibrant colour chosen, it’s time to add the sunburst effect to your photograph. Position the brush at the centre of the image where you want the sunburst to originate. Click once to create the first ray of light. To achieve a natural and organic appearance, slightly vary the brush size and angle as you click around the centre, adding more beams in a circular or radial pattern. This approach creates a sense of randomness and depth, enhancing the realism of the sunburst.
Take care not to overdo the effect, as excessive rays or overly intense brightness can overwhelm the image’s overall composition. Strive for a balanced, harmonious sunburst that complements the photograph’s aesthetic and focal point.
As you add the rays, observe how they interact with the image and make adjustments as necessary. You may need to alter the brush size or opacity to achieve the desired level of intensity and luminosity. Remember that the goal is to enhance the image with a touch of magic and radiance, capturing the viewer’s attention and elevating the visual storytelling.
Step 5: Adjust Opacity and Blending Mode
After adding the sunburst effect, it’s time to fine-tune its appearance to blend with the original image seamlessly. Begin by adjusting the opacity of the sunburst layer in the Layers panel. Lowering the opacity will make the sunburst effect more subtle and allow the underlying image to show through, creating a more natural and integrated look.
Next, experiment with different blending modes for the sunburst layer. Changing the blending mode can significantly impact how the sunburst interacts with the original image. Two popular blending modes for sunburst effects are “Screen” and “Lighten,” as they make the dark areas of the sunburst layer transparent while preserving the bright rays.
While adjusting the opacity and blending mode, keep an eye on the overall balance and harmony of the composition. Aim to strike the perfect blend where the sunburst effect enhances the image without overwhelming it.
Step 6: Apply Optional Refinements
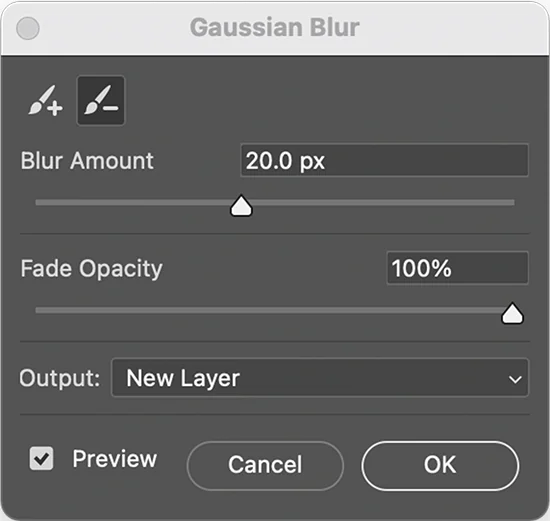
In this step, you have the option to apply additional adjustments to refine the sunburst effect further and enhance its overall impact. These refinements can add a touch of artistry and finesse to your composition.
One common technique is to apply a subtle Gaussian Blur to the sunburst layer. That can soften the rays and create a more dreamy and ethereal look. However, be cautious not to overdo the blur, as it might diminish the clarity of the effect.
You can also experiment with adjusting the Levels or Curves of the sunburst layer to control the brightness and contrast of the rays. Tweaking these settings can help better balance the sunburst’s brightness and the original image.
Remember to exercise restraint while applying refinements, ensuring that the final result complements the aesthetic of your photograph rather than overpowering it.
By completing Step 6, you have added an artistic touch to your sunburst effect, elevating its visual appeal and making your photograph genuinely captivating. Your sunburst image is ready to be saved and shared, showcasing the radiant beauty and storytelling prowess it brings to your visual creations.
Step 7: Save Your Sunburst Image
Having completed the sunburst effect and any optional refinements, it’s time to save your final masterpiece. Go to the top menu and click “File” > “Save As” to open the Save As dialogue box.
Depending on your intended use, choose a file format for your image, such as JPEG or PNG. JPEG is ideal for photographs, while PNG preserves transparency if you plan to use the sunburst effect on a different background.
Name your image and select a destination folder on your computer to save it. Ensure you choose a location where you can easily access and share your sunburst image.
Before clicking “Save,” double-check that the image quality and resolution are suitable for your purpose. To maximize the visual effect, you can increase or decrease the picture size or resolution as deemed necessary.
Congratulations! You’ve successfully created a captivating sunburst image that brings radiant energy, warmth, and storytelling prowess to your photograph. Save your creation and share it with the world to showcase your creative vision and artistic expression. Remember, the possibilities with sunburst effects are endless, and with practice, you can master this stunning technique to elevate your photography to new heights.
Conclusion
Sunburst images are captivating compositions with radiant light and rays that enhance a photograph’s overall impact and storytelling. The dispersion of rays and glowing colours bring positive vibes and warm vibrance, making enticing compositions. These radiant works of art induce a celestial symphony of light and colours that inspires imagination to make individual narratives out of transforming ordinary images. Stick to the steps mentioned in this blog post if you want to get sunburst images with their cent per cent accessories that coax a mystical allure, resembling a fairy tale, transporting viewers to otherworldly realms, igniting wonder and enchantment.
