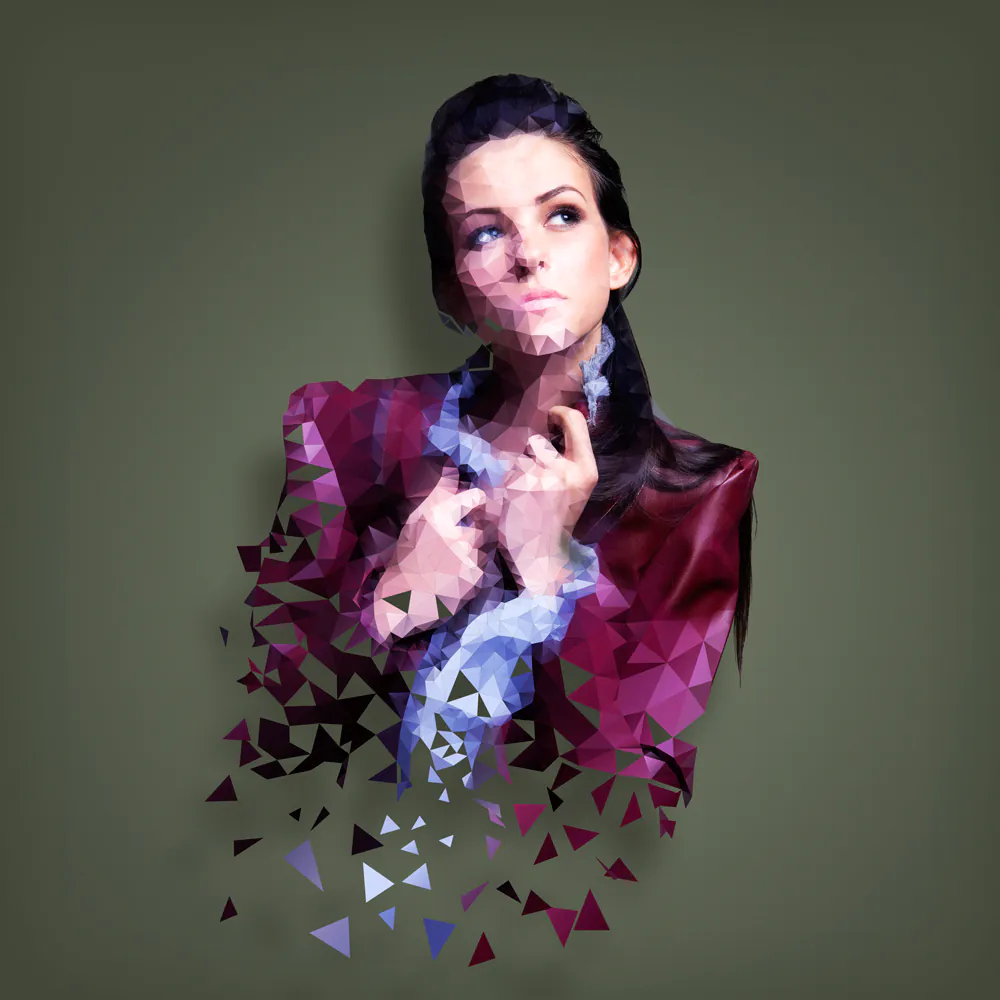
How to Create Polygon Art from a Photograph
Polygon art gives an image a geometrical visual representation by stylizing it with polygons, including triangles, squares, and hexagons. With the demonstration of geometric shapes and lines in the polygon art image, it appears like a graphic illustration or vector art. Because of its angular specification, polygon artwork has applications in digital artwork, graphic design, animation, video games, and more. The utilization of polygon art attributes images an inorganic contemporary look and a simplified minimalistic appearance by eliminating knotty details, textures, and other complexities. The typical sharp edges and lines of polygons play their role in contributing to geometrical aesthetics, resulting in a crisply ordered and structured composition. Another feature of polygon art images is the use of flat colors or gradients, which can be bold for surreal and dynamic effects or muted shades for creating calmer, serene effects, depending upon the photograph’s theme. The steps below will take you through the process of creating polygon art from a photograph.
Step 1: Select a Photograph
When selecting a photograph for polygon art, consider the following factors. Choose an image with clear subjects and distinct shapes to make the polygon art visually appealing. Look for high-resolution photos to ensure better detail when converting to polygons. Consider the composition and balance of the photo, as well as the colors and lighting. The subject matter, such as landscapes, animals, objects, or portraits, can vary widely. Remember that complex or cluttered images may require more careful planning and simplification during the polygon art creation. Select a photograph that inspires you and aligns with your vision for the polygon art piece.
Step 2: Plan the Composition
When planning the composition of your polygon art, follow these guidelines. Begin by analyzing the selected photograph and identifying the key elements and shapes that define the subject. Consider how these shapes can be simplified into polygons while maintaining the subject’s essence. Pay attention to the overall balance and visual flow of the composition. Determine the placement of polygons, ensuring they interact harmoniously and create a cohesive image. Strive for a pleasing arrangement of shapes, considering symmetry, repetition, and focal points. Experiment with different polygon sizes and proportions to create visual interest and accurately represent the subject. Consider the negative space surrounding the subject and how it contributes to the composition. Sketch or make notes to help visualize the planned composition before proceeding to the next step.
Step 3: Sketch the Outline

After planning the composition, it’s time to sketch the outline of your polygon art. This step helps establish the basic framework and shape of your subject. Here’s how to approach it:
Begin by referring to your planned composition and subject analysis.
Using a pencil or digital sketching tools, lightly sketch the major outlines and contours of the subject.
Focus on defining the main shapes and forms represented by polygons.
Start with broader shapes and gradually add more detailed contours as needed.
Keep the lines loose and light, allowing for adjustments and refinements later.
Pay attention to proportions and ensure the sketch captures the subject’s essence.
If using digital tools, utilize layers for easier editing and refining.
Review and make any necessary corrections or adjustments to achieve the desired outline.
Step 4: Define Polygon Placement
Once you have sketched the outline of your subject, it’s time to define the placement of polygons within the outlined areas. Here’s how to proceed:
Refer to your planned composition and subject analysis to guide the placement of polygons.
Identify the areas within the subject where polygons will be used.
Consider the composition’s overall balance, visual flow, and desired emphasis.
Determine the size and shape of polygons to fit within each area, considering the level of detail you want to achieve.
Focus on creating a pleasing arrangement of polygons, considering symmetry, repetition, and the subject’s natural structure.
Use light pencil strokes or digital sketching tools to mark the boundaries of each polygon area.
Ensure the polygons’ placement accurately represents the subject’s forms and contours.
Continuously refer back to your reference photograph to maintain accuracy in polygon placement.
Review and make necessary adjustments to ensure the polygon placement enhances the overall composition.
Step 5: Polygon Creation
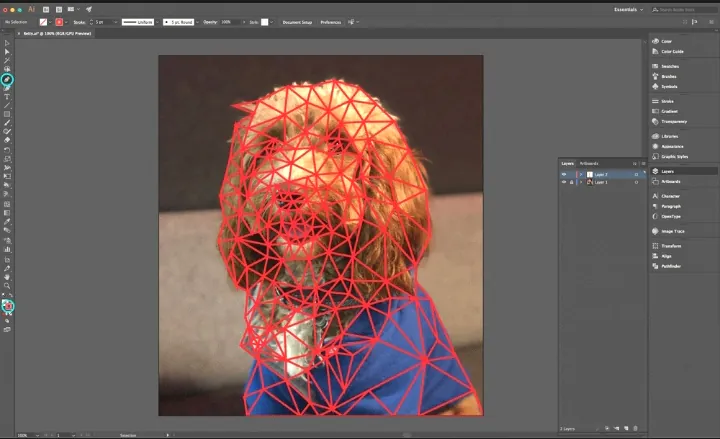
After defining the placement of polygons, it’s time to create the polygons within the outlined areas of your subject. Follow these steps:
Begin with one section or area at a time to focus on the details and maintain organization.
Determine the shape of the polygon for each area. Triangles are commonly used, but you can also experiment with other polygons like squares or hexagons.
Use a pencil or digital tools to draw the lines forming each polygon’s edges carefully. Ensure that the lines follow the contours and boundaries of the subject.
Maintain consistency in the size and shape of the polygons within each area unless intentional variation is desired.
Pay attention to the angles and intersections of the polygon edges to create a clean and cohesive appearance.
Progressively work through the different areas of your subject, creating polygons and connecting them as needed.
Take breaks to step back and evaluate the overall effect, making adjustments if necessary.
Using digital tools, use shape or polygon creation tools to expedite the process and ensure precise shapes.
Refine and smooth out any rough edges or inconsistencies in the polygon lines.
Continue this process until all areas of your subject are filled with polygons. Remember to reference your initial composition plan to maintain consistency and balance throughout the artwork.
Step 6: Polygon Size and Proportions
Polygon size and proportions play a crucial role in polygon art, as they contribute to the overall aesthetic and accuracy of the subject representation. Follow these steps to achieve effective polygon size and proportions:
Assess the reference photographs and analyze the sizes and proportions of the different elements within the subject.
Start by identifying the areas or features that should be emphasized or given more prominence.
Consider the relative importance of different parts of the subject and determine the appropriate polygon sizes to reflect this hierarchy.
Enlarge polygons in areas of focus or larger shapes to draw attention and add visual weight.
Reduce the size of polygons in less prominent areas or smaller details.
Ensure the overall composition remains balanced and visually appealing by considering the relationships between different polygon sizes.
Pay attention to the natural proportions and shapes of the subject, striving for accuracy and maintaining recognizable forms.
Take breaks and step back periodically to assess the overall effect and adjust as needed.
Experiment with different polygon sizes and proportions until you achieve the desired visual impact and accurate representation.
Step 7: Color and Shading
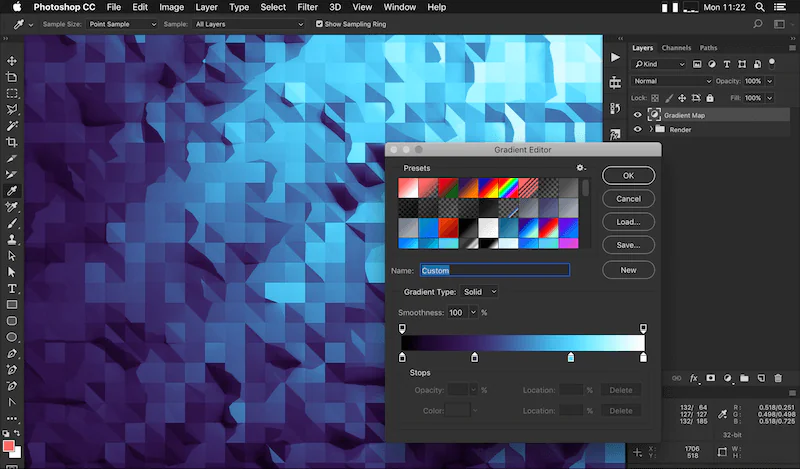
Color and shading are essential elements in polygon art that add depth, dimension, and visual interest to your composition. Follow these steps to incorporate color and shading in your polygon art effectively:
Choose a Color Palette: Decide on a color scheme that complements your subject and desired artistic style. Consider using a limited color palette for a cohesive and harmonious look.
Apply Flat Colors: Fill each polygon with flat colors using the chosen color palette. Assign colors based on the subject’s natural colors or experiment with more unconventional color choices for a stylized effect.
Experiment with Gradients: Instead of flat colors, you can use gradients to add depth and visual richness to your polygons. Apply gradients within each polygon to simulate lighting and shading effects.
Consider Light and Shadow: Analyze the subject’s lighting conditions and envision how light and shadow would fall on its surfaces. Add darker shades or gradients to areas in shadow and lighter shades to areas receiving direct light.
Blend and Transition: Smoothly blend colors or gradients where different polygons meet to create seamless transitions and avoid abrupt color changes. That enhances the overall cohesion and realism of your artwork.
Refine and Adjust: Step back and evaluate the colors and shading in your polygon art. Make necessary refinements or adjustments to achieve the desired visual impact and realism.
Step 8: Refine and Adjust
Refining and adjusting your polygon art ensures a polished and visually appealing final result.
Take a break from your artwork and then return with fresh eyes. Step back and evaluate the composition, polygon placement, colors, and shading.
Review the proportions of the polygons and ensure they accurately represent the subject. Check for any areas that may need resizing or adjustments for better symmetry.
Pay attention to the edges and lines of the polygons. Clean up any rough or jagged edges to ensure sharp and well-defined shapes.
Refine the colors and shading by adjusting gradients, tones, and highlights to create depth, volume, and realism.
Share your work with others and seek constructive feedback. Consider the suggestions and observations to make further improvements.
Make additional refinements, try different color variations, or explore alternative polygon arrangements to enhance your artwork.
Finalize your polygon art image by saving it in the desired format. Consider creating different versions with varying color schemes or effects to explore different artistic interpretations.
Conclusion
Polygon artwork arouses a sense of temperance and simplicity in your photographs by reducing subjects to their initials shapes. The angular outlines used in polygon art images develop a sharp contrast capturing the subject’s essence. Polygon art owns a unique visual language to stabilize simplicity and complexity to style various genres of visual composition. Moreover, strategically combining colors and shading methods adds breadth, intricacy, and balance to your photographs. Be sure that every phase of creating polygon art from photos necessitates total attention and accuracy, as well as exhibiting your creative notion.
