
How To Create Photography Website In WordPress?
Do you wish to create your very own enticing photography website? If yes! Then this blog is all you need to learn how to do it all by yourself. A photography website serves as a showcase for your most cherished masterpieces. It is a place where your work gets all the exposure it needs to be known by the world. To mention, a website makes your work look more professional and well-organized. To make the website-building process much easier for you we have simplified it to five simple steps that can result in a professional-looking photography website. Let’s dig in!
How to Set Up Your Photography Website?
In this blog cum tutorial, you will get to know more about the creation of a stunning photography website and fill it with professional-looking photos to your business advantage. Here are 5 selected steps that you need to execute for getting your complete photography website:
- Sign up in BlueHost
- Set up the Basic Settings
- Customize your Photography Site
- Add Useful WordPress Plugins
- Optimize Site Performance & Speed
Step 1: Sign up in Bluehost
The very first step is to sign up for your desired Bluehost plan. There are cheaper as well as high-budget plans that you can use according to your choice. For getting a complete overview of each plan visits the official website, the plan usually begins at $2.75/month. Click on the ‘Get Started Now Button after selecting the right plan and carry on by following the instructions given on your screen.

On the very next page you will find various plans available alongside features and pricing:
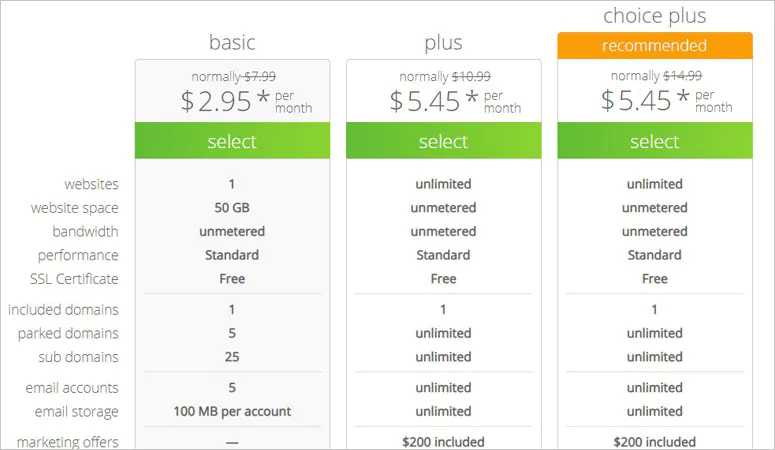
Out of all the plans the 36-month plan gives you larger control by giving your highest savings rate and the 12-month plan can prove highly economical with a bigger discount package. Now it is time to set your site domain name, you can create a new one or go with an existing domain name it is all up to you. If you don’t have a suitable one you can always search your business domain under the section ‘Create a new Domain’:
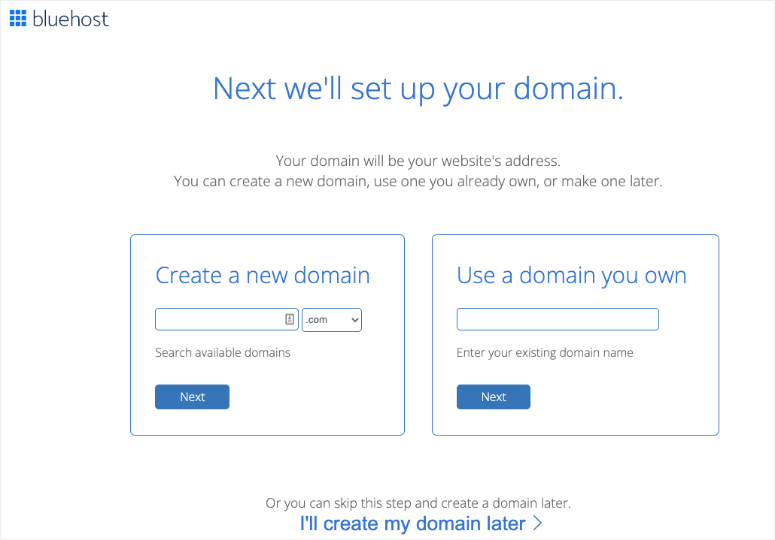
A professional way to handle this situation is to use a ‘Free Domain Name Generator Tool’ for your business benefit and register your domain name as soon as possible:

Bluehost lets you view your plan details to timely setup changes if required:

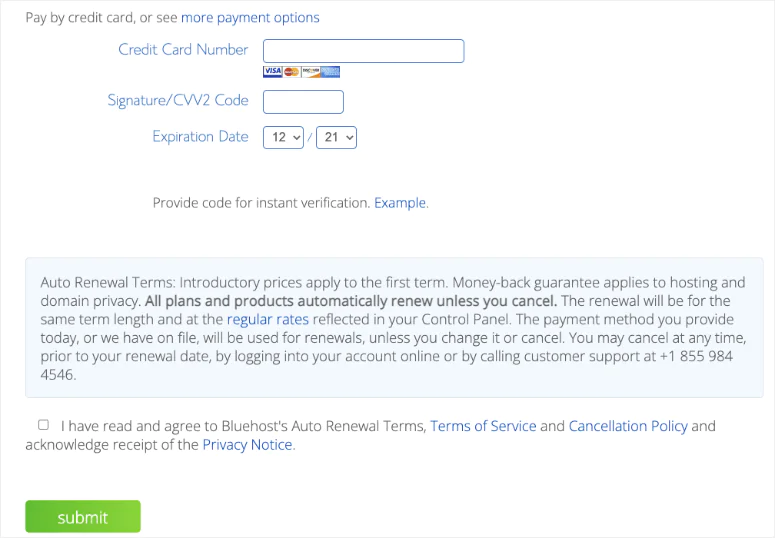
Here you will find a section labeled ‘Package Extras’. When building a photography website we recommend unchecking all options here, you can always buy your hosting plan later. Enter your payment details and you are all done in this section:
Congratulations! You are all done with step one by buying yourself a domain and hosting plan.
Step 2: Set Up the Basic Settings
- Set Up WordPress
When you are signed in to Bluehost, WordPress is automatically selected in your plan. You just need to install it by completing a few simple actions. Log into the Bluehost account and navigate to the ‘My Sites’ section:
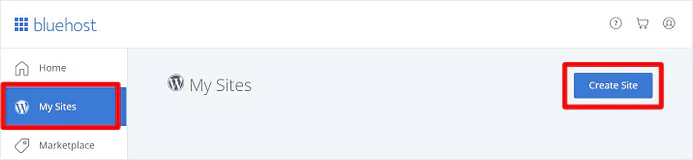
Here you just need to press the ‘Create Site’ Button and follow all the instructions given on your screen, afterwards you need to log into WordPress from the Bluehost dashboard:
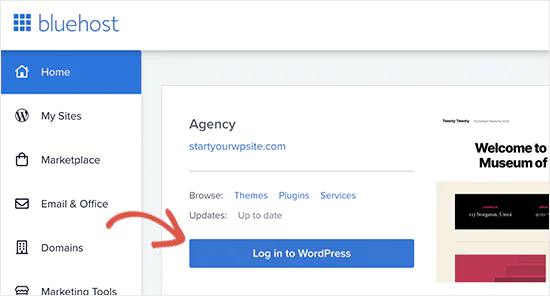
From here you will reach the WordPress admin panel from where you can easily manage your site.
Configure SSL Certificate
Bluehost gives you a free SSL Certificate. This will help you encrypt your onsite data and keep hackers at bay. Ensure that your site is using HTTPS and not HTTP. You can confirm this action as shown below:

Head over to the General page in the settings section of your WP menu. Here you need to ensure that your WP Address and Site Address are set to HTTP.
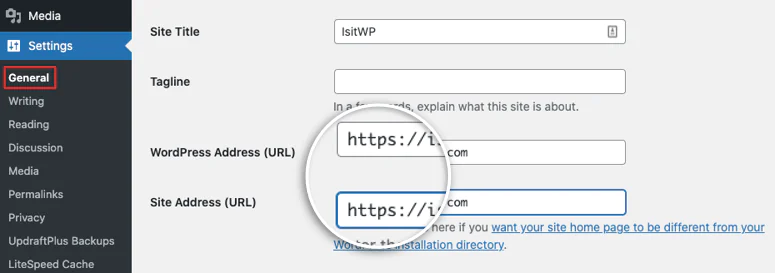
Take this chance and change your onsite tagline and title if you want. Later save the changes to avoid losing them.
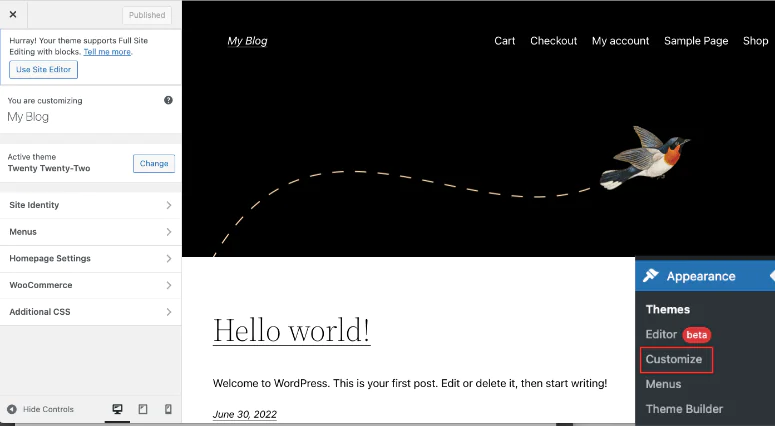
Step 3: Customize Your Own WordPress Site
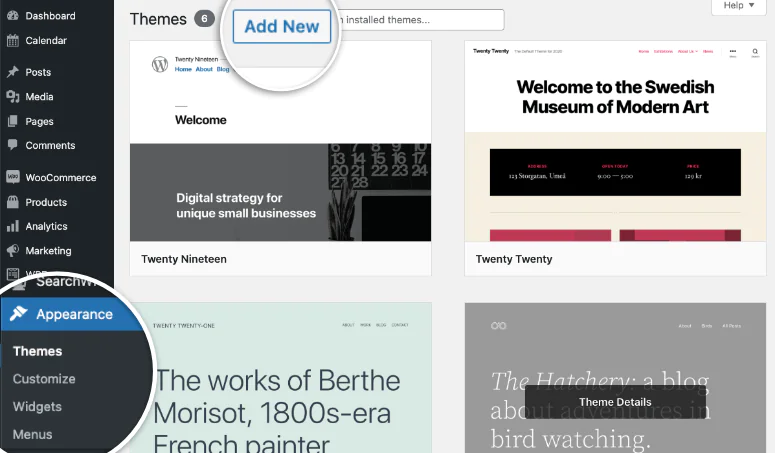
WordPress is home to thousands of website designs and themes. This is the reason why we love step so much. You have unlimited options to choose from both free and paid themes. The larger number of choices can leave you all confused about which is the right one for you. We have sorted out a few themes namely Oshine, Novo Photography, Divi, and Photography for your photography site. You can explore new themes by going to the themes section and by clicking on the ‘Add New Button to get a view of all the available themes right away.
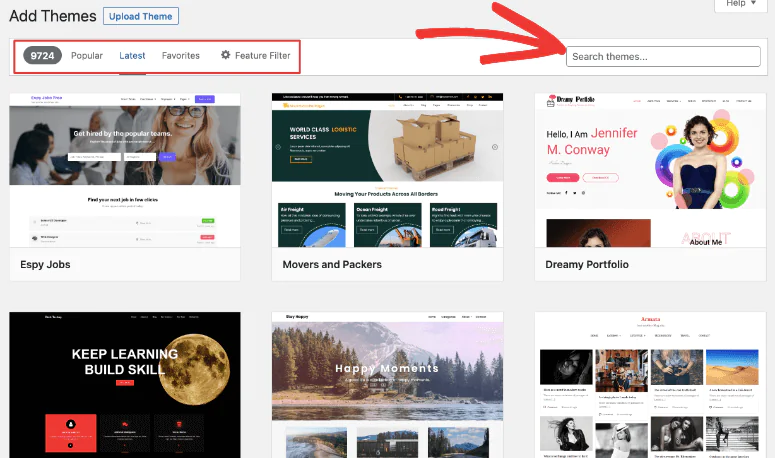
Here you can filter out the latest and trendy themes for your photography site. You can search for professional photography themes in the search bar or you can find a third-party developer who creates new and professional themes for photographs to sell on their site. Whenever you buy a theme you will get a zip file that you can purchase and upload to your site page.
Now go to the ‘Customize’ page in the ‘Appearance’ section where you can launch your theme customizer.
Step 4: Add Useful WordPress Plugins
WordPress is home to thousands of popular and useful plugins that can readily enhance your photography website appearance. All you need to do is to navigate to the ‘Add New’ tab in the Plugins section:
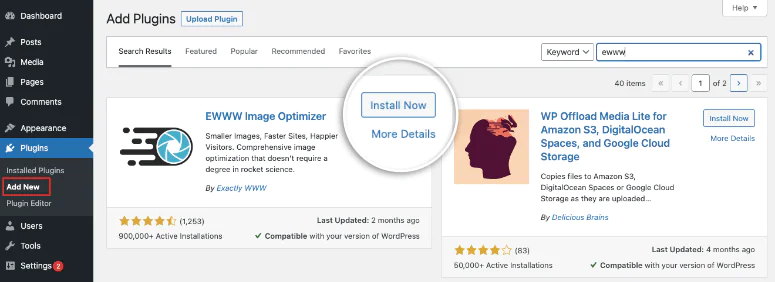
Here is a list of a few plugins that prove useful when you think of creating a professional photography website;
Envira Gallery
Envira Gallery is an exciting WordPress gallery plugin that best suits the market photography trend. It comes with an easy-to-drop and drag builder that enables you to create customized video galleries, image galleries, responsive photo albums, etc. You can accomplish a well-designed photography website by using this incredible tool to add photos without using any code. All you have to do is to select from the pre-built gallery templates and create the look you want on your own. Once you are all done with creating your image galleries you can easily organize them into albums and sort them out with tags or cover photos.
Soliloquy
Soliloquy is another well-suited tool to create impactful sliders to portray your photos to your users. It helps you create full-width sliders by using the drag-and-drop interface. You can include captivating animations to elevate the impression of your photos on your users. It comes with various useful features like a fullscreen lightbox, slider templates, dynamic sliders, product sliders, and importing abilities from Flickr, Instagram, and more.
Easy Digital Downloads
Easy digital downloads are a must-have eCommerce plugin tool especially for WordPress if you plan to market products online. By using this plugin you can sell almost all kinds of digital products such as images, videos, graphics, artwork, etc. Customers can buy multiple products at once using the shopping cart system. In addition, you can preset your discount codes, and tax rates, and track all payment transactions by creating a database of your customers.
Instagram Feed Pro by Smash Balloon
Instagram feed Pro By Smash Balloon is another banger that can easily get your job done anywhere on your WordPress site. If you are a professional photographer Instagram is a golden social media mine to get as much exposure for your photos as you can. This tool will help you put your name out there and let people know about your splendid work. Smesh Balloon embeds your Instagram content by directly linking it to your web page which helps to improve your overall SEO score. This plugin enables you to turn your social site photos into a shoppable feed and let people buy them as they browse through them. You can also use smart features like highlighting posts, filtering photos using tags, etc.
MemberPress
Memberpress will allow you to create a membership website where you can get connected with other professional photographers. You can grant them access to the member area only to contribute, view or buy photographs or any other artwork you want. You can also charge members a fee if you wish to for joining the group or they can join any other membership plan that benefits them more.
LearnDash
LearnDash is a learning management system (LMS) platform that lets you create courses for your photography interests. You can then sell these courses on your website. You can grant access to students or peers or conduct any class for the course. Also, it is easy to add course material, and tests, and create forums for professionals or laymen to discuss. As far as the revenue is concerned, then there are options available to accept payments one-time only and also preset automatic renewals.
Step 5: Optimize Site Performance & Speed
Most business owners work on creating smart and attractive product photography. But many forget that these images can load on the user’s end. If you are using higher-resolution files there is a greater chance that your images will not load on your site’s page. So it is essential to ensure images look perfect and are well-optimized for the Internet to easily load them. This step is much needed for better user experience and SEO. There are many popular plugins that you can use to optimize your images like WP Rocket, W3 Total Cache, and EWWW Image Optimizer to name a few incredible optimization tools.
In addition, they provide access to the free content delivery network. This network of servers is spread across the world and delivers cached static content to your website users from their closest CDN server location. CDN serves static content from your user’s nearest server and thus loads the photos of your site faster than normal. Congratulations! You have successfully made it through reading the full blog and creating your very own Photography website.
