How To Create Motion Blur Effect In Photoshop
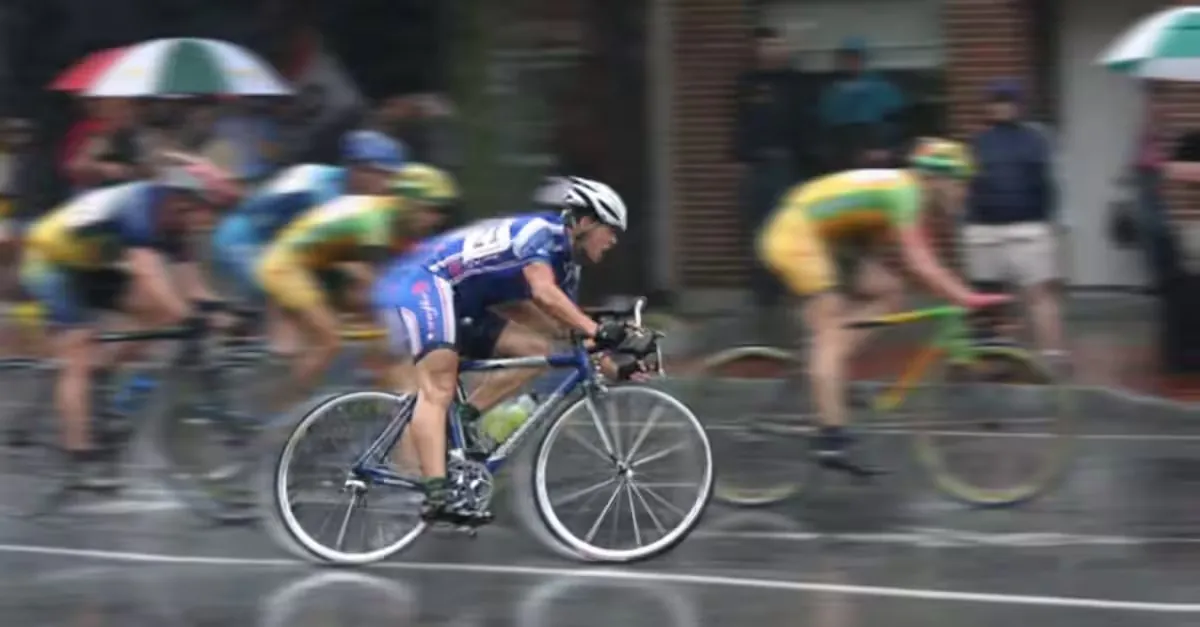
Motion blur effect happens in images precisely due to camera shake, subject shake, and shutter movement. It is typical in photographing fast-moving subjects, which can be controlled with techniques like panning or freezing. On the other hand, intentionally created motion blur effects can bring innovation and novelty to your images. Some techniques and tools are adopted to control the motion direction and camera shutter movement. Whenever you want to add this effect to your images, be considerate to use a suitable software tool. You can use Photoshop, one of the most effective software in generating the motion blur effect, which can help you create a novel blur effect with simple steps.
Step 1: Open your image in Photoshop.
Launch the software to create a motion blur effect in Photoshop and open the image you want to work with. You can do this by navigating the “File” menu and selecting “Open.” You can also use the shortcut Ctrl+O (Windows) or Command+O (Mac).
Once the “Open” dialog box appears, locate the image file on your computer and click “Open” to load it into Photoshop. The image will then be displayed in the Photoshop workspace, ready for you to apply various editing techniques, including motion blur.
Ensure you are working with a high-resolution image to achieve the best results. Motion blur effects are more noticeable and visually appealing when applied to images with clear subject movement or when creating a sense of speed and dynamism.
Step 2: Duplicate the background layer
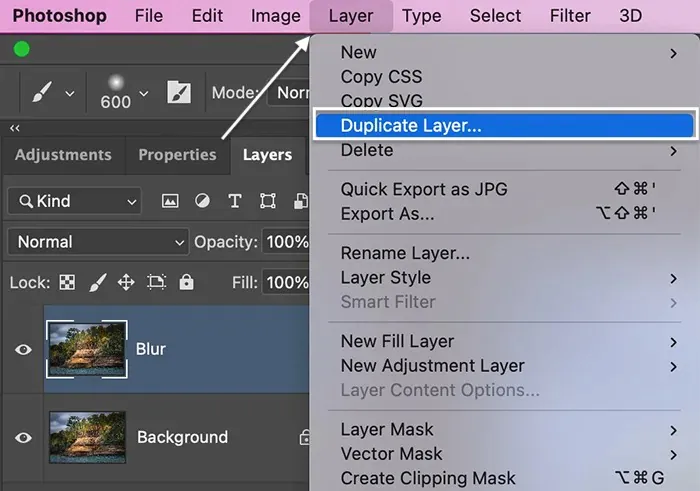
Once your image is open in Photoshop, it’s essential to create a duplicate layer before applying the motion blur effect. Duplicating the background layer ensures you have a copy of the original image, allowing you to make non-destructive edits and preserve the integrity of the original image.
To duplicate the background layer, select it in the Layers panel. You can find the Layers panel by going to the “Window” menu and selecting “Layers” or pressing the F7 key on your keyboard.
Press Ctrl+J (Windows) or Command+J (Mac) as a shortcut to duplicate the layer. Alternatively, right-click on the background layer and choose “Duplicate Layer” from the context menu.
After duplicating the layer, you will see a new layer named “Layer 1” (or a similar name) in the Layers panel. The duplicated layer will be identical to the original background layer.
Duplicating the background layer provides a separate layer to apply the motion blur effect while preserving the original image on the background layer. You can adjust and refine the effect without permanently altering the original image data.
Step 3: Select the duplicated layer and apply the Motion Blur filter
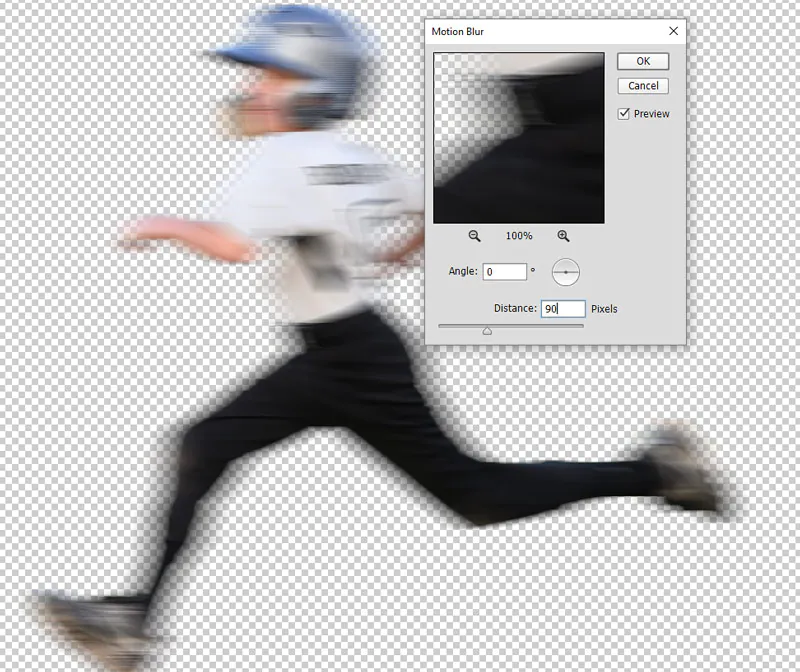
With the duplicated layer selected in the Layers panel, you can apply the motion blur effect using the Motion Blur filter in Photoshop. This filter simulates the appearance of motion or movement within an image.
To access the Motion Blur filter, navigate to the “Filter” menu at the top of the Photoshop window. Then choose “Blur” and select “Motion Blur” from the submenu.
Once you select the Motion Blur option, a dialog box will appear, displaying a preview of the effect on your image. This dialog box aids you in adjusting the settings for the motion blur effect.
In the Motion Blur dialog box, you will find the following options:
Angle: This determines the direction of the motion blur. You can input an angle value to match the direction of movement in your image or use the slider to adjust it visually.
Distance: This controls the amount or strength of the blur effect. You can specify a distance value or adjust it using the slider. Increasing the value will result in a more substantial motion blur effect.
As you adjust the settings, you will see the preview update in real-time, allowing you to fine-tune the effect according to your desired outcome.
Experiment with different angles and distances until you achieve the desired motion blur effect. Remember that the appropriate settings depend on the specific image and the desired creative effect.
Once satisfied with the settings, click the “OK” button to apply the motion blur effect to the duplicated layer.
Step 4: Adjust the opacity of the blurred layer.
After applying the motion blur effect, you can adjust the opacity of the blurred layer. This step allows you to control the intensity of the motion blur and blend it with the original image.
To adjust the opacity, locate the Layers panel in Photoshop. You can find it by going to the “Window” menu and selecting “Layers” or pressing the F7 key on your keyboard.
You will see the duplicated layer in the Layers panel with the motion blur effect applied. By default, the layer’s opacity is set to 100%, meaning the blur effect is obvious.
Lower the layer’s opacity to reduce the intensity of the motion blur. You can do this by clicking on the opacity value next to the layer’s name in the Layers panel and dragging the slider leftwards. Alternatively, you can manually enter a specific opacity value.
By lowering the opacity, you can make the motion blur effect more subtle and blend it with the original image, creating a more natural and visually pleasing result. Experiment with different opacity levels to find the right balance for your image and desired effect.
If needed, you can also use layer masks or the Eraser tool to selectively remove or restore the motion blur effect from specific image areas, allowing for further customization and control over the final result.
Remember to save your work as a new file to preserve the original image and ensure you can make further adjustments if necessary.
Step 5: Refine the motion blur effect
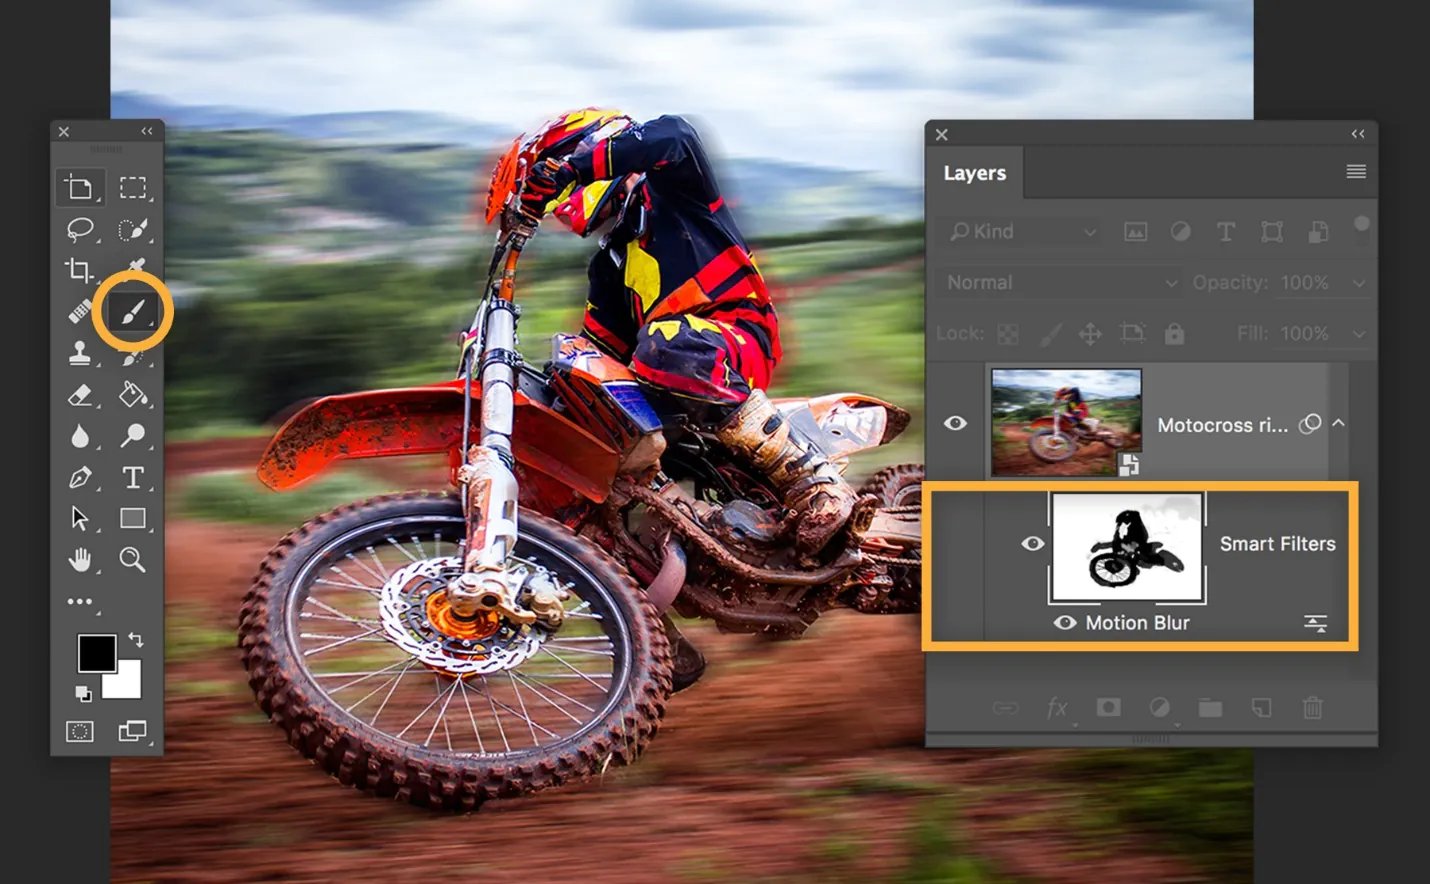
Once you have applied the motion blur effect and adjusted the opacity, there are a few techniques you can use to fine-tune the motion blur effect in Photoshop:
Layer Masks: Layer masks allow you to control where the motion blur effect is applied and where it is hidden. Select the duplicated layer in the Layers panel and click the “Add Layer Mask” button to add a layer mask.
Use a brush tool with black color to paint on the layer mask, hiding the motion blur effect in specific areas. Switch to a white brush to reveal the motion blur effect again if needed. This technique is helpful for selectively applying the effect to specific parts of the image.
Eraser Tool: The tool can manually remove or erase the motion blur effect from specific areas. Select the Eraser tool from the toolbar, adjust the brush size and hardness as needed, and then erase the areas where you want to remove the motion blur. This method is helpful for precise control over the effect.
Layer Opacity and Blend Modes: Experiment with different layer opacities and blend modes to alter the appearance of the motion blur effect. Lowering the layer opacity can make the effect more subtle while changing the blend mode can create different blending and interaction between the motion blur layer and the underlying layers. Play around with different settings to achieve the desired result.
Step 6: Save your image
Once you are satisfied with the motion blur effect and any additional refinements you’ve made, it’s time to save your image in Photoshop. Saving your work ensures that you preserve the changes you’ve made and allows you to use the final result in various applications.
To save your image, follow these steps:
Go to the “File” menu at the top of the Photoshop window.
Select “Save As” or “Save” depending on your preferences. “Save As” allows you to specify a new file name or format, while “Save” will overwrite the existing file if you’ve previously saved it.
Choose the file type for your image in the Save As dialogue box. The most common formats include JPEG, PNG, and TIFF. Select the format based on the level of compression or quality required.
Choose the location on your computer where you wish to save the image. You can navigate to a specific folder or create a new one.
Enter a meaningful file name for your image. Choose a name that describes the content or purpose of the image to make it easily recognizable later.
Configure any additional settings based on the file format you’ve chosen. That includes options like image quality, compression level, or metadata settings. Adjust these settings according to your requirements.
Once configuring the settings, click the “Save” button to save your image. Step 7: Share or export your image.
After saving your image in Photoshop, you can share it with others or use it in different contexts like Social Media, Printing, Web, or Online Use or Export for Other Software.
Consider creating a backup or archive of your image files to ensure long-term preservation. Store them securely or use cloud storage services for added protection.
Remember to respect copyright laws and obtain permission to publicly share or distribute your image.
Conclusion
To conclude, whether deliberate or accidental, the motion blur effect has its aesthetic worth and can elicit various feelings and responses. You can add the illusion of movement to your image by applying the Motion Blur effect, giving it a more youthful and frenetic vibe. The motion blur effect in photographs is often highly effective in showing speed or an aura of mobility. Using creative tools like Photoshop, you can deliberately blur the subject or its surroundings, giving your visual a mood or style that provokes your audience’s attention.
