How To Create Lenticular Pictures With Photoshop
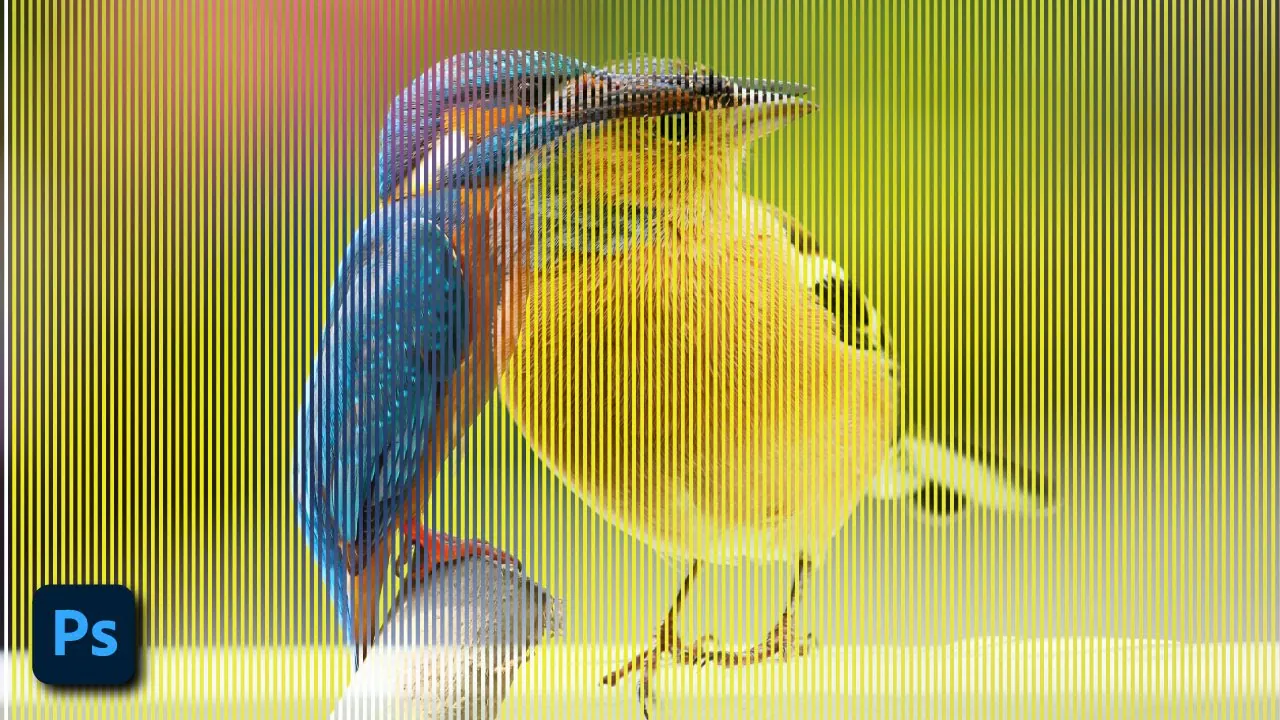
Lenticular pictures represent a vibrant depth and dimension, giving the viewer diverse perspectives from different positions. When the viewer shifts their perspective, various layers within the image appear to advance or retreat. These pictures also simulate an animated and motion-like effect as the viewer moves around; looking at them from different directions, they perceive a feeling of being in movement and activity. The typical lenticular picture is produced by interlacing a group of images and printing on specific lenticular lens sheets. These physical lenticular prints then act as a vital function in providing interactive image displays. Likewise, different image manipulation programs like Photoshop produce the lenticular effect, turning monotonous photos into vibrant, entertaining visual stories. This advanced lenticular approach aids in lowering the necessity of physical printing resources so that the modified images can conveniently be shared on online platforms and get recognition on the spot. This blog will deal with those strategies that can create digital lenticular pictures out of your typical photographs, thus amplifying their visual persona.
Step 1: Select a set of images
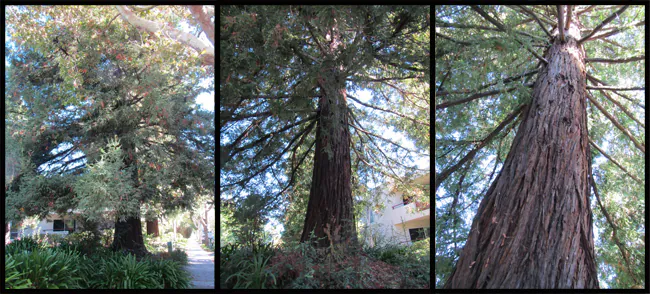
Select a set of images that capture distinctive points of view or moments of the same scene or subject, synchronizing with your ideas for the lenticular effect.
The chosen pictures should capture distinctive angles, points of view, or moments so that the editing can improve the energetic visual encounter.
Consider the overall concept or story you need to share through the lenticular pictures. Concentrate on the visual components inside each image, such as contrast, composition, and depth.
Confirm that the chosen images complement each other to preserve thematic consistency.
Assess the pictures based on their capacity to make a compelling lenticular impact, whether it’s 3D depth, animation, or a shifting viewpoint.
A flawless lenticular experience and flawless results depend on the authenticity of the image selection.
Step 2: Make individual frames for each image
Subsequent to finalizing the images, you need to load each chosen image in Photoshop and start the frame creation.
Apply Photoshop’s layer function to make distinct frames or layers for each photo, setting up the foundation for the lenticular animation.
Check that each outline portrays a particular moment, angle, or viewpoint in the selected pictures.
Utilize tools inside Photoshop to edit and strengthen individual frames, altering components like contrast or color to boost visual allure.
Consider the sequential arrangement of the frames, as this will impact the presentation and story of the lenticular effect.
Be cautious with the position of each frame, keeping up uniformity in size and positioning for a consistent shift within the ultimate animation.
Each frame arranged in this step works as a pivotal building piece, contributing to the overall coherence and effect of the animated or energetic visual impact.
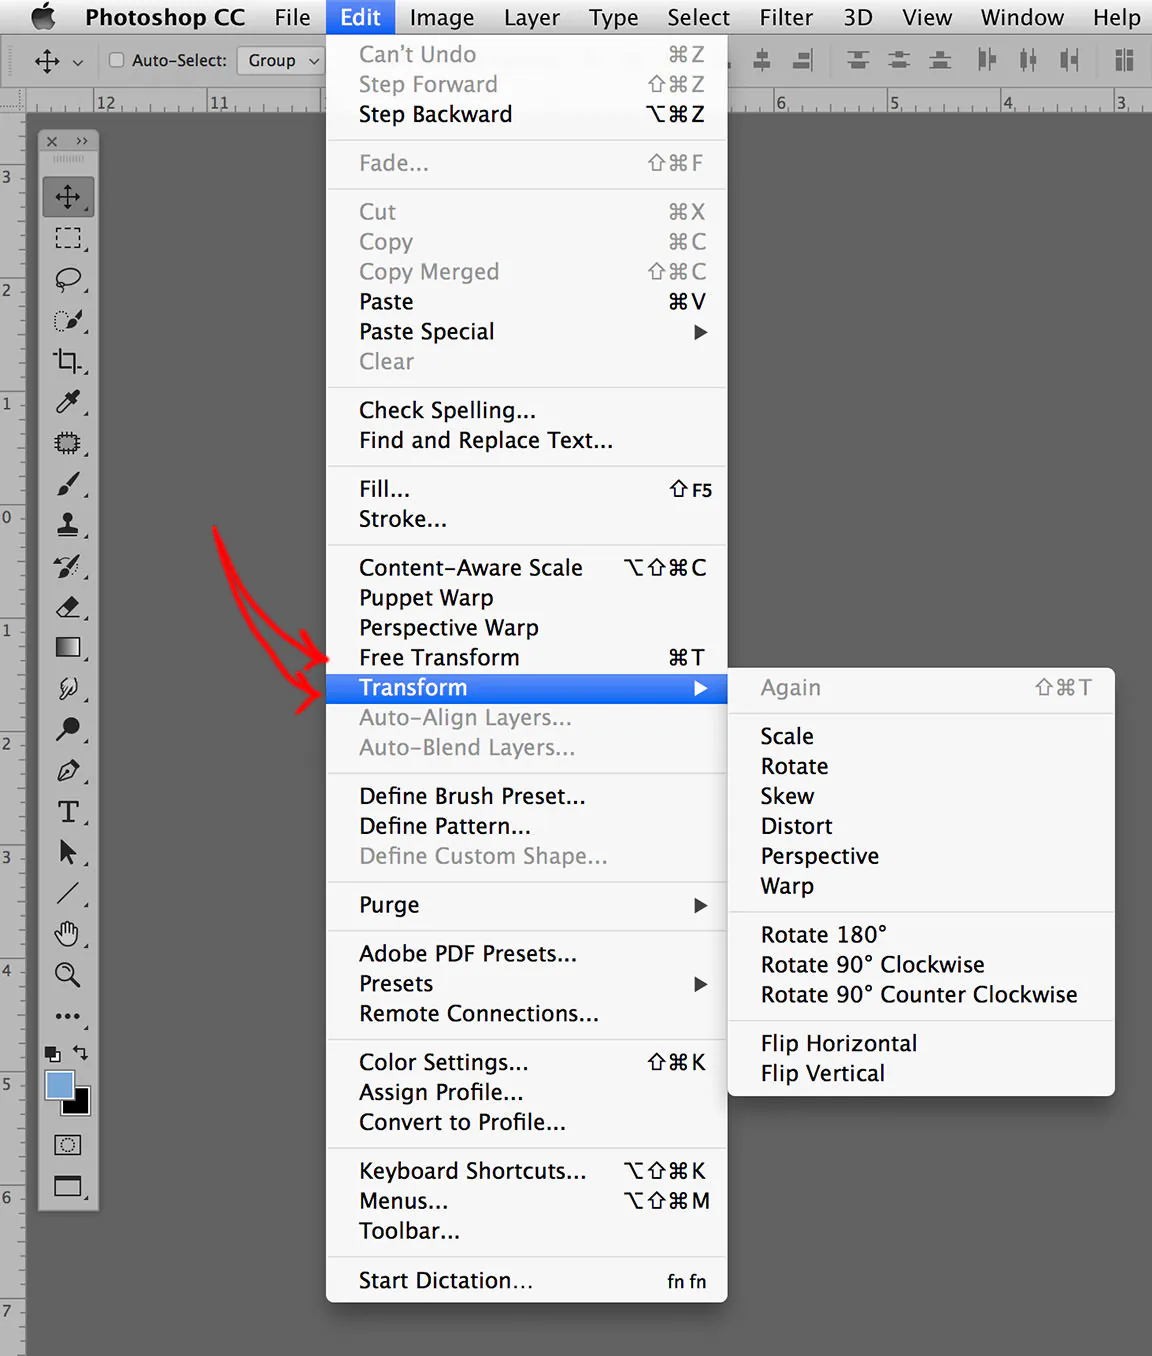
Step 3: Regulate the size and position of frames
Evaluate the measure of each frame inside Photoshop. Consistency in size is essential for a clean and professional-looking lenticular picture.
Use Photoshop’s resizing tools to bring consistency among frames, altering dimensions to form a consistent visual involvement.
Make use of alignment tools inside Photoshop to ensure the exact positioning of each outline. Appropriate alignment is vital to avoid visual disturbances and sustain the smoothness of the lenticular impact.
Consider the overall composition, guaranteeing that the components inside each frame harmonize with adjoining frames to communicate a cohesive story.
Try Photoshop’s editing features, such as the transform and alignment tools, to fine-tune the course of action of frames and accomplish the required visual effect.
Employ techniques like layer grouping to proficiently manage and organize frames inside the Photoshop workspace, facilitating the modification process.
Keep previewing the advancing lenticular sequence to survey the visual stream and coherence, making alterations essential to distill the arrangement and size of frames.
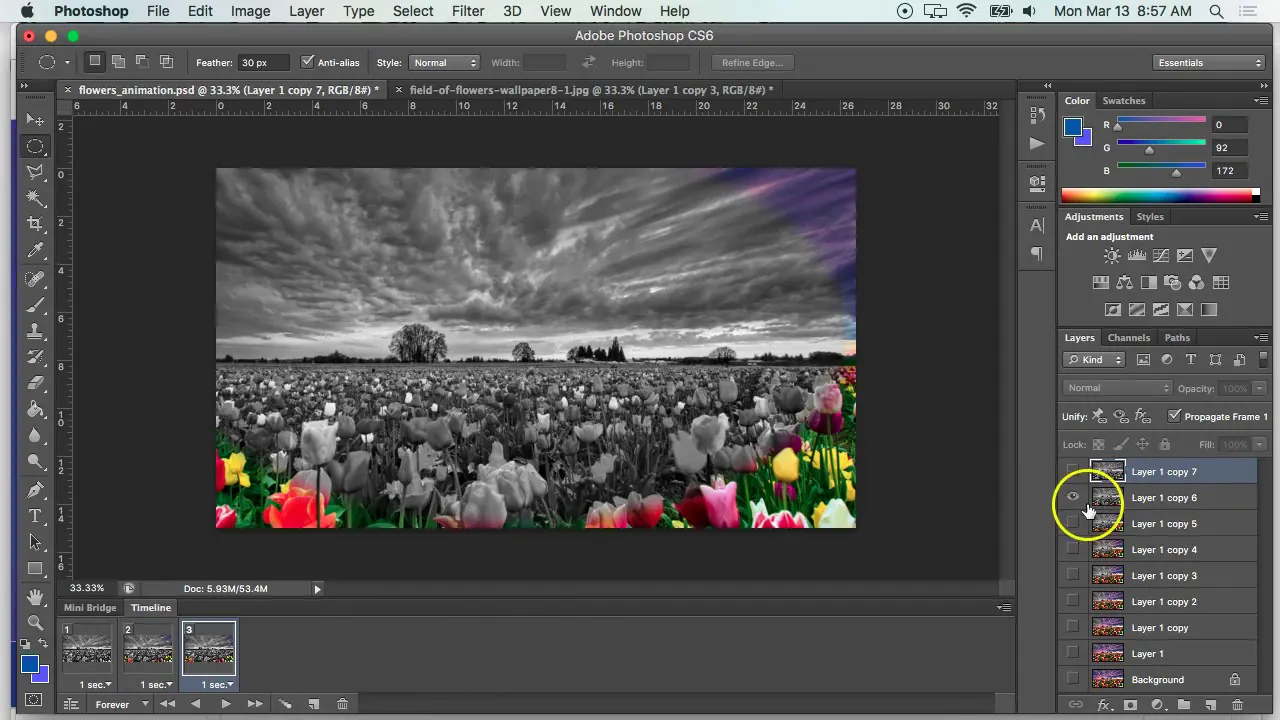
Step 4: Use the timeline and interlace all the frames
Move to the interlacing stage utilizing Photoshop’s specialized timeline function.
Get to the timeline panel in Photoshop selecting the “Create Frame Animation” option to start the interlacing process.
Copy each frame as required inside the timeline, building the sequence that will frame the lenticular impact. That includes organizing pixels in a particular order to conform to the lenticular lens’s characteristics.
Utilize Photoshop’s interlacing features to weave the pixels of each outline together consistently, making a continuous visual move between frames.
Carefully consider the timing of each frame, regulating the duration to control the speed and beat of the lenticular activity. This step does the fine-tuning of the overall pacing and impact.
Play with different interlacing techniques, guaranteeing that the interlaced frames successfully pass on the intended lenticular illusion—whether it be 3D depth, movement, or an energetic perspective move.
Frequently preview the advancing animation to distinguish any irregularities or visual imperfections while making fundamental adjustments to optimize the interlacing and accomplish a pristine result.
Step 5: Tune each frame’s duration
After the frames are interlaced to make a cohesive animation, head to the timeline panel in Photoshop to dig into the vital task of setting frame delays.
Individual frame delays decide the timing and pace of the lenticular animation, affecting how each frame moves into the next.
Carefully evaluate the required visual effect and narrating rhythm, setting the frame delays appropriately. Consider longer delays for moments that warrant expanded viewer consideration and shorter delays for energetic or fast-paced sequences.
Utilize Photoshop’s timeline controls to fine-tune the duration of each frame, making an agreeable stream that adjusts with the expected lenticular impact.
Play with diverse frame delay setups, previewing the movement at different speeds to discover the ideal timing that improves the general viewer encounter.
Frequently survey and tweak the frame delays, balancing fluidity and visual effect to make an enjoyable and consistent lenticular movement.
Step 6: Preserve your project in a GIF format
With the lenticular animation refined and frame delays set, continue to save the venture as a GIF file, which is a favorable format for animations.
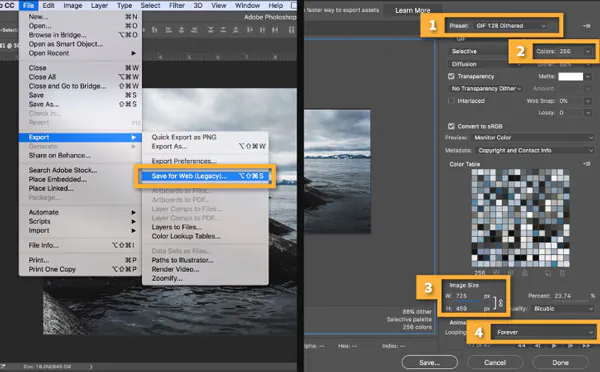
Proceed to the “File” menu in Photoshop and choose “Export” then “Save for Web.” This highlight permits ideal control over GIF settings.
Select the GIF format and tweak settings such as the number of colors, dithering, and quality.
Adjusting file size and picture quality is significant for a productive and visually stimulating result.
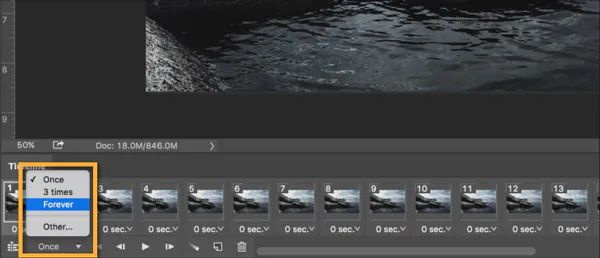
Affirm that the “Looping Options” are set per your inclination, deciding whether the animation plays once or loops ceaselessly.
Save the GIF file to the assigned location, guaranteeing that the file name and organization coincide with your venture details.
Frequently audit the saved GIF file to affirm that the visual quality and animation speed meet your desires. Make any fundamental alterations and re-save as required.
This step concludes the digital creation process, creating a file for digital sharing, online showing, or encouraging distribution.
Step 7: Consider the presentation alternatives
The ultimate step includes deciding the stage for displaying the lenticular animation—whether through digital display or physical printing.
For a digital show, share the saved GIF file online or show it on digital screens, permitting viewers to encounter the lenticular effect on computers, tablets, or other advanced gadgets.
When considering physical printing, guarantee that the printing process adapts to the dimensions and resolution of the digital lenticular record. Proficient printing services may be utilized for ideal scenarios.
In the case of printing, select a suitable material for the lenticular image, keeping in mind the specified presentation format, whether as a standalone image, part of promotional materials, or incorporated into a larger show.
Confirm that the chosen stage complements the expected viewer encounters in a digital space with intuitive engagement or as a substantial, eye-catching print.
Audit the digital or printed lenticular image to confirm that the visual and dynamic effects coincide with your imaginative vision.
This concluding step marks the move from digital creation to real-world introduction, advertising the lenticular animation to spectators through advanced platforms or as a physical, intuitive exhibit.
Conclusion
In summary, the exhilarating effects of lenticular pictures can comprise a sense of pondering and engagement that makes them appear charming and appealing. These impacts hold the eyes and motivate a sense of thoughtfulness, making the pictures more compelling. The immersive nature of lenticular pictures, where the image changes or appears to move as the watcher shifts focus, incorporates a further dimension of participation. This interactive aspect raises the viewer’s acceptance, making the regular pictures more significant. The viewers are primarily riveted by the quick, sharp changes that occur in these images; this piques their interest and enables them to appreciate the artwork thoroughly.
