How to Create Depth and Dimension in Portraits Using Dodge and Burn
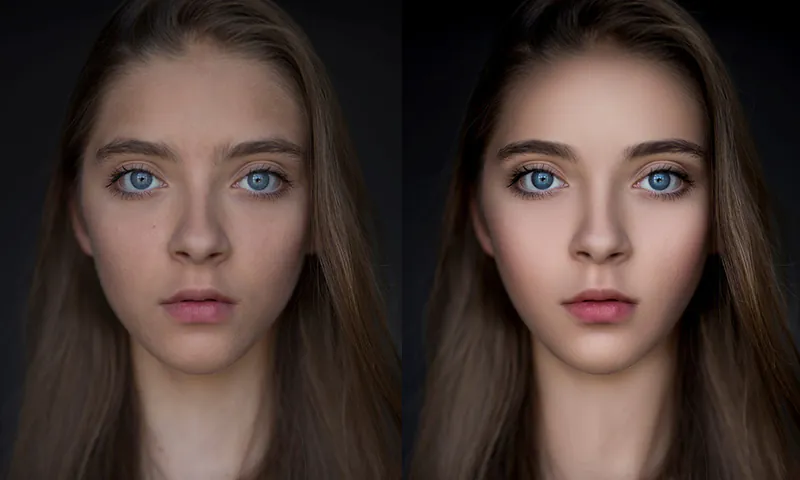
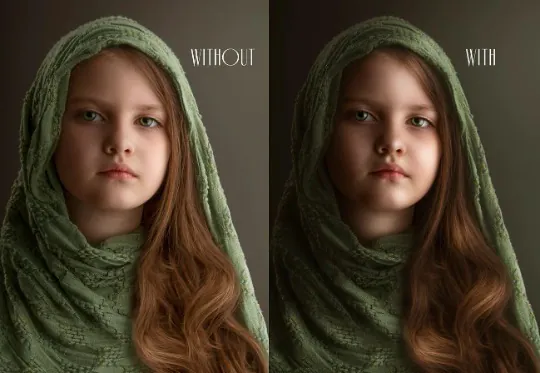
Dodge and burn are traditional darkroom techniques that have now been adapted to digital photography. Dodge refers to selectively lightening specific areas of an image, while burn involves darkening certain parts. This technique can sculpt and shape the face, create highlights and shadows, and add dimension to a portrait. You can draw attention to specific features by strategically applying dodge and burn, softening or emphasizing textures, and bringing out your subject’s unique characteristics.
Preparing Your Image:
A well-prepared image is important before diving into the dodge and burn process. This step sets the foundation for applying dodge and burn techniques effectively and achieving the desired results in your portrait photography. Some essential considerations when preparing your image include:
Exposure and Color Correction: Ensure that the overall exposure of your portrait is balanced and properly adjusted. Check the histogram and make necessary adjustments to avoid overexposed or underexposed areas. Additionally, pay attention to colour balance and correct any colour casts or inconsistencies. This step ensures that your dodge and burn adjustments apply to a well-exposed, color-accurate image.
Skin Retouching: In portrait photography, the subject’s skin plays a significant role. Take the time to retouch the skin and address any blemishes or imperfections. Use tools like the Healing Brush or Clone Stamp to remove distractions or unwanted elements. Be mindful of maintaining a natural look and avoiding excessive retouching. The goal is to enhance the subject’s features while retaining their authenticity.
Global Adjustments: Consider applying global adjustments to enhance the image’s appearance. That includes adjusting contrast, brightness, or saturation to achieve a pleasing tone and colour balance. However, be cautious not to make these adjustments too extreme, as they can affect the subtlety of your dodge and burn adjustments later.
Sharpening: Sharpening is another important step in image preparation, especially for portrait photography. It helps to enhance details and bring out the subject’s features. Use appropriate sharpening techniques or tools, such as Unsharp Mask or Smart Sharpen, to achieve a crisp and well-defined image. Remember to apply sharpening as the final step before proceeding with dodge and burn.
By investing time in preparing your image, you create a solid starting point for applying dodge and burn techniques. This process ensures that your adjustments will be applied to a well-exposed, color-balanced, and retouched image. Taking care of these aspects sets the stage for successful dodge-and-burn implementation and helps you achieve your portraits’ desired depth and dimension.
Identifying Areas for Dodge and Burn:
To effectively create depth and dimension in your portraits using dodge and burn techniques, it’s crucial to identify the specific areas that will benefit from this process. You can enhance your subject’s contours, highlights, and shadows by strategically applying dodge and burn adjustments. Here are some key points for identifying the areas to focus on:
Study the Lighting Conditions: Observe the original photo and analyze the lighting conditions. Determine where the light falls on your subject’s face and identify the areas that naturally catch highlights and shadows. Understanding the lighting will guide you in deciding which areas to dodge (lighten) and which areas to burn (darken).
Enhancing Contours: Contouring is key to creating depth and dimension in portraits. Pay attention to the face’s natural contours, such as the cheekbones, jawline, and brow ridge. These areas can benefit from both dodge and burn adjustments. By selectively lightening the high points and darkening the hollows, you can accentuate the three-dimensional shape of the face.
Highlighting Features: Consider the distinctive features of your subject that you want to emphasize. The eyes, lips, and nose are often the focal points of a portrait. Apply dodge adjustments to brighten the areas around these features, drawing attention to them and adding depth. Be subtle and maintain a natural appearance while enhancing these elements.
Balancing Shadows: Identify areas of the face that are naturally shadowed, such as the eye sockets, neck, or sides of the nose. These areas can benefit from burn adjustments to deepen the shadows and create a sense of depth. You can sculpt the face and add dimension by carefully balancing the highlights and shadows.
Texture Enhancement: Dodge and burn techniques can also enhance textures in your portraits. For example, if your subject has textured skin, such as freckles or wrinkles, you can selectively dodge those areas to reveal the details. That adds interest and depth to the overall image.
Remember that every portrait is unique, and the areas that require dodge and burn adjustments may vary. Take your time to study and analyze the image, experiment with different approaches, and trust your artistic instincts. By identifying the key areas to focus on, you can apply dodge and burn effectively, resulting in portraits that exhibit depth, dimension, and a captivating visual impact.
Applying Dodge and Burn Techniques:
Once you identified the areas in your portrait that would benefit from dodge and burn adjustments, it’s time to delve into the process. Depending on your software, Dodge and Burn can be achieved using various tools and methods. Let’s explore some effective techniques for applying dodge and burn:
Dodge and Burn Tools: Most image editing software, such as Adobe Photoshop, provides dedicated Dodge and Burn tools. These tools allow you to lighten or darken specific areas of your image. When using these tools, adjust the brush size and hardness to match the area you are working on. Use a low opacity setting to build the effect and gradually maintain control over the adjustments.
Adjustment Layers: Another approach to dodge and burn is utilizing adjustment layers, such as Curves or Levels. Create a new adjustment layer and adjust the curve or levels to brighten (dodge) or darken (burn) specific regions. Use layer masks to apply the adjustments to the desired areas selectively. This non-destructive method offers flexibility in refining your dodge and burn adjustments later.
Brushes with Low Opacity: Brushes with low opacity allow you to gradually build up the effect, achieving more subtle and realistic results. Select a soft brush with a low opacity setting and gently apply the dodge and burn adjustments. This technique is particularly useful when working on intricate details or sensitive areas, such as the eyes or lips.
Painting with Light and Dark Colors: An alternative to dodge and burn tools is manually painting with light and dark colours. Create new layers and set the blending mode to Overlay or Soft Light. Choose a light colour to paint on the areas you want to brighten (dodge) and a dark colour for the areas you want to darken (burn). Adjust the opacity and flow of the brush to control the intensity of the effect.
Layer Masks: Layer masks are invaluable for selective adjustments during the dodge and burn. They allow you to hide or reveal specific areas of your adjustments, giving you precise control. Use layer masks to target the dodge and burn adjustments to specific regions of your portrait. This technique is particularly useful when applying different levels of dodge and burn to different areas.
Experiment with these techniques and find the best workflow and artistic vision approach. Remember to zoom in and out regularly to assess the overall effect and make necessary adjustments. Take breaks to maintain a fresh perspective on your edits and avoid overdoing the dodge and burn process. With practice and patience, you’ll develop a keen eye for subtle adjustments that bring depth and dimension to your portraits.
Dodge and Burn Workflow Tips:
To maintain a smooth and efficient workflow while applying dodge and burn techniques to your portraits, consider the following tips:
Work on Separate Layers: Perform dodge and burn adjustments on separate layers. That makes changes or fine-tune the intensity of the adjustments without affecting the original image. It also provides flexibility in experimenting with different settings or techniques.
Maintain Non-Destructive Editing: Use adjustment layers, layer masks, or Smart Objects to ensure non-destructive editing. That allows you to modify the dodge and burn without impacting the original image quality.
Zoom In and Out: Regularly zoom in and out of your image to assess the overall effect of the dodge and burn adjustments. That helps you maintain a balanced and natural appearance, preventing overdone or exaggerated results.
Take Breaks: Editing for extended periods can lead to visual fatigue, making it difficult to judge the effectiveness of your adjustments. Take breaks and revisit your work with fresh eyes to ensure you achieve the desired results.
Use Subtle Adjustments: Dodge and burn techniques are most effective when applied subtly. Aim for natural-looking results that enhance the depth and dimension of your portraits without appearing overly manipulated.
Practice Patience: Mastering dodge and burn techniques take time and practice. Be patient with yourself and keep experimenting with different approaches. As you get experienced, you will better understand how to attain the desired results.
Following these workflow tips, you can maintain control over your dodge and burn adjustments and achieve professional-looking results in your portrait photography.
Conclusion:
Dodge and burn techniques can significantly enhance the depth and dimension of your portraits. By skillfully applying these techniques, you can bring out your subject’s unique features, emphasize contours, and create a captivating three-dimensional effect. Remember to start with a well-prepared image, identify the areas that can benefit from dodge and burn, and experiment with different tools and methods. Eventually, you’ll develop an eye for subtle adjustments that will take your portrait photography to new heights.


