How To Create Awesome Glitch Effects
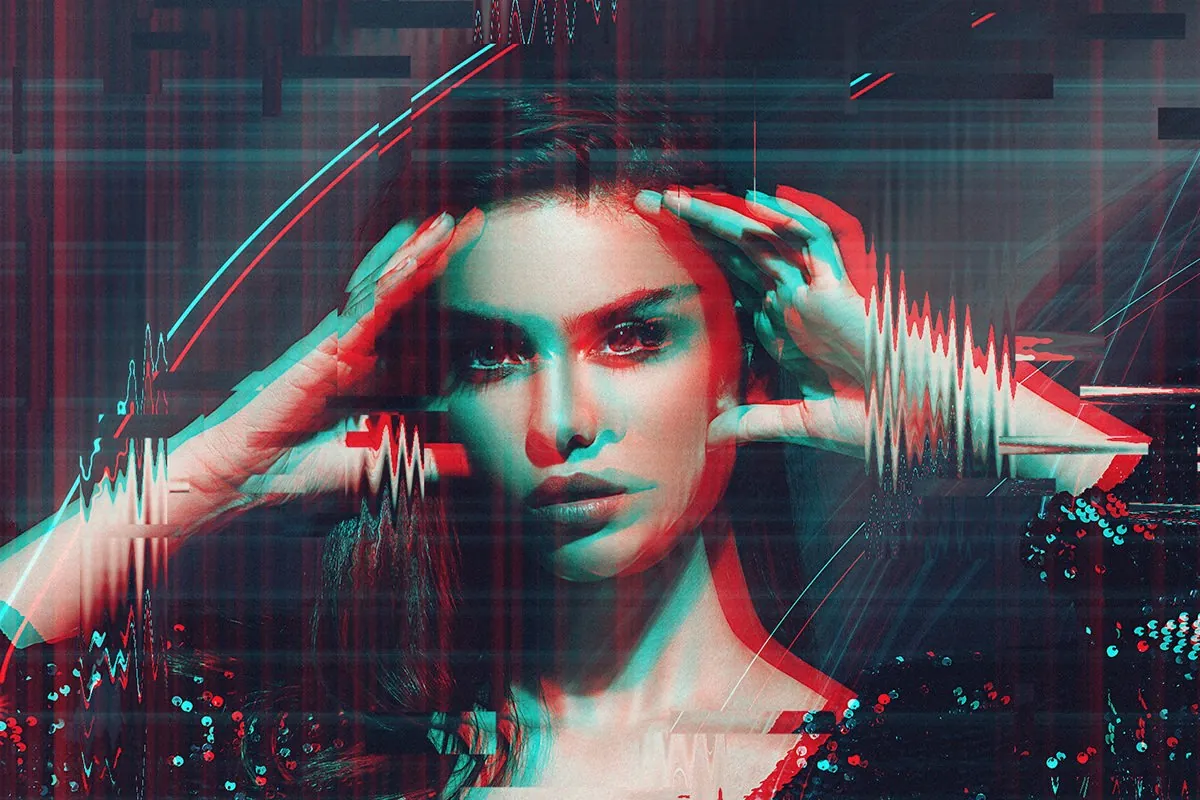
The glitch art effect challenges conventional photography aesthetics by turning a squeaky-clean image into surreally distorted, artful images that display imperfections in a perfect manner. It lets viewers ponder over appreciating imperfections and flawlessness, leaving aside the common beauty and perfection notions about visual art. Unexpected distortions and deviations are created through the integration of digital or analog glitches that produce rarely remarkable visual effects, setting unique and unconventional standards of beauty. Creating glitch art effects in images involves experimenting with various techniques, such as introducing random patterns, channel separation, pixel sorting, etc. The techniques you choose to create the glitch effects determine the specific modifications and outcomes. For instance, adding random patterns into the image via data corruption might result in fractured and abstracted regions. In contrast, channel separation can result in discolored and disconnected reproductions of the original. Pixel sorting rearranges pixels in a photograph determined by their values, resulting in glitchy, flowing lines or hypnotic patterns. Consider following the general steps highlighted in this blog to create awesome glitch art effects in images.
Step 1: Select an Image
At the onset of your glitch art venture, carefully choose a digital image that captivates your imagination. Opt for a visually striking photograph, artwork, or graphic with diverse textures, colors, and shapes. Seek out images with pronounced contrasts or unique compositions to amplify the impact of glitch effects. Keep in mind that glitch art is a creative experiment, and any image can serve as a compelling canvas for your artistic vision. Whether it’s a breathtaking landscape, an abstract masterpiece, or a passionate portrait, your chosen image will be the starting point for crafting mesmerizing glitch art. Embrace the unforeseen outcomes and embark on an imaginative journey through the fascinating world of glitch art.
Step 2: Install Glitch Art Software
Begin by exploring different glitch art software options available.
Choose software that is compatible with your computer’s operating system.
Opt for glitch art software that aligns with your creative requirements and preferences.
Obtain the chosen software from a reliable source or official website.
Follow the software’s installation instructions to set it up on your computer.
Ensure the software is functioning correctly and ready for use.
Take some time to get acquainted with the software’s user interface and features.
Refer to tutorials or guides to better understand the software’s functionality.
With the glitch art software installed and understood, you are now prepared to delve into the world of glitch art creation.
Step 3: Open the Software and Load the Image
Double-click on the glitch art software’s icon or open it from your applications folder to start the program.
Familiarize yourself with the software’s user interface, which may include menu options, panels, and tools.
Use the software’s “Open” or “Import” function to load the chosen image into the program.
A file explorer window will appear, allowing you to navigate to and select your desired image file.
Click “Open” or “Import” to import the selected image into the glitch art software’s workspace.
The loaded image will be displayed on the software’s interface, ready for glitch effects to be applied.
Ensure the image appears correctly and is ready for glitch experimentation.
At this stage, it’s essential to reiterate the importance of having backups for the original image to preserve its integrity.
With Step 3 completed, you are now set to explore and apply glitch effects to the loaded image using the glitch art software.
Remember to embrace the creative process and enjoy the journey of crafting unique glitch art compositions.
Step 4: Explore Glitch Effects
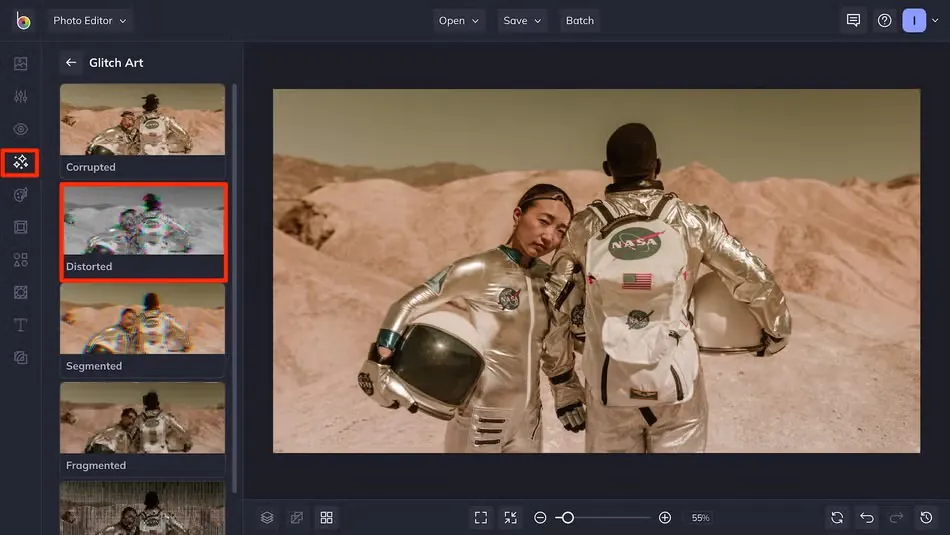
Navigate through the glitch art software’s menu or sidebar to access the various glitch effects available.
Familiarize yourself with the diverse range of glitch effects offered, such as data bending, pixel sorting, color channel manipulation, and more.
Click on each effect to preview how it alters the image in real time, allowing you to visualize the potential outcomes.
Take the time to understand how each effect distorts the image and creates visual anomalies.
Begin experimenting with different effects to observe their individual and combined impact on the image.
If applicable, explore adjustable parameters that control the intensity or style of the glitch effects.
Let your artistic intuition guide you in selecting and combining effects that resonate with your creative vision.
Remember to keep the original image throughout this exploration and save any desirable versions as separate files.
Embrace the iterative nature of glitch art and be open to unexpected and unique results.
With Step 4 completed, you have delved into the world of glitch effects, gaining insights into their characteristics and potential combinations. Now, you are well-equipped to proceed with applying glitch effects to your chosen image.
Step 5: Apply Glitch Effects
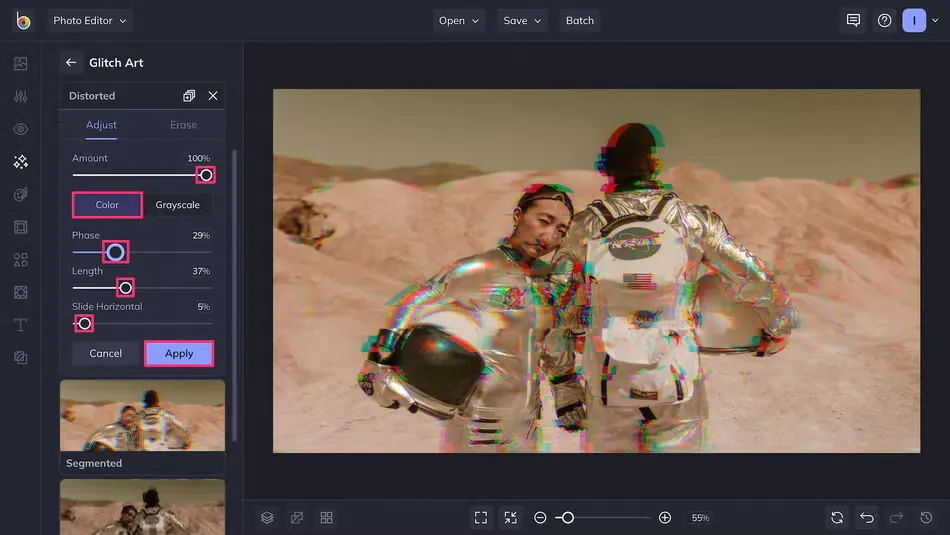
Choose a specific glitch effect from the software’s options that aligns with your creative vision.
Activate the chosen effect by clicking on it or adjusting the provided sliders and parameters.
Observe the image as the effect is applied in real-time, allowing you to gauge its impact on the composition.
If the software permits, fine-tune the parameters to control the intensity and aesthetics of the glitch effect.
Experiment with combining multiple glitch effects for more intricate and layered visuals.
Continuously preview the image after each adjustment to assess the evolving glitch art.
Throughout the process, periodically save your work as separate files to preserve different stages of glitching.
Embrace accidental glitches or unexpected outcomes as they often add artistic charm.
Iterate and experiment with different effects and settings, letting your creativity guide the transformation.
Reflect on the progress and make revisions to achieve your desired glitch art vision.
With Step 5 accomplished, your image now bears captivating glitch art effects. Continue refining, exploring, and pushing creative boundaries to craft a truly unique glitch art masterpiece. Remember to save and preserve your original image while reveling in the serendipity and artistic allure of glitch art.
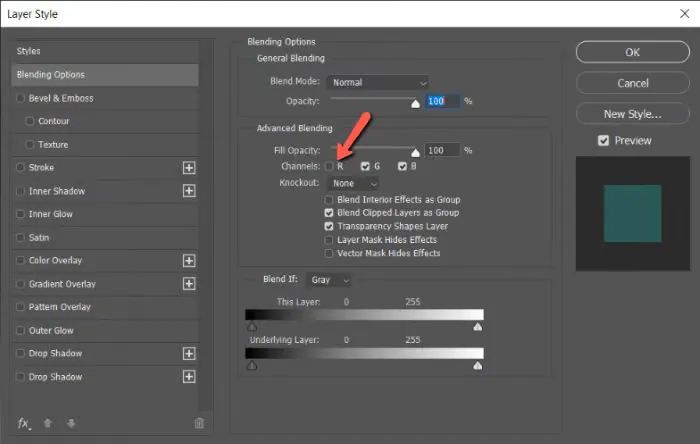
Step 6: Layer and Blend (Optional)
Create multiple copies of the glitched image to explore layering and blending possibilities.
Apply different glitch effects to each copy, producing diverse visual elements.
Overlay the glitched copies on top of one another using image editing software like Photoshop or GIMP.
Experiment with blending modes (e.g., Screen, Multiply, Overlay) to merge the layers creatively.
Fine-tune each layer’s opacity to control glitch elements’ visibility and intensity.
Use masks to isolate specific glitched areas, allowing selective blending for refined compositions.
Blend the glitched layers harmoniously, creating a cohesive and visually engaging glitch art piece.
Continuously review the composition to make adjustments until you achieve the desired effect.
Save different variations as separate files to preserve different glitch art outcomes.
Embrace the freedom of layering and blending, which enables limitless possibilities for artistic expression.
By completing Step 6, you’ve taken your glitch art creation to a higher level by layering and blending glitched images. The process enhances complexity and artistic depth, culminating in visually captivating compositions. Continue exploring, refining, and experimenting to produce glitch art that reflects your creative vision. Remember to save your progress and stay open to unexpected artistic discoveries throughout the journey.
Step 7: Save the Glitched Image
After achieving your desired glitch art aesthetics, ensure the composition is complete and visually appealing.
Save the final glitch art as a new image file to preserve your masterpiece.
Choose an appropriate file format (e.g., JPEG, PNG) that maintains image quality and compatibility.
Always keep the original unaltered image in a secure location for future reference or further glitch art projects.
Consider saving different versions of the glitch art with various effects or compositions.
Store the final glitch art file and its versions in multiple locations for added security.
Use a meaningful and descriptive filename to identify the glitch art easily.
Add relevant metadata to credit yourself as the creator and provide additional context to your glitch art.
Now that your glitch art is saved share it with others on social media, art platforms, or with friends and fellow artists. Proudly showcase your glitch art creation, celebrating your creativity and the artistic journey you embarked upon.
With Step 7 accomplished, your glitch art is securely saved and ready for sharing with the world. Embrace the sense of accomplishment and continue exploring the captivating world of glitch art, where creativity knows no bounds. Celebrate your artistic expression and continue to experiment and refine your glitch art skills to craft even more visually stunning and thought-provoking creations.
Conclusion
Glitch art effects can inject a new wave of creative randomness and distortions into images, breaking them out of conventional sophistication and delicacies. After going through a set of steps and techniques, the final glitch art images promote striking imperfections and a glitchy artistic disorder. Pixelation, color changes, data bending, and other fascinating artifacts appear in these photographs, generating distinct and abstract aesthetics that contradict traditional conventions. Making glitch art introduces glitches and unexpected aspects into the image using glitch art software or manual techniques. You can play with myriad glitch effects, altering parameters to obtain the desired visual results.
