
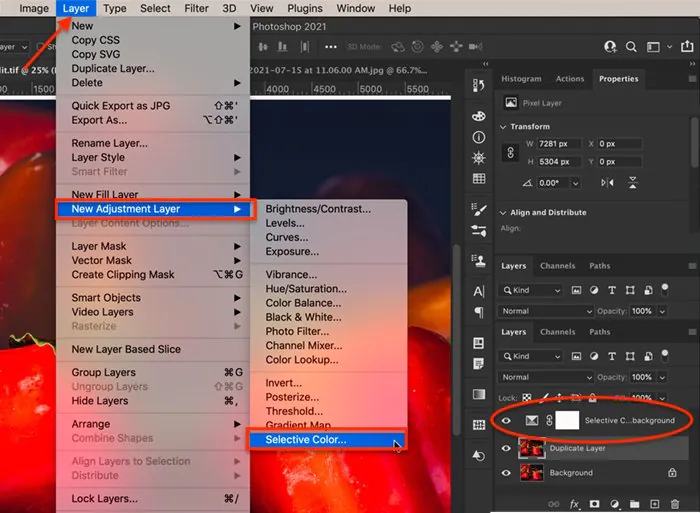
How to Apply Selective Colour In Photoshop
The selective colour technique invokes specific parts of your image to pop out, including the subject, background, or a mix of elements, while keeping the remaining portion of the image low-key. It illuminates the main focus in a colourful way, calling attention to the highlighted subject or background and creating a colour sway. Using selective colour in Photoshop, you can deftly achieve your objective of making your desired elements dominate over other, less crucial factors. When applied to an image’s subject, this selective colour technique isolates the subject using specific colour combinations, making the subject prevail over an unsaturated or intendedly made monochrome background. Sometimes selective colour techniques can also be applied to illustrate the background instead of the subject. The photograph’s narrative might take on a novel twist by retaining the backdrop components in colour and desaturating the subject, making the surrounds the focus point while the subject becomes a small chunk of the bigger plot. The detailed steps to apply selective colour in Photoshop are as follows:
Step 1: Discerning Selection
In the initial stage of applying the selective colour technique in Photoshop, meticulously discern the specific elements within the image that require emphasis. This discerning process involves identifying the subject, background, or a combination of elements that you intend to make visually striking. Carefully analyze the composition, considering the visual hierarchy and the narrative you wish to convey. Use advanced selection tools, such as the Magic Wand or Pen Tool, to outline the chosen areas precisely. The success of this step lays the foundation for the subsequent stages, enabling you to draw attention to the essential components and create a captivating visual experience.
Step 2: Duplicating Background Layer
Once you discern the elements for selective colour enhancement, duplicate the original background layer in Photoshop. Duplicating the layer ensures the preservation of the untouched image, providing a safety net for experimentation and comparison. Right-click on the background layer to choose “Duplicate Layer” to create an identical copy. This duplicate layer is the canvas for applying selective colour effects, allowing you to work non-destructively. With this step, you can freely experiment with different colour adjustments and modifications while having the option to revert to the original image if needed. Duplicating the background layer also aids in achieving seamless and professional results, enabling precise isolation and manipulation of the chosen elements while maintaining the integrity of the overall composition.
Step 3: Refining Edges
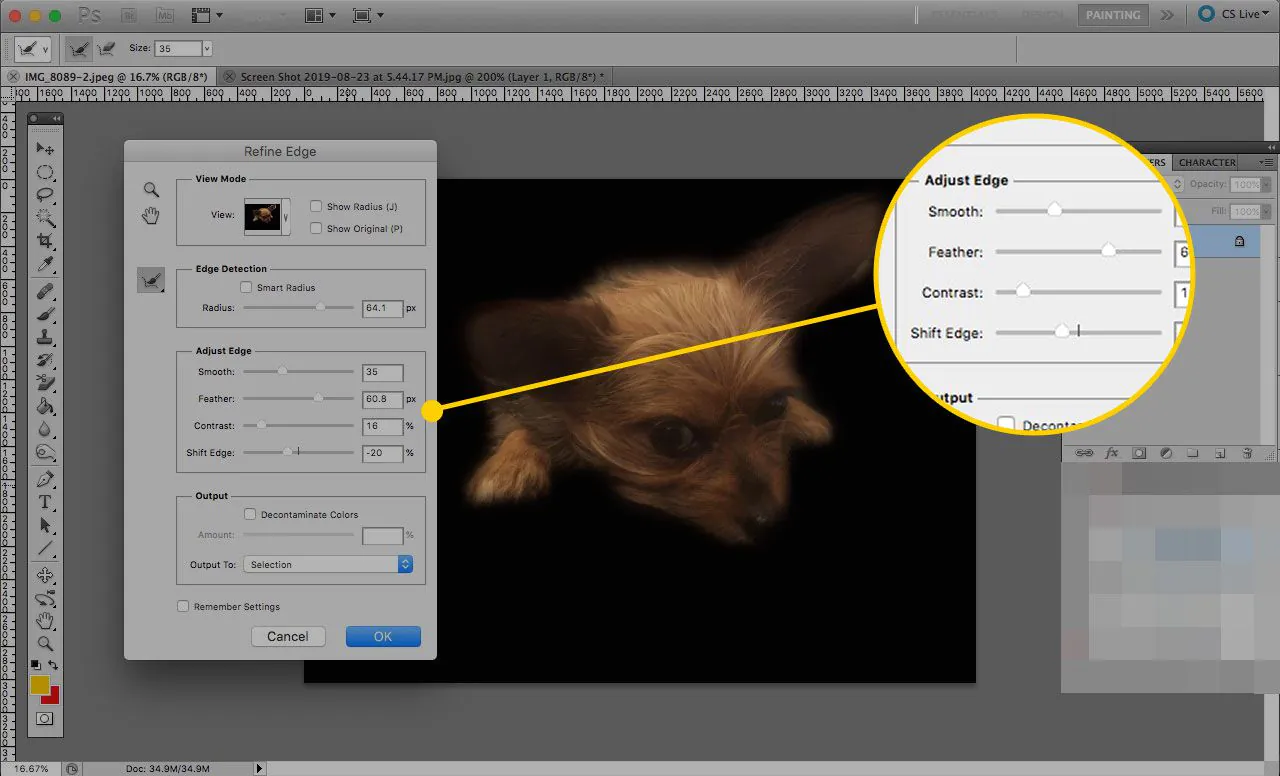
To ensure a seamless and polished outcome, meticulously refine the edges of the selected elements in the duplicated layer. This step is crucial for achieving a natural and harmonious blend between the highlighted and desaturated areas. To fine-tune the selection boundaries, utilize advanced edge refinement tools like Feather, Refine Edge, or Select and Mask in Photoshop. Adjust the refinement parameters to achieve the desired level of smoothness and accuracy, considering the image’s resolution and complexity. By diligently refining the edges, you can avoid harsh transitions and prevent distracting artefacts in the final result. The attention to detail during this step contributes to the overall visual appeal of the selective colour effect, ensuring that the highlighted elements stand out with precision while seamlessly integrating with the low-key portions of the image.
Step 4: Intensifying Vibrancy
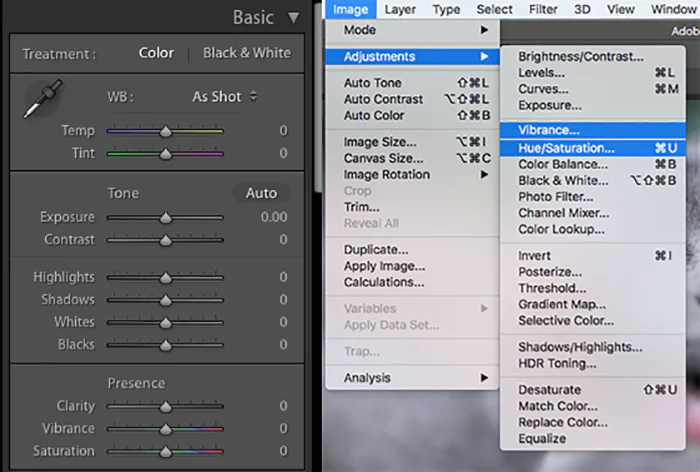
With the refined selection in place, proceed to intensify the vibrancy and brilliance of the chosen colours. Utilize advanced colour adjustment tools in Photoshop, such as Curves, Levels, or Hue/Saturation, to enhance the colour richness and depth. Carefully manipulate the colour channels, tonal curves, and saturation settings to achieve the desired visual impact. This step is pivotal in making the selected elements stand out and command attention within the composition. Strive for a balance between boldness and naturalness, ensuring that the intensified colours complement the overall mood and tone of the image. Be mindful of potential colour cast issues and address them meticulously to maintain visual harmony. By skillfully intensifying vibrancy, you breathe life into the highlighted elements, elevating the image’s artistic expression and creating a striking contrast with the subdued areas.
Step 5: Desaturating Background
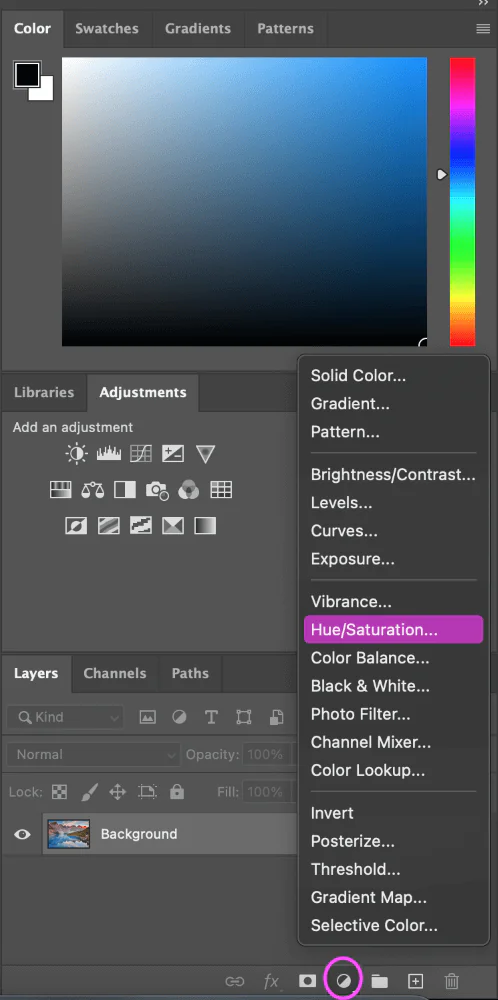
After intensifying the vibrant colours in the selected elements, proceed to desaturate the remaining image portion in the duplicated layer. To convert the non-selected areas into grayscale or muted tones, utilize advanced desaturation techniques in Photoshop, such as selective desaturation or Hue/Saturation adjustments. This deliberate contrast between the colourful focal points and the desaturated background enhances the visual impact of the selected elements, making them stand out prominently. Aim for a harmonious balance between the vibrant and subdued regions to ensure a cohesive and visually appealing composition. Pay close attention to preserving subtle tonal variations and textures in the desaturated areas, as they contribute to the overall depth and sophistication of the image. By skillfully desaturating the background, you create a captivating and dynamic visual narrative that directly guides the viewer’s attention to the vividly illuminated focal points.
Step 6: Precision Masking
With the desaturated background in place, proceed with precision masking to reveal the colourful elements in the duplicated layer. Utilize advanced layer masking techniques in Photoshop to selectively unveil the intensified vibrant colours. Carefully apply a white brush on the layer mask, targeting the areas where you want the selective colour effect to be visible. Take your time to ensure accurate and seamless masking, paying attention to details and edges for a polished outcome. Refine the masking to achieve flawless integration of the colourful and desaturated regions. This precise masking process is pivotal in maintaining the visual clarity and impact of the selective colour effect, allowing the highlighted elements to shine through while seamlessly coexisting with the subdued background.
Step 7: Balancing Contrast
Once the precision masking is completed, focus on balancing the contrast between the highlighted elements and the desaturated background in the duplicated layer. To fine-tune the overall tonal range, utilize advanced contrast adjustment tools in Photoshop, such as Curves, Levels, or Contrast/Brightness. Aim to strike a delicate equilibrium between the vibrant and subdued areas, ensuring that the highlighted elements retain their visual prominence without overpowering the rest of the composition. Pay attention to maintaining smooth transitions and avoiding harsh contrasts that may distract from the intended focal points. By skillfully balancing contrast, you achieve a visually cohesive and captivating image that exudes impact and harmony. This step is crucial in elevating the overall visual appeal of the selective colour effect, allowing viewers to appreciate the interplay between the vivid colours and the subdued tones in a way that enhances the image’s expression.
Step 8: Refining Color Balance
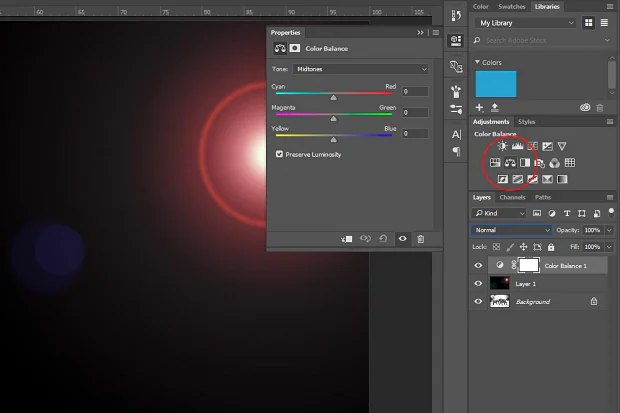
Utilize advanced colour correction tools in Photoshop, such as Color Balance, Selective Color, or Color Lookup, to fine-tune the overall colour tones. Pay attention to the relationship between the highlighted elements and the desaturated background, ensuring they harmonize cohesively. Make subtle adjustments to the colour temperature, tint, and saturation levels for a natural and visually pleasing result. This step is pivotal in creating a unified and polished appearance, where the selective colour effect seamlessly blends with the overall composition. Aim for a refined colour balance that complements the image’s subject matter and enhances the intended mood and atmosphere. By skillfully refining the colour balance, you ensure that the selective colour effect enhances the visual impact and storytelling of the image, leaving a lasting impression on viewers with its captivating appeal.
Step 9: Layer Opacity Adjustment
Utilize advanced layer blending options in Photoshop to control the intensity of the selective colour effect. Lowering the layer opacity allows a more subtle integration of vibrant colours with the desaturated background, creating a soft and nuanced look. On the other hand, increasing the opacity enhances the boldness and impact of the highlighted elements, making them stand out even more prominently.
Experiment with different opacity levels to find the perfect balance that complements your artistic vision. This step allows you to tailor the selective colour effect to suit the image’s mood, style, and message. By skillfully adjusting the layer opacity, you can achieve a refined and sophisticated selective colour effect that integrates with the overall composition.
Step 10: Final Composition
After fine-tuning the layer opacity, it’s time for the final composition adjustments to ensure the selective colour effect harmonizes cohesively with the overall image. Take a step back and review the entire composition with a critical eye, paying attention to the overall balance and visual flow.
Assess the selective colour’s impact on the composition, enhancing the intended focal points and storytelling. Make any necessary tweaks to the colour balance, contrast, and layer blending to integrate the highlighted and desaturated elements seamlessly.
At this stage, consider the image’s overall aesthetics and the emotional response it evokes. Strive to create a visually compelling and engaging composition that captures the viewer’s attention and leaves a lasting impression.
Once satisfied with the final result, save your work in the desired format and resolution.
Conclusion
Selective colour in Photoshop is an influential aspect that is substantially vital and invigorating for images. Due to selective colour effects, your images look more subjugating with a combined power of subdued, low-key elements and painted, sparkling, high-key ones. That distinction devised between high-key or selectively coloured parts and unsaturated, monochrome low-key areas of the same images also gives off an atmosphere of unity. The visual display of selective colour delivers a universal message of equality among worthy and petty factors of life. In a way, such images become more dear to the viewers’ hearts and souls by virtue of creating an emotional bondage.
