How To Create A Gradient Mesh In Illustrator
Illustrator’s gradient mesh feature creates different kinds of shadow and lighting effects by hitchlessly blending colors within mesh points. These effects make images seem to have a three-dimensional structure, appending depth and naturalism. The gradient mesh feature’s adaptability opens users to creative user choices. They can experiment with different shading techniques, light directions, and color palettes to prompt distinctive styles by altering the light direction, adjusting the severity of shadows, or experimenting with color combinations. Along with image editing, you can also create unique and flawless illustrations for your project designs with the help of the gradient mesh tool, which accurately controls color placements and gradients. The gradient mesh function is a must-have for projects requiring a high visual impact. Its adaptability has no boundaries, from making captivating images for internet art to crafting amazing visuals for print media. This blog presents a step-by-step plan to create a perfect gradient mesh in Illustrator for your images or projects.
Step 1: Open Illustrator and import your image.
To initiate the gradient mesh creation process, launch Adobe Illustrator and ensure you have a high-resolution image ready for your project. The image’s quality is vital as it forms the foundation of your artwork. Click “File” and then “Open,” selecting the desired image from your files. A new canvas will unfold, presenting your image as the backdrop for your creative endeavor. This essential step sets the stage for the transformative journey ahead, where you’ll harness the power of the gradient mesh tool to craft captivating and realistic illustrations. With Illustrator at your fingertips and your image in place, you’re prepared to embark on this artistic exploration.
Step 2: Generate a new layer for the gradient mesh.

The organization is key to a seamless creative process. Establish a dedicated layer for the gradient mesh to keep your artwork tidy and easily manageable. Hover over the “Layers” panel in Illustrator to locate the “New Layer” icon and click on it. Give the new layer an appropriate name and position it above the image layer. This simple yet crucial step ensures that your gradient mesh remains separate from other elements in your artwork, making future adjustments and modifications smoother. With the gradient mesh residing on its layer, you can confidently experiment with colors, shading, and lighting effects while maintaining control and preserving the integrity of your illustration. A well-structured workspace paves the way for artistic freedom and creativity.
Step 3: Select the image and choose “Object” > “Create Gradient Mesh.”
Begin by selecting the image you want to apply the gradient mesh to. Simply click on the image to ensure it is highlighted and ready for manipulation. With the image selected, navigate to the top menu of Adobe Illustrator. There, you’ll find the “Object” option, which houses the transformative “Create Gradient Mesh” feature. Click on “Create Gradient Mesh” to initiate the process. A delightful dialog box will emerge, inviting you to customize the settings of your gradient mesh. Here, you can determine the mesh grid’s number of rows and columns. These rows and columns are the essence of your mesh structure, defining how colors blend and transition within your artwork.
Step 4: Set the mesh grid’s number of rows and columns.
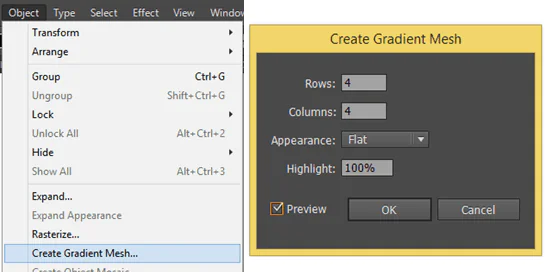
With the “Create Gradient Mesh” dialog box now open, it’s time to bestow your mesh grid with the desired level of detail and complexity. The number of rows and columns you select shapes the smoothness and precision of color transitions within your artwork. A higher density of rows and columns allows for finer control over the gradients, granting you the ability to create intricate shading and highlights. However, this might require more meticulous work and time investment. On the other hand, opting for fewer rows and columns results in more distinct and pronounced gradient transitions, which can be ideal for simpler illustrations or projects with tight deadlines. As you determine the right balance, consider the intricacy of your artwork and the level of control you wish to exercise over the color blending.
Step 5: Add mesh points where needed for shadows and highlights.

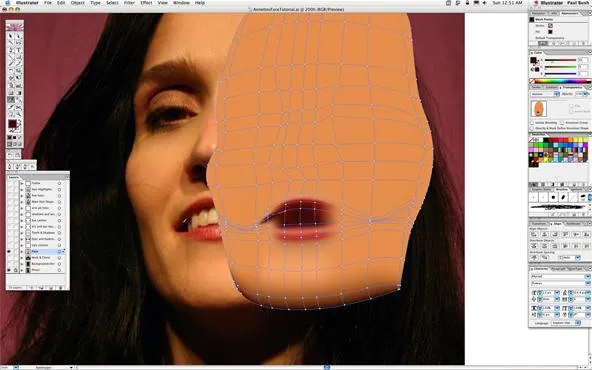
With the mesh grid established, it’s time to add mesh points strategically to your artwork. The mesh points act as anchor points, guiding the formation of shadows, highlights, and various color variations. Select the “Mesh Tool” (shortcut U) from the Illustrator toolbox. Gently guide your cursor to precise locations on the image where shadows and highlights should manifest. These selected areas will be the focal points for adding mesh points.
Placing the mesh points requires careful consideration of your object’s contours and light source direction. For realistic and captivating results, position mesh points in areas where shadows would naturally occur and where highlights would catch the light. These anchor points allow you to sculpt the dimensionality of your artwork, breathing life into your illustration.
Adding more mesh points in areas with intricate details can refine the gradients and enhance the overall realism of your artwork.
Step 6: Adjust the color of the mesh points to create gradients.
Having added the mesh points, it’s time to infuse your artwork with mesmerizing gradients. To achieve this, select the “Direct Selection Tool” (shortcut A) and click on a mesh point to reveal its color properties. Here lies the power to dictate each mesh point’s hue, saturation, and brightness.
With the color picker or the Swatches panel as your artistic palette, experiment with various colors and their combinations. Embrace harmonious shades blend to craft smooth transitions from one color to another. Play with saturation and brightness to add depth and dimension to your illustration.
Step 7: Experiment with different shading techniques.
With the gradients in place, it’s time to embark on an artistic exploration of shading techniques. The direction and intensity of the light source play a crucial role in creating realistic shadows and highlights. You can imbue your artwork with depth and dimension by using darker colors for shadows and lighter shades for highlights.
Consider the position of the light source about your object. Shadows should naturally form on the side opposite the light, while highlights should appear where the light hits the object most intensely. Remember that the gradient mesh allows for precise control over shading, making it an invaluable tool for achieving realistic lighting effects.
Experiment with different placements of mesh points to create variations in shading. Adjust the color intensity and distribution to create nuanced shadow patterns that mimic real-world lighting conditions.
Step 8: Control light direction by adjusting mesh point colors.
With each mesh point acting as a miniature painter’s palette, you can simulate how light interacts with different surfaces, adding a new level of realism and depth to your illustration.
Begin by considering the position of your light source. Adjust the colors of the mesh points to align with the direction of the light. For areas facing the light source, use brighter colors to create highlights and emphasize the reflection of light. Conversely, for areas in shadow, employ darker colors to accentuate depth and contrast.
The precision offered by the gradient mesh allows you to paint with light, shaping the illumination of your artwork with exquisite finesse.
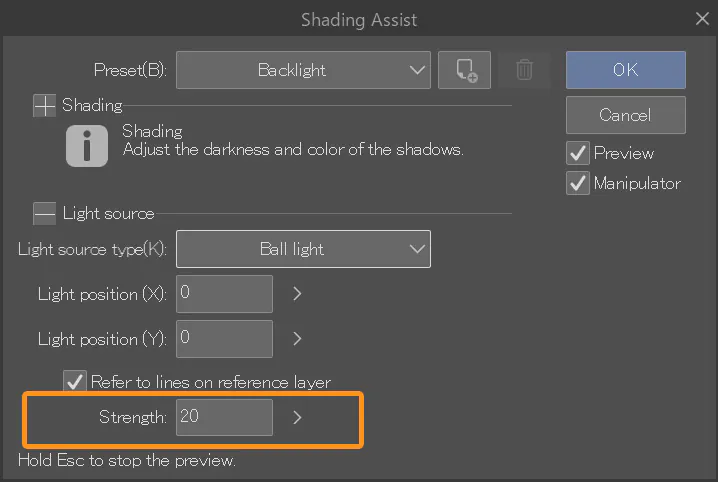
Step 9: Fine-tune shadow intensity and highlights.
With the foundation of a light direction set, it’s time to fine-tune the shadow intensity and highlight brightness within your artwork. Using the “Direct Selection Tool,” delicately adjust the colors of individual mesh points to enhance the depth and realism of your shadows and highlights.
Pay close attention to the subtleties of light and shadow in the reference image or your artistic vision. By meticulously refining the shadow intensity, you can perfectly transition from light to dark, making your illustration more convincing. Similarly, refining highlights with precision will add a captivating luminosity, drawing attention to specific areas and accentuating the three-dimensional nature of your artwork.
Try different color schemes, such as complementary, analogous, or monochromatic palettes, to evoke diverse emotions and moods. Vibrant hues may exude energy and dynamism, while subtle tones can create a sense of serenity and elegance.
Step 10: Review and save.
Identifying areas that require refinement or tweaking. Fine-tune the placement of mesh points, adjust colors, and refine gradients until your artistic vision materializes on the canvas.
Before finalizing your illustration, ensure all your layers are intact and well-organized. Double-check that the gradient mesh is placed on its dedicated layer for easy management.
Choose an appropriate file format for your intended use, such as JPEG, PNG, or SVG. Additionally, consider saving your work in the native Illustrator format (AI) to retain the ability to make future edits.
With a sense of accomplishment, export your artwork and share it with the world. Whether it graces digital platforms or print media, your creation, brought to life by the magic of the gradient mesh, will captivate and inspire all who lay eyes upon it.
Conclusion
In conclusion, gradient mesh in Illustrator is a proficient and handy feature that provides you with appeasement and accessibility to various accommodations, whether they relate to image modifications or creating general illustrations for designing projects. Contrasting light and shadow levels and modestly blending colors, Illustrator’s gradient mesh produces an organic feel to images. This harmonious shift of colors, accomplished with gradient mesh, gives an ethereal quality to the design. The uniform color blending gives a visually tempting effect and adds rhythm and flow to the final composition.
