How To Create Anamorphic Art Photos
Anamorphic art visuals are distorted in a way that apparently they are unchanged and normal as before. Still, you can see the modifications looking from a certain angle or using devices like cylindrical mirrors or smartphones. These hidden modifications, which require some effort to see and appreciate, trigger viewers to explore the enigmatic, unseen world of anamorphic effects. Two significant approaches for creating anamorphic art effects are perspective distortion and grids and guides. Perspective distortions include changing the proportion of objects so that they seem to be stretched or compressed. Likewise, guides and grids let you produce accurate distortions relative to anamorphic art that aligns image elements at the intended angle to create ideal effects. Apart from individual techniques, you can also go for digital editing programs that contain all main anamorphic tools in a single menu, facilitating your process of creating anamorphic images. The basic steps and fundamental techniques to create anamorphic images are as follows:
Step 1: Image Loading
Creating anamorphic art lays the groundwork for your creativity by loading your image into your preferred software. You can utilize trending software, like Adobe Photoshop or GIMP.
Once you have the software to work with, launch it. Next, explore its file menu and navigate to the ”open” option. By clicking this option, you can scan through your computer’s files for the image you want to convert into an anamorphic.
The image will be loaded onto your canvas by the program, ready for the subsequent phases of the transformation process. Now, proceed to the next step in making anamorphic art.
Step 2: Cropping and Dimensions Accommodations
After loading your image, you need to adjust its size and dimensions. You can use different cropping and resizing techniques to remove distracting elements from the image and illustrate the key factors.
Cropping
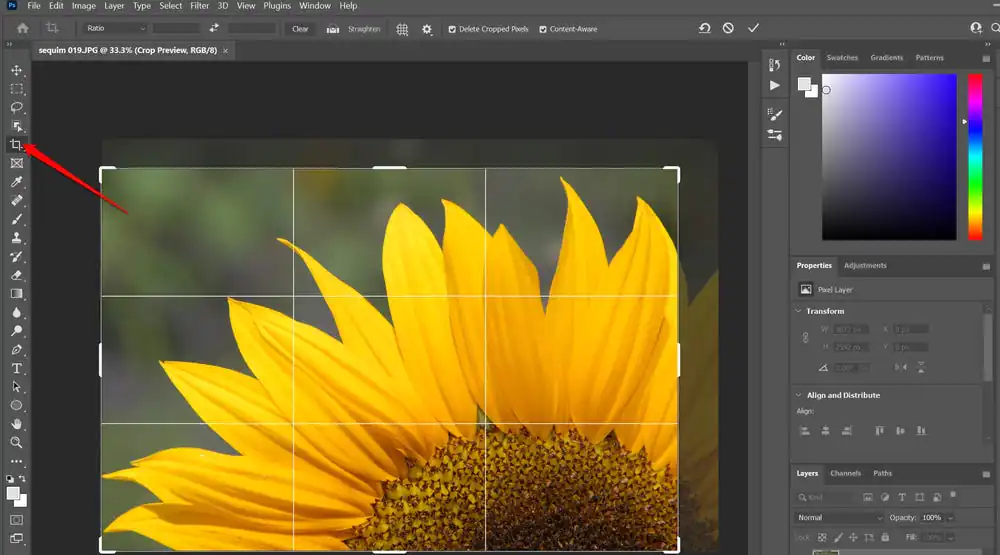
The cropping approach is allied to sculpting, in which needless things are removed to evince the main subject. Begin by finding your cropping tool in your editing software. This tool can design your image’s new frame or border. Select the area you wish to keep carefully, deleting any unnecessary or irrelevant elements from the original image. The purpose is to produce a blank canvas that will be the basis for the anamorphic transition.
Resizing

After you’ve refined your image by cropping, the vital step is size correction. Consider this stage to be preparatory for your anamorphic metamorphosis. Your canvas should be free of mess and have dimensions that fit the extent of your artistic vision. To create an exquisite frame for your project, use the resizing or canvas size features offered by your editing software. When making these modifications, hold in things like aspect ratio and preferred viewing angle. This sheer attention to specifics confirms that your anamorphic artwork is proportional and striking, strengthening your audience’s visual experience.
Step 3: Distorting the Perspective
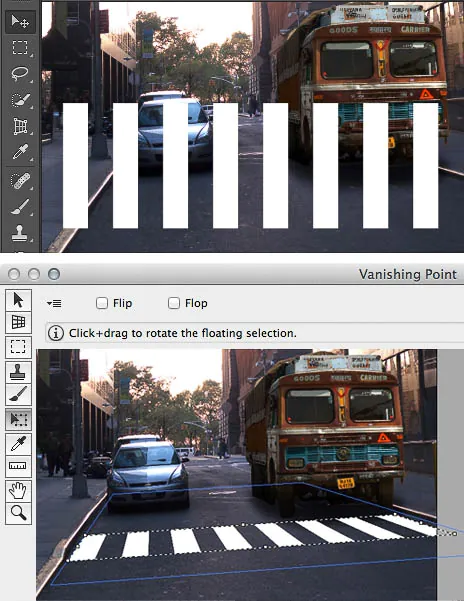
Choose the tool: Pick up the proper distortion tools in your image editing software. Standard tools for distortion production include perspective warp or skew. These tools display a user-friendly interface that allows you to maneuver the image’s perspective smoothly.
Define the distortion: Before framing any adjustments, develop an unambiguous grasp of your image’s appearance when seen from the desired perspective. This practical approach guarantees that your distortion corresponds to your creative purpose.
Incremental alterations: Apply distortion gradually and subtly. Minute, controlled changes primarily work best. Play with different distortion levels and evaluate the influence on the image’s layout.
Keeping balance: While you distort elements or objects in the image, toil to maintain balance and accord. The distorted elements should appear symmetrical when viewed from the correct angle. The ideal result is generating a visually appealing impression that does not look too fabricated.
Retrospect from the intended angle: Consistently audit your progress by previewing the image from the preplanned viewing angle. This step confirms that your distortion is consistent with your vision and remains practical in achieving the desired effect.
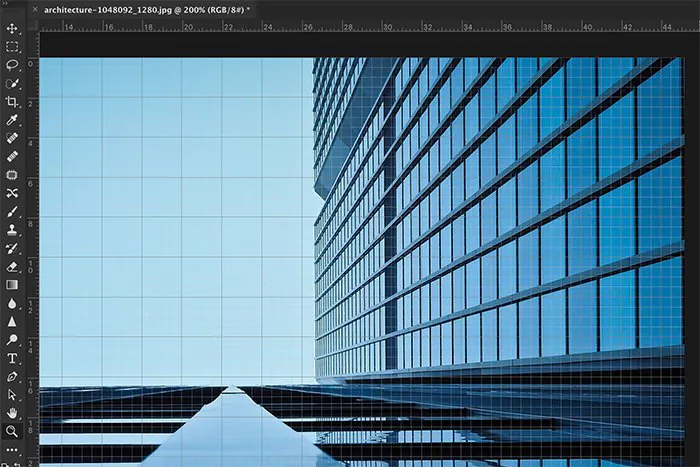
Step 4: Alignment Accuracy
Take time to envision the right viewing angle before beginning the precise alignment. Your mental picture will operate as your compass, reflecting the viewpoint from which your anamorphic art will seem undistorted and instantly appealing.
Many image editing software programs possess overlay grids or guidelines that are invaluable. Use these visual tools as dependable partners in your quest for alignment perfection. They are a visual guide for directing you precisely as you match your deformed image pieces with their unaffected counterparts.
Alignment often calls for revisiting the distortion applied in the preceding step. Fine-tune the distortion so it is perfectly coordinated with the correct viewing angle. It’s the fine details that translate your concept into a stunning reality.
Never limit your investigation to a single point of view. Try seeing your photograph from multiple angles. This multi-angle inspection ensures that your anamorphic work retains its enticing beauty regardless of the observer’s angle.
Use the zoom and pan features to get into the finer details of your image. This thorough inspection aids in spotting any slight misalignments or defects that may jeopardize the overall look.
Lastly, achieving the summit of alignment takes patience and perseverance. It’s a painstaking process, similar to carving the ideal sculptures, and the attention to detail makes your anamorphic product utterly appealing.
Step 5: Finalization
For a flawless final anamorphic artwork, you need to:
Refine Distortion:
First, readdress the distortion you applied beforehand. Adjust it carefully to strike the right balance between creating a memorable illusion and maintaining the character of the original image.
Color Enhancement:
Colors are essential in anamorphic art. Scrutinize your image’s color palette. Make the color more vivid and appealing. Use contrast to give your work depth and intrigue.
Contrast Adjustment:
Balance the degree of contrast in your photographs. That helps to attract attention to vital features while highlighting distorted elements. A well-adjusted contrast will guarantee that your design stands out.
Perfecting Details:
Zoom in for a closer look at each detail. Correct any inconsistencies or inaccuracies from the preceding stages. Pay careful attention to edges, transitions, and any flaws that must be addressed.
Arrangement Symmetry:
Consider the overall arrangement of your artwork. Organize elements and adjust anything that interferes with the flow or equilibrium.
Considering your target audience:
Throughout this procedure, keep your audience in mind. Consider how your distortion illusion will seem to the viewer from their point of view. Make changes to maximize its impact.
Repeat as necessary:
Fine-tuning may require numerous steps. If needed, be bold and return to the previous stages. Refine, assess, and iterate until you reach the ideal image.
Checklist:
Before you finish, go through your transformation artwork one last time. View it from various perspectives and lighting conditions.
Step 6: Exporting
Follow these sleek steps for an accurate export:
Pick a suitable file format per your project’s requirements and software compatibility, like JPEG, PNG, or TIFF.
Before exporting, save your original artwork by saving a copy in its original format for prospect editing.
Tune the resolution to mirror your intended use, conserving distortion integrity during resizing.
If you use formats like JPEG, set file size and quality to get the optimal setting.
Consider keeping relevant metadata, like EXIF information, to add context to your art.
Confirm that the distortion effect remains tempting from enormous angles.
Select a descriptive filename and maintain an organized file structure.
At last, click “Save” or “Export” to share your anamorphic composition on social media, in your portfolio, or for print exhibitions.
Conclusion
Finally, creating anamorphic art is a fascinating pursuit involving visual illusions and creativity. Anamorphic pictures have been used consistently in the visual art arena from their Renaissance beginnings to the modern day. Creating those images requires technical ability and a thorough grasp of perspective and geometry. Availing the techniques outlined in this article, you can generate stunning anamorphic images to challenge perceptions and interest people. You can develop anamorphic art that leaves an indelible impression on viewers and draws them into the secrets of visual illusions as you present the artwork.
