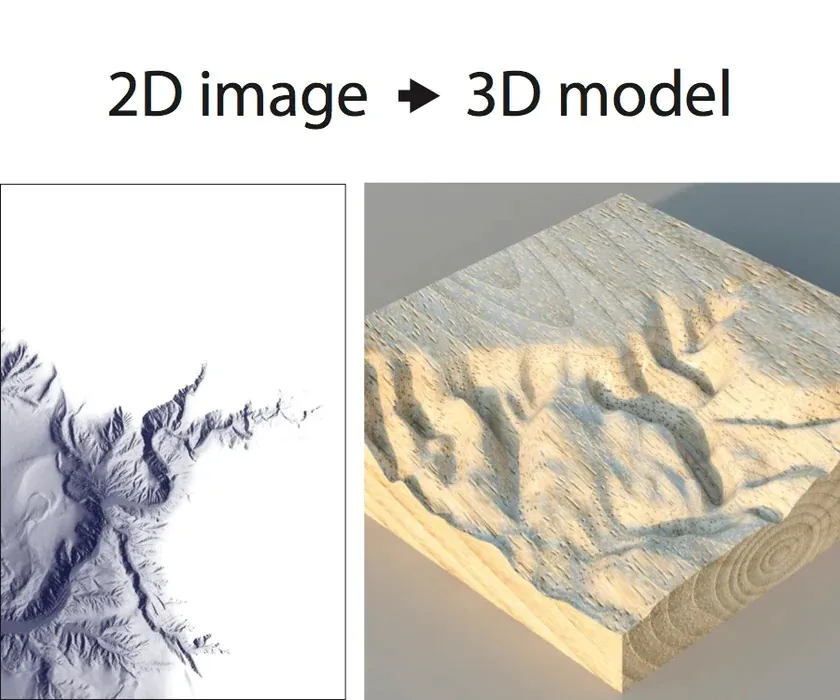
How To Convert 2D Images To 3D Models
The process of converting 2D images into 3D models is fascinating and practical, providing many possibilities for designers, architects, engineers, and hobbyists equally. You can take several approaches if you want to make a realistic 3D model of an object, a building, or a landscape. However, turning a flat image into a three-dimensional object might seem overwhelming for beginners. Fortunately, the process has become simpler and more approachable than ever with modern apps and tools. In this blog article, we’ll lead you step-by-step through converting 2D images to 3D models. We’ll review the fundamentals of 3D modeling, various methods for converting 2D images into 3D models, and the tools and applications you can use to get the desired outcomes. By the end of this tutorial, you will better grasp how to convert 2D images into 3D models and the skills necessary to create your own 3D models from 2D images. Ultimately, you can add a third layer to your 2D images and make your concepts come to life.
Fundamentals of 3D Modeling:
3D modeling is the process that creates a three-dimensional representation of an object or scene. It involves manipulating digital geometry to create shapes, surfaces, textures, and materials that can be rendered and animated in three dimensions. The fundamental concepts of 3D modeling include shapes, forms, volumes, and space, and the process involves modeling, texturing, rigging, and animating the 3D objects.
Various Methods for Converting 2D Images into 3D Models:
Converting 2D images into 3D models is a complex process involving various techniques and software. Following are some of the most common methods used for this purpose:
Photogrammetry: Photogrammetry is a technique that involves taking several images of an object from different angles and using specialized software to stitch them together to create a 3D model.
Laser Scanning: Laser scanning involves using a laser to scan an object and create a 3D model based on collected data. This method is commonly used in industrial applications and is highly accurate.
Depth Maps: Depth maps are 2D images that contain information about the distance of different parts of an object from the camera. These depth maps can be used to create a 3D model of the object.
Structured Light Scanning: Structured light scanning involves projecting a pattern of light onto an object and then using cameras to capture the pattern distortion caused by the object’s shape. This information is used to create a 3D model.
3D Modeling Software: 3D modeling software like Blender, SketchUp, and 3D Studio Max can be used to manually create 3D models based on 2D images. This method is time-consuming but offers complete control over the final result.
Each method has its benefits and drawbacks, and the choice of technique depends on the project’s specific requirements.
Tools And Applications for Converting 2D Images into 3D models:
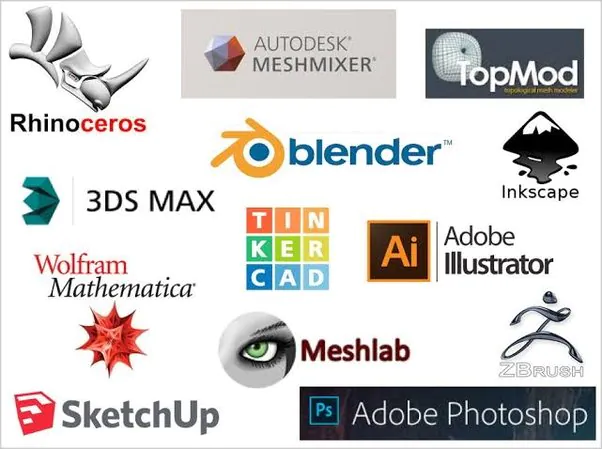
Autodesk Maya: A 3D modeling and animation software used for creating 3D models for film, TV, and video games.
Blender: A free and open-source 3D modeling software that allows users to create and edit 3D models.
ZBrush: A digital sculpting software used for creating high-quality 3D models and characters.
SketchUp: A 3D modeling software for architectural and interior design, product design, and game design.
MeshLab: A free and open-source 3D mesh processing software for cleaning, editing, and transforming 3D meshes.
Step-by-Step Process of Converting 2D Images to 3D Models:
Even though it may seem difficult initially, converting 2D images to 3D models can be simple if you have the right tools and methods. Here we will take you through the step-by-step process of converting 2D images to 3D models using software and apps.
Step 1: Choose Your Software
The first step in converting 2D images to 3D models is to choose the right software. Many software options are available, both free and paid, with varying levels of complexity and features. Some popular options include SketchUp, Blender, Autodesk 123D, MeshLab, and ZBrush.
Step 2: Choose Your Image
Once you have chosen your software, the next step is to choose the image you want to convert to a 3D model. Choosing a high-quality image with a clear outline or silhouette is important. That will make it easier for the software to create a 3D model from the image.
Step 3: Convert the Image to a Vector Format
Before converting the image to a 3D model, you must convert it to a vector format. A vector format is a file format that uses mathematical equations to represent images. That allows the image to be scaled up or down without losing quality. You can use software such as Adobe Illustrator or Inkscape to convert the image to a vector format.
Step 4: Import the Vector Image into the 3D Modeling Software
Once you have your image in a vector format, you can import it into your 3D modeling software. The process for importing the image will vary depending on the software you are using, but typically you can go to “File” and then “Import” to select the vector image.
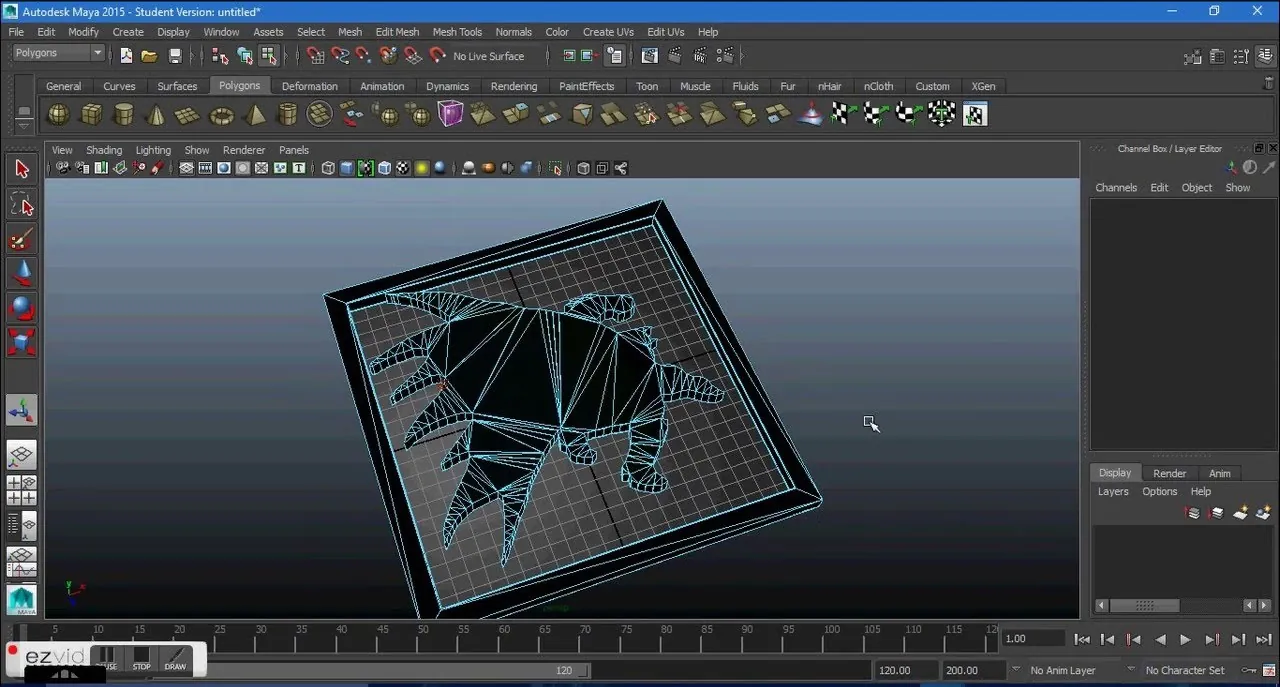
Step 5: Extrude the Image
The next step is to extrude the image to create a 3D model. Extruding means pulling a flat object into a 3D shape. In most 3D modeling software, you can extrude an object by selecting it and then clicking on the extrude tool. You can then adjust the depth and height of the extrusion to create the desired 3D shape.
Step 6: Add Detail to the Model
Once extrudes the image, you can add detail to the model to make it more realistic or accurate. That can include adding texture, color, or other details. Many 3D modeling software options offer a range of tools for adding detail, such as sculpting, painting, and texturing tools.
Step 7: Export the Model
Once you have finished creating your 3D model, you can export it in a format that can be used for 3D printing or other applications. The format you choose will depend on the software you use and the application you create the model for. Some common file formats for 3D printing include.STL, OBJ, and .3MF.
Step 8: Clean Up the Model
Before printing your 3D model, it is important to check it for errors and clean it up, which involves checking for holes or missing faces and repairing any issues. You can use software such as MeshLab to clean up your 3D model and ensure it is ready for printing.
Step 9: Print the Model
Printing the 3D model is optional in converting 2D images into 3D models. This step is only necessary if the 3D model is intended for physical production. It may involve adjusting the model’s size, orientation, and support structures to ensure successful printing. To print a 3D model, you will need access to a 3D printer and a suitable file format for the 3D model, such as STL, OBJ, or AMF. The 3D model file can be loaded into the 3D printer’s software, and the printer will create the physical object layer by layer. It is important to note that 3D printing can be complex and may require additional steps, such as choosing the right printing materials, adjusting printing settings, and post-processing the printed object to achieve the desired finish.
Printing the 3D model is only necessary if the 3D model is intended for physical production. Here are some other possible next steps:
Refining the model: If the 3D model is intended for use in a digital application or visualization, the next step would be to refine the model. That may involve adding more details, refining the topology, or adjusting the proportions to make the model look more realistic or visually appealing.
UV mapping and texturing: UV mapping involves unwrapping the 3D model onto a 2D plane to create a flat texture map. That allows for textures to be applied to the 3D model. Texturing involves adding color and texture to the 3D model to make it look more realistic. This step is crucial for creating high-quality 3D models.
Rigging and animation: If the 3D model is intended for animation or interactive media, the next step would be to rig the model. Rigging involves adding a skeleton to the 3D model, which allows it to be animated. This step is often followed by animation, where the 3D model is animated to create movement and tell a story.
Overall, the next steps in converting 2D images into 3D models depending on the model’s intended use and the level of detail required for the final output.
Conclusion:
To sum up, converting 2D images to 3D models is a complex and challenging process, but with the right tools and methods, it can be accomplished with impressive results. Whether you are a designer, engineer, or artist, various software and applications are available to help you create 3D models from 2D images. From using photogrammetry techniques to employing 3D modeling software, the key is to experiment and find the method that works best for your specific needs. With practice and patience, anyone can learn how to create stunning 3D models from 2D images.
